Material for platbands
Carved platbands are made mainly from coniferous wood. The best option is pine, it cuts normally, is inexpensive, and is durable due to its high resin content. In principle, you can use any other coniferous board, but it is better not to try with spruce: it is too fibrous and cannot be cut even with the sharpest tool.
You can also make carved frames from hardwood - linden (the softest), poplar, maple, oak, cherry, etc. But you need to be able to work with each species, get your hands on it, and there is no guarantee that you will get something digestible, and hardwood is expensive. That’s why window frames are often made from pine. You just need to pay attention to the quality characteristics.
Carved window frames - a way to make your home unique
If you have wood or a board that has been lying around for 3 years or more, you can use it: it is already definitely dry, it just needs processing and calibration. If you don’t have woodworking equipment at home (thicknesser and circular saw), you will need an edged board. Wood of the first or highest grade is suitable for carved platbands. This means that there should be no knots, chips, or resin pockets on the board. Take chamber-dried wood with a moisture content of no more than 8-12%. This is not sold in the markets; you need to look for it at sawmills and construction stores.
Why kiln drying? Because it is dried in a special chamber, quickly removing moisture. At the same time, some of the boards crack and bend - these are rejected, the rest are sold. If you make carved frames from chamber-dried wood, they will definitely not be damaged or cracked.
Three golden eras for carving in the past
If the material culture of the Mediterranean is imprinted in marble, and nomads in leather goods, then everything primordially Russian is the tower, carved and painted wooden utensils. According to the outstanding researcher of Russian culture, historian D. S. Likhachev, “Russia is literature, music and wooden architecture.”
What is preserved is what does not burn. We admire Vologda “laces” made of wood , because the houses with shutters are still strong and because there were no great wars on Pechora.
The second reason for the existence of a stable tradition of decorating homes with wooden carvings is self-government without the heavy burden of taxes. Most of the “merchant” type houses and churches “without a single nail” have been preserved in the North, in the Urals, and on the Don. The Old Believers played a significant role in maintaining long-standing traditions: the monasteries were decorated with cedar carvings.
A long winter, a forest all around and a noble desire to make something are the right conditions for taking a board, a chisel, and then surprising your household with the results of your creative impulse.
A little practicality - a hobby is not a hindrance
Wooden lace requires periodic maintenance: platbands and ridges fall down, they need to be repaired, and systematically tinted after winters.
Troublesome. But the situation is different if we consider the exterior decoration of the house from the point of view of the need for beauty. A person needs creative self-expression.
Interior design is usually done by women. However, no one will see embroidered curtains on a cloudy day. The message of goodness is encoded in the decorative patterns made by the owner of the house and hung around the windows and doors.
It is doubtful that the carver remembers the semantics (meaning) of ornamental subjects when he undertakes to turn an ordinary board into a decoration. Moreover, he does not look into his genetic memory. It cuts, as God whispered in my ear.
Four transformations and Asian influences
When discussing carved motifs, it is impossible to explain them only by archaic origins. Some patterns cannot be accurately interpreted. The heyday cannot be attributed to the Novgorod Republic either: the restored towers stand without carvings at all. They cut columns, bas-reliefs and crosses on the pediments using white stone, and changed the shape of the pillars for the porch. The slotted one from that period has not survived.
What has been preserved
In museums you can find excellent shutters from the 17th-18th centuries. Based on the artifacts that have survived to this day, it can be judged that it was the false shutters that began to be decorated. Northerners covered window frames with fish bladders. To prevent the skin from tearing from the wind, it was covered with boards. In winter the windows were not opened. But so that the hut would not seem blind , the carvings amused the eyes of passers-by. Favorite motifs are the sun, lions, fish. All this was cut out in relief on a plane.
Names store interpretations
Window frames are more complex . The ancient names of carved decorations have been preserved:
- spindle whorls (aka ears) - accents at the upper corners of the window;
- bezel (or comb) - a hemispherical decoration above the window opening;
- beard - patterned hanging under the window sill;
- edge - cornice.
The names “ears”, “knees”, “legs” indicate that the window was thought of as an actor in the courtyard. Even the word “pattern” itself comes from “look”. The window was dressed up like a bride. In favor of this theory is the expression “The house looked towards the forest with its windows.”
Composite planar elements were made “into the slot” - that is, applicatively. A series of “beads” (hemispheres) were cut out in the thickness of the board. They are an example of a combination of champlevé and applicative carving. The triangular “rays” are also notched. They lined up in rows or walked from the center. In the latter case, the result was “cornflowers”.
The end of the archaic heyday
The first, archaic period (with the syncretic origin of terms - in connection with parts of the human body) was interrupted by the desire of Tsar Peter I to follow the West. The classical style required new facades. Carvers were hired to make abaci—wooden templates used in plastering “marbled” houses. The tsar ordered to decorate every noble house with mutulas (plaster profiles).
Even if the building was basically wooden, “crackers” (triglyphs) on the cornice were still nailed and whitewashed with lime. Log columns, “shingles” are a legacy of the Enlightenment, the “classic” style with wooden structures hidden under plaster.
Wooden architecture of the Baroque era includes branched mirror frames and ornate wall cartouches. The wood was varnished and gilded. The artisans were supervised by clerks from abroad.
Saved the churches
The few free carvers were saved by orders from churches. But the clergy needed something else - a complex three-dimensional “curl” (interlacing of acanthus leaves of the Baroque type). It was for the “kudrina” that cranberries and caesariks were made - unusual carpentry tools originally from Holland, complemented by an oblique knife and a straight chisel. The peasants acquired many valuable skills when leaving Peter's shipyards.
European portal structure
The second turn in understanding the exterior of a wooden house occurred after the march of Kutuzov’s army following the remnants of Napoleon’s defeated army. Soldiers returned from Vienna and Paris with an understanding of the classical system framed by windows.
The following words have come into use:
- sandrik - window cornice;
- pediment - imitation of the end of the roof above the window;
- column - a pilaster or board with grooves on both sides of the window;
- low tide cornice;
- panel - rhombic, rectangular, octagonal insert;
- jib - a bracket in the form of a fillet under low tide.
Together with the old words “whorl whorl” and “ear”, new borrowings from marble carving from the Renaissance West have firmly settled in the vocabulary of wooden craftsmen. Instead of the old “carpenter”, the honorary “joiner” appeared.
We read from A.P. Chekhov (the owner addresses his dog Kashtanka): “You are in opposition to a man, like a carpenter in opposition to a joiner.” A carpenter is one who has a hundred tools (many tools). Outlandish instruments were brought as trophies from defeated countries.
The classic window frame is as follows:
- Sandrik (aka former “edge”);
- pediment - a round or triangular top;
- semi-columns on the sides (or flat boards with carved ornaments nailed on top);
- bases and capitals of columns (often replaced by ornamental accents);
- ebb and a cornice supporting it with a pattern and “bumps” on the sides.
In the Russian style, this entire set is composed on 4 boards of the same thickness (usually 20 mm) with slats, diamonds and patterns in the form of lace napkins stuffed on top.
Rococo heritage
Napoleon's conquerors saw abroad another original technique from the heritage of the Rococo style. We are talking about the apse of a hemispherical niche. They loved the semicircles above the window, but used them in their own way. The apse shell in wooden architecture turned into a “sun” with filled or inset rays. Angels and menorahs in the torn Rococo roofs were replaced by roosters and kissing doves.
The legacy of the 19th century carpenters is still preserved in Tambov, Chita, and the cities of the Golden Ring.
A short period of bad taste
The merchant's call to the masters of the late 19th and early 20th centuries was the third turn in incised decoration. They began to move away from the classics. Carved ornaments were applied to almost every board of a merchant's house. The mansions were buried in wooden lace, losing their outlines, like a blooming lilac bush.
Exhibition pavilions, decks of steamships, and fair gates are replete with black and white photographs of that period with a dense web of ceremonial pomposity.
By that time, every peasant and city homeowner considered it necessary to decorate windows, cornices, porches, gables, and balcony canopies with carvings.
Tools
To make carved platbands with your own hands, you will need the following minimum set:
- drill with a set of drills;
- electric jigsaw with soft start and a bunch of different wood saws;
- chisels;
- sandpaper with grains of different sizes;
- flap disc made of sandpaper for wood on a drill.
You can make these carved window frames with your own hands
To reduce the time it takes to create carved patterns and sanding, it is better to have a router and a grinder.
Types of products
There are two main types of wood: solid and laminated veneer lumber. The first option is intended for painting, with the exception of valuable species. But glued ones are covered with other materials such as veneer and laminate.
According to configuration, platbands are divided into the following types of products:
- Smooth. These are standard models, most often flat or slightly convex. They are easy to make with your own hands, even for a beginner.
- Profiled. They have multi-level protrusions and recesses along the entire length of the product. Shaped trims can be made using a router or you can buy the appropriate blanks.
- Curly. Such samples are quite difficult to execute. They are obtained by processing wood with a vertical router or on special machines that are programmed according to a blank template. The most expensive ones are with hand-carved ones.
Types of door frames depending on configuration
One at a time or in bulk?
Carved platbands usually consist of repeating elements. At least two vertical slats on each window are made identical. And since several windows are usually decorated, a lot of identical elements are required. If you are going to make slotted trims, you naturally want to cut out several pieces at the same time, stacking the boards and somehow securing them.
The applied carved platbands are also interesting
The desire is understandable, but difficult to implement, and the benefits over time are not as great as it seems. The first difficulty is that home craftsmen usually have jigsaws that are not very powerful. To cut through several boards, you have to move the saw more slowly along the intended pattern. On straight lines the speed is still tolerable, on curves it is low. And the smaller the bend radius, the slower you have to move the file. If you work with one board, there are no such problems. So, in terms of time, if there is any gain, it is very small.
One more thing. Even thick, good, expensive files with a large thickness of the workpiece are deflected. So, when cutting several boards at the same time, the quality of the slot on the bottom (or two) remains a big question.
Installation of platbands on openings
Installing carved wooden frames will not be difficult with proper preparation and knowledge.
There are 3 ways to record cash:
- Install on the tenon using special glue. A hole should be drilled specifically for the tenon on the inside of the part, as well as in the window frame. This will ensure a tight grip, a neat and finished look, and will also protect against moisture.
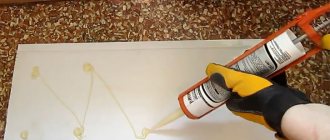
- A simple and effective way is to attach it using glue, polyurethane foam or silicones. These methods are effective, but have many disadvantages. For example, if there is an uneven wall, there is a high risk of getting poor-quality fastening. Some builders additionally use self-tapping screws, but there is a high risk of cracks.
- Using finishing nails is one of the simplest and most effective methods. Decorative strips are easy to install and dismantle. Nails should be used with a length of no more than 5 cm and a diameter of at least 2 mm. Small nails with a flattened head securely fix decorative elements.
Typically, the design of the platbands consists of two side strips, an upper and lower trim, and sometimes a visor. The connection between the parts occurs end-to-end, using a tenon or nails. If the window has a window sill, then it is better to abandon the bottom trim.
Installation of a classic wooden frame for windows
First of all, the window sill or bottom trim is attached, then the side strips, and finally the top trim and visor. If all parts are connected using nails, then care must be taken to ensure that rust does not subsequently spoil the appearance of the decorative elements.
In order for the external structure of the window to look neat and aesthetically pleasing, the following parameters should be monitored:
- the width of the platbands should be 8-10 mm larger than the frame;
- The strips should be located from the window hinges at a distance of 2 to 3 cm.
How to enlarge a template
Simple carved platbands can be made without templates. There will be several examples in the video - it shows how to draw and cut. But not everyone can draw more or less complex patterns on their own. It takes skill and talent. The easiest way is to find a diagram, print it in the desired size, transfer it to cardboard and cut it out. You will get a template that you can trace.
The second way: copy from a photograph. Not all diagrams can be found. Some, especially antique window frames, you will not find anywhere. If you have at least some drawing ability, you can copy them.
Even such an ornament can be copied... if you have the skill
Questions may arise about how to increase the size of the found diagram or template. There are three options:
- Using any graphic editor. The simplest one - Paint - is available on any computer running Windows (the “Image” tab, the line “Change image size”, select “centimeters” and enter the desired length (height) in the box. The resulting file can be printed. If the printer is small format, It may be necessary to split it into several pages.Them should then be glued together and, based on the resulting drawing, a template should be made.
- Using a photocopy. Copiers have a zoom function.
- Taking graph paper, transfer the drawing to the desired scale. To do this, divide the original image into squares with a side of 0.5 or 1 cm (can be printed on a piece of checkered paper). Then we transfer the lines to graph paper, increasing them in the required proportion.
The first two methods are faster. But when scaling, the picture may turn out fuzzy and blurry. You can correct it by hand, or you can draw it in some editor, for example, CorelDRAW. Watch the video to see how to do this. Just an example of drawing a diagram for carving.