A simple and inexpensive way to mark property boundaries is to install a chain-link fence. Of course, today there are many alternative materials that have a more presentable appearance, for example, a fence made of corrugated board. But they are more expensive and labor-intensive to install, and are more suitable for permanent external fencing of a country house.
What if you need to fence off a building plot, a summer cottage, separate a business area from a residential area, or make an enclosure for animals?
Is it wise to spend a lot of money and a lot of time, attracting specialists, if you can make a fence from a chain-link mesh with your own hands in one day, and the result will be achieved? The manufacturing technology, calculation and installation are described below in the form of step-by-step instructions.
Do-it-yourself chain-link fence
Advantages of a chain-link fence
- saving financial resources. The price of a chain-link fence is almost the lowest of all possible fence options. Only a fence made of branches can compete in price, but otherwise it will lose;
- light weight. There is no need for a massive frame or pouring a foundation;
- strength and resistance to environmental factors: moisture, temperature changes, ultraviolet radiation, fire, mechanical damage;
- light transmittance. A chain-link fence does not create an obstacle to the penetration of sunlight, which means that there will be no shaded areas on the site and the plants will feel comfortable in any part of it;
- low maintenance and no need for repairs;
- ability to withstand significant load. For example, it is easier to break a wooden fence than to break a metal network;
- availability. You can buy chain-link mesh at any hardware store or market;
- a large assortment allows you to choose the one that is best suited for your specific needs;
- high installation speed. Two people can install a chain-link fence in one day.
Of course, a mesh fence is not without its drawbacks, including: unattractive appearance, “transparency” of the fence and the need for painting. Some of the shortcomings can be easily eliminated if you know how to choose a chain-link mesh correctly.
The procedure for installing the fence
Like most construction work, fence installation is carried out in several successive stages:
Territory preparation and marking
Before you stretch the chain-link mesh onto the fence, you should clear the strip along which it will be mounted. In addition, at the preparatory stage, the necessary materials and tools are collected.
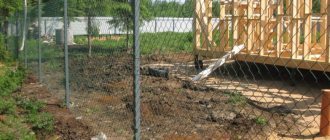
To mark the installation locations of the posts on each straight section of the fence, drive pegs at the mounting points of the two outer supports. After this, pull the cord between them and, measuring the required distance, mark with pegs the installation locations of the remaining pillars.
Digging holes, installing and concreting pillars
Digging holes for installing pillars can be done using a regular bayonet shovel, but it is much more convenient to use a special hole drill. It can be manual or mechanically driven. This will be especially relevant if there are a large number of pillars being installed.
The diameter of the hole must be no less than the cross-sectional dimensions of the pipe with an addition of 100-150 mm in each direction. The depth of the excavated holes is 400-500 mm for ordinary stable soils or 800-1000 mm for heaving, heavily moistened and other unstable soils.
The procedure for installing the pillars is similar to marking. On each straight section of the fence, the two outer supports are first installed. After the concrete has hardened, you need to pull a cord between them and install all the other pillars along it, be sure to check the vertical using a building level. The concrete mixture for pouring pits with installed supports is prepared from cement, sand and crushed stone in a ratio of 1:3:4.
General procedure for installing a fence.
Mesh installation
As mentioned above, the design of a chain-link fence can be different. Each option has its own advantages and disadvantages, usually associated with the level of reliability of the fence and ease of installation.
Tension method
The simplest method involves fastening the mesh to installed supports without the use of additional elements and fasteners. To do this, roll out the mesh on the ground to a distance of about one and a half spans between the posts. Bend the edges of the wire spirals with pliers if this has not been done by the material manufacturer. This will prevent possible injuries during work and improve the appearance of the fence.
The mesh laid out on the ground must be lifted and secured to the posts using wire or clamps. You will need an assistant or two to complete the job. It is almost impossible to ensure the tension of the mesh while working alone.
Strengthening the structure with lags
To more securely fasten the mesh and prevent possible sagging over time, you can weld horizontal logs from a thin profile pipe or even a metal rod with a diameter of 6-8 mm to the installed racks.
If you use a rod, before welding it can be passed through the cells of the mesh, which then does not need to be tied. If a profile pipe is used, the fence is fixed using plastic self-clamping clamps.
The presence of logs will not only strengthen the structure, but also place various decorations on the surface of the mesh for the final design of the fence. In addition, the logs will pull the entire system into a single whole, i.e. you do not need to install special slopes to stabilize the corner posts.
Sectional fence
This design is a fence in which rectangular sections welded from a corner are fixed between installed posts, inside which a chain-link mesh is stretched.
It is somewhat more difficult to manufacture, but it has a number of advantages over simple tension systems. To install a sectional chain-link fence:
- on a flat, hard surface, draw a rectangle corresponding to the section configuration;
- place a corner on the line and weld the frame;
- inside the corner shelves, in increments of 150-200 mm, weld small pins made of wire or rod with a diameter of 6-8 mm;
- lay the mesh inside the section and pass its edges through the pins;
- bend the pins with a hammer, fixing the position of the mesh;
- the sections are secured to the supports by welding lengths of steel strip to the post and frame.
After installation is completed, all unpainted surfaces must be covered with a layer of paint.
Types of chain-link mesh for fences - which one is better
When choosing which chain-link mesh to use for fencing, you need to take into account its main parameters:
1. Material of manufacture:
- low carbon steel (the mesh is more ductile);
- stainless steel (hard mesh).
2. External coating:
- non-galvanized chain-link. Wire thickness - 1.2-5 mm, mesh size 50-100 mm. This mesh is prone to rust and needs painting;
- galvanized chain-link. Wire thickness - 1.6-5 mm, cell size 50-100 mm. Does not require protection, has a long service life;
- plasticized (metal with polymer coating). Wire thickness - 2.5-2.8 mm, mesh size 25-50 mm. More presentable, with high-quality coating it has a long service life.
Advice. Ask the seller for a certificate confirming the quality of the coating. A simple PVC coating without additives that guarantee its resistance to ultraviolet radiation and frost will soon become unusable.
We recommend – characteristics of chain-link mesh
3. Chain-link mesh dimensions
The smaller the cells, the smaller the living creatures will fit through the mesh. This is relevant when building a fence, for example, for chickens or ducklings. But such a mesh will be heavier, more metal will be needed to make it, which means it will be more expensive. For a fence, the best option is a mesh with a 50x50 cell.
Recommended – mesh cell sizes of chain-link mesh
After the grid is selected, it’s time to move on to the main work, namely, creating a sketch of the fence, calculating materials and installing the fence (tension and sectional).
How to make a chain-link fence with your own hands
Manufacturing of tension fence
This is a simple and economical way to install a chain-link fence with your own hands, for which you will need:
- profile or round pipes for racks;
- net;
- clamps or hooks;
- drill, shovel;
- tape measure, bubble level or plumb line;
- crushed stone, sand, water;
- Bulgarian;
- anti-corrosion agent.
Site marking
Before installation, the fence line is cleared, freed from excess vegetation, and large mounds are cut off. A cord is pulled between the extreme points and the installation locations of the supports are marked in increments of 2-2.5 m along a plumb line.
Pit preparation.
Using a hand or gasoline drill, holes are made at marked points to a depth of 0.7-1.2 m. First, the blades are rotated in one direction, then in the other. The soil from the hole is discarded. Add crushed stone to the bottom in a layer of 10 cm and compact it with a long crowbar.
Installation of poles
The pipes are treated against rust and primed. After drying, the primers are installed in the wells strictly vertically. If there is no assistant who could hold the pole, it is fixed with improvised materials. The following operation is carried out depending on the chosen method of foundation construction:
- butting - crushed stone is covered in layers, each compacted with a crowbar;
- partial concreting - first, concrete is poured to 2/3 of the height, crushed stone is poured on top;
- full concreting - the hole is filled with concrete, pierced with a rod to release air bubbles.
On dry soils with low groundwater levels, pipes can be installed by plugging. To avoid flattening the top of the stand with a striking tool, a metal “glass” is placed on it.
Fastening the mesh
After the concrete has hardened, a mesh is fixed to the outermost column. The reinforcement is threaded into the cells and hooked. You can weld the rod to the stand.
The roll is unwound 2.5 m, tensioned and sequentially secured to the racks using clamps, hooks, screws with overlays or other devices.
If it is unsafe to install mesh on clamps in your area, you can pass a steel rod through the cells and weld it to the post after 20-30 cm. Another way to prevent the theft of the mesh is to use anti-vandal nails or hardware with tear-off caps.
It is not recommended to outline corners with a solid canvas. The mesh must be cut and secured thoroughly on both sides of the post separately.
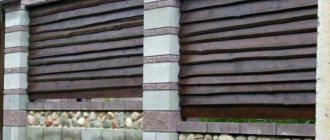
Decorative decoration of a chain-link fence
The mesh fence is not distinguished by its bright design and attractiveness, but if desired, it can be decorated, the result will be a nice and durable fence for the site.
Ideas for decorating a mesh fence
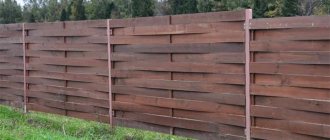
- openwork weaving. It is made with thin wire on a mesh with large cells. A simple pattern can be made with your own hands;
Decorative weaving on chain-link mesh
Openwork weaving on a chain-link mesh
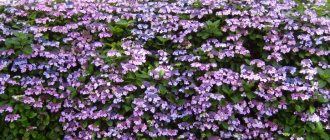
- decorative landscaping. Planting weaving or climbing plants along a chain-link fence will create a hedge around the area. Alternatively, you can attach hanging flower pots, as in the photo on the right;
Landscaping with weaving or climbing plants on a chain-link fence
Landscaping with hanging pots on a chain-link fence
- in order not to wait for the greenery to grow and braid the fence, the mesh can be decorated with decorative wire flowers;
Decorating a chain-link fence with fabric and wire flowers
Decorating a chain-link fence with decorative flowers
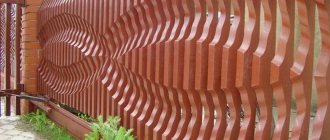
- creative design. With a little imagination, you can create original and funny decorations for a chain-link fence.
Original design of a chain-link fence
Original decoration of a chain-link fence
Methods for installing chain-link
Having determined where the fence will stand, it is necessary to schematically depict the future structure and draw up a cost estimate.
We recommend using metal pipes as pillars, after applying an anti-corrosion agent to them.
The building site is cleared of debris and vegetation. Marking is carried out using pegs and a stretched rope.
Further creation of the fence depends on the selected type of mesh fastener. Let's look at each of them in more detail.
Tensioner
It is easy to install and low cost. One edge of the chain-link is fixed to the post, the other is pulled tightly. The recommended distance between supports is no more than 2.5 m.
To achieve good tension of the mesh, you can use the following intermediate fasteners:
- clamps;
- cable;
- lanyard;
- hook with long thread.
The disadvantage of this method of fixation is that the chain-link will begin to sag, so it is better to use it to create small temporary fences.
Sectional
A good fence option for areas that are on a slope, on sandy, moving soils.
It is recommended to install the posts at a depth below the freezing point of the soil. The supports are fastened using any method other than concreting.
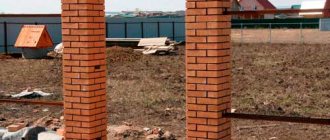
It is better to choose metal as a material for racks. For brick supports, you will have to install the mortgages in advance.
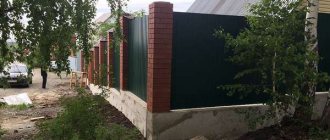
The sectional structure will cost more than other types, but will also last much longer. To make a frame, you need to have welding skills or invite a specialist.
Photo: sectional fence made from a metal corner and chain-link.
An alternative is to buy sections in a store.
The work order is as follows:
- Steel plates 5 mm thick, 5 cm wide, 15–30 cm long are welded to the pillars. They are fastened at a distance of 20 cm from the top and bottom of the supports.
- The frame is made from a metal corner measuring 30*40, 40*50 mm. A corresponding piece of mesh fabric is welded inside the frame. Reinforcement rods are inserted along the edges and fixed with spot welding.
- An alternative solution is to weld long hooks 3 mm thick, bend them inward and attach a chain-link to them. After tensioning the mesh, it is better to weld the ends of the hooks so that the mesh does not slip off over time.
The finished frames are cleaned, coated with an anti-corrosion agent and painted in a suitable color.
With guide
A type of tension. It is mounted using the same method, but 2-3 metal ones are welded between the pillars or wooden logs are fixed.
If installing a fence requires securing a large volume of mesh, then the use of guide beams will be an excellent reinforcement of the structure.
On heaving soils, pillars should not be concreted; it is better to install them below the freezing point of the soil and backfill them.
With metal rod
This is a tension-type fence, which is strengthened by pulling strong wire through the mesh. They fasten it along the top and bottom rows of the chain-link so that the fabric does not begin to sag over time.
The simplest way is to make a loop out of wire, throw it over a post, tighten it, thread it through the cells to the next post and repeat the procedure.
You can weld plates with hooks to the supports and attach a metal rod to them. There is an option to buy special tensioners for wire, but they will not be cheap, and when installing a budget structure made from chain-link, it is not profitable.
It is convenient to use mesh fabric as a sectional material for fencing in summer cottages, when, in conditions of limited finances, it is necessary to delineate the boundaries of the estate without shading the plants growing nearby. For other purposes, it is worth using chain link to create a temporary fence.
Cost of a chain link fence
The total costs of constructing a chain-link fence are determined taking into account the materials used and their quantity. For example, the cost of materials was indicated as they were discussed. The cost per meter is easy to calculate, knowing the consumption of each material and the length of the fence.
The price of a chain-link fence for work and installation is per 1 m.p. is given in the table
Thus, a chain-link fence is a cost-effective and prefabricated type of fencing that you can make with your own hands.