What kind of foundation can there be for a fence?
No matter how many fence designs there are, they all stand on several types of foundations. The depth, diameter or cross-section of pipes, width and depth of the base may differ. These parameters depend on the climate zone and the material from which the fence spans are made. But there are not very many designs and ways to implement them:
- A little sand and crushed stone is poured into a hole made in the ground, and a pipe is inserted. The gap is filled with stones and rubble and compacted.
- Wells are drilled in exactly the same way, pipes are installed, only the filling around the pillar is concreted.
- The pipe is installed in permanent formwork, the gap between it and the formwork is filled with concrete.
- Screw piles are used instead of pipes.
- The pillars are concreted, and a grillage is made between them. To provide the tape with sufficient strength, the grillage tape is reinforced, forming an air gap under it.
- They make a shallow strip foundation on pillars.
- Strip foundation to frost depth.
Some ways to install fence posts
The designs are arranged in order of increasing cost: the least expensive is the first method, the most expensive is the fourth. The choice of foundation for the fence depends primarily on the type of soil and the level of groundwater. If the soil drains water well and the groundwater level is low - below the freezing depth - it can be installed on any structure. If the groundwater is located high, you want a “serious fence” made of brick or rubble, for example, and the soil is clay or loam - you will have to make a more serious foundation, which costs a lot.
If you don’t know how deep the water is in an area, dig a pit near the planned fence. Its depth is 50-70 cm below the freezing depth for the region. If you have dug to this level, but there is no water, then you are lucky and you can make a fence with the base of any structure.
Types of embedded parts for lighting supports
There are two groups of embedded products on the modern market that are capable of reliably fixing a power line support to the foundation, regardless of its height and weight. The main difference between the elements under consideration is the option of nodal fastening. Based on this criterion, foundation embedded parts are divided into:
- flanged (ZF or ZDF) - with a square (type K) or round (type D) support part (flange);
- anchor (ZA or ZDA) - with square or round conductors.
These products are designed to hold lighting poles in a vertical position without external bracing or spacers. They are dug to a depth of three meters, after which they are concreted. In this way, compressive and overturning loads are transferred to the ground. The embedded parts for lighting supports are made of metal.
They have several sizes and different weights. They are recommended for use in:
- zones with moderately cold, moderately humid, moderately warm and hot dry climates;
- areas with different wind loads;
- slightly aggressive external environment.
Parts of embedded elements of supports and masts protruding from the foundation block, including fasteners, are treated with anti-corrosion compounds. They can be galvanized or bitumen coated.
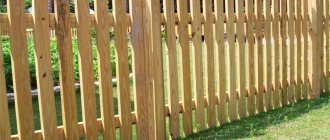
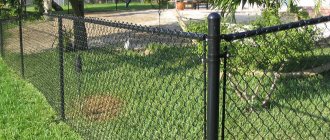
Installing posts for a lightweight fence
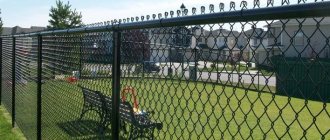
A lightweight fence is one whose spans are covered with relatively low-weight materials: chain-link mesh, wood of any design, corrugated board, metal picket fence, welded or forged metal mesh. Pillars without plinths are most often placed under them.
Posts for a mesh fence or picket fence
The cheapest and most universal way is in a wide hole and filling the gap with crushed stone. It works great on heaving soils with a high groundwater level, and costs many times better than poured concrete. A light fence installed correctly using this method will never be pushed out in the spring.
The cheapest and yet most reliable way to install a fence is with pillars in a compacted backfill.
Holes for posts of this type are obviously drilled much wider than the diameter of the pipe. They poured crushed stone or sand onto the bottom, compacted it (with a long pole or crowbar), set up a post, covered it with crushed stone around it, set the post up vertically and secured it with temporary spacers. Pour crushed stone around in layers - 10 cm each, carefully compact it to the maximum possible density. That's it, the installation is complete.
On normal soils
It is worth explaining why it is more stable and how such a pillar works on soils with normal drainage ability. Water in any quantity goes deep through the crushed stone, where it disperses naturally. When freezing, the amount around the pillar is not enough to have a noticeable effect. The soil freezing around the pillar puts pressure on the crushed stone, which, due to its mobility, compensates for it almost completely.
It is better to make a foundation for a fence made of corrugated sheets by filling the upper part with concrete
On such soils, crushed stone can be replaced with coarse sand. The coarser the grain, the better, but dusty or fine-grained sands are not suitable. Lay the sand in layers, pour it thoroughly. Otherwise the whole system works the same.
The key point here is the depth to which the post must be buried. If the windage is small and the soil drains well, it is enough to bury it to 1/3 of its height or a little more. In this case, the hole needs to be made a little deeper: so that there is a cushion under the pipe of about 10-15 cm. Water will go into it and the column will remain almost dry. This is good for both its durability and stability.
Depth of holes for pillars in heaving soils
If the soils are clayey, it is necessary to dig 10-15 cm below the freezing depth. Water will collect in this crushed stone cushion, since they do not always have time to drain on clayey soils. If the pillow is located below the freezing depth of the soil, there will be no problems with heaving: there is still no water around the column, it has accumulated below and is in a liquid state.
If the freezing depth is very large - 2 meters or more, even this “economy” option will be very expensive. Then you can make a drainage system around the fence to lower the groundwater level. The decision is correct, but implementation is even more expensive.
Different types of screw piles
Another option is to use screw piles. They can be drilled 2 meters much faster. But the piles themselves, and the services for their installation, are not the cheapest. You can, of course, try it manually first; if that doesn’t work, call the technician.
The most budget-friendly option in such a situation is to bury the pillars to a depth that is more or less acceptable, make the hole wider - about 50 cm in diameter or a square with the same side, that is, increase the damping layer. In winters with average temperatures, the fence will stand normally, but in abnormally cold or little snow some pillars may fail. But in most cases, light fences react to this normally, and in the spring everything “sits” into place. It is necessary to correct the position only if the pole is skewed.
Posts for a light but “sailing” fence
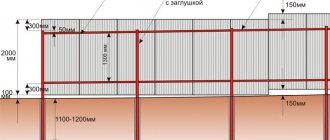
If the spans have a continuous or almost continuous surface, the wind creates a decent load on the foundation pillars of the fence. But if the weight of the filling is still small - corrugated sheets, wooden panels - you can still get by at low cost. In this case, to compensate for the wind load, the upper part of the backfill must be concreted. The depth of the concrete block is about 30 cm.
To compensate for windage from the fence, the upper part of the backfill must be concreted
To prevent the concrete block from being destroyed by gusts of wind, a reinforcing mesh is laid. You can use a ready-made mesh with a pitch of 5 cm, you can make it from a 6-8 mm rod. If the mesh is galvanized, it is placed so that it is buried in the concrete by at least 30 mm (monitor the distance from the sides). When using ferrous metal, the layer of concrete along the edges of the rods increases: at least 70 mm. In total, the dimensions of the concreted area with a ferrous metal mesh are: depth 30 cm, sides - at least 34 cm, with a galvanized mesh, the side of the square around the column is 30 cm.
Foundation for fences on loose soils
If the bearing capacity of the soil is very low - these are peat bogs, dusty, loose sand - in addition to backfilling with crushed stone, the hole must be concreted to the full depth. In this case, the measure is necessary. Concrete creates a significantly larger supporting surface, and this is important for these soils: the load from the fence is distributed over the entire surface and it stands normally.
Cheaper in this case are bored-rammed piles: a hole is drilled, a sleeve of roofing material rolled into a tube of suitable diameter is inserted into it, preferably 2 or 3 layers. A pole is inserted inside this formwork, set up, and around it is filled with concrete grade M 300 and no lower.
If the groundwater level is high, but the inflow rate is low, you can try to pump it out of the hole and then fill it with concrete. If the water arrives quickly, take a plastic bag of suitable length. It is lowered inside the formwork, the edges are secured around the protruding sleeve. A pole is carefully placed in the bag and concrete is poured. Concrete gradually displaces water and fills the entire form.
Light fence on screw piles
The second method is suitable if below, under peat or sand, there is a layer of soil with normal bearing capacity. In this case, you can make a foundation for the fence on screw piles. They are twisted to the required depth - going 20-25 cm into the supporting layer. Fence posts are attached to the protruding heads, or the remaining length of the pile is used.
Classification of embedded elements
To increase strength, concrete structures are reinforced with meshes of wire, rods of periodic and constant cross-section. These elements also apply to closed-type embedded parts. Classification is made according to the following criteria:
- anchor rod type – round/corrugated reinforcement, straight/curved, threaded/without thread
- installation method - ZDA (rebar studs between two conductors) or ZDF (pipe with flange)
Any embedded part must comply with GOST 10922-90, since they bear a significant load. For the foundation, an anchor rod or reinforcement A-III - A-II class 25 - 8 mm in diameter is used. If the temperature in the operating region drops below 30 degrees, choose plates made from VSt3ps6 steel.
In other cases, VSt3kp2 steel is used.
Anti-corrosion treatment consists of galvanization, galvanizing, painting. For light loads, stamped parts are usually placed in reinforced concrete products. When shearing and tearing forces increase, anchor rods welded to the plates are used.
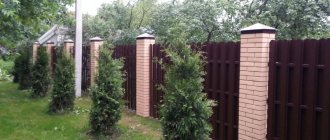
Foundation for a fence with brick pillars
If you want to make a fence on brick pillars, the work and costs will be more significant. Even if the weight of the span remains small - corrugated sheets, wood, forging with some kind of material, paired or without it - it doesn’t matter. You will have to make a serious foundation for the pillars themselves, because they themselves create a serious load.
Foundation for a fence with brick pillars
Such fences do not respond well to uneven shrinkage. A mortgage is usually placed in brick pillars, which is then connected to the crossbars of the entire fence. The connection turns out to be rigid, and with uneven shrinkage, cracks appear in the places where the mortgage is attached, and the destruction of the masonry begins. Therefore, the minimum permissible level of foundation for a fence with brick pillars is below the depth of soil freezing. This approach will ensure stability.
Normally draining, medium-heaving soils
Even if the water drains well, in order for the fence to stand for a long time, you have to dig below the freezing depth. But still, significant forces act on that part of the pile body that falls into the freezing zone. When freezing, the soil and concrete freeze into a single mass, and then heaving forces are able to break the pile and squeeze out a piece of the fence.
To avoid such a situation, the foundation for the fence is made in permanent formwork. In this case, the soil cannot freeze with the concrete and “works” on its own. As formwork, you can use several layers of rolled roofing felt, polystyrene foam or polystyrene foam (even packaging from household appliances will do), plastic or asbestos-cement pipes of a suitable diameter.
Example of pile reinforcement
In any case, there must be reinforcement inside the pile. This is a structure of 4 bars of 8 mm reinforcement, connected by crossbars of 4-6 mm bars. It goes to the entire depth of the pile, with an outlet into the pillar. Then, if desired, you can increase the reinforcement and fill the gap between the bricks in the column with concrete. The second option is to attach a pipe to the fittings, around which a column is placed. Recently, this has been a more common method of constructing a brick pillar.
Methods for reinforcing a fence post
TISE piles are more reliable in such a situation. They have a cylindrical flare at the end, which significantly increases the resistance to buoyant force. Such foundations for a fence can be made on slightly and moderately heaving soils.
The procedure for making TISE piles
To make this type of piles, a drill with a folding blade is used, which folds back after reaching the required depth. In order for such a foundation to work normally, it is advisable to make the expansion below the freezing depth.
But it is not always possible to drill with a hand drill. On very dense clays and soils with crushed stone, drilling a hole can be unrealistic. And if the freezing depth is about 2 meters or more, then it may be impossible to cope with such a task. In such cases, there are several solutions:
- Use galvanized screw piles. It is much easier to screw them in even by hand; in extreme cases, there is special equipment.
- Make a pile foundation with a cushion. In this case, dig a larger hole. A crushed stone cushion is made at the bottom, and a reinforcing belt (made of 8 mm rod) is placed on it in the formwork. The belt is made in such a way that there are outlets from it into the column (about 30 diameters of the reinforcement in height, that is, for 8 mm reinforcement the outlets should be 240 mm). After the concrete of the cushion has set, the formwork is placed and the pile is poured. It must also be reinforced, and the outlet from it goes into the pillar.
An example of the formation of a pillow and outlets under a pillar
After pouring, piles on normal soils are backfilled with “native” soil; on those prone to heaving, it is better to fill them with crushed stone. In this way, a damper backfill will be created around the pile, compensating for the lateral soil pressure on the pile. And the vertical pushing will be resisted by the pillow.
Very heaving soils
If the freezing depth is too great or the soil is very heaving, another solution is required. It is necessary to tie the foundation pillars to distribute the resulting loads. For fences with stone pillars, but light filling, this is done using a grillage - a reinforced concrete strip. To prevent it from being bent by heaving forces, an air cushion about 10 cm thick is placed underneath it.
Type of pile-grillage foundation for a fence
Such a foundation for a fence is built like this: after pouring the piles, a trench is dug, which is larger in size than the required grillage: formwork will need to be installed. Low-density foam plastic, 10 cm thick, is laid at the bottom of the trench and around the piles. A reinforcing frame is made: four rods of 10 mm in diameter, connected with a 4-6 mm rod. The pile outlets are combined with grillage reinforcement. Everything is filled with concrete. After setting, the formwork is removed, the foam remains under the grillage. It provides the required air gap: with a low density, it consists of 90% air. After winter, of course, it will shrink, but that’s not a big deal: the air will remain. But to prevent sand or debris from falling into the cracks, it is necessary to bury flat slate on both sides, which will block this crack, preventing it from silting.
The same grillage can be made on screw piles. If they suit you better, everything remains in effect - their cutting parts are buried below the freezing level, and then everything is the same as with a grillage, ditch, formwork, polystyrene foam, reinforcement, filling.
One of the foundation options for a fence with brick pillars
Why shouldn't you put sand or crushed stone under the grillage? Because in this case it will be wet and most likely will not help much when it freezes. As a result, the grillage will burst.
Anchor embedded parts
The products consist of several pins distributed in a circle, or four – installed in the corners of a square. In both cases, individual elements are fastened into a single structure by conductors located in the upper and lower parts of the embedded part. Using mounting holes, they are strung onto pins with a diameter of 30-42mm.
The total diameter of round anchor products intended for installation of a support or mast is determined by a conventional circle connecting the centers of the studs. The size ranges from 540 to 1500mm. For square elements, this indicator indicates the distance between two corner pins.
The support thrust bearing is mounted on the ends of the studs protruding from the concrete mass, which are actually anchors. Fixation is carried out using fasteners provided for by the work technology. Typically, anchor parts require nuts and washers that thread onto studs.
The symbol for the anchor element for supports includes:
- abbreviation details;
- diameter and number of studs;
- the diameter of the holes on the jig along the circumference or the distance between the corner slots;
- length of the embedded part;
- symbol of the protective layer (ХЦ – cold galvanizing, b – bitumen mastic).
Foundation for a heavy fence
In principle, the same foundation as for a medium-weight fence will do. You just need thicker reinforcement: 12 mm. When reinforcing, it is necessary to place the rods so that they are at least 70 mm deep in the concrete. Based on this, and the requirement that the minimum distance between the reinforcement bars must be at least 2 infill diameters, we obtain a minimum grillage width of 250 mm. This is if the concrete is filled with crushed stone of a fraction of 20-40 mm.
In addition to the usual grillage reinforcement, it is advisable to lay a layer of metal mesh on the upper longitudinal bars in increments of 5 cm. It will give the upper zone of the tape greater strength. And you can start laying the infill 2 weeks after pouring, rather than 4.
Don't forget to put waterproofing under the brick
The grillage is made in exactly the same way: with the formation of a damper layer of foam underneath it. After the concrete has gained most of its strength, it is advisable to coat it with bitumen mastic. This is necessary not so much for waterproofing, but to reduce adhesion to the soil. Since the grillage under a heavy fence is most often located in the ground, it is also affected by tangential heaving forces. To reduce them, coating is necessary.
Don't forget also about the sheet blocking access to the damping zone under the grillage. Without it, after some time the gap will silt up, which will lead to heaving under the tape, and this will lead to the appearance of cracks in the fence.
Is it possible to make a strip foundation for a stone or brick fence? Can. If you make it below freezing level, it will stand great, but it costs a lot more.
Flange embedded parts
The products are made from steel pipes of different diameters, ranging from 168mm to 426mm. A thick round or square flange is welded to the top of the rolled metal, having a hole in the middle corresponding to the internal diameter of the pipe. The cutouts intended for bolted connections are located in the following way:
- type K (square flange) - 4 pieces in total, only in the corners;
- type D (round flange) – along the perimeter (the number of holes depends on the diameter of the applied element).
The bearings of the lighting supports are screwed to the flanges.
Metal supports in the form of gussets are placed on the back side of the flange. They significantly strengthen the overlay pad, preventing it from deforming in the horizontal plane. An oval-shaped through hole is cut out on the side surface of the metal pipe.
The window is intended for supplying underground electrical cables to the lighting support.
Flange embedded parts for supports or masts are designated by letters and numbers. For example, the product ZF-24/12/D396-2, 5-b stands for an embedded part with a round flange connection. Along the perimeter it has 12 mounting holes for bolts with a diameter of 24 mm.
Round slots are located along a diameter of 396mm. The length of the pipe is 2.5 meters, and the protective coating is made of bitumen.