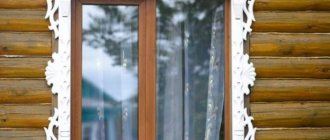
At all times, decorating a private home at an affordable cost has been a non-trivial task. And if previously there was no alternative other than carved wooden frames for windows, facades or pediments of a wooden house, now a fairly inexpensive and high-quality solution has appeared - window frames made of painted galvanized sheets with decorative elements in 3D format.
The production company, having deeply studied and assessed the needs of consumers and the demand in the decor market, mastered and created a technology that made it possible to create patterned metal trims of any complexity and any color while maintaining the quality of the metal produced by the world's leading manufacturers.
How to make carved frames for metal windows
Since ancient times, people have been decorating their homes. The buildings from the old era are still preserved. There, the presence of platbands was a mandatory attribute. He pointed to the wealth of the residents who lived in it. This decoration of the house gave it status. Nowadays, platbands are used both for decoration and to perform some useful functions.
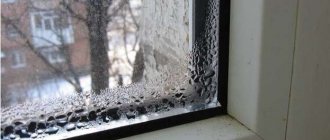
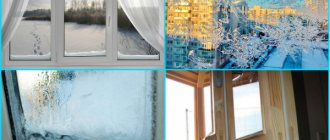
Nowadays, the popularity of window frames is gaining momentum. It's becoming fashionable. But not everyone knows that platbands serve as good protection against freezing of the seams between the window opening and the window frame in winter.
Platbands are made from different materials. Consider an option made of iron.
Iron platbands, along with wooden ones, are distinguished by their durable properties. They tolerate moisture and natural factors well. Of course, they are susceptible to corrosion, but if you follow the painting technology, you can achieve the maximum effect of counteracting external natural factors.
Creating metal trim is a real art. For manufacturing we will need a set of tools and consumables:
- Metal sheet, from which we will make our platbands. Iron sheets are produced in factories in rolls. The optimal option for processing and manufacturing platbands will be a sheet thickness from 0.4 to 0.7 mm.
- Large sheets of paper, whatman paper or wallpaper. They will be needed to create a template for our future drawing.
- Jigsaw. For cutting holes in metal.
- Metal drills of different diameters, mainly 8 mm for holes for jigsaws and 4 mm for holes for connections of platbands and its parts.
- Sandpaper. Grinding of flash and irregularities.
- A hammer or riveting machine for joining parts.
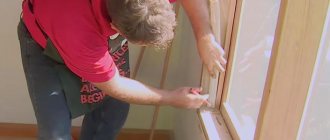
Before you start creating platbands, it is worth making slopes. They are also made of metal. Take measurements of the slopes, taking into account the protruding edges. Based on the dimensions obtained, we create a template for future platbands. You should make two parts of the platbands. Side and top with bottom. You should fold a sheet of paper in half and then apply the design. This will simplify the task and you will get two identical drawings. When moving on to working on metal, you need to prepare a place for cutting it so that it is convenient for you. You can use two identical tables. Place them side by side, with a short distance for working with a jigsaw.
Let's start cutting:
- We cut out the blanks of our future platbands from metal to size;
- Glue or attach a template for the future drawing. We mark the drawing;
- We drill holes for cutting out the ornament with a jigsaw;
- We cut out the drawing;
- We clean the edges of the cuts with sandpaper;
- We carry out drilling and subsequent riveting of parts of the platbands;
- If necessary, paint the trim in the color you like.
Now the platbands are ready. All that remains is to mount them to the windows. Installation depends on the materials from which the house is built. You can secure it with nails or self-tapping screws on a wooden house. The dowel should be secured with nails or anchors on brick houses. Metal trims are ready!
Creating metal trims is labor-intensive work. She will be rewarded with a new transformed look for your home. Give positive emotions to you and passersby.
DIY window trims
You can add individuality to your building with the help of hand-made window trims. The owner will choose the color, material, pattern and thickness to his taste.
How to make slotted trim yourself
Every owner wants to decorate a room beautifully. If the house is not new, the procedure will require a lot of effort and money. Carved configurations on the windows will add individuality to an apartment or private building. This way you can even renovate an old building and give it a second life. The building will look unusual and stand out from the rest.
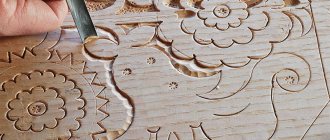
Slotted cashers are best made from pine. The raw material is easy to cut and even a beginner can handle it.
The process occurs in the following order:
- Transfer the pattern to the board. Clearly outline the lines. You can prepare the template yourself or use a ready-made one.
- Make the cuts by drilling large holes along the lines where the wood needs to be removed.
- Use a jigsaw to cut out the pattern without going beyond the edges of the line.
- Process the edges if the configuration is curly.
- Saw the board to the marked line.
- Cut wood from areas where there should be voids.
- Sand with a machine, drill with an emery wheel or by hand with sandpaper. The manual method is best used only for hard-to-reach places.
- Treat with primer to create a protective layer.
- Paint it. Wood oils are best for this. They are well absorbed and the products are easier to care for. In the future, it will be necessary to clean the dirt and apply a new layer every 1-2 years.
- Put in cash.
DIY metal window blocks
Metal cashers are easy to make using ordinary tools. This does not require any special skills. You need 2 sheets of iron 0.7 mm thick to make the side casings and the top and bottom. Drawings with a pattern on whatman paper or wallpaper are attached to the bottom one. To make it convenient to work, you need to place 2 tables at a short distance from each other. Cutting should be done in this interval. The process is then performed in the following order:
- Using an electric drill, drill holes in the corners of the image. For work you need to use an 8 mm drill.
- Cut out the pattern.
- Sand the edges with sandpaper.
- Drill and rivet the blocks.
- Paint if necessary.
Metal frames for windows - advantages, installation features
Platbands are necessary not only for decorating a window, giving the facade a designer look that allows you to bring any ideas to life, but also provide decorative protection for seams from freezing and the negative impact of natural phenomena. Metal trim is a high-quality, reliable material that can protect window seams well, make them airtight and decorate the window itself.
Metal trims for doors
Door casings, like window casings, serve as decorative and protective elements. They are selected depending on the appearance of the building. We recommend using galvanized steel trims, as they fully meet all the basic requirements and will last a very long time.
Decorative functions of metal platband:
- Improves the appearance and disguises the space between the door frame and the wall.
- Against the background of the facade of the house, doors using platbands look more harmonious.
Protective function of metal platbands:
- Door casings cover the fasteners that were used to install the doors.
- Platbands protect against unauthorized entry, as they completely block access to the crossbars. Attempts to break into doors are unlikely to be successful.
If necessary, metal trims can be decorated with various decorative elements. As a result, the door will not only ensure your safety, but will also decorate your home.
Platband as decoration
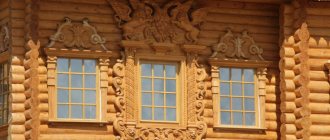
Many have seen ancient wooden buildings decorated with carved platbands on the outside. Such decorations are made by hand and can have a rather complex design that turns a boring house into a work of art. You can create a piece of a fairy tale using metal window frames. Any patterns can also be carved on them, but, unlike wood, metal is a more reliable and practical material that can withstand any load.
If wooden products do not tolerate moisture well, require constant care and are not very durable, then metal analogues do not have these disadvantages. It is enough to use stainless metal or paint the product regularly. Metal window frames can completely replace wooden elements. You can cut out the desired pattern yourself using flat metal sheets, and, unlike working with wood, you do not need to have carving skills or special tools.
It is much easier to work with metal sheets: they will not require drying, special conditions for this, and will not require the use of varnish, which fades in the sun, which is why you have to constantly renew it. After installation, metal platbands will not require additional maintenance and will fit perfectly into the design of the facade. Installation of metal slopes will also not cause any difficulties.
For beauty and aesthetics, plastic corners are installed on the windows. Find out what they are from our material.
Plastic and metal platbands for framing plastic windows
Today, many of our compatriots install metal-plastic windows in their homes. Window openings are framed from the outside (from the street) with platbands.
Wooden frames are as relevant as a century ago, but are gradually being forced out of the market by cheaper and less maintenance-intensive analogues made of plastic or metal.
Plastic platbands take the lead due to the following advantages:
Platbands for plastic windows
- stylish design;
- the ability to create any configuration;
- wide range of prices;
- weather resistance;
- dyeing plastic in the mass allows you to create a uniform color throughout the entire product, and, accordingly, a wide choice of colors (the most popular shades are white, black and brown, wood);
- moisture resistance;
- resistance to deformation;
- the ability to choose a frame with a wood texture;
- ease of installation. PVC platbands for windows are installed with an adhesive composition, using special removable elements or attached directly to the window profile.
- light weight. In the absence of wind loads, installation of plastic trim on windows can be done using double-sided tape;
- ease of care;
- a new product on the market is platbands with a cable channel in which electrical wiring can be hidden;
- There are special trims for installation on vinyl or metal siding. Plastic platbands for plastic windows under siding are distinguished by a well-thought-out installation system;
- good compatibility with metal-plastic windows. After all, it is difficult to choose a wooden frame for plastic windows;
- do not require additional finishing;
- not susceptible to insect damage;
- long service life.
Examples of plastic window casings - photos
Plastic platbands for plastic windows
Don’t think that plastic trim on windows is something boring and standard. There are even carved plastic trims on the market.
Metal window trims are also a fairly practical option for finishing a window opening. They are made from thin sheet non-ferrous metal. They have all the advantages of plastic platbands. But they are more resistant to mechanical damage and are not destroyed by direct fire. The only caveat when installing metal trim is the accurate taking of all measurements. Because making a high-quality cut of a metal profile at home is quite problematic.
Carved metal trims allow you to create a beautiful “lace” finish to the window opening. At the same time, they have considerable strength and have a long service life.
Thanks to the variety of models, the plastic casing, as well as its metal counterpart, is suitable for any window.
Features of rough material
The thickness of a suitable iron sheet is between 0.40 and 0.70 mm. Such sheets are produced at factories in rolls up to 50 meters long. The width of the product is 1.25 m; the sheets do not always need to be painted, since you can buy an already painted product of the color and shade you need. To ensure that the material does not receive damage during transportation, it is protected from scratches with a special film, which can be removed if necessary. The metal is quite strong and flexible, so it does not cause difficulties when working with it.
What is required to make a slope?
To work you will need:
- The metal sheet from which the platband will be made.
- Wallpaper or whatman paper from which you can make a drawing template.
- Paper clips: These will be needed to secure templates and parts.
- Connecting staples no less than 4 mm.
- Pencil.
- Ruler.
- Eraser.
- Drill 8 mm. You will need it in order to use a jigsaw.
- 4 mm drill for joining parts.
- Metal saw and jigsaw.
- Sandpaper for sanding products.
- A small hammer for straightening and a riveting machine, you can use it manually.
Methods for making platbands
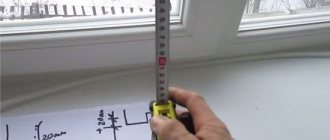
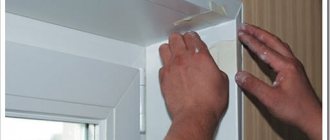
Before proceeding to the manufacture of platbands, you need to install metal slopes on the windows . White metal would be a good option. You will need to measure the slopes to find out their exact size. In addition, you need to take into account the protruding edges: you need to calculate the length and width of the platbands based on these data. Typically the length is 35 cm with the addition of the width of the trim.
Once the size is obtained, you can make templates for the trim. For this you will need whatman paper, you can use wallpaper. You need to make two templates - a long one for the side of the window and a shorter one for the top and bottom if the windows have a size close to the standard one.
The sketch is drawn on a sheet of paper folded in half. The center of the pattern should be on the fold. You don't need to cut out the design twice: using this method, you will get two identical templates without any extra effort, and the templates themselves will be perfectly even.
It is more convenient to make carved metal window frames at a previously prepared workplace. This will require two tables of the same size and height. You need to leave a distance of 8 cm between them so that the jigsaw can maneuver. Most often, metal of two colors is used to make platbands: the top sheet can be white, and the bottom sheet, which will act as a background lining, can be any one.
- To make platbands from a sheet of metal, you first need to cut a sheet of suitable width. Once you have all the lines drawn, you will need to use an electric drill. Using an 8 mm drill, you need to make holes for the jigsaw in the corners of the picture.
- The part that you will cut needs to be placed on the table, so that the cut out pattern is in the center, taking up the free space between the tables.
- After the upper part is ready, you need to move on to making the lower part. You will need to cut a strip of the desired size.
- After this, the metal trims need to be turned over. The finished part should be placed face down. This will free up the outer edge; leave a width of 5 cm and cut out.
- When the workpieces are ready, the protective film will need to be removed and the sheets of metal placed on top of each other. Just in case, secure them with paper clips: to do this, you need to drill several holes with a 4 mm drill. A manual riveting machine is used to connect the parts so that they do not come apart during work.
- After you have secured the sheets, they need to be completely drilled and riveted. The platband can be considered ready.
Sequence of work
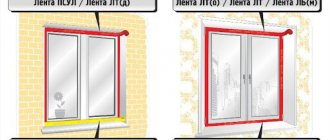
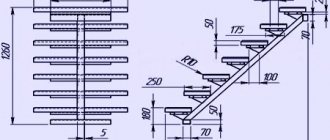
Installation of metal slopes on windows involves carrying out measuring work. The width and height of the product will correspond to the internal and external parameters of the opening. The manufacture of the top, bottom and side metal elements is carried out by cutting them from a prepared metal sheet in accordance with the measurements obtained.
Scheme for trimming a metal slope
Scheme for trimming the lower metal ebb
Scheme for trimming the upper metal ebb
At the second stage of work, the installation of a low tide takes place, the horizontal position of which is controlled by the building level. The lower junction of the wall and the window frame is equipped with a special heat-insulating material and diffusion tape for noise reduction and moisture protection.
First you need to install the tide
When attaching the ebb, mounting foam is applied to the window opening and to the ebb from the inside. To prevent it from bending due to the expansion of the foam, it is pressed tightly for a while. After the ebb is fixed, the installation of metal slopes begins.
Before installing metal slopes, it is necessary to treat the places where they will come into contact with the window frame with sealant.
Metal slopes are secured with polyurethane foam
First, the side elements are installed, maintaining the required slope from the inside to the outside. The upper and lower parts are adjusted using a knife depending on the level of inclination .
The side elements must be installed in a vertical position and tightened with screws. The upper part is adjusted to the side elements. It is aligned with the outer corners and secured with self-tapping screws.
At the final stage, all contact areas are treated with sealant.
When installing slopes on a façade made of corrugated sheets, use horizontal lintels
If the façade of the house is covered with corrugated sheets, it is necessary to use horizontal lintels when finishing window openings. These are side shelves made of corrugated sheets, which are attached to the wall on one side and to a metal profile on the other. Steel trims give the façade completeness.
How is installation done?
Once the façade trims for the windows are ready, you can proceed to their installation. It will not take much time and can be completed without the involvement of specialists. The installation method depends on what materials the walls are made of: if they are wooden, you will need the following:
- Hammer and nails 6 cm.
- Mounting gun and silicone: it is better to take a colorless one, it will be needed for sealing cracks.
- Artist's brush and paint to match the color of the trim. With its help, you can paint over the heads of nails and screws and make them invisible.
- Drill with 4 mm drill bit.
- Plugs for screws. You can also use homemade wood products.
- Medical syringe filled with liquid silicone.
- External metal slopes should be ready by this time.
The platband must be fitted tightly to the slope so that it does not protrude beyond its limits, and secured to the wall. If there are uneven places or gaps remain, they need to be coated with silicone sealant. After this, paint all the heads of the screws and nails with a small brush: this will rid the structure of unsightly dark spots.
For more information on how to restore a wooden window and give it a new look, read the article “How to repair and paint a wooden window” on our website.
Decorating windows in a wooden house requires a special approach. Read how to choose a material for covering windows in a wooden house.
Installation of platbands
In most cases, craftsmen, instead of making platbands from scratch, purchase ready-made themed products. This speeds up the installation process of the strips and the readiness of the glazing for full use.
Specialists, in turn, get rid of a lot of hassle, including the use of certain machines, the cost of stencils for window frames, etc.
The complexity of the installation itself is explained by the configuration of the platbands. If they are wooden, then you need to use nails or screws. It’s easier with other models, because... they provide fastening elements in advance.
The fastening of the planks is carried out in stages:
- First you need to mark the window opening to determine the required dimensions of the slats;
- Next, the planks are sawn at a 45-degree angle according to the established area;
- The next step is to attach the platbands to the seams between the frame and the wall (if the glazing is recessed, then the platbands are attached to the wall by means of extensions).
Extensions are strips for filling the ends of the walls of the opening. They are used when installing window and door structures.
Concrete walls require the use of dowel screws to attach the planks. And if the frames on the windows in the house have an aluminum or plastic profile, then on the back side of the latter there must be ready-made latches for docking with the frame.
It is recommended to use adhesives only for auxiliary fastening of the planks to the frame. An exception is foam trim for interior window decoration. Such planks can be installed completely on glue, without using nails and screws.
What if the wall is brick or block?
Slopes are not always installed on a wooden structure - sometimes the owners want to make a brick house more decorative. You can also use metal slopes for this. The construction of metal slopes in this case is no different, but the use of nails will have to be abandoned.
Before installation, you will need to drill holes for dowels in the walls. It is advisable to use materials at least 6 cm long, otherwise there will be a risk of the structure falling out of the wall. After the holes are ready, you need to insert plastic blanks into them. Holes for screws are also pre-drilled in the mounted slopes: make sure that all holes strictly coincide.
After everything is ready, the structure is put in place and screwed. Working with cracks occurs in a similar way. You can use silicone sealant: a colorless one will be most convenient, since you won’t have to select its shade, but if both the wall and slopes are white, you can use white. It is not recommended to use polyurethane foam. It cannot withstand moisture, requires protection from weather conditions and has an unattractive appearance.
Purpose of metal bars on windows
Metal structures of window grilles can perform a barrier function, providing protection for the object from external penetration and decorative at the same time.
Depending on their purpose, metal gratings are divided into:
Decorative. They can decorate a balcony or window opening on the lower floors of residential buildings. For the manufacture of gratings, class A 1 reinforcement with a diameter of 6-8 mm is used. When composing a pattern, the cell size is no more than 200 mm.
Security and decorative. The grid is made from reinforcement bars of class A 1 with a diameter of up to 14 mm. A simple ornament allows for cells up to 180 mm in size. This design significantly increases the protective function of the grille.
Security. If increased safety of the facility is needed, class A3 reinforcement bars with a diameter of up to 20 mm are used. The cell in this case should not exceed 150 mm.
Metal casing
Durable, maintenance-free, painted in hundreds of colors and with a variety of designs - these are the metal trims that we produce. These technological and decorative elements help securely fasten even heavy structures. At the same time, the integrity of the walls, window frames, roof and facade is not compromised. The result is a harmonious, sophisticated home design.
The platband is the front part of the finishing of the facade of the building, and we advise you to carefully consider the choice of this part and the other associated elements of finishing the facade space.
What is a metal window casing?
Among the additional elements for siding, metal platband stands out and is very popular. Galvanized platband is a edging component for door, window and other openings, which looks solid and durable and no home can do without it. It carries not only a practical function, being used for edging windows, doors and other facade elements, but also an aesthetic one, decorating the facade, giving it uniqueness, individuality, originality, and solidity.
Metal options have many advantages over similar products made from other materials: wood, plastic and others.
Buy window trim and you will receive:
- the ability to create original, complex shapes;
- attractive appearance;
- durability;
- strength, resistance to damage;
- combustion resistance;
- design in different colors (the entire range of the RAL catalogue).
Pros and cons of the material
Despite the fact that external metal slopes are more expensive than other types of finishing, their positive qualities more than make up for this drawback:
they have a high degree of resistance to corrosion and rust;
Metal slopes are covered with a layer of galvanized steel
It is recommended to install noise-absorbing tape along with the slopes
Among the disadvantages, we can note the high cost and the presence of sound effects arising from the fall of drops or hail on their surface . This can be dealt with if you use a special noise-absorbing sealing tape when installing metal slopes.
Another disadvantage of a metal slope is the impossibility of installing it in arched openings.
From the history of the appearance of metal platbands
Window casing is a convenient and functional device. Its history goes back to the distant nineteenth century. Already in those days, people decorated the windows of their houses with beautiful openwork decoration. This is how they protected their home from evil spirits and various slander. They created a comfortable atmosphere and gave a unique image to the entire building. Back then, wooden materials were most often used for manufacturing.
Over the years, wood began to be replaced with lighter and more economical analogues. And in the twentieth century, heavy and expensive options were replaced by galvanized metal trim. It weighed less and provided ample opportunity for a wide variety of configurations. In addition, there was no need to paint such a finish every year.
Resistant to moisture and sudden temperature changes, it retains its original qualities for a long time. And at the same time look as elegant and luxurious as wooden structures. Skillful hands of masters create such masterpieces that they can rightfully be considered works of art. Such a strip for decorating a window or doorway of a building looks very impressive. Decorative painted elements at the entrance areas immediately attract the eye. In addition to their interior function, they protect the building during the cold season and maintain the required level of heat.
It is not difficult to care for galvanized metal trim. It is enough to carry out regular checks for rust, cracks and other defects. The surface has a smooth, even shape.
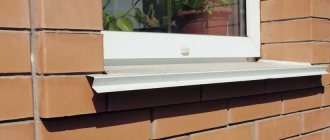
Installation of galvanized platbands
Galvanized metal trim, like any other, is made individually for each window or doorway, after careful measurements to achieve maximum compliance with the contours. Otherwise, it may turn out to be slightly smaller or, conversely, larger than needed for a particular window or door. The platbands are assembled from four parts: bottom, top and two side parts, which are assembled into one structure already in place, directly when edging the openings. If there is ebb on the windows, the lower part of the window casing is not installed.
Advantages over other materials
There are several types of finishing materials, using which you can give the window opening a complete appearance. These are plaster, drywall, plastic and paint. But in terms of its technical characteristics, none of these materials can compare with metal slopes. When deciding how to make slopes, you need to study the characteristics of finishing materials.
The polymer layer of the steel slope protects the product from rust
When using plaster, you must be prepared for the fact that the plaster layer will crack over time. Moisture getting into the gaps between the window frame and the plaster layer can cause mold to appear.
Drywall as a finishing material for slopes is only suitable for interior work. Even GVLV brand drywall is not able to withstand the direct effects of precipitation. In a short time it will swell, lose its appearance and collapse.
The use of plastic panels for finishing external slopes leads to the fact that in the sun the plastic fades and acquires an unpleasant yellowish tint. And with a sharp drop in air temperature, the plastic becomes brittle and may lose its integrity after minor mechanical stress. Therefore, it is better to use plastic for finishing internal slopes, especially in the kitchen.
Metal slopes are not exposed to weather conditions
The advantages of metal slopes are obvious, since the material for their production is galvanized steel, which is covered with a protective polymer decorative layer at the production stage. This protects products from corrosion and rust.
Metal trim from our factory
Our company offers high-quality and inexpensive samples of window casings. For production processes we use multifunctional equipment and durable materials. These conditions make it possible to obtain products with impeccable performance characteristics.
The products of our plant are made only from high-quality Russian metal. We do not strive for cheapness and do not use low-grade raw materials or thinner metal, since quality is achieved only through strict adherence to production conditions.
Window trims, which you can buy from us:
- Classic, rectangular shapes.
- Exquisite, designer samples for finishing building elements.
- Variants of painted metal in various colors.
- Products with polymer coating.
Wooden trims
These window trims have a thickness of at least 30 cm. The width depends on the structure of the profile. If the wooden profile is simple, then it is enough to use a sawing machine to make it.
Wooden frames are loved by many for the following features:
- Availability;
- Easy to install.
But thematic planks have more disadvantages:
- Small assortment;
- Susceptibility to rot and insects;
- Requires regular painting and varnishing.
In cross-section, wooden window frames are rounded, beveled, and smooth. The length of each species reaches 2 meters.
How to make carved frames for windows from sheet iron
Which of us, seeing before us beautiful, old, log houses, decorated with intricately carved openwork platbands, with rich kokoshniks carved like a royal crown on the roofs, did not admire the fabulous beauty that has come down to us from the depths of centuries. But seeing such beauty and admiring it is one thing. But turning your home into a fairy-tale palace is not an easy task.
And the point is not even that someone lacks artistic skills or lacks imagination in constructing twisted patterns, the problem is the fragility of external wooden elements and structures. Unfortunately, wooden platbands and carving elements retain their original appearance for many years, only in indoor, dry rooms. In an external humid environment, wood quickly warps, cracks and chips, especially in places with fine carvings. The external environment, sun and rain quickly destroy paintwork, forcing you to spend extra money on paint and repaint everything every two or three years.
Despite some difficulties that may seem at first glance, you should not give up the desire to turn your drab house into a little mansion. The abundance of materials in hardware stores allows you to replace wood with a more durable material. In this master class you will learn how to make carved window frames with your own hands by replacing wood with flat iron.
Flat iron, or flat sheet, as it is correctly called according to the factory classification, is thin tin (0.40-0.70 mm thick), which comes from the factory in rolls of 20, 30 and 50 meters. The standard factory width of sheets in rolls is 1 meter 25 centimeters. Flat iron is painted in different colors, from white to dark chocolate. All iron sheets are covered with a protective film to protect them from scratches during transportation.
Cost of metal products
If you decide to buy bars, then the question will soon arise - where to buy bars for windows? Typically, specialized hardware stores sell all kinds of metal products to protect windows. However, we should not forget that there are private craftsmen who can adjust the price and please the buyer with a good discount.
It is worth paying attention to a company that takes measurements of windows for free before accepting an order. You should read reviews, compare prices, and talk to previous customers.
If there is a need to purchase inexpensive metal gratings, you can take unpainted products, as well as products made by welding the rods. In this case, the quality will strictly correspond to the price of the product.
The price range for metal grilles for windows is quite wide. The complexity of the design, the material used, and the popularity of the craftsmen also have a huge impact.
The approximate price of window bars varies from 1,500 to 4,000 rubles per square meter.
Materials and tools
To make carved window frames we will need:
- a flat sheet of tin iron with a standard width of 1 meter 25 centimeters;
- a roll of wallpaper for making templates for the platband pattern;
- paper clips for fixing templates during translation of drawings and for subsequent fixing of finished parts to each other;
- connecting brackets size 3-4 millimeters;
- a simple pencil;
- eraser;
- ruler;
- an 8 mm drill bit for drilling holes for a jigsaw in the places where the parts of the top cover plate are to be cut;
- a small drill of 3-4 millimeters for drilling holes in places where parts are riveted;
- electric jigsaw;
- metal saw with fine teeth;
- fine and medium sandpaper for grinding burrs on the back of parts;
- manual riveting machine and rubber hammer for straightening workpieces.
The process of making carved platbands
When starting to manufacture window casings, it is necessary to prepare and install slopes on the windows in advance. One option is white iron slopes.
After we manufacture and install the slopes, we take the exact size from the window, taking into account the edges of the slopes protruding onto the walls. When the size is taken, we calculate the width and length of the platbands. The standard width is 30-35 centimeters, the length of the window plus the width of the casing.
Having taken all the measurements, we make templates for the platbands from any smooth roll of wallpaper. Having chosen a sample drawing, we prepare two templates. One long side and one short for the bottom and top of the window. Fold the cut strip of paper in half and draw a sketch so that the center of the pattern is at the fold. When the design is cut out, its second half will automatically be ready, so you will get the correct, even template.
We prepare the workplace, for this we place two tables of the same height, next to each other in length, leaving a gap of 7-8 cm between the tables, this is the place to work with an electric jigsaw. Platbands are made of two colors of metal (the simplest option). The top overlay color will be white, and patterns are cut out on it. The second color of your choice is the background lining under the top carved sheet.
We take a sheet of flat iron and cut strips for the trim of the required width.
We turn the blanks of the upper overlay part of the platband face down, and securing the template with paper clips to the reverse side, we transfer the openwork pattern of the platband.
When the drawing is ready, take an electric drill, insert an 8 mm drill and drill through holes along the edges of the drawing for a jigsaw file and begin cutting out the casing.
We cut out the frames for the iron windows.
We place the strip of iron on the table so that the part to be cut out is in the center of the table, and begin to cut out the design along the contour. Having cut out the upper part, we proceed to making the lower, background part of the casing. To do this, we also cut the sheet of iron into strips of the size we need, taking into account the edging. The width of this sheet should be 4-5 centimeters wider.
Turn the sheet face up. We place the finished top blank of the casing on it face down. We trace the outer edge along the edge of the design 4-5 cm wide and begin cutting.
Having prepared both pieces, remove the protective film from them and place them on top of each other.
We fix them with paper clips and make 1-2 holes with a 3-4 millimeter drill. Using a manual riveting machine, we make a control coupling so that the parts do not come apart. After that, we drill and rivet the entire structure. The window casing is ready.
Installation of carved window frames
After the platbands are made, we begin their installation on the wall; here you will need a ladder or stepladder. When installing platbands on a wooden wall you will need:
- hammer;
- small nails 5-6 centimeters;
- mounting syringe;
- mounting liquid silicone (white as the color of the casing or colorless) for filling cracks;
- a small art brush, and paint matching the color of the trim to putty the nail heads.
When installing platbands on stone walls, we will need:
- electric drill;
- drill with a diameter of 3-4 millimeters with a Pobedit tip;
- plugs for screws (if there are no plugs, you can fit and hammer homemade wooden plugs into the hole in the wall);
- syringe and mounting liquid silicone;
- a small artistic brush and paint matching the color of the casing to putty the screw heads.
The trims are fitted close to the edges of the protruding window slopes and attached to the wall.
Then all cracks and uneven places are coated with mounting silicone. And the heads of nails or screws are painted with a thin brush with paint according to the color of the platband. The work is ready, the carved frames are installed on the windows.
Photos of window trims
Read: Kitchen-dining room design: interesting solutions, beautiful design options and rules for applying style (85 photos + video)
Did you like the article? Please share with your friends 
4+
Write a comment
New designs
Modern kitchen
Modern kitchen appliances: ovens
Natural wood furniture
How to choose good cement?
Sequence of installation work
To correctly attach platbands to windows, you need to consider installation options, then choose the best method:
- Mount to a frame or wall using mounting elements.
- Special fastening latches are installed on the frame , overhead strips are placed on them and snapped into place, like a clothing button.
- Installation is carried out using double-sided tape, which is glued to the frame on one side, and overhead strips are glued on the other side. This method is not reliable enough, so it is used extremely rarely.
To correctly install overlay trims on windows with your own hands, you need to carefully take measurements, make markings, and cut the product , which is sold in linear meters. These works are performed in the following sequence:
- Measure the height of the frame; two parts of this size will be needed.
- Measure the width of the frame; if the window has a molding, you will need one piece; if plastic trim is provided around the entire perimeter of the window, you will need two pieces.
- Since window frames are sold by linear meters, parts are cut from the main product according to the measurements taken and of the required length.
- To connect horizontal and vertical elements at an angle of 90 degrees, the ends of each part must be cut at an angle of 45 degrees, this makes it possible to correctly join the elements.
- The dimensions of the platbands must correspond to the dimensions of the window frames.
To ensure that the joints of the overlay strips are even and the angle is exactly 45 degrees, use a special device - a miter box .
If you install plastic windows yourself, you need to remember the following:
- For vertical elements, the cut is made on one side if there is a low tide, on both sides if the plastic platbands have a closed space.
- Horizontal pieces should have a 45-degree cut on both sides.
The next stage is installing the parts on the window slope. If the slats have special grooves, and the window slopes have tenons, then you just need to align them and snap them into place. If there are none, try on the parts, applying them to the window, and after the final adjustment of all the elements, you need to remove the platbands from the window, apply “liquid nails” type glue , then glue the strip.
Platbands for windows inside and outside a wooden house
Wooden houses look distinctive, original and unique. Especially when you compare them with similar high-rise buildings in big cities. Wood is a natural material given by nature itself. It gives warmth, coziness and comfort to everyone living inside. Window trims in a wooden house add uniqueness and originality to the structure. They also perform a number of other positive functions.
Types of platbands for the home
Since ancient times, people have decorated their houses with carved platbands. They played the role of decoration, added individuality, and fulfilled a mystical task. Such elements served as a kind of amulet, protecting against evil and negative energy. The patterns often depicted various fairy-tale creatures acting as patrons.
Photo 1. Curly trims
Advantages of platbands:
- Decorate the facade or interior of the house.
- Close the gaps between the window frame and the wall.
- Prevents dust, moisture, cold and wind from getting inside.
- Reduce heat loss.
They can be installed outside and inside the house. Window trims inside a wooden house can additionally cover wiring, cables, and communications. They are made from different materials and are usually installed around the entire perimeter of the window opening.
Wood is used to make window frames - it is a traditional and long-used material. It has proven itself well in processing and coloring. Perfectly suited for our climatic conditions. There are many different paints, impregnations, and varnishes available on the market that protect it from the effects of decorating factors. They can also highlight the beauty of natural wood.
Photo 2. Larch frame for windows
Despite the large selection of raw materials, in a wooden house they mostly use window frames made of wood. This is explained by the environmental purity and naturalness of its origin. It looks beautiful, has an original natural pattern, and has a long service life with proper care.
Wood often used to make window frames:
- Larch is most often used for making window frames when decorating a house. With additional treatment with antiseptics, it is well resistant to natural phenomena and eating by insects. Not quite suitable for creating carved platbands.
- Linden is a very flexible material, allowing you to make any pattern or element out of it. You can make a thin casing from it or even make it carved and figured. Its disadvantage is its ability to absorb a lot of moisture. It requires mandatory treatment with protective compounds.
- Pine window frames have a beautiful texture, pleasant smell and smooth texture.
Photo 3. Pine window frames
These products also differ in their shapes. Based on appearance and design, they are divided into the following types:
- Flat platbands
are the simplest to manufacture. The planks have a smooth surface with a width of 5 cm. Sold mainly by linear meters. Before installation, they are usually cut into pieces of the required length, then joined at an angle of 45 degrees or in a butt. - Shaped platbands
have bulges of different levels on the surface, cuts or grooves running along the entire length of the product. - Curly trims
have the most complex design in comparison with other analogues. Visually they look like lace framing a window. They are quite difficult to make, so they are often made to order, although you can make them yourself. The carved design is usually made using a stencil and the necessary woodworking tools. The result is a beautiful and original decorative element.
Curly window frames are usually installed from the outside. They are also installed inside the structure. This is usually done when finishing the entire room with wood. Window trims inside a wooden house perform functions and purposes similar to external models.
To give wood products a beautiful, finished look, they are painted, varnished, or covered with other materials. First you need to grind it and clean it from dust. To ensure that window frames on the outside or inside of the house retain their natural, beautiful design and color, they are opened with colorless varnish. To tint and give the appearance of an expensive, valuable species, stain is used. It also protects against insects and pests, and creates a protective layer that prevents the penetration of moisture. At the next stage, experts advise covering the planks with varnish.
Photo 4. Painted trim with flutes
Inside a wooden house, window frames can also be treated with wax impregnations. It is recommended to paint pine parts to protect soft wood from the influence of external factors. Most often, water-dispersion, enamel or nitro paints are used. The surface must first be treated with a primer.
Photo 5. Framing windows inside the house
You can buy high-quality platbands for installation inside and outside the house in our online store LesoBirzha. From us you can order flat or shaped products from cedar, linden, pine, larch grades A, AB, Prima, Extra in different size options. We also offer our customers fast delivery throughout Moscow and the Moscow region.
Do-it-yourself wooden trims
Wood is a good material for making window trims. For such work you will need certain tools and skills to work with them:
- Carpentry workbench.
- To cut out patterns you will need an electric jigsaw.
- Measuring tools.
- Screwdriver, attachment for it for self-tapping screws.
- Wood drill with a diameter of 12 mm.
- Mounting clamp.
- Brushes for painting the product.
Work on the manufacture of wooden planks must be carried out in the following sequence:
- The plastic windows are measured, then a sketch of the future product , and boards of the appropriate size and quality are selected.
- Using the chosen pattern, a template is made from cardboard or thick paper, then cut out.
- Using a template, the drawing is transferred to the board.
- Holes are drilled in areas intended for sawing. They are needed to make it easier to work with a jigsaw later. The more holes you drill, the easier it will be to work with a jigsaw.
- The jigsaw file is inserted into the drilled hole, then they begin to cut out the pattern , moving the jigsaw along the markings. If the jigsaw has a soft start, the drawing can be done more accurately.
- You need to cut out the inner as well as the outer part of the design.
- Having completed all the necessary cuts, the workpiece must be cleaned with fine sandpaper to remove all irregularities and roughness.
- In order for the product to serve for a long time, it is treated with a special antiseptic impregnation, which does not allow bark beetles to multiply in the tree and protects it from fungi and mold.
- Paint is applied to the impregnated parts , carefully covering hard-to-reach areas.
- After the paint has completely dried, the patterned areas of the product are connected to the main overlay strips. To avoid seeing the fastening joints, work is done from the wrong side.
- Installation of platbands on windows is carried out using self-tapping screws, which are screwed into the dark part of the part.
Cladding with sandwich panels
Window trims made from sandwich panels represent the design of a window opening with special plastic sheets, between which foamed polyurethane foam is located.
Advantages of the facing method:
- ease of installation work;
- durability;
- resistance to atmospheric changes;
- high thermal insulation properties;
- ease of cleansing;
- wide choice of shades.
To install sandwich panels, you need to prepare the following tool:
- knife for cutting sheets;
- screws for fastening;
- PVC profile, U-shaped;
- liquid Nails;
- drill (screwdriver).
Slopes are finished using this material as follows:
- Remove dust and dirt from slopes.
- Attach PVC profiles using self-tapping screws: fix them along the entire perimeter of the box.
- Cut panels of the desired shape and size from sheets.
- Attach the upper slope: one edge is inside the profile, the other is on top. Fastening is carried out with liquid nails.
- Mount the side elements.
- If necessary, a layer of insulation is placed on the panels (this can be polystyrene or mineral wool).
Important! During finishing work, the protective film with which the sandwich panels are equipped is removed only after the installation process has been completed.