Optimal sizes
If you approach the issue of determining the size of a chicken coop scrupulously, then for each breed of bird there is a certain standard of “living space”. But in a country house or in a private house they rarely keep a purebred bird. Therefore, they start from the average.
There are some general guidelines to follow when creating a chicken coop project.
Estimating the area and dimensions of the building
When building a chicken coop, they usually proceed from the planned number of birds. It is believed that 2-4 chickens can live on 1 square meter of area. If we are talking about broilers, you can take 3-4 pieces per square meter. They are inactive and this area is enough for them. If we talk about laying hens or meat and egg breeds, it is believed that the optimal number is 2-3 birds per square area. So, a chicken coop for 10 broiler chickens can have an area of -2-3 square meters, a poultry house for 10 chickens - when keeping laying hens or meat and egg breeds - requires 4-5 square meters. If you decide to build a chicken coop for 20 chickens, the area for broilers will be 5-7 squares, for eggs and meat - 8-10 squares.
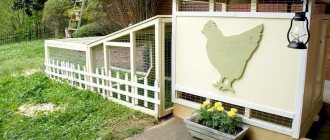
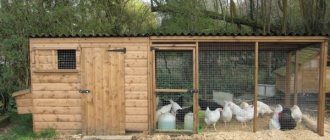
A beautiful chicken coop for 10-20 chickens does not need to be hidden in the backyard
But knowing the area of a chicken coop for 20 chickens or 10 is not everything. We still need to decide on the sizes. Most often they try to make a rectangular building: 3 * 1.5 m; 4*, etc. In this case, you can clean the poultry house without going inside - a rake, scraper, broom will reach even the far corners. Square ones are not so convenient in this regard, although a small chicken coop for 10-20 chickens will still not be large. So a square is fine.
How tall should the chicken coop be?
When building a chicken coop, you still need to decide on the height of the building. For birds, a height of about 140-150 cm is sufficient. But you must remember that you will have to clean the house, collect eggs, and change bedding. So when choosing the height of the poultry house, they proceed from their own convenience. For this reason, the roof is made higher than head level - so that you can walk upright.
The height depends on whether you will go inside for service or not.
No overlap
There are two options when installing a roof. First: if the poultry house is without a ceiling (ceiling), you can remove the walls by about 140-150 cm, make the roof gable and raise the ridge by 180-200 cm (or a little higher, as is convenient for you). In this case, you can move around the center of the room without problems, but we still rarely go to the edges. There is usually a perch and nests there, and there may be bedding. You will have to work carefully in this area, protecting your head.
There may also be no overlap inside
The benefit of this option is that with this arrangement we save on wall material. The downside is that more is spent on insulating the roof: it must be insulated over the entire area, which is significantly more than what is required when insulating the ceiling. But, in general, this option turns out to be less expensive, but also less convenient (you have to take care of your head).
With attic
The second option for how to build a chicken coop for 10-20 chickens is to make a mini-copy of a regular house. In this case, the walls are driven to the height required for free movement inside. This is a person’s height, plus 10-20 cm. But keep in mind that part of the height will go to the ceiling, there will also be a floor and bedding on it. Each requires about 15 cm of height. So, if the owner of the chicken coop is 180 cm tall, you will have to make walls with a minimum height of 220-230 cm.
With overlapping you will have to insulate less
As you can see, this option will require more materials for the walls, but only the ceiling (ceiling) can be insulated, and the attic can be left cold. The attic can also be used to store straw, bedding, etc. But don’t forget about rodents, who love such storage facilities and can become a problem.
On poles
Another option: make a chicken coop for 10 chickens on poles. In this case, 4 beams are dug into the ground at the corners of the building, the floor covering is made at a height of 50-80 cm from the ground level. The roof is made at a height of 180-200 cm. In general, this is a convenient option for a mini-chicken coop for a summer residence. This is more of a summer option, but can be insulated. In order for the bird to be able to get in and out, an inclined ladder is made from boards with thin perches nailed about 10 cm apart to make it easier for the bird to move.
Why not a mini-chicken coop for 5-6 chickens?
In general, you choose the height and general construction plan at your own discretion.
Drawing
Before purchasing materials and construction, you need to decide what size the chicken coop will be. It depends on the number of birds.
Options for simple, but not difficult, chicken coop construction
For 10 chickens
A closed, warm poultry house with an aviary is needed for year-round keeping of chickens. 0.2 acres of land are allocated for the construction of a house with a range of ten chickens.
Material for building a chicken coop
For chicken coop walls, the material chosen depends on the intended use. For a summer chicken coop, boards, plywood, and OSB are suitable. Such buildings are made according to the principle of frame house construction: a frame is assembled from timber, covered with boards or sheet material. The task of such buildings is to protect from the sun, wind and rain, and they do this very well.
For a winter chicken coop you can use the same materials as for a summer one, but the walls will have to be insulated. You can also use logs, timber, gas or foam concrete, adobe, cinder block, shell rock, sandstone, etc. Basically, any building materials. If there is material left over from the construction of a house, bathhouse, barn, it can be put to use. Only part of the material during the construction of a winter chicken coop requires mandatory insulation, while others can be done without (depending on the thickness of the wall, winter temperatures).
Boards, OSB, lining, plywood - these are the most popular materials for building a chicken coop
A chicken coop for 10-20 chickens is usually covered with inexpensive material. Most often it is roofing felt or slate, but any other material can be used. Only if you are planning a metal roof (from metal tiles, corrugated sheets), keep in mind that chickens do not like noise. During rain or hail, they may become frightened, which will affect the number of eggs or weight gain.
Insulation - mineral wool or polystyrene foam. Mineral wool is vapor-permeable, so normal humidity can be automatically maintained in the chicken coop (if the walls are also vapor-permeable). Polystyrene foam does not allow moisture to pass through, but it is cheaper and is used to build a budget poultry house. Just remember that mice love to live in such insulation (foam plastic and mineral wool). And this is a problem. To block their access to the inside of the wall, it is tightened on both sides with a fine metal mesh (cell size - the smaller the better).
There is also extruded polystyrene foam. It is much more expensive than the options listed above, but the advantage is that fungi do not grow in it, bacteria do not multiply, and insects and rodents do not like it. And one more thing - it has excellent thermal insulation characteristics and, to insulate a chicken coop, a thickness of 2-3 cm is enough (foam plastic needs more than 5 cm), so in fact, the cost of insulation will not increase very much.
Chicken coop production
Author of the idea: Nelly Fedosenko
If you go to Google Images and search for “chicken coop,” you will get a ton of suggestions from manufacturers:
Priced from $100 and up.
If you go to Yandex.Images and send a request for “chicken coop”, you will see basically the same thing, but in much smaller quantities.
“The same thing” - because our bloggers, when describing the charms of the countryside, are forced to take foreign pictures, because their own similar charms cannot be found in our own open spaces.
Through Yandex.Direct, only chicken coops for 2-4 birds from the Italian company Ferplast (ferplast.com) are advertised, at a price of 12,000-14,000 rubles:
And on the first two pages of search results in Yandex, I found only one seller of chicken coops - the site kuryatniki.ru, which sells large, but too bulky and too expensive chicken coops:
Chicken coop for 5-6 chickens, 38,000 rubles:
Luxury chicken coop (for 7-15 chickens), 145 thousand rubles:
Don't you think that this is too little choice and expensive prices for a former agricultural country, whose population still looks with nostalgia towards the countryside and strives to escape there?
In my opinion, there is a huge field for activity here.
The design of the chicken coop is simple. Material (wood and iron mesh) - heaps. There is demand.
To find a buyer, you don’t even need to go to the Internet. Here they are - summer residents - living next to you and buying greenhouse structures in stores in the spring.
Place your sample (or a poster with its image) in a store that sells greenhouses and leave a pocket with business cards (this is our usual practice).
Or distribute leaflets among dacha cooperatives.
See how many people are searching for chicken coops online:
Considering that only a small part of your target audience searches for information on the Internet, you can imagine its actual size.
But while there are no competitors, you can stake your claim on the Internet.
Register on tiu.ru (there is practically no competition there - only two sellers of chicken coops: one sells the same Ferplast, the other sells plastic chicken coops for 17 thousand rubles).
Place your chicken coop at your dacha, take a photo, share the photo with your friends on a social network (the more original your design is, the more you will promote it).
For example, this one (although this particular design is already occupied by the creator of nogg.co):
By the way, this chicken coop is made by hand in the UK and is sent free to everyone for 1950 pounds (92 thousand rubles).
We can also make it by hand from environmentally friendly materials. And we can do it much cheaper.
If you come up with an even more original design (for example, a nesting doll chicken coop), make a website in English - you too can get on the pages of the most visited foreign sites and get a wealthy clientele capable of paying $3,000 (equivalent to £1,950) for a wooden chicken coop for several chickens
Everything is possible. The choice is yours.
Drawings and projects
A summer chicken coop for 10-20 chickens is a small building, usually made of wood. A mini poultry house with a walk, which will house less than a dozen birds, has dimensions of 3 * 1.5 m. Moreover, this is with a walk - a fenced off area. The very room where the chickens will spend the night and lay eggs is 80-100 cm deep, 140-160 cm wide, and its height is about 1 meter.
Summer chicken coop for 5-9 chickens with walking - a very small building
For maintenance - changing bedding, cleaning - there is a door in the back wall. There is a small window covered with shutters to let in light. In general, an ideal option for a summer house for seasonally keeping a small number of chickens.
A chicken coop for 10-15 chickens is a more serious building. Dimensions double: 1*2. The height can still be kept low - all servicing can be done through a door in the back wall. There is no need to go inside. Only as a last resort.
Drawing with dimensions of a chicken coop for 10-15 chickens
For an even larger number of birds, you need to make an even larger barn for chickens. This is really a barn or a shed. You can already enter such a room.
If the winters are snowy, you will have to make high slopes and a hip roof
Please note that even the smallest poultry house should have windows. No one will install metal-plastic, but glass must be present. In a seasonal chicken coop, one glass is enough; in a winter one, it is better to install two. Moreover, the second can only be installed in cold weather. And one more thing: it is advisable to have shutters on the window. This will give you the opportunity to change the length of daylight hours.
There are designs for chicken coops of unusual shapes - in the form of a triangle or a wigwam. This type of construction is optimal. By spending a minimum of funds on construction, we get a substantial area.
Unusual shape. It turns out that the floor area is large, and the costs are very small.
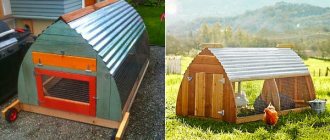
This chicken coop for 10-20 chickens is built using frame technology. There are no walls as such; they are covered with soft roofing material. A very rational construction. It is also suitable for snowy regions: with such an inclination, little will be delayed.
Types of chicken enclosures
The type of enclosure depends on:
- number of birds;
- the purpose of their breeding;
- method of content.
A house of 3-5 m2 (the norm is 0.3 m2 per bird) with a walking area of 5-6 m2 is enough for 10 chickens.
Poultry house for 5 chickens
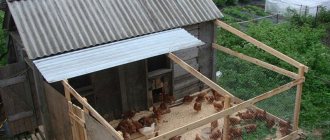
In the drawing, the chicken coop and aviary are a single structure.
The simplest drawing of a chicken coop for 10 chickens
There are other options for keeping poultry.
A barn or greenhouse combined with a poultry house
On small farms, chickens are most often kept in a barn. Capital construction is the key to the safety of birds and their protection from bad weather. Building a barn specifically for chickens is expensive and difficult. Therefore, the room for their maintenance is often combined with a utility room, where garden tools and utensils are kept.
It is enough to have a shed the size as in the photo, and divide it with a partition with a door.
Half of the barn can be used as a room for 5-10 birds
The bird's walking area is fenced with a net. In order for birds to be able to leave the room and enter the aviary, windows measuring 30*40 cm are needed in the wall of the barn.
Chicken passages in the barn wall
Greenhouses are used for winter housing of birds. It is enough to install nests, feeders and several crossbars for perching. Due to warmth and good lighting, the productivity of laying hens increases.
Poultry house in a polycarbonate greenhouse
Lightweight canopies and portable structures
If chickens are raised for meat, a temporary structure in the form of a lattice fencing is installed for them. The mesh is attached to a lightweight frame structure. A sloping or arched roof is covered with tarpaulin or polyethylene.
Since birds are kept in such an enclosure only in the summer, the chicken coop does not need a floor.
The summer poultry house can be collapsible or portable
Portable bird aviary
Collapsible chicken coop
The portable aviary is rearranged so that the chickens graze on fresh grass and do not run away.
Houses in the poultry yard
On a spacious local area, birds do not have to be kept in a cramped enclosure. You can fence off a separate yard for them and put up a house with nests for laying hens, in which the chickens will hide at night or in bad weather.
House for chickens with a run in the yard
It’s easy to build such a chicken coop with your own hands, and it will be enough for 10 chickens. It has a floor raised above the ground on small posts, so the poultry house can serve all year round.
Drawing with dimensions of a house for chickens on poles
Chicken coop for 10-20 chickens: choosing and making a foundation
The type of foundation depends on the type of material chosen. If this is a frame building or timber or logs will be used, the most optimal is a columnar foundation. The costs in time and money are minimal, reliability is sufficient, and possible distortions of the columns are compensated by the strapping and elasticity of the material.
Even a small chicken coop is better placed on a base
If the walls are built from blocks of any type, brick, shell rock and any similar material, a strip foundation is needed. There are more costs, but there is no other way to do it. An even better option is a slab foundation, but the costs are even higher. But the slab can be used as a subfloor, and with such a foundation any frost heaving is not a problem.
Preparing the site for the foundation
To build a chicken coop for 10 chickens with your own hands, first clear the area. It is necessary to remove all the fertile layer. Its thickness can be 20 cm or more, and maybe only 5. In any case, we remove everything, including stones, roots, etc. We level the area and compact it. For tamping, you can use a piece of large diameter log with a crossbar-handle nailed on top.
You can also use stones. It is only important to remove the fertile layer
It is necessary to remove the soil because the animal and plant remains in it under the building begin to rot. So it is necessary to remove the fertile layer of soil. We carry out further construction work on the cleared and leveled site.
Columnar foundation
The foundation pillars for the poultry house can be made of brick, but the easiest way is to use concrete blocks 20*20*40 cm. They fit perfectly. If you are building a chicken coop for 10-20 chickens, it is unlikely that your structure will be larger. The longest side length that can be is 4 meters. If the winter is snowy, you can put three supports on this side: two at the edges and one in the middle. If the length of the chicken coop wall does not exceed 3 meters, we place only supports in the corners.
In the selected places we dig holes that are slightly larger in size than the future pillars. The depth of the holes is 25-30 cm. Pour medium-fraction crushed stone onto the bottom and compact it well. The thickness of the compacted layer is 15 cm. We pour sand onto the compacted crushed stone and tamp it well too. Blocks can be placed on this base. They need to be placed “on the horizon”. To do this, you can use pegs with a rope stretched along the level, or you can put even planks on the blocks, lay a building level on them and use it to navigate.
Wooden and frame chicken coops are usually placed on such blocks
Once the blocks are aligned, you can begin laying the strapping. This is either a beam (for frame or timber construction) or a log. The strapping beam/log must be treated with impregnation. Under them, on the posts, it is advisable to lay a piece of roofing felt or waterproofing material folded in two layers (a modern and improved analogue of roofing felt). That's it, you can continue building the chicken coop.
Strip foundation for a chicken coop
A strip foundation is usually made for a chicken coop for 20 chickens, which will be built from any building blocks, wood concrete, adobe, shell rock, brick, etc. To make a concrete strip, you will have to dig a trench at least 50 cm deep and at least 35 cm wide along the perimeter of the future building. Try to make the walls of the trench even, and if the soil is loose, with a slight slope.
The bottom of the trench is cleared of stones and roots, leveled, and compacted. Crushed stone of medium fraction is poured onto the bottom, leveled and compacted. Layer thickness - 15 cm (compacted). Construction sand is poured on top and compacted. The thickness of the layer is about 10 cm. Next, formwork is assembled from boards in a trench for pouring concrete. The formwork panels should rise above the ground by at least 10-15 cm. In this case, the floor of the chicken coop will be slightly raised.
Strip base - for serious buildings or very difficult soils
To increase resistance to soil movements during frost heaving, reinforcement is placed inside the strip foundation. In this case, two rods with a diameter of 10-12 mm (ribbed, not smooth) are sufficient, which are located at a distance of about 15 cm from each other. The distance from the rods to the formwork panel is at least 5 cm. The distance from the bottom should be the same or greater .
The last step in constructing a strip foundation for a chicken coop for 10-20 chickens is pouring concrete. The grade of concrete is M150, it’s not worth doing less. The proportions are standard: for 1 part of M400 cement we take three parts of medium-fraction crushed stone and four parts of dry sand. Water - 0.7-0.8 parts. Mix everything and pour it into the formwork. Having leveled the top edge, cover the foundation with film and wait 1-3 weeks. If it is warm (+20°C and above) we wait a week, if from +17°C to +20°C - two, if less than +17°C - three. After which you can remove the formwork and continue construction.
Remember that the concrete foundation, even for a chicken coop for 10-20 chickens, must be waterproofed. It can be coated twice with bitumen mastic, or you can lay two layers of roll waterproofing. If the humidity in the area is high, it is better to use both.
How to build a warm winter chicken coop for 50 chickens with your own hands
After choosing a project and preparing materials, construction work begins. The whole process is divided into main stages, each of which requires careful compliance with the conditions.
Marking
The selected area is cleared of debris. Markings are made using pegs and twine. Check the level and level the area if necessary. According to the markings, make a trench 15-20 cm wide for pouring the foundation.
A plywood formwork 40 cm high from the ground is erected on top of the pit along the perimeter
Pouring the foundation
Metal reinforcement is installed in the prepared trench. The rods are fastened together with tying wire. The resulting space is filled with concrete.
For a columnar foundation, holes are made in the ground along the perimeter in 1 m increments using a hand drill. The depth of the pit is 50 cm, width 50*50 cm. Install the reinforcement. Sand and gravel 10 cm thick are poured into the bottom of the pit. Concrete is prepared from cement, sand and crushed stone in a ratio of 1: 2: 3. The prepared solution is poured into prepared trenches.
At the pouring stage, the solution is leveled and care is taken to ensure that the base is perfectly level.
Floor arrangement
Roofing felt is laid on the foundation in one layer. A frame is made of 10*15 cm timber on top. The elements are laid at a distance of 1 m. A subfloor made of 5*10 cm boards or plywood is laid on top of the frame.
The underside of the timber is covered with bitumen mastic so that upon contact with the ground the wood does not rot.
A film is placed on the boards for waterproofing. A lathing is made of 5*5 cm timber on top. The gaps are filled with insulation. Finished floor boards are attached to the top.
Expanded clay, mineral wool, basalt slab or polyurethane foam are used as floor insulation.
Walling
A wooden beam is installed horizontally on the prepared base. The distance between the beams is equal to the width of the insulation slab, but not more than 1 m.
The roof can be either gable or single-pitch
The outside of the frame is sheathed. Windows are placed at a ratio of 1:10. For 10 m2 of total area, openings with a total area of 1 m2 are made. The gaps between the beams are filled with insulation. To ensure that there are no gaps left, the corners are filled with frost-resistant foam.
Sheathing can be done with OSB, plywood or clapboard
Roof
Sheathing boards are placed on the rafters. The step between them is 50 cm. If a high snow load is expected on the roof in winter, the sheathing is done every 1-2 cm. Waterproofing is laid on the boards. Roofing material is laid on top.
A vapor barrier is attached from the inside and insulation is provided in the spaces between the rafters. Sew up the attic with plywood, OSB or boards.
Slate, ondulin, metal tiles or bitumen coating are chosen as roofing materials.
Lighting
In a winter chicken coop for 50 chickens, long-term lighting is provided for up to 14 hours a day with an intensity of 5-15 Lux and 60 Lux. Its color for chickens should be red. Therefore, lamps are selected based on the following parameters:
- incandescent lamps are suitable, but burn out quickly;
- fluorescent lighting sources are durable, but sometimes flicker;
- LED lamps are expensive, but reliable, and the brightness is easy to adjust.
When choosing lamps, pay attention to cost, burning time, color
Ventilation
Experts consider supply and exhaust ventilation to be the easiest option to install. You will need two pipes with a cross section of 15-20 cm and a length of 2 m and 0.5 m. The long part is the element for supply air. It is installed above the floor at a distance of 20 cm. The top of the pipe is brought above the roof.
The exhaust part is installed so that in a chicken coop for 50 chickens it lowers by 10 cm. The top is also brought above the roof. To ensure better air outflow, a fan is connected to the exhaust pipe.
Pressure is created in the pipes, so carbon dioxide and unpleasant odors come out and oxygen enters
Heating
Particular attention is paid to insulating a winter chicken coop for 50 chickens. In winter, the temperature should not fall below 5 0C. In case of severe, prolonged frosts, heating is provided.
It could be:
- oven;
- electric convection;
- gas;
- electric infrared.
The heating method is chosen based on cost, ease of installation and maintenance
Interior arrangement
A winter chicken coop for 50 chickens provides a sleeping perch. It is made from timber 4-5*5 cm. The two upper corners are cut off, giving a rounded shape. Climbing ladders are provided to the perch.
Placing the perch at the same level prevents competition between birds for a higher place
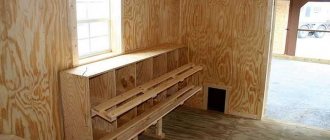
Also, in a winter chicken coop for 50 chickens, ten nests are made for laying hens. The nesting box is made of boards, plywood, OSB, or ready-made plastic boxes are installed. The boxes are hung from the wall or mounted on a rack. To make it easier to collect eggs, the floor in the nest is sloping. A ladder is placed so that the chicken can climb. One nesting box is made for five laying hens.
A winter chicken coop for 50 chickens is filled with feeders and drinkers. For home-made structures, pipes with a cross-section of 10-15 cm or a profile are used.
The nests and floor are filled with sawdust, hay or straw.
Insulation and vapor barrier
The walls in the chicken coop are erected using the chosen technology. There are no nuances here. Insulation, in fact, too, but it’s worth talking about insulation, since after all, this building has its own characteristics.
Lay thermal insulation between two layers of sheathing - and here you have a winter chicken coop
Mineral (basalt or glass) wool
Insulation with mineral wool is most often done if a chicken coop for 10-20 chickens is built according to the principle of frame house construction. The assembled frame is sheathed on the outside, laying a layer of waterproofing under the material (plywood, OSB, boards). At the same time, please note that there should be a ventilation gap of 2-3 cm between the insulation and the outer skin. This can be provided by strips stuffed between the posts or stretched twine (secured with staples from a stapler). The second option is less reliable, but faster and cheaper.
To insulate a chicken coop with mineral wool, it is best to use hard or semi-rigid mats. They are cut into pieces of the required length and inserted into the spacer between the racks on the side of the room. It turns out that on the outside they rest against slats or stretched twine. The thickness of the insulation is 5-10 cm (depending on the region) and the material of the outer cladding, but in any case, when installed, it should not protrude beyond the racks. If the width of the racks is not enough, and thick insulation is needed, planks/boards are placed on top of the racks.
Example of a chicken coop frame
During construction, place the racks at such a pitch that the distance between them remains 3-5 cm less than the width of the insulation. Due to its greater width, the insulation will hold on (the elastic force works). Just be careful: measure the actual width of the roll, and do not use the number that is on the roll. There may be a difference of a couple of centimeters, the edges may bend, so as a result it will be difficult to install the insulation, as it will fall out. When insulating, try to ensure that the pieces fit together without gaps. If they do exist, fill them in thin strips. The installed insulation can be fixed using ordinary twine and staples from a construction stapler.
A vapor barrier membrane is fixed over the installed insulation. In the simplest version, this is a film with a density of 200 microns. But it’s better to take a membrane for vapor barrier. It is attached to the posts with wooden planks, using small nails or staples from a stapler. At the joints, one sheet should overlap the other by at least 15 cm. Double-sided tape is used to glue the sheets together. This results in a double seam that provides a normal degree of protection against steam penetration. Internal cladding material (plywood, OSB, gypsum fiber board, gypsum plasterboard, boards) can be mounted on top of the vapor barrier film.
Why not an option? Also insulation... All that remains is to come up with something with the floor
So, when insulating a chicken coop with mineral wool, the wall pie looks like this (from inside to outside):
- internal lining;
- vapor barrier;
- insulation;
- ventilation gap;
- waterproofing;
- outer cladding.
The sequence of layers prevents moisture from penetrating into the insulation from the inside. This task cannot be completed 100% - vapors still penetrate. Therefore, it is necessary to have a ventilation gap between the insulation and the waterproofing. Due to this, the steam trapped in the insulation escapes. It is this construction that guarantees that the insulation will work.
Polystyrene foam and polystyrene foam
When insulated with polystyrene foam and polystyrene foam, everything is a little simpler. It is itself vapor-tight, so it is not necessary to protect it from steam penetration. If a chicken coop for 10-20 chickens is built on a frame principle, you can lay foam plastic between the posts. It is cut with a fine-tooth saw (for metal) and secured using polyurethane foam with low expansion. To prevent the insulation from leaking, strips are placed along the racks on both sides. You can lay polystyrene foam and expanded polystyrene both from the street and from the room. Sheathing can be done in any order. The only thing: on the street side, under the sheathing, it is better to fix the waterproofing. Especially for polystyrene foam - it “blooms” when exposed to large quantities of moisture.
Expanded polystyrene is also used to insulate chicken coops.
If a chicken coop for 10-20 chickens is made of vapor-permeable material (foam and gas concrete, timber, logs), it must be insulated with foam plastic from the outside. There should be a ventilation gap between the wall and the insulation, which will allow moisture to evaporate from the wall. To do this, a lath 20-30 mm thick is stuffed onto the wall. Then the counter-batten is stuffed in the opposite direction. The thickness of the bars is no less than the thickness of the insulation. Foam plastic/extruded polystyrene foam is fixed between the counter-battens on the mounting foam. Then, on top, you can install the outer skin.
Ventilation
Chickens feel fine in normal humidity. When they fall or rise, they begin to hurt (high humidity is more dangerous), so ventilation in the chicken coop should creep in during the planning period. A hole is made in one of the walls for air flow. To do this, you can insert a piece of plastic pipe into the wall and select a cover for it.
Ventilation is very important
The air outflow from the chicken coop (exhaust) is a pipe passed through the roof or the top of the wall. On the street, the pipe rises some distance above the roof and ends with a fungus or a canopy - for protection from precipitation and foliage. The supply and exhaust are located in opposite corners so that the air travels the greatest distance. This type of ventilation is called natural, but it does not always work stably.
For stable operation, a fan with a cover is embedded in the upper part of the wall. It's better if it has several speeds. The operation of this type of ventilation does not depend on the weather, but depends on the availability of electricity and requires human intervention. In principle, you can do both methods and use them as needed.
Do chickens need a home?
Not only farmers, but also owners of private estates who live in them permanently, as well as city residents who stay at their dachas from early spring to late autumn, breed chickens.
Regardless of how poultry is kept - in a fenced area or free-range, a house - a chicken coop - is required. She spends the night in it, lays eggs, and in winter she stays indoors all the time. Accordingly, there should be a place to place feeders and drinkers, as well as a perch, since chickens sit on a perch even in their sleep.
It seems difficult to build a house for chickens. However, there are certain recommendations that are advisable to follow. This will ensure the poultry’s health, growth, and ability to lay eggs. The latter largely depends on the availability of light and heat.
Therefore, it is advisable to order the construction of a chicken coop from specialists who are familiar with the features and nuances of such non-standard housing.