Proper laying of a brick stove is not only an architectural balance that preserves the durability of the structure, but also a guarantee of functional benefit and safety during operation. Setting up a barbecue is necessary even for an experienced master. Knowing each brick row with a given number of elements and exact location gives an invaluable effect in the speed of doing the work with your own hands and a high-quality result.
Users often search for: “How to build a tandoor.”
The term “ordering” characterizes two construction concepts used in one architectural field – bricklaying. It is this division that sometimes confuses a novice stove maker. It is important to keep ready both definitions, which by their name provide not only control of the masonry in rows, but also the order in which the masonry is executed.
If there is not enough time to build a furnace, we recommend contacting.
Where to start construction
Now the time has come to replace the old metal barbecue grill for the dacha with a good-quality brick grill.
You already have a rough idea of what it will be like. This could be a low table with a brazier or a solid structure that combines all kinds of cooking utensils.
The grill can become a central building, spreading the aroma of barbecue from the center of the site, or separate your dacha from the neighbor’s with a reliable wall.
Barbecue grill located in the center of the site
At this stage you need to decide:
- what functions should it perform,
- where it will be located: outdoors, veranda or in a gazebo.
If you like to cook a lot and variously, gathering large groups around, a complex with a barbecue, a stove for a cauldron, a smokehouse, a sink and other devices installed under the roof would be a good choice.
Minimalists who prefer to quickly cook dishes on skewers or a grill will opt for a simple-design barbecue grill.
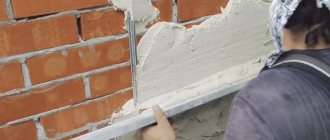
Laying process step by step
The masonry scheme is classic. The starting line is laid without composition. This measure will make the walls diligent and even. Marks for the positions of all subsequent masonry lines are indicated on the base.
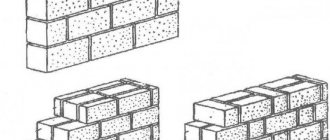
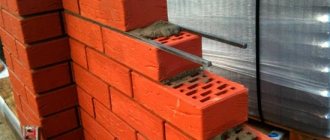
The laying of a brick grill is carried out using a chess algorithm: the next line is always shifted by half a brick
Before laying, make sure that the base has acquired the required strength. This usually takes at least a week.
Question with masonry composition
For the intended operations, two types of composition can be used.
- Standard. It will not come into direct contact with the flame. Based on the brand of cement, you need to calculate the amount of sand. So, for brand M25 the proportions are as follows: 5:1 (sand-cement). For M50 the ratio is 4:1. For M75 – 3:1.
- Fireclay type clay. It is sent for laying the combustion chamber. It is fire resistant and can withstand high temperatures.
The brick laying method is determined by the order of your preferred drawing. And even the slightest deviation from this order is not acceptable. To comply with the parameters:
- Carefully laying out the first line of bricks.
- Laying out the line starts from the corner. Then the side walls are created.
- The voids between the bricks do not exceed 1 cm.
- The correctness of the angles and the evenness of the masonry are controlled.
- The composition for the initial line must be thick.
- The bricks in the following lines overlap the seams of the previous line.
- When laying out subsequent lines, the verticality of the corners of the masonry is checked.
- Every third seam is reinforced. Steel rods or mesh are used.
In this case, the work follows the following order:
It is very important not to deviate from it. To check the evenness of the masonry, use a level and a vertical plumb line.
Lattice question
A base for the brazier is placed between two walls (opposite). Corners or rods are mounted here. They are metal. The creation of a combustion compartment is already underway on them. For this base you can use a metal pallet
An important condition is that ash must be easily removed from the combustion chamber.
In its area, side gaps remain in the masonry. This will allow air to enter the firebox. Without it, the fuel will not ignite
The appropriate height for this department is 10 masonry lines. This is approximately 70 cm. The bottom here is made of sheet metal. The top of the compartment ends with a concrete floor. One brick line is made in it.
Chimney issue
The easiest way here is to install a cone-shaped metal box. It should taper upward.
Creating a chimney from brick is a difficult task in itself. Even the slightest miscalculations in determining its height are not allowed here.
The combustion chamber and chimney are built only from fire-resistant bricks
Often the rear wall of the chimney is used to mount the chimney. In this case, three bricks are placed on the back side of this wall, and one brick on the sides. For the required height, 6 masonry lines are created. The front side of the chimney is covered with a concrete slab. One and a half meters of masonry is laid out in a pipe format. A canopy is placed at the top to protect the chimney from precipitation. Galvanized metal is used for its manufacture.
It is important to install valves to be able to further adjust the temperature in the combustion chamber
Scheme, drawing, project
The project with a drawing of a brick grill is ready! You can start building
Projects large and small begin with a simple diagram drawn on paper. You need to figure out:
- approximate overall dimensions of the entire structure - they will be a multiple of the size of the brick;
- position of the main elements;
- their sizes.
For a small barbecue, it is enough to sketch out the proposed pattern and follow it, not forgetting about the dressing between the rows. The dimensions in a drawing made independently may change slightly during the laying process depending on the brick used, the thickness of the seam and the embedded elements.
Banding is a method of laying bricks in a row relative to the previous row, usually by half a brick.
For more complex structures, a detailed project is developed based on the diagram, where all the nuances are taken into account. To lay a brick barbecue with your own hands, make up barbecue orders - diagrams for laying bricks in each row.
Simple brick grill
This design is very simple and can be easily modified to suit any needs and desires. It consists of brick walls in which projections are arranged (the brick is placed on its edge). Heat-resistant sheets (metal, etc.), grates, and skewers are placed on these protrusions. Convenient, especially if there is some kind of roof over your head in case of precipitation, but it is built separately and at will.
Project and photo of the finished brick grill/barbecue
Any brick structure requires a foundation, or at least a prepared foundation. Not even this small brick grill. Since there are not many bricks - the wall is half a brick - a compacted area lined with some kind of hard covering is suitable for this structure.
Preparing the base
Remove the fertile layer and, if necessary, deepen the pit. The depth should be about 20-25 cm. The dimensions of the foundation or platform are 50 cm larger than the dimensions of the stove in all directions. The bottom is leveled, crushed stone of the middle fraction is poured onto it. The thickness of the crushed stone layer is 15 cm. It is compacted well. It is advisable to use a vibrating plate, if not, a metal or wooden tamper.
Further steps depend on the selected base. If this is one of the coverings - paving stones, paving slabs and similar materials, then a layer of fine-grained sand is poured into which the covering is laid level.
If a slab foundation is chosen as the base, it is reinforced with a rod 10 mm in diameter. It is laid along and across the foundation in increments of 20 cm, and tied at the intersection. If you don’t know how to knit with special wire, you can tie it with plastic clamps. Reinforcement with a finished mesh of thick wire is allowed for this model. The formwork is placed around the edges and everything is filled with M250 concrete. Work can begin in a week if the average daily temperature was not lower than +20°C, and in two if it was +17°C.
Ordering (masonry drawings) and recommendations for masonry
For this brick grill, solid ceramic brick M200 is used. You can use a stove-type one, but it’s more expensive; you shouldn’t use fireclay: it’s not the right temperature and it doesn’t like moisture too much to feel normal in an open grill.
The masonry is laid using a clay-sand mixture, to which a little cement is added for greater strength. For beginners, it is better to take a ready-made mixture for stoves, but not heat-resistant, without fireclay. Knead according to the instructions, seam thickness - 3-5 mm, maintain strictly. Constantly monitor the verticality of the walls and the horizontality of the masonry. This is important for normal operation of the oven.
Arranging a brick barbecue (masonry drawings)
As you can see, everything is really very simple. Each odd row starts with a whole brick, the odd row starts with a half. In the 6th and 10th rows, the bricks are placed on a spoon - sideways, and turned across the main masonry. If you are making a barbecue - under the grate - in the same rows, the back wall is made of bricks, also placed on spoons, and to maintain the thickness of the masonry, they are placed in two rows, just like the rest - with bandaging - displacement of the seams. If you are going to use the grill for skewers, place a brick on the back wall, also on a spoon, making a ledge in this area as well. In front, a profile metal pipe of small cross-section, cut to size, is used as a support for the skewers. You can make recesses in it for skewers.
Starting from the 7th row, the laying is carried out only on half - right or left - as is convenient for you, but this layout is given under the frying chamber on the left - it is wider, and there is a table on the left. If it’s more convenient for you the other way around, do a mirror image of this order.
Brick is a hygroscopic material; in order to reduce the amount of moisture that it will “pull” from the base and extend its service life, waterproofing is needed under the first row. You can lay rolled material (such as roofing felt or waterproofing material) in two layers and apply hydrophobic impregnation around the perimeter. A layer of waterproofing between the first and second rows would not hurt either.
This is what one of the variations of a brick grill looks like without a table (if you don’t need one, just ignore this part)
After the brick grill is built, it is left to dry in warm weather for 1-2 days, in cooler weather - for 3-5. Then you can do a test run. Approximate “equipment” is shown in the photograph of the finished barbecue. This version has three rows of protrusions: the top one is for food, the middle one is for coals, and the bottom one is for collecting burnt coals and ash.
In order for a folded grill to serve more or less long, it is advisable to coat it with a composition that reduces hygroscopicity. For this case, KO-85 varnish is best suited. And it would also be nice to provide some kind of lid: close it in case of rain and for the winter.
Choosing an installation location in a country house or plot
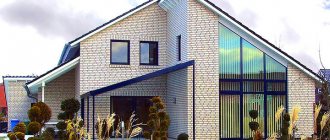
A barbecue grill is a stationary building that cannot be moved to another location. It fits into the site and becomes one of the main functional and decorative elements of the landscape. Therefore, it is important to choose a convenient place for it in advance.
Convenience of location
The location of the barbecue on a personal or summer cottage should, first of all, be convenient for use. Usually a path is laid to it and a resting place is arranged.
To prevent smoke from interfering with cooking and relaxation, it is necessary to take into account the direction of the wind that prevails in the area and locate the grill on the leeward side. If you choose a place too close to the house or summer kitchen, the smell of cooking dishes will linger into the house, but you won’t have to go far for various little things. If you are away from home, it’s the other way around. Usually, owners find a middle ground, preferring criteria that are more important to them.
You should not place the barbecue adjacent to the neighbor’s property. The smoke and smell of a fire does not delight everyone. What if the neighbors came to their dacha to get some fresh air?
Technical requirements
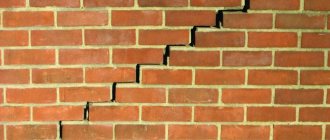
You should not place the barbecue in a wetland or constantly wet due to watering, because the brick structure will absorb moisture and collapse faster.
Constant moisture will cause the brickwork to deteriorate more quickly.
When installing a brick grill with your own hands, you also need to remember that this is a source of fire hazard. Sparks or fallen burning coals can cause fires in nearby flammable materials, trees or buildings.
When placing a barbecue on the site, you need to remember that this is a source of fire hazard
Therefore, it is recommended to follow the safety rules:
- choose an open place;
- the distance to trees, buildings, and parking areas must be at least 5 meters from an open fire, from the walls of the barbecue - 0.5 meters;
- do not store flammable items nearby;
- lay concrete tiles, stones, paving stones or other non-combustible covering around.
Covering with paving slabs for the construction of a brick barbecue with your own hands
The process of building a roaster
It is necessary to consider the step-by-step construction of a barbecue. Regardless of the project and design, the basic stages of construction are the same:
- Creating a foundation.
- Laying walls.
- If desired, the barbecue can be finished with decorative bricks or tiles.
- Manufacturing and placement of equipment.
- Arrangement of the food preparation area.
Now you need to figure out how to build a barbecue in stages.
At stage 1, the base for the furnace is created. A strip foundation is poured if the barbecue project involves a not too massive structure. If the owner plans to make cladding with decorative bricks or build a table or cupboard nearby, he will need a slab foundation.
When constructing a strip foundation, a trench is dug around the perimeter of the barbecue. And if they flood the entire area, they will dig a hole under the entire area of the furnace. The depth in both cases will depend on the weight of the structure. Typically, a brick barbecue does not exceed 1 ton. Based on this calculation, the sand and gravel substrate should be located at a depth of about 30 cm. To ensure that the trench is level, use a thread stretched between dug stakes.
The width of the trench and pit depends on the thickness of the walls of the future furnace and the boards for the formwork. The foundation is laid on the basis of: wall thickness plus 6-7 cm on each side. After making the trench, gravel and sand should be poured. First, sand is poured in a layer of 7-10 cm and compacted thoroughly. This can be done by filling it with water. Then there is a layer of gravel 5-7 cm, which is also compacted.
Before pouring the foundation, it is necessary to make formwork and reinforcement. The formwork is made of wooden boards or plywood. It is fixed around the perimeter of the trench and fastened with nails or self-tapping screws. The boards must be tightly connected to each other so as not to let the solution pass through. To prevent them from falling or tilting, secure them with metal rods or wooden pegs. To ensure that the formwork can be easily removed after the cement mortar has dried, it is lubricated with a special lubricant.
If the geometry of the wall lines is simple, scrap lumber can be used in the manufacture of formwork. But if it’s complicated, it’s better to take plywood.
Foundation
A stationary brick grill definitely requires a foundation, which is due to the significant weight of the structure. A reliable foundation is necessary even for a small grill if you want it to look presentable and serve for a long time without subsidence or cracks.
Work algorithm:
- Using a tape measure, pegs and cord, we mark the place according to the dimensions chosen in the project.
- We remove the turf and dig a hole 30-35 cm deep.
- Fill one third with sand, compact it, water it, tamp it.
- Add the same layer of crushed stone with sand in a ratio of 3:1.
- We waterproof the walls by laying roofing material so that it protrudes 10 cm above ground level.
- We construct formwork around the perimeter from boards or timber with a protrusion of 5-10 cm above ground level.
- We lay the reinforcing mesh.
- Fill with a solution of cement, sand and gravel, prepared in a ratio of 1:2:4.
The foundation must be poured in one go so that the slab is monolithic and does not crack.
After pouring, do not rush to erect a brick structure. The foundation should dry evenly and harden after standing for at least 2-4 weeks. During this time, you can cover it with film.
Ready foundation for barbecue
Reinforcement and mortar filling
To strengthen the foundation, it must be reinforced.
For these purposes, reinforcement or chain-link mesh is used. You can weld the metal rods together in advance or lay them in a trench. The net must be secured to pegs to prevent it from twisting. The reinforcement is laid so that a mesh with a side of a square of 10 cm is obtained. It is also advisable to prime it for better bonding with concrete. Pouring a monolithic foundation for a barbecue is no different from the same for a summer house or an ordinary living space. It must be done at once. Therefore, you need to make sure that you have enough materials. Otherwise, it will no longer be a monolithic foundation, and its parts may not be fastened together well. Then it can crack and burst in the cold season if there is moisture at the junction of the layers. Such a foundation will be fragile.
To create a concrete mixture, cement grade M 400 and higher is usually used. To ensure that the foundation has a flat surface, beacons are installed. This role can be played by metal rods installed at the same height along the perimeter of the formwork. Evenness is also checked by a level or fishing line stretched along the edges. After pouring the solution, its surface is smoothed with a spatula so that no irregularities remain.
To remove the formwork, you need to wait until the concrete mixture hardens. This usually takes several days. During this time, it is necessary to water the foundation with water to protect it from drying out. And you can move on to the next stage when, after 21 days, the concrete gains 70% strength.
Tips for building brick grills
- Laying begins from the corner. During work, it is important to check the verticality of the walls using a plumb line and level.
- The outer part of the barbecue grill is made of ceramic brick, and the firebox and chimney are made of fireproof fireclay. Sheets of basalt cardboard are placed in the gap between the firebox and the lining.
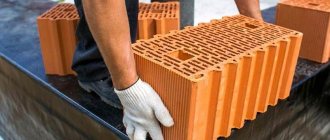
- Bricks should be soaked in water before use, especially if you are a novice mason. Wet brick will not absorb moisture from the mortar too quickly, which will help you complete the laying more slowly and with better quality.
- To try on, the row must first be laid out without mortar, and then laid out with mortar.
- When laying a large structure, to increase strength, craftsmen recommend laying a reinforcing mesh after every third row.
How to lay out bricks for a barbecue and oven first without mortar
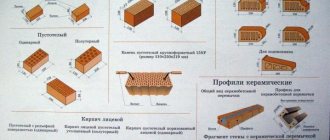
Materials
Considering that the furnace is constantly exposed to high temperatures, it is highly advisable to use special, so-called fireclay or oven bricks.
It is highly resistant to heat and temperature fluctuations, and is quite strong and durable. However, the price of such bricks is significantly higher than that of ordinary ceramic or silicate bricks. Therefore, many craftsmen, in order to save money, lay out with fireclay bricks only that part of the furnace that is directly heated, making the external contours with ordinary masonry material.
Important: special fire-resistant masonry mortar is used for fireclay bricks!
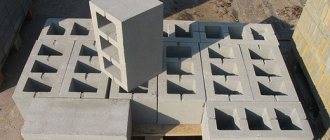
For better heat retention, the external contours of the stove and the supporting structures of tables, sinks and other auxiliary elements of the barbecue complex can be laid out either from solid ceramic bricks or from hollow ones.
A special mortar is used for laying stove bricks. It is better if it is a ready-made mixture or glue. If such a composition is not commercially available or you want to try your hand at making it yourself, you can try the technology proposed in this video.
DIY barbecue construction
Just as important is how you prepare the dishes. Some of the work can be done at home, but some must be done on site, outside. That's why these grills, which have a work surface next to the hearth chamber, and below it a charcoal chamber and other necessary accessories, are so convenient to use.
Brickwork BBQ - The height at which the countertop and also the grate with baking utensils is located is usually around 80 cm, but you can place them a little lower or higher, accommodating the height of the person who will often be the chef.
Proponents of “sit-down” gatherings can build a barbecue in which the hearth and grate are 50–60 cm above the ground. Rather, you're not grilling alone, so you'll want to make sure there's room around the fireplace for both the cook and guests. It is best with an asphalt surface on which garden furniture stands (or for the duration of the meeting).
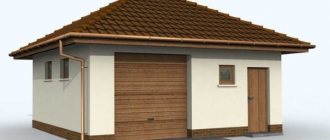
With the delights of baking, we can also enjoy the garden in the rain if we place the grill under cover. In the extended version, it is sometimes equipped with running water and light. However, before deciding on such an investment, we must ask ourselves: will we use this space in the garden often or only a few times during the season? Construction of a barbecue with photo examples:
Drawings and arrangement of the barbecue
Unfortunately, it is quite difficult to give exact figures - the size of the barbecue, the number of bricks. But in order to make it easier to navigate the approximate dimensions of the furnace and calculate the required amount of materials, we suggest looking at schematic drawings of the devices.
In addition to diagrams and drawings, it is also convenient to use the so-called ordering - the order in which the barbecue is laid out in rows. Using them you can immediately calculate the required amount of materials.
We also present to your attention a video on how to install a barbecue yourself.