Choosing a place for a brick grill
There are several very important parameters for landscaping a comfortable recreation area. As a rule, a barbecue for a country house is the “heart” of a landscape solution. So:
- The selected area should be protected from wind and dust; this is important when preparing food. It is also not advisable to irritate your neighbors with smoke, and in some cases the smoke may also be flammable.
- The surface for the construction of a brick barbecue must be leveled
- It is better if the distance to communications is not great (water, electricity), which will be useful to you when using the barbecue
- To increase service life, it is best to place the grill under a canopy, in a gazebo. Precipitation quickly destroys materials and worsens the appearance of the barbecue.
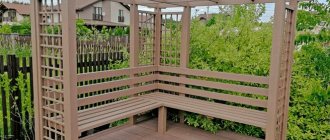
- Ergonomic arrangement of furniture will facilitate the process of cooking and ensure the joy of spending time together with the company
- It is better to place plants and beds that are important to your heart further away. Temperatures are not always favorable for plants
After you have weighed all the pros and cons, assessed and chosen a place to stay. You can look at photos of brick barbecues and start choosing a project.
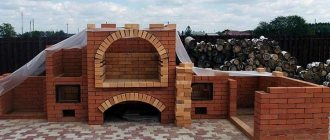
Barbecue oven-arch made of fireclay and textured brick
Stylish barbecue oven in the form of a parabolic arch by the famous architect Antonio Gaudi.
To build such a barbecue yourself, first of all you need straight hands, imagination, great patience and a desire to do something unusual.
You will also need:
- fireclay brick;
- fireclay plate;
- hand-molded brick;
- masonry mortar;
- oven masonry mixture;
- glass ceramics;
- copper;
- mullite-siliceous fire-resistant felt.
How old are you?
I have long been hatching the idea of making an unusual barbecue based on Gaudí’s parabolic arch. Finally, there were customers who liked my idea, and after making corrections and clarifications to the barbecue oven project, I began work.
Barbecue project in the form of an arch.
Laying the barbecue base.
Laying out the “body” of the stove according to a pattern (circle) in the form of an arch.
Intermediate stage of barbecue construction.
Covering the barbecue vault with bricks.
The chimney adapter and the chimney itself are decorated with old copper.
The sink on a granite countertop is located to the right of the barbecue and is covered with a shaped casing.
How old are you?
During the process of building a barbecue, the idea came up to install glass ceramics in the upper part of the parabola. This allows you to see the entire flame and admire the fire.
Original homemade barbecue
The result is a visually light and transparent design with an uncompromising view of the fire and the ability to grill meat.
Designing a barbecue
The big plus of a brick grill is its versatility. Often the design allows it to be used as a barbecue, roaster, spit and grill. With the correct layout of the grill, its capabilities increase. Often an additional bonus is the ability to smoke food or use the fireplace as a tandoor.
You can diversify the design with additional niches for storing firewood, dishes, and accessories. It is very convenient when preparing food to have a sink and a workspace for cutting meat on hand.
Often you need to organize a ash pit. Don't forget about the canopy for a comfortable stay. Here you should also take into account the presence of lighting, which contributes to good rest and comfortable work.
When choosing materials, it is better to consider:
- High temperatures (burning varies depending on the type of wood)
- Temperature changes (unpredictable natural conditions are also taken into account)
For example, you should choose a specialized fire-resistant brick. Silicate species are not functional under such temperature loads.
In fact, many drawings of barbecues can be found on the Internet. Most often, to find the right option you will have to process a mountain of information. For the perfect project, you will probably have to combine several variations of drawings. Individual elements you like can easily be combined and thus the project becomes individual.
It is best to draw a sketch to scale for orientation on the ground. It is advisable to take the size of the brick as a measure so that you do not have to cut it. With a functional drawing it will be easy for you to calculate the amount of materials.
Mini-stove in the shape of an egg: for warmth and soul
Original mini-oven, made by yourself.
How old are you?
I am engaged in laying stoves. One day I started thinking about what structures were still missing. After some thought, I decided to make an experimental mini-oven in the shape of an egg.
The miniature oven was made as follows:
- Half of the furnace core was made from fireclay and fireclay mortar (a refractory mixture).
- The outer shell of fireclay cores was made from clay bricks and iron.
- Metal stand for a mini-oven.
- Grate.
Ready-made egg-shaped mini-oven.
The oven halves are secured to studs.
How old are you?
The first fire was a great success. It is too early to talk about the performance characteristics of the furnace. But, already from the first firebox, the heating of the furnace is visible over the entire surface. With this shape of the stove, you can “heat” not only along the floor, but also the floor itself. Parts of the stove, made in the shape of hemispheres (or almost hemispheres), perfectly withstand thermal overloads.
The user’s further plans include: based on this diagram, make a full-size designer and functional stove-fireplace-egg. Its halves will open using an electric drive and bring the oven into operating mode.
Well, in the meantime, the oven does an excellent job of serving as a barbecue maker.
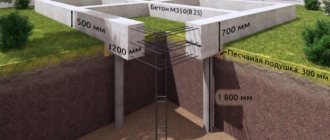
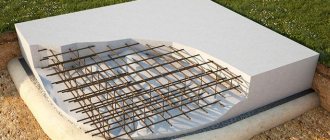
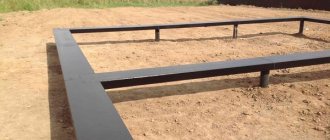
Foundation
Marking on the ground can be easily done using pegs and twine. We dig a pit for the foundation with a margin of 5 cm on each edge. The pit should have a uniform depth, without differences.
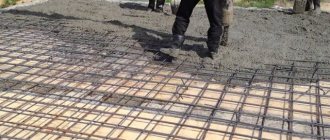
Then we cover the bottom with slag, after which we install formwork around the perimeter. We reinforce with metal, knit a frame or lay heavy iron with a mesh. Then we fill everything with concrete. It may take more than three days to harden.
How to make a round grill in the ground with your own hands
Often, summer residents do not want to bother with complex drawings when building a barbecue. You can do it simply and make it right in the ground.
The simplicity of the device and unpretentious design will not spoil the appearance of the site
The whole family can gather around such a fireplace on summer evenings. An additional plus: the roaster is multifunctional, suitable for preparing kebabs and grilled foods. It is easy to build a round brick or stone structure within a few hours.
To make a round brick grill in the ground with your own hands, you need to follow simple instructions:
- Clear the area of debris and remove vegetation.
- Draw an even circle on the ground using a barrel or large lid.
- Dig a hole with a depth corresponding to the length of the brick. It is important not to protrude beyond the edges of the circle.
- Line the inner walls of the recess with bricks, placing them vertically.
- Place a layer of sand at the bottom of the hole. This will limit the access of moisture from the soil.
- Around the pit, make an embankment of crushed stone, rubble, or lay out a decorative edging of flat stone. This will prevent the fire from spreading and burning the grass around the fire pit.
The round brick grill in the ground is ready.
Smooth brickwork in the shape of sun rays looks beautiful
Barbecue with smokehouse
For a smokehouse, it is important to design the firebox below ground level, which should be taken into account at the planning stage. It is also worth considering that all rows of bricks in the smokehouse must be tied; the chimney is often a closed trench.
Of course, only enthusiasts are carried away by such subtleties, since construction becomes more complicated and an ordinary barbecue becomes a two or three-level structure. However, all the efforts are worth it, because decorating the table with smoked game or fish costs a lot.
Brick barbecue projects: drawings, photos
Features: the length of the firebox should not exceed 1 m - this is enough for 8-10 skewers at a time. The width should be consistent with the length of a standard skewer - 47-62 cm. The height of the frying area is ideally just above the waist of the person who will cook.
Since a stationary barbecue often becomes the central decorative element of a site, this should be taken into account when designing and choosing a location.
Its reverse side looks like a solid brick wall, so it is advisable to position the structure so that it is not visible from the reverse side. Or provide for its decoration taking into account fire safety.
Subtleties of the chimney device
- If you plan to use the grill as a grill/barbecue/smokehouse, you need to think in advance where and what elements are removed so as not to interfere with the draft.
- It is better to construct a chimney from full bricks, this reduces the risk of malfunctions and emergency situations due to overheating.
- We recommend covering the chimney with a canopy for proper functioning.
- Use only non-flammable materials. If there is a canopy, it can be impregnated with special solutions.
- The smoke collector can be made of metal, this will make the design easier.
- With a complex vault design, a circle is used in the construction of the barbecue.
Schemes, drawings and masonry
Before starting work, you need to draw up a drawing with dimensions. Typically, the width of the barbecue is about 1 m. The length depends on additional options - stove, countertop, sink, etc., and the shape of the structure - angular or rectilinear.
The height of the working surface from the floor level is 70-90 cm, the brazier itself is about 60 cm. The top of the pipe, if the brazier is installed in a gazebo, is raised above the roof level.
The final dimensions of the barbecue are calculated based on the dimensions of the brick 250x120x65 mm and the thickness of the mortar layer 3-5 mm. It must be taken into account that the masonry in each row is carried out by bandaging the seams.
You can use a ready-made drawing from the Internet or develop your own unique design.
Metal barbecue - let's do it ourselves
The best option for self-production would be a portable grill made of sheet steel or stainless steel. You will be able to transport it and, accordingly, take it with you into nature.
Drawings of such mobile roasters can be easily found - their manufacture takes little time and also requires a minimum set of knowledge and tools.
Drawing for making a barbecue from metal
You should choose high-quality steel with a thickness of at least three millimeters.
brazier
- Fill the resulting “well” with crushed stone.
- Place the formwork. It is convenient to make it from thin plywood, wrapping it around the base and fastening it with wire.
- The thickness of the overlap is 8-10 cm.
- Place roofing felt or film on the bottom of the formwork (to save mortar).
- Secure the reinforcing mesh in the middle.
- Fill with concrete using sand, cement and crushed stone in proportions 3:1:3. Important: If you want to hide the ceiling, you will need to cover the base with another layer of brick.
- On top of the ceiling, be sure to lay a continuous row of bricks on the stove mixture.
- Line the ring wall of the roasting pan. Use baking mixture. Make air gaps in the first row. The depth of the roasting pan is 25 cm to the grate or space for skewers.
To make it easier to remove coal or ash from the roasting pan, place a slightly smaller metal sheet on the bottom.
Advantages compared to a standard barbecue
- During construction, available materials are used, so you significantly save your budget while protecting the environment.
- A simple barbecue can be assembled anywhere by a person even with zero level of preparedness, but with imagination and dexterity.
- There is no need to carry additional weight. This is true if you are planning a picnic without a car.
- A roasting pan made with your own hands is always of optimal, suitable dimensions, so the meat will not burn, but will become juicy and aromatic.