"Zodchiy" provides services for the construction of stone (brick) houses.
These can be houses based on standard designs, which, thanks to successful architectural and planning solutions, have been in constant demand for many years among a wide range of buyers and are excellent for the construction of social housing within the framework of government or industry programs. And there may also be high-status mansions, respectable villas, built according to individual projects for people with a high level of aspirations. Moreover, “Zodchiy” is ready to design and build not only a dwelling, but also an entire architectural ensemble - an estate with a bathhouse, a garage, garden paths and, of course, a recreation area, a grill or barbecue, a family nest in which everyone will feel cozy and comfortable family members, regardless of age and hobbies.
Advantages of stone (brick) houses:
Strength. Stone walls, including brick ones, can withstand large static loads, which makes it possible to build reliable houses with several floors and does not limit home owners from using heavy floor or hanging furniture.
Durability. Brick is a fireproof, wear-resistant material that is characterized by high resistance to environmental influences. According to various estimates, a brick house can serve its owners for more than 100 years. The ability to retain heat in the house for a long time. Thanks to the optimal thermal inertia that brickwork is characterized by, in winter, even if the heating is turned off, brick houses retain heat for a long time. There is plenty of room in the use of finishing materials. When decorating a stone house, you can use almost any finishing materials, creating real masterpieces of architectural and design art.
We employ qualified, experienced, creative architects. When designing each house, they take a special responsibility to the safety and reliability of the future facility, and also successfully solve issues of general ergonomics and functionality of the building. When developing a unified stylistic composition of the house, our architects use original design solutions that make it possible to make its appearance interesting, harmonious and very expressive.
It is worth emphasizing that when designing, the company’s specialists pay great attention to the economics of the house, creating an economically feasible object and thereby saving the customer from wasteful, unreasonable expenses.
You can order the construction of a stone house at the Zodchego exhibition grounds, which are open daily from 10.00 to 20.00.
Today, building a brick house is one of the most expensive processes.
But this is compensated by the extraordinary quality of structures made from this material, as well as their durability compared to other materials. Brick is an artificial building material. The choice of brick varieties is very large, depending on the scope of its application and purpose. In the process of constructing large buildings, brick is used as a facing material. The special advantages of using this material include the fact that, thanks to modern technologies, brick houses are built not only with high quality, but also in a fairly quick time. The price of building a brick house is from 19,500 rubles per m2 Discuss the project with the manager Leave your details, the manager will call you back soon If this cost is too expensive for you, we recommend that you familiarize yourself with the prices for construction from other materials.
What you need to know before construction
Design
Before you start building a house, you need to do some preparatory work. It is noteworthy that you will not be able to simply buy a plot of land and start building a house there. More precisely, you can do this, but such construction will be illegal.
First, you need to obtain a building permit from the district administration. To do this, you need to collect the necessary package of documents: an application for construction, copies of ownership, purchase and sale, passport and other documents. Among them there should be drawings of the future construction, and coordination with various services. Once your application has been reviewed, you will be issued a building permit. This can be done after the completion of construction work through the court, but still, in order to avoid problems, it is better to take care of this in advance.
Preparation also includes choosing a location, planning, and purchasing materials. It is also important to decide on the type of foundation, choice of brick, installation method and roofing material. If you prepare and think through everything in advance, then all the work will go easier and faster.
It is important to decide what work you can do yourself and what should be entrusted to specialists.
After everything is done, you can begin construction. All work can be divided into the following stages:
- Selection of tools and materials.
- Brick selection.
- Planning.
- Work on pouring the foundation.
- Walling.
- Roofing.
- Finishing work.
So, let's take a closer look at how to build your own brick house.
Stages of building brick houses
In past publications it has been repeatedly noted that if you have a clear plan or guidelines for action, it is much easier to follow construction technology. (For more details, see “High-quality construction organization: how to do everything right and save your budget”).
Now let's take a closer look at the construction stages. So, what does the construction of brick houses include?
The process of building brick houses
Design
The construction of brick houses begins only if there is a ready-made project: either individual or standard, with subsequent reference to specific construction. At the same time, the approximate cost of future construction is calculated.
Note! The project and all calculations for it are carried out in accordance with the requirements of SNiP and qualified specialists. This is the basis of the basics, so you should not engage in amateur activities without specialized training.
Before performing design calculations, it is desirable to have some initial data that allows you to determine the properties of the soil, landscape features, the influence of climatic conditions, and also makes it possible to calculate the cost of construction at each stage.
Subsequently, design solutions (a project for the construction of a brick house) help to monitor the progress of the work being carried out and control the work process in the complex.
Brick house foundation
Foundation structure
A brick house, even if it has only one floor, is not a lightweight structure. Therefore, the basis of the building is a reinforced concrete strip, or a strip foundation, reaching the depth of the soil freezing. It is dangerous to start building brick houses without solid support.
The strip foundation is located under both external and internal load-bearing walls, and its width is calculated to accommodate the main load-bearing wall, insulation layer and facing masonry.
As a result, we get the strongest and most reliable foundation for the future structure. But it should be understood that this significantly increases the cost of the project itself.
Note! The price of a deep strip foundation can be about 30% of the cost of the entire frame structure of the building.
Masonry of internal walls
Construction of walls and internal partitions
Based on the calculations made, the project justifies the type of foundation chosen, the type of material, and the method of laying. Further, depending on the tasks set (lightening the structure, increasing the thermal insulation of walls, maintaining a certain style, etc.), the construction of brick houses can be carried out using one or more installation methods.
House designs take into account all the loads placed on the walls, the operating conditions of the building, and the architectural features of the structure. Based on these factors, the type and brand of material (brick) is selected.
Note! Consultants from manufacturing plants, if necessary, will help you decide on the type, brand, size, as well as prices for the selected brick. Also, they can calculate the bricks for building a house.
Procurement of tools and materials
Tool
Building a house is a simple task, but it requires some effort, skill and planning. But even with all this, it’s impossible to imagine construction without the necessary tools and materials. Therefore, for such work you will need the following tools:
- building level;
- level;
- construction hammer;
- trowel, trowel;
- Bulgarian;
- jointing;
- plumb line;
- construction cord;
- shovel;
- concrete mixer.
Sand for masonry mortar
If we talk about materials, you need to purchase the following:
- brick;
- cement;
- lime;
- sand;
- plasticizer or liquid soap;
- fittings;
- plywood or boards;
- insulation (slag, mineral wool, polystyrene foam, expanded clay);
- hydroisol or roofing felt.
All this can be purchased at any hardware store.
Which brick to choose
Brick
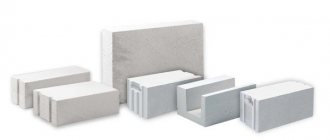
Since you can find different types of bricks in construction stores, you should decide which brick to build a house from. The most popular and leading options are red clay and sand-lime bricks. When laying, they can be used separately or combined with each other. As experts advise, when laying, you can add insulation to the middle. Since such bricks are quite heavy, the load on the foundation will be corresponding. To reduce it, you can use a brick with cells. This is a lightweight version of regular brick, which weighs 20% less than usual.
To ensure smooth, beautiful and reliable masonry, do not buy bricks that have already been used. Your material must be intact, of the correct shape and without cracks.
Once all the necessary tools and materials have been prepared, you can proceed to the next stage - planning.
Main stages of construction of brick buildings
The construction of a brick house involves a number of sequential actions, of which the actual technology of the process consists. These include:
Types of bricks.
- development of project documentation;
- procurement of materials and tools;
- laying the foundation;
- erection of walls (with or without cladding) under the roof.
Success in implementing each of the construction steps depends not only on how accurately the workers follow the instructions of the foreman. The technology of building a house requires understanding from all participants in the process of the task and the final result. Only in this way will it be possible to successfully complete the construction of the building on time and without unnecessary financial costs.
Stage two - home planning
Home planning
As you know, you can’t build something without planning everything first. Therefore, first it is important to decide what the building will be used for. If this is a small country house in which you plan to live during the warm season, then you can build it in half a brick. If the residence is not permanent, but at any time of the year, then the walls can be laid in one brick. In this case, the building will even support several floors. Well, when you plan to build a house for permanent residence, the thickness of the walls of such a house is recommended to be one and a half bricks.
Plasterboard partitions
If you decide to build a one-story house, then the construction of the foundation can be simplified. In this case, the walls of the house will be made of plasterboard. There is no need to reinforce them. But when the partitions are built from brick, the foundation will look different. Since the future building will be made of brick, which has a high density and, accordingly, puts a large load on the foundation, the foundation for your house must be strong enough. The most reliable is a strip foundation, the design of which exactly follows all the lines of the walls and partitions of the building. Then you need to pour a foundation under each wall and partition. In this case, the entire load from the walls is distributed over the entire area of the soil, and therefore the stability of the building increases.
Cost of building brick houses
Prices for building brick houses consist of several components:
- design;
- Construction Materials;
- applied technologies;
- modern equipment;
- laying utilities;
- climatic and landscape features, etc.
Brick house in hilly terrain
All this will largely determine the cost of building brick houses, which significantly exceeds the cost of construction from most alternative materials. Today, the cost of a brick house averages 19,000 - 22,000 rubles per 1 square meter of area.
This amount includes all necessary materials and components, as well as the implementation of key types of work.
Types of work that determine the cost of building brick houses
- foundation in the form of a slab of 250-300 millimeters with excavation and insulation with extruded polystyrene foam over the entire area of the foundation slab;
- construction of all load-bearing walls according to the project. Typically, red hollow bricks are used, which are laid in 3 sections with a width of 380 mm;
- installation of two reinforced belts along the entire perimeter of load-bearing walls;
- construction of load-bearing interior walls 200-250 millimeters;
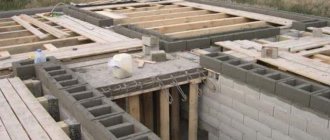
- installation of the ceiling between the 1st and 2nd floors using wooden joists with a pitch of 600 millimeters;
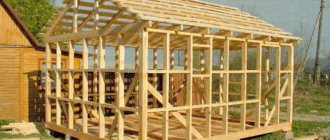
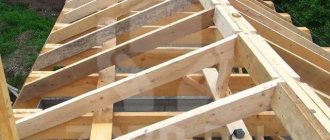
- installation of a rafter roofing system with insulation and the use of vapor barrier;
- roof installation;
- concrete lintels over window and door openings;
- installation of metal-plastic windows, finishing of slopes, installation of ebb and flow;
- installation of a metal entrance door, finishing of door slopes;
- installation of a ventilation shaft made of solid brick under a fireplace or hood;
- treatment of all wooden elements with special antiseptics and fire-fighting compounds.
Brick porch in the form of arches
Additional expenses
We must not forget that the construction of turnkey brick houses also includes costs for equipping with engineering systems, interior finishing according to the developed design project and costs for the complexity of the work, depending on the wishes of the customer.
In this regard, one should approach the issue of building brick houses quite rationally. It is advisable to first consult with specialists, study the modern construction market, communicate with friends who have already dealt with this issue, etc.
Based on the information received, you need to realistically assess your capabilities and only after that begin searching for craftsmen and choosing a project.
Materials for brick construction
I would also like to draw attention to the fact that when starting the construction of brick houses, it is very important to know the calculation of the total cost of all work. It is this knowledge that will help you quickly navigate the construction services market and rationally plan your budget.
If the amount is limited, then when calculating bricks for building a house, it is best to resort to by entering the query “Calculation of house construction” or similar on the Internet.
Automated systems are good because they take into account many factors when making calculations: area of the building, type of foundation, wall material, number of storeys in the building, number of doors and windows, roofing material, floors and finishing of the building facade, etc.
Turnkey brick house
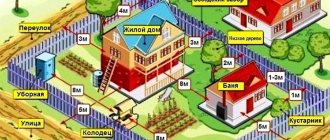
Marking the future site
In order for your building to have the correct location, and to avoid unnecessary problems during the construction process, you need to make markings on the soil that correspond to the plan of your house. Drive pegs into the ground in places where the corners of your building will be, as well as in places where walls will be built. This must be the actual size. Then take a rope or thick rope and stretch it over all the pegs. Thus, you have made a certain guideline that will help you dig a trench for the future foundation. You can check the horizontality of the tensioned rope with a regular level.
After everything is done, all that remains is to take shovels and dig a trench according to your guidelines. To do this, you can ask your friends, relatives or neighbors for help, since it will be very difficult to do everything yourself. Moreover, when the house has several floors, the depth of the trench can be up to 2 m.
Foundation formwork
Formwork for the foundation trench
Based on the technology, the foundation needs to be built 10–15 cm above ground level - this is the minimum. In regions with harsh winters, the base can be even 40–50 cm. To achieve this, you need to install formwork along the edge of the trench. It can be made of plywood or ordinary boards.
In the case where the surface of the site is uneven, you need to find the highest point and push off from it.
In order for the foundation to be made in one plane, the formwork must be brought in height to the tensioned rope and supports must be made. It is important to remember that the higher the formwork is, the more often and closer the supports need to be installed. If this is not done, the mass of concrete can crush the entire structure, causing it to flow or become uneven.
In order for the formwork to reliably hold the concrete, it must be made strong: without holes or gaps, as concrete can leak through them. Planed boards or plywood are often used for formwork, but you can choose other material that is on hand.
Pillow for strip foundation
Before you start pouring the foundation, it is important to make a cushion at the bottom of the trench by pouring small gravel, stones or sand into it to a depth of no more than 5 cm, after which it must be compacted. If you don't have a vibratory plate or compactor roller, you can use a homemade device. To do this, take a wooden beam with a cross-section of 150×150 mm with a height convenient for you and attach handles to the sides. Using brute force, compact the entire trench. Thanks to such a cushion, the shrinkage of the building will be much less, and the building itself will be more stable.
After this, the reinforcement cage is laid along the entire length of the foundation. To assemble it yourself, you will need:
- fittings Ø10–17 mm;
- fittings Ø5–8 mm;
- thin wire for knitting;
- Bulgarian;
- wire cutters;
- pliers.
You need to calculate how much reinforcement you will need in advance. It is important to take into account soil data and the number of floors of your future home. We can say for sure that if you build a three-story house on loose soil, then everything will be to the maximum - both the depth of the foundation and the diameter of the reinforcement. To make an accurate calculation, you need a whole topic where all the subtleties and nuances are taken into account, so it is better to use a calculator.
Pouring the foundation
It is important to know that the foundation can be monolithic or prefabricated. The monolithic foundation is made immediately on site. To do this, a concrete solution is mixed and poured into the prepared trench. A prefabricated foundation consists of ready-made slabs that are laid in the ground. A monolithic foundation, which can withstand enormous loads, is much better suited for a brick house. Even if you build several floors of the house, a basement and a garage, the structure will hold securely. The only drawback of a monolithic strip foundation is that it is not recommended to use it in soft soil. The best option would be a pile foundation.
So, it's time to pour the foundation of your home. To ensure the strength of the foundation of the house, pouring should be done in horizontal stripes in one step. If you fill it partially or make separate vertical sections, then there is a high probability that these joints may crack. Therefore, everything needs to be done quickly and not without additional help. Ask a friend or relative to help you, as additional hands are simply needed in this matter.
Mixing the concrete
The first thing you need to do is mix the concrete. This is a labor-intensive process that involves making the concrete and transporting or transporting it to the location where the pouring takes place. To pour the foundation, you will need a lot of concrete. If the depth of your trench is more than 60 cm, then after you have poured the first layer of concrete, throw rubble stones there and continue the process.
After you finish pouring the formwork, you need to compact the concrete by expelling the air from it. A deep vibrator is well suited for this purpose. But since not everyone may have it, you can use a thick stick to compact the concrete with up and down movements. After such manipulations, the concrete surface must be leveled with a trowel. Generally, concrete dries within 5–7 days. But you need to start laying bricks only after a month, when the concrete has gained strength and is not malleable.
Foundation for a brick house
Whatever arguments are given in favor of foundations on piles or concrete pillars, the best option for a brick house will only be a strip foundation. Reliability and low complexity of execution simply leaves no chance for other types of foundations. The tape is located under all load-bearing walls and some partitions. The width of the foundation is necessarily 15–20 cm greater than the thickness of the walls. The set of tools and materials for laying a strip foundation for a brick house is as follows:
- to prepare the mixture you need cement, sand and aggregate in the form of gravel or crushed stone of the middle fraction;
- roofing felt or any materials produced from it, for waterproofing the base;
- to raise the formwork above the ground you will need unedged boards or plywood;
- reinforcing bars;
- mixer, containers, shovels, theodolite and any device for “removing” air from the thickness of concrete.
Schematic drawing of a strip foundation.
At the construction site, the soil is cleared of foreign objects. The top 10 cm layer of soil is removed along with the turf. Further work is carried out according to the situation. If a basement is planned for the house, then a pit is dug to a depth below the freezing level of the soil. If such construction is not provided, then only a trench of the appropriate size is prepared. When working manually or using hired equipment, it is necessary to ensure the evenness of the corners so that the foundation slab is without distortions, which will subsequently affect the evenness of the brickwork. The depth of the trench or pit for the construction of a basement or ground floor must be the same.
Depending on the type of laying of the strip base, and there are two of them: monolithic and prefabricated, further work is also carried out according to plan. When pouring cement mortar, the bottom of the pit is first covered with a sand-cement cushion, watered, compacted and covered with waterproofing. The preparation ends by pouring a small layer of solution.
When laying a prefabricated base, the same manipulations are performed, with the difference that the cushion is laid in the place where the slabs are installed. This is a more complex option for laying a strip foundation, and to implement it, you will need special equipment or at least five people. The blocks are installed in the trench and bonded with concrete mixture.
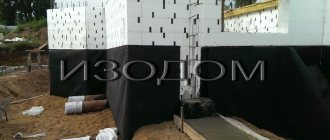
Waterproofing works
Foundation waterproofing
An important step before laying walls is waterproofing the foundation, thanks to which moisture from it will not penetrate into the house or basement, and the brick will not collapse. In this way, you will extend the service life of the foundation of the house and protect yourself from the formation of fungi and dampness.
Such work can be performed after the foundation has hardened. Everything is done quite easily, the main thing is the presence of a waterproofing material (waterproofing or roofing felt). It needs to be laid or glued to the foundation in 2-3 layers. After construction is completed, all excess pieces that will protrude should be trimmed. The base of the building should be coated with molten bitumen.
Types of masonry
- Solid masonry made of solid or hollow bricks. The coldest option. It is mainly used for the construction of internal partitions and outbuildings.
- Masonry with an air gap . Made from any type of brick. An air gap is left between the outer and inner rows of masonry, which is then filled with heat-insulating material.
- Well masonry . Also performed in 2 rows. Every 3-4 bricks laid in the usual order, 1 brick is laid flat, forming “wells”, which are then filled with insulating material.
- Three-layer masonry with insulation . It is carried out by laying a layer of insulation on a wall laid out in 1.5 bricks. Then the facing brick is laid. It is rigidly connected to the main wall using steel anchors. It is considered the warmest method of masonry, however, the rigid metal bond between the masonry may not always be reliable and may collapse over time. In addition, there is a high risk of moisture settling on the insulating layer, which threatens the formation of mold.
The choice of installation method depends on the type of brick used and the average annual temperature values that determine the requirements for thermal insulation. The layer of mortar in the joints should not exceed 15 mm.
When doing masonry, do not forget about the need to bandage the seams to give the building strength. The essence of the dressing is to overlap the vertical seams of the lower rows with the top row of bricks.
The basis for masonry is mortar
Solution
After a month, you can begin work on the construction of the brick frame of the building. First you need to make a solution, thanks to which the entire structure will hold securely. The main type of mortar is cement-limestone, limestone or cement. The basis or base for any of them is sifted sand (it is better if it is river sand). To find out how to make a solution and in what ratio to take the components, just look at the packaging, where everything is indicated. The most common proportions of sand with cement or lime are 3:1 or 4:1. In this case, the future masonry will be very strong, and it will not be difficult to make, since the solution will be inelastic.
To find the best quality ratio of materials in the composition, you need to test them in action, because sometimes you come across low-quality cement. You need to make several compositions with different proportions, for example, 3:1, 4:1 and 5:1. You don’t need a lot of composition - you will only need it to make small balls from them. Wait until they are all dry and then hit them with a hammer. Pay attention to the ball that, upon impact, cracked and did not crumble - this is the ratio of components that must be chosen for the manufacture of this ball.
Brick selection
For the construction of brick structures, two types of bricks are mainly used:
- Sand-lime brick consists of quartz sand and lime in percentage terms. It has the following properties:
- has a porous structure that allows the walls to breathe;
- good heat and sound insulation;
- has frost and heat resistance;
- excellent external qualities.
Brick has several types, depending on its filling during the manufacturing process, these are hollow and solid.
Sand-lime brick
Sand-lime bricks are light in weight, which allows them to be used for finishing buildings.
- Ceramic brick is made from clay of fine fractions. It has the following advantages:
- high strength;
- resistant to various destructive influences;
- has high thermal conductivity.
- The construction of cottages is also made from ceramic blocks with a porous structure, which provide not only good stability and strength to the walls, but also a high level of heat conservation, as well as good air exchange.
Ceramic brick
Houses made of ceramic bricks are not only durable, but also environmentally friendly, since the material is produced from natural raw materials.
Construction of brick walls
The main points of laying brick walls
Once the mortar is ready, you can begin laying bricks. You need to start by drawing out the corners. The first bricks must be laid especially carefully and carefully, since further masonry and the general appearance of the future building depend on them.
At first it may seem that such work is simple, brick to brick and you're done. But it is very difficult for inexperienced masons to make the walls perfectly smooth and geometrically correct. To do everything right, you need to try and be patient. This type of work is long and tedious, but you will gain practice that will help you further. What do you need to do?
- The first bricks need to be placed in the corners. Use a water level to check the horizon and level everything if necessary.
- You need to stretch the string along the top edge of the brick and fix it perfectly straight.
- The twine should not bend or interfere with the masonry - it should be well stretched and serve as a guide for perfectly even masonry.
- After this, lay the base row of bricks. In order for them all to fit perfectly, they need to be tapped with the handle of a trowel, while aligning everything with the twine.
- In the case when you make the outer part of the wall with facing bricks, you need to do jointing. It must be done with a fresh, uncured solution. Then the surface will be protected from moisture, and the house will look aesthetically pleasing.
- After the first row is ready, the twine needs to be moved in the same way and fixed. Then lay the next row of bricks in the same way, not forgetting about the dressing.
- After every third row, you need to use a transverse bandage of the wall.
- Don't forget about the walls. Everything is done the same way. If you want to do them later, you need to make sure that there is a bundle from the load-bearing wall, from which you can continue laying later. To do this, you need to leave a ladder of bricks in the place where the wall will be built.
- When you have reached a certain height, you need to make openings for the windows. It is necessary to provide in advance the places where the openings for the doors will be.
To ensure quality masonry, you need to check the position of each brick.
You need to check the position of each brick
At this point, the frame of your future home is ready. All that remains is to make the roof. It is difficult to carry out all the work on your own. Therefore, ask for help from professionals who will provide you with a reliable roof over your head.
Now you can be proud of yourself, because you yourself were able to make every person’s dream come true. As you can see, building a house on your own is difficult, but possible. Therefore, if you plan to make a cozy home for yourself and your family, buy the materials and get to work!
Brickwork: building brick walls
Brick buildings surround us everywhere. They learned to use this material for construction back in ancient times. Houses made of raw bricks were discovered in the oldest settlement of Neolithic people - Çatalhöyük. The technology for constructing brick structures is called masonry. Brickwork is used in mass construction and in the private sector. People who do masonry professionally are called masons. You can learn this craft on your own, then when working in your dacha you won’t have to resort to the services of professionals.
The process of learning to become a mason is complex and requires many hours of practice. In this article we will try to cover all the main issues related to brickwork. Knowledge of technological processes and tools will be useful not only for those who are planning to master bricklaying in practice, but also for those who plan to build a house using hired crews.
To practice masonry with your own hands, it is best to start with a small facility, such as a brick smokehouse, barbecue, or small shed. It is very important to become familiar with the basic tools of a mason. All tools can be divided into those used for preparing mortar, for applying mortar to bricks and measuring devices.
- Concrete mixer (concrete mixer) – construction equipment for preparing building mixtures. In order not to spend a lot of time and effort on preparing solutions, concrete mixers are used. Concrete mixers can be manual (driven by rotating a handle) or electric (driven by an electric motor). Electric stirrers can operate without human intervention. Constant rotation prevents the solution from hardening. The drum itself can rotate, but the blades remain motionless. In some designs, the blades rotate but the drum is stationary.
A frame with wheels makes it easier to transport the mixer around a construction site or summer cottage.
The design of the concrete mixer uses a gear motor or a crown as a drive mechanism.
- A drill mixer makes it easier to mix the solution. The drill can operate at low speeds with high torque and has a special stirrer attachment.
- A trowel (trowel) is a spatula-shaped hand tool designed for manipulating thick substances – solutions. A mason's trowel consists of a cloth polished on both sides. The handle is made of plastic or wood. The handle is connected to the canvas by a special bracket. At the end of the handle there may be a special striker for tapping bricks during laying. The dimensions of the trowel depend on the specifics of the work from 150x100 mm to 200x100 mm.
Trowel with a wooden handle and a steel striker at the end
The ease of working with the tool depends on the trowel handle. An inclined handle on the bracket of 4 - 5 cm allows you to avoid getting residual solution on your hands when tapping.
- A mason's pick is a tool for splitting and shrinking bricks. On one side of the head there is a firing pin, on the other there is a sharp blade. The handle can be made of wood or plastic with rubber inserts. Rubber protects the hand from vibration; wood is more pleasant to the touch, but with intensive work it quickly becomes unusable and requires replacement.
Rubber coating reduces vibration when working with a mason's pick
- Jointer is a tool designed for jointing seams. The joints are equipped with plastic and wooden handles. They have a narrow feather, which is given various shapes (convex, straight, oblique, triangular, etc.). The jointing feather allows you to penetrate the seam and level it after laying.
The jointing is used to rub the seam
- A mortar shovel is intended for applying mortar to masonry or for preparing a mixture. The blade is shaped like a scoop, which makes mixing the solution easier. The handle is made of wood or fiberglass. A D-shaped handle is sometimes placed at the end of the handle for ease of use.
Large bucket volume makes it easier to feed the solution
- Containers for solution - containers for preparing the mixture. Depending on the size there are several types. Plastic containers can be round or rectangular, usually their volume does not exceed 100 liters. To prepare large quantities of solution, metal containers of 200 liters or more are suitable.
The container for the solution is equipped with sling rings for moving using cranes or other lifting equipment
- Water container – to prepare the solution you will need water; for convenience, it can be poured into a special container. A bucket or plastic container is suitable for this.
- Plumb Line – refers to measuring instruments for checking straight vertical lines (plumb line) on corners, walls and posts. A plumb line is a steel cone-shaped weight on a rope.
The weight of a mason's cord plumb line reaches 1 - 2 kg; lighter products are used in calm weather
- A level is a measuring device for determining the horizon line. Inside the level there is an air bubble, which by its movement shows how much the surface has deviated from the horizontal or vertical
- The rule is a rod with a measurement scale. The rule is made of wood or aluminum. The rule is used to measure the evenness of walls.
You cannot use only one measuring instrument and neglect the others. Level, plumb and rule are used together, complementing each other.
- Ordering - a steel or wooden strip for measuring rows of masonry. The order is attached to the corners and allows you to measure the height of the next row along with the seam.
- A mooring is a nylon thread or fishing line that is stretched between two corners to control straight lines in the rows of masonry.
Before we start talking about the masonry itself, we need to say a few words about terminology. The spaces between brick blocks are called seams ; the seams are filled with mortar and connect all the elements of the building into a monolithic structure. Seams can be vertical or horizontal. Horizontal seams are made continuous; in most wall masonry they are located parallel to the ground and the horizon line. The only exceptions are specific types of masonry (arches). The vertical seam should not be continuous; if there is a continuous vertical seam in the wall, then the masonry technology has been violated. Professionals call this method of placing bricks ligation of seams .
All brick surfaces have their own names. All of these terms are used by professional masons. The bed is the upper and lower planes of the brick. The spoon is two long side planes. The poke is located at the ends of the product. The rows in which the bricks are butted together are called spoon rows (named after the surface on the front side). If the bricks are in contact with the butts, then such a row is called a spoon row.
Bandaging the seams allows you to form a monolithic structure. The top rows fix the bottom ones. There are a large number of different dressing systems, but the most common are single-row, three-row and multi-row.
- Single-row ligation is a method of creating a monolithic brick structure when alternating spoon and butt rows occurs.
- Three-row dressing - suitable for the construction of posts that need to be stabilized. With this method of laying, three rows of spoon rows are tied with one tying row.
- Multi-row dressing differs from three-row dressing in the number of rows connected; there can be 5 or 6 of them.
Decorative masonry - spoon and interlocking bricks alternate, while the interlocking brick has a different color
Decorative masonry is allowed on the front side, when bricks of different colors form a certain pattern.
The seams between blocks of bricks are made differently depending on the purpose of the masonry.
- Pustoshovka is a rough version of the seams, designed for subsequent plastering. A space unfilled with cement is left between the bricks. When plastering, the solution enters this space and improves adhesion to the surface.
- The undercut is used to create a smooth brick surface. The solution completely fills the entire space to the edge. The undercut is used for cladding.
- Joining is an additional processing of the seam, which includes giving the seam a certain shape. Often a special tool is used for this - a jointer. Professional masons make jointing themselves. Depending on the shape of the tool, the seam is curved, concave, oblique, triangular or double-cut.
The thickness of the walls being built affects the masonry. In the central and northern region of our country, two or two and a half bricks are used for the external walls of houses. If the building is two-story, then the thickness of the walls on the second floor can be made narrower. At the same time, there are a large number of variations of masonry of different thicknesses.
Types of masonry depending on the thickness of the walls
- Half a brick (15 cm) - bricks are laid in a row one after another. This thickness is allowed when constructing partitions inside a house to divide the space into rooms. In this case, the wall should not be load-bearing. Single brick masonry can be strengthened using reinforcement.
- In one brick (25 cm) - the bars are adjacent to each other with spoons. This type of masonry is used for load-bearing walls in the interior of a house or extension.
- One and a half bricks (38 cm) can be used to build the external walls of a house for one-story structures. This type of masonry uses two layers of bricks. The inner one is closed with spoons, the outer one is closed with pokes, as when laying half a brick. With this method of building walls, a layer of insulating or soundproofing material can go between the two layers.
- Two bricks (51 cm) - two layers of brick wall follow each other. In both cases, the bars are closed with spoons.
- Two and a half bricks (64 cm) - the wall consists of three layers of brick. Two rows are closed with spoons, one with pokes. This wall thickness is suitable for capital private houses. For the outer layer, facing bricks can be used, and for the internal layers, construction bricks can be used. The wall can provide high-quality thermal insulation and strength, but due to the high consumption of bricks and mortar, the house will cost much more.
Brick in masonry is only half the battle. A solution is a substance that performs a binding function. After application, the thick substance hardens and gains strength. Depending on the composition, types of solutions are distinguished.
- Cement is the most commonly used type of mortar; it contains water, sand and masonry cement. The preparation of the solution usually takes place right at the construction site; in this case, auxiliary tools (concrete mixers, drill mixers) come to the rescue. The use of cement mortar allows you to create monolithic, durable structures, while low-quality ingredients or a violation of the technology can lead to cracks and damage to the integrity of the material.
Cement production technologies vary; the most popular type is Portland cement. It consists of gypsum, crushed cement clinker and calcium silicates. The name of cement is associated with the English island of Portland, where a similar-colored stone is mined.
- Limestone is prepared from sand, water and quicklime. The material is used for the construction of partitions indoors, since the substance has poor resistance to moisture. In this case, the resulting solution has high plasticity.
Mortars for buildings in ancient Greek and Roman cities were based on limestone. The Romans added additional ingredients to lime solutions that increased resistance to moisture. Some of these buildings have survived to this day.
- Lime-cement mortar contains both cement and lime. Combines the beneficial properties of two types of solutions.
- The stove mortar is intended for stove masonry, as well as for the masonry of outdoor barbecue grills. Typically the stove solution is used for the interior of the firebox. For preparation, a mixture of sand and clay is used, which is subjected to long-term pre-soaking.
- Dry masonry mixtures - in fact, are a ready-made solution - diluted with water and you can work. The components are in optimal proportions, so it is difficult to disrupt the cooking technology. Masonry mixtures contain additional ingredients that increase the characteristics of the final product (strength, density, ductility, frost resistance).
When using cement, the proportion may often change in favor of sand. When trying to save money, no cement is added to the solution. As a result, the mixture loses strength and the frozen solution may crack. Such a distortion cannot occur with a ready-made mixture.
Maintaining the correct proportions is an important component of a good solution. There are no universal recipes; you have to mix them depending on the composition. For lime mixtures, 4 parts sand to 1 part lime is typically used. For cement mortar, the grade of cement is important. The brand is designated by the letter “M”, the number is the compressive strength. For M 500 you will need to make a proportion of 1 part cement and 4 parts sand. For M 300 – 1:3. The amount of liquid affects the consistency of the solution. The master proceeds from climatic conditions - in hot weather they make more liquid cement so that it does not set longer. Also, the thickness of the mortar is selected for specific masonry and types of brick. Beginners are advised to add water to the future solution in small doses to make it easier to select the desired consistency.
To obtain solutions of different shades, various additional ingredients can be added to it. For example, for a black solution, soot is added during mixing.
The preparation procedure itself can be carried out either manually or using specialized equipment and tools. Manual mixing is usually done using ordinary shovels. All ingredients must be purified. The sand must have a fraction of more than 2 mm and must first undergo a sifting process. Unsifted sand may contain pebbles and debris, causing problems for the mason. The finished solution must be stirred periodically to slow down the setting process.
The solution consumption is influenced by many factors. For 1 sq.m of masonry, 75 liters of mortar will be required if the thickness of the masonry is one brick. The consumption can be increased by the lack of professionalism of the worker and the structure of the brick (in hollow bricks, the mortar flows into the holes). The quality of the brick and cracks also affect; unevenness will require more mixture.
Brick laying can be done in different ways. Masons have developed two main methods: butt and press.
- End-to-end - with this masonry method, the mortar is laid on the bed of the brick lying below. The top row of bricks is placed and, using its weight, forces the mortar onto the vertical plane of the adjacent block. Excess mortar is removed using a trowel. When applying the solution, it is necessary to make an indent from the front side.
- Pressing is a method in which the mortar is driven onto the vertical surface of an adjacent brick using the edge of a trowel. The solution is placed on the bed with an indentation of 10 mm from the front side, while leveling it over the bed. There is a version of this method when the solution is applied to the butt of the brick being laid (when laying butt to toe in spoon rows)
Butt laying Butt laying
Professional masons sometimes practice this method of masonry, when the mortar is applied to 3-4 bricks at once. Beginners are advised to apply the mixture for one brick, since due to lack of skills, the applied solution will have time to dry out.
Brick wall construction technology
The construction of the wall begins after completion of work on the foundation; laying the first layer requires a lot of experience and is a responsible undertaking on which all further construction will depend.
- Laying bricks is a stage that is recommended for beginners. Professional masons usually do without it. The first row of bricks is laid without mortar on the foundation.
Roofing felt is laid between the foundation and the brick.
- We level the levels - for leveling we use a rope or fishing line - a mooring, it is stretched between two corners and ensures alignment on the front side. Sometimes the mooring is tensioned both on the inside and on the outside. Orders are fixed at the corners - this is a scale that allows you to mark rows of bricks with seams.
- The laying of the first row is adjusted using a level. In order not to measure the distance from the front side each time, a steel rod is placed on the edge of the brick.
It is useful to have several rods of different lengths in stock. A long rod is laid along the front side. Short ones can be used to fill a vertical seam.
- The laying of subsequent rows is done from the corner. The mooring is being pulled to a new level. Each brick is controlled by a level. Shrinkage is done with the back of a trowel or a mason's hammer.
- Reinforcement - reinforcement is added to the masonry every 2-3 rows. Its diameter should not exceed the width of the seam.
- After completion of the masonry, when working with the outer layer of the wall, jointing is carried out.
Brickwork is a complex and labor-intensive procedure. The complexity of the masonry depends on the thickness of the walls and the methods of dressing. It is better to master the craft of a mason from simple types, practicing on half-brick walls. It is not recommended to take on the construction of a house without experience in masonry; in this matter it is better to turn to professionals. Knowledge of the specifics of work and tools will be useful in designing and estimating construction costs.
Blueprints
Brick one-story residential building – Cottage
Two-story brick residential building
Brick house with garage
Project with a garage
Project of a one-story brick house 250 m2