Stage I. Design
So, to begin with, we advise you to draw up a detailed project that will help you make a gable roof with your own hands without flaws, distortions and similar problems.
Functionality of a barn roof
First of all, decide on the functionality of such a design. So, often a gable roof is combined with an attic, even if we are talking about an ordinary shed. For example, so that you can bring in hay or simply unnecessary things to dry:
Gable roof installation
The purpose of the shed will determine whether you will cover it or leave the space under the roof open and ventilated. Basically, you will need to pay attention to the following structural elements:
The two slopes of such a roof are connected at the ridge. To organize the roof overhang, so-called rafters are made - special elements that are slightly smaller in thickness than ordinary rafters and essentially extend them beyond the walls of the barn.
The same beam that connects the rafter legs is called a tie. The tie is used only when the rafters for the shed are made hanging - without special support on the internal wall or partition, which are rarely found in sheds on their own.
Installation of a pitched roof
But remember that projects for a shed with a pitched roof involve the construction of two separate pitched roofs that do not have a common ridge:
Therefore, if you wanted just such a roof, consider it as a combination of two single-pitched roofs, with all the construction features of such, but not as a gable roof. As for how to properly build pitched roofs, there is a lot of wonderful material on our website.
Arrangement of the roof of the barn
Many of those who are looking for answers on how to build a shed
They are looking not for theory, but for practice. Next, according to theory, as a rule, is the process of covering the walls of the barn, but sometimes you can and should do it differently.
The barn, as already mentioned, has an optimal pitched roof structure. What does this give? This design makes it possible to install a fairly high door in the front part and at the same time, does not make the entire barn excessively high.
When you cover relatively large areas with roofing material, when calculating the required material, you always take it with a small margin. From the roofing material that was purchased to cover the extension to the house, what remained was the roofing profiled sheet. In fact, the size of the shed was predetermined by the remnants of the corrugated sheet, since I did not want to buy additional material.
Frequent rains determined the further order of work. And although the construction of a barn consists of successive stages, then came the construction of the roof. The roofing sheet is laid with an overlap.
The corrugated sheet is fastened using special roofing screws with a rubber gasket (sealing washer) that prevents the penetration of water through the fastening hole.
If desired (or if there are no roofing screws), you can choose painted screws to match the color of the roofing material. According to the rules, 8-10 pieces are used per 1 meter square. Again, according to the general rules, corrugated sheeting is attached to the elements of the roof sheathing in the places adjacent to them, and to connect two sheets together in the upper part of the sheet wave. The pitch angle of the roof, among other things, determines the distance between the hardware: the greater it is, the smaller the distance between the hardware.
But on small, very small areas of the roof, you can deviate a little from the rules - after all, during heavy rain, water flows down the lower parts of the roofing sheets, and over time, sealing gaskets on hardware tend to dry out in the sun and lose elasticity. And there is information that when installing self-tapping screws in the lower wave, the sealing rubber washers begin to collapse after 4-6 years.
Therefore, in this case, hardware screwed into the upper wave of the corrugated sheet is quite sufficient. Important nuances that cannot be ignored when attaching corrugated sheets are the correct position of the screw and the depth of screwing in the screw.
Make sure that the hardware fits into the sheathing at an angle of 90 degrees, and also that the sealing washer is pressed tightly against the corrugated sheet, but no more than necessary: do not overtighten either.
The most basic way to install roofing screws is to use a hammer. Using a self-tapping screw, using a hammer, you pierce the metal, and then use a screwdriver with a screw-in attachment to drive the self-tapping screw into the roof sheathing element. To avoid overtightening the screw, use a screwdriver only at low speeds. Although, to make a hole in the corrugated sheet, you can attach a metal drill of the required diameter in a screwdriver and make holes with it.
Stage II. Preparatory work
But before preparing the material for the rafters, build a foundation and walls. This will determine how strong and complex you can build the roof itself.
After all, this element of the barn also has its own weight, and it is impossible, for example, to build a heavy massive roof for flimsy frame walls. Just as there is no point in being afraid of creating extra load on walls that were built from strong and durable material.
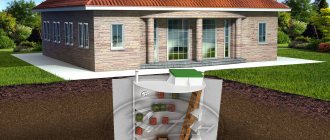
Construction of the foundation
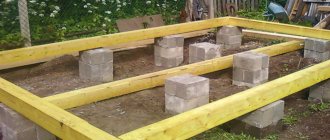
For a small garden building, a small wooden foundation, which is treated with antiseptics to prevent rotting, is quite suitable for you:
For a massive barn with heavy walls (for example, made of stone), you will have to build a solid strip foundation with different recess depths. And as a foundation for a medium-sized shed, a columnar one is ideal:
It is not worth calculating complex exact loads on such a foundation, as is usually done for an entire residential building, but intuitively you should understand that the durability of the building depends on the quality of the foundation, but “burying money in the ground,” as professional builders like to say, is also not worth it .
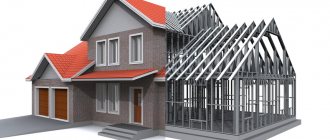
We calculate the material for the rafters
Now let's move on directly to the construction of the roof itself. Rafters are wooden or metal beams that serve as a load-bearing element of the roof. You can strengthen the trusses for the roof of the barn with special internal partitions, which have their own names:
Here is a good example of how these elements are implemented in live construction:
The finished gable roof trusses are regular triangles if you are building a symmetrical roof, and scalene triangles if you are building an asymmetrical or asymmetrical one. But, if your barn has an internal wall, it is better for you to build a gable roof using a system of layered rafters, which are additionally supported by such a partition. But all this will need to be mounted at height, and not in advance on the ground.
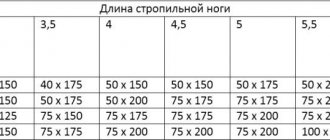
We would also like to offer you our online calculator for calculating such a roof. It's absolutely free.
Choosing material
Depending on how heavy the roof of your shed will be, decide whether you need wooden or metal rafters:
The only disadvantage of metal rafters is that they have considerable weight and require skill when working with them. And, in particular, you will have to weld metal at altitude.
For wood, take coniferous species, but not lower than first grade and with a moisture content below 18%. Be sure to treat future rafters with an antiseptic and use fire retardants for fire protection. Working with such material is a pleasure:
Only a template for them must be made in advance if you want to end up with a smooth and beautiful roof. Find time for this, and the process itself will become easier:
And how to correctly connect the rafters in the ridge, the illustration we prepared will help you:
If we are talking about the simplest small shed, then build the following simple rafter systems for it:
Construction of the foundation, base and frame of the barn
It all starts, of course, with the foundation for the barn
. Since the soil at the site where the shed is installed is predominantly sandy, and the weight of the planned building is not large, the simplest method of constructing the foundation for the shed was chosen.
About 10 cm of the top layer of earth was removed along with turf according to the size of the future barn. The entire selected volume of earth is replaced with sand, and the sand is spilled with water and thoroughly compacted. Next, slightly chipped and defective concrete tiles 6 cm thick, remaining from the old paths, were laid directly on the sand.
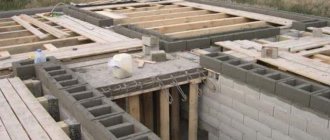
The next step was to assemble the frame of the shed
. First, the base of the frame is made. The base is a rectangle assembled from two longitudinal and five to six transverse lumber elements (joists).
In practice, this means that you can use the lumber that you have available: it can be timber (150×150 mm; 100×150 mm; 100×100 mm;) edged board 100 and 150 mm wide and 50, 40 mm thick. In a word, make what you have.
Having assembled the base from the board, you need to fasten it together, making the floor of the barn (rough or finishing - whatever). In this case, the floor of the barn was thick, oil-painted, moisture-resistant plywood.
If, when assembling the base, you do not use timber, but an edged board, then install the board only on the edge.
Now you can proceed directly to assembling the frame of the shed. We install corner posts at the corners of the shed base. The roof of the barn is pitched
, so the rear corner posts should be shorter than the front ones.
Install additional racks, and since the barn is not large, their number is determined by the size of the material (plywood, chipboard) you have, with which you will subsequently cover it. Although the installation of additional racks can be postponed until the rough covering of the walls.
To temporarily fix the corner posts, install side supports (it’s better not to nail them, but to use self-tapping screws - then just unscrew them).
Installation of a shed frame
Next, using self-tapping screws and connecting corners, we mount the upper trim. The upper trim, like the lower one, can be made from either timber or boards. The elements of the top trim are fixed to each other and also attached to the corner posts.
You don't have to use corners, but if you don't want to bother with filing, this is the nicest thing to do. Galvanized plates are perfect for wooden structures.
After this, we install the roof sheathing. Once again, I repeat, the material for the sheathing can be either timber or board. The distance between the sheathing parts is around 40-50 cm. The edges of the sheathing elements should protrude 10 - 15 cm beyond the perimeter of the base of the shed.
Stage III. Making a Mauerlat
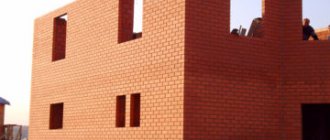
If the walls of the barn were made of brick, concrete, blocks or other similar moisture-transmitting materials, then the rafters of the gable roof should rest on these walls through a special wooden block. It is called Mauerlat.
Otherwise, damp walls that are wet from rain will transfer moisture to the wooden elements of the roof. As a result, they will rot, collapse and warp the roof. We don't need this, do we?
But the main task of the Mauerlat is to evenly transfer the load from the roof to the walls of the barn. A Mauerlat is not always needed: the simpler and smaller in size your outbuilding is, the more simplified its construction will be. And if the barn is large, but its walls are made of timber or stone, for example, then you should not worry about the point pressure of the roof rafter system.
You can connect the rafters to each other and to the Mauerlat either using special metal fasteners or by cutting.
Similar in function to a mauerlat, a log is a timber that is placed on the interior walls of a barn, if there are any. It also takes on part of the pressure from the rafter system:
That's all the wisdom of building a barn rafter system.
Rough sheathing of a barn
Next comes the rough lining of the shed walls - the next stage in the construction of a shed in the country. If you still have unused plywood after renovation, then it will do just fine. Its color and thickness do not play a determining role. The main thing is that the plywood is not rotten or swollen from moisture. After all, we want to build a barn
, not just how, but cheaply. If you do not intend to line the shed in the future, try to place the best side of the plywood inside the building when installing it.
If the material with which you are sheathing the outside of the shed is strong enough, then you can not install additional racks, but fix it from the inside using additional slats. Whatever is more convenient.
Plywood shed interior view
After installing the plywood on the side planes of the barn, it was covered with roofing felt, also left over from the previous building. The use of roofing felt is not at all a mandatory step in the construction of a shed, but it is certainly not harmful.
Also pay attention to the additional fastenings from pieces of board nailed diagonally in the upper corners of the shed. Their fastening significantly increases the overall rigidity of the shed frame.
Installing additional posts at the front of the barn could undoubtedly increase the overall stability and rigidity of the structure. But initially a double door was planned. The reason is simple: it was assumed that it would be possible to temporarily store large items in the barn that would definitely not fit through the opening of one standard door.
Stage IV. Installation of sheathing
Here's another common question: how tight should the sheathing be? It all depends on what kind of roofing you will use. If it is quite heavy, such as ceramic tiles, then both the rafters and the sheathing must be solid. If it is a light soft roof, rolled materials or polycarbonate - simpler, but without exceeding the pitch between the rafters by more than 60 centimeters.
Much also depends on the chosen angle of inclination of the roof: if it is steep, the sheathing is built more sparsely, if it is flat, then it is almost continuous.
Of course, a win-win option would be to make a fairly dense sheathing that will take on the main loads from the snow and the roofing itself. But this is an additional consumption of material.
Slate roof
This is already a budget option, which is most often used for these purposes. Slate has been a popular material for many years. He has not lost fans thanks to the following characteristics:
- Fire resistance.
- Does not rust.
- Does not deform.
- Easy to install and repair.
- Does not get hot when exposed to the sun.
To lay slate with your own hands, you need:
- Make the sheathing staggered. It is made perpendicular to the rafters and parallel to the ridge.
Stage V. Insulation and ventilation
Now let's note this. The fact is that the barn belongs to the category of those buildings that are usually poorly insulated and not heated in winter. Therefore, they always have certain problems with condensation, dampness and mold. That is why we recommend that you build such a roof ventilated, or at least partially ventilated. True, then the roof itself will be close in its design to the roof of a real residential building. And in this case, you need to think about ventilation, insulation, and everything so that the insulation in the roof does not rot.
The roof overhang itself is already colder, and the snow, which has melted a little on the main section of the roof, will begin to freeze on it again. The result is long icicles, a destroyed drain and many other problems. Not to mention the fact that such a phenomenon destroys the roofing itself. And roof ventilation allows you to cool the roofing from the inside, thus preventing the snow from melting.
There are three types of roofs based on the type of ventilation:
- Ventilated;
- Non-ventilated;
- Partially ventilated.
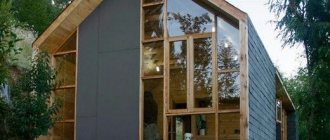
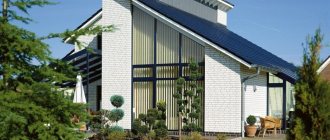
For example, in such construction, the entire under-roof space remains free, the attic floor is not equipped, and therefore the air circulates well in it:
But in this project, a full-fledged attic is being built, which will have dormer windows and natural or forced ventilation:
And to protect the walls of the barn from rain, the roof needs to extend beyond them by at least 20 centimeters. It is advisable to hem this overhang, despite the fact that it is still a barn.
Stage VI. Roof covering
You can cover the roof of the barn with any material that you have in stock, or it is possible to get it at a low price. But for now, slate remains one of the most popular materials, despite the noise around it lately. And all because of its cheapness and durability.
The only thing we recommend to you is to adhere to personal safety rules when installing such roofing, namely, wear personal protective equipment when cutting. And keep in mind that slate itself is a heavy material, and therefore a fairly dense sheathing should be made under it.
We hope that our article will help you understand everything!