Performing a roof calculation
The design of a hipped roof seems simple at first glance, but this is a big misconception. The design seems to be simple, however, without accurate calculations, the rafter system may turn out to be weak and will not withstand wind or snow loads. To make an independent calculation, the first thing you need to do is draw up drawings of the future hip roof. This process requires compliance with basic rules:
- the diagram should show all dimensions of the base, that is, width and length;
- It is imperative to take into account the slope angle of the slopes;
The shape of the base of the hip roof is the parameter from which you will first have to start.
The best shape for a hip roof is a square.
In this case, the side slopes will represent an isosceles triangle. Using a square base shape makes it easy to calculate the total area of the hip roof, which is useful when purchasing roofing material. The calculation is made using simple geometric formulas from the school curriculum:
- Calculate the area of one slope, that is, an isosceles triangle.
- Since a hipped roof with a square base has all the same slopes, their total area is calculated by multiplying the area of one triangle by four.
- Next, calculate the area of all eaves overhangs. They represent the shape of an isosceles trapezoid.
- All results obtained during the calculation process are summed up.
Online calculators help simplify the process of independent calculations, where you just need to enter the exact data and get the finished result. In this picture you can see an example of calculation using the formulas:
Here is a drawing of a hip roof:
Step-by-step roof installation
This type of tent structure involves the assembly of all elements in order:
- Mauerlat installation;
- installation of mowing beams;
- installation of central supports and struts;
- installation of special spigots;
- roof sheathing;
- vapor barrier film flooring;
- waterproofing layer flooring;
- the last step is the roofing.
It is important to follow the sequence of work and not jump from one stage to another. Otherwise, the quality of the roofing structure may decrease
ab521b3d65a8c1c1e9dde0403159c229.jpe
13dbe6948d7236a0e44b932cbdad9f68.jpe
ed47d500272f3c509d1eb26a306d4fa4.jpe
Installing the system yourself
Installing a rafter system for such a roof is considered a difficult task. Therefore, everything must be calculated accurately. In this case, the ceiling is done only after the construction of the structure, but not before. Step-by-step installation is as follows:
- First, a Mauerlat is installed on the surface of the walls. It is secured with anchors. But a layer of waterproofing material is placed under the base. For these purposes, roofing material made on the basis of mastic will serve. For wooden walls, special strapping is performed.
- The slanted rafters are secured and installed in the corners. To do this, you need to cut off those edges of the boards that will be at the top of the roof so that they create an edge. To install slanted rafters, you must use a mortise beam. If the wall is made of brick, then metal clamps made of reinforcement are used to fix it to the Mauerlat, and for wood, ordinary staples are used.
- In the middle of the entire system, supports are installed.
- In those parts where the slopes are located, diagonal slats, braces and struts are installed. This will help prevent damage to the roof from strong gusts of wind.
- Next, the installation of trusses, extensions and struts is carried out.
- The boards are being filled.
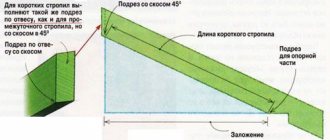
To install diagonal beams, it is recommended to maintain a right angle. It is necessary to make the correct calculation of the rafter beams in order to obtain an overhang for arranging the box. To lengthen the rafter legs, “fillies” are used, which lengthen the beams.
Additional factors used in the calculation
When determining the size of the roof base, it is necessary to take into account which part of the building the roofing system will rest on. It depends on the building material chosen for the construction of the walls of the house:
- the hip roof of a wooden house rests on the top frame;
- in stone or brick buildings, the support is the Mauerlat;
- if the construction of a hipped structure is planned for a log house, then the main support will be the upper rows.
We've sorted out the walls, now let's move on to the rafters:
- The rafter system has a certain installation step. For rafters up to 3 m in length, the distance between them is maintained at 1–1.35 m.
- If the length of the elements is from 3 to 4 m, then the pitch is 1.4–1.7 m.
- For rafters with a length of 4 to 6.5 m, the distance between elements is 1.1–1.35 m.
- Large rafters with a length of 6.5 m are mounted in increments of 1.1–1.4 m.
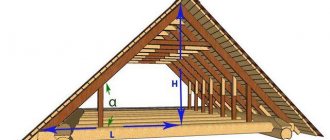
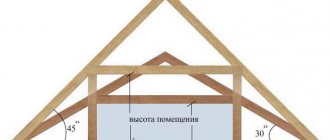
The next important indicator is determining the angle of the slopes. A hip roof is usually built with slope angles from 40 to 60 degrees. These indicators can be changed depending on the roofing material used:
- if the hipped roof is covered with tiles, then the slopes are mounted at an angle of 30°;
- for asbestos-cement slate, a slope from 14 to 60° can be maintained;
- The smallest slope of the slopes has a roof made of rolled material, which is 8-18o.
Proper consideration of all these parameters will help to build a strong hip roof. Although it should be noted that it is better to trust such calculations to specialists, otherwise a minor mistake can disrupt the imbalance of the structure, which will lead to its rapid destruction.
Roofing installation
For a hip-type roof, do not lay the roof covering one degree at a time, for example:
- flexible tiles are installed at a slope of 8-18 degrees;
- asbestos-cement materials are installed at 14-16 degrees;
- metal tiles are installed at a slope of 30-60 degrees.
In addition to the main roofing materials, specific types can be used, for example, reed and reed options. The reliability and durability of such a roof is reduced to a minimum, especially if the region is in harsh climatic conditions.
Basically, flexible and metal tiles are used for complex roof shapes. The material is significantly more expensive, but has a long service life. In the first case, a special gas burner is used for installation. The material is fused by heating the flexible tiles and roof base. And in the second case, the sheets are secured using a screwdriver and self-tapping screws. Coating is always done from the bottom up.
The waste of the roofing covering will be large, since the roof has a shaped shape and trimming is indispensable. This must be taken into account when calculating material consumption.
If the work will be carried out alone, then you should be patient and strong. After all, at all stages of assembling a roofing product, you will have to support a beam somewhere or supply a roofing sheet. Therefore, it is advisable to include another person in the work who will help in difficult situations. However, if such a roof is intended for a small gazebo, then in this case you can cope on your own.
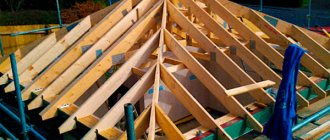
Types of rafter systems used
The strengthening element of the entire building and the basis for laying the roofing is the rafter system. A hip roof involves the use of two types of such structures:
The hanging system is used on large spans where there is no possibility of installing internal supports or for buildings without internal walls. All structural elements are mounted on external walls with the installation of wooden or metal ties. The upper part of the rafters is connected to each other at one point, and the outer walls serve as the lower support. Self-installation of a hanging system is very difficult, and repairs will also not be easy;
The inclined system is universal and simple. Its support can be external or internal walls, as well as additional supports installed on a concrete base. An inclined system for roofs with slopes less than 40° would be the best option. When installing supports, a maximum distance between them is allowed - 4.5 m. If the span reaches 6 m, then it is necessary to attach struts under the rafters. The construction of this system is more economical.
Having decided on a suitable rafter system for the house, you can begin building the structure.
Roof design and installation
In the process of planning the installation of a roof, you must first decide on its type. You can use the services of experienced craftsmen who will help you create a project and select the necessary consumables for it. Information is also available from various sources for independent study, including photos and videos of the installation of roofs and roofs.
Stages of roof installation:
- Installation of a mauerlat (beam laid around the perimeter of the outer wall to support the rafters);
- Assembly and installation of the rafter system, securing them to the ridge;
- Installation of horizontal couplers;
- Installation of waterproofing material;
- Installation of sheathing;
- The final arrangement of the front surface of the roof.
Construction studs are used to secure the roof structure to the walls of the building. Under the rafter system there are supporting roof niches, which are fastened to each other with strong wire or reinforcement.
In order to correctly design the roof structure, you need to take into account the shape and volume of the building, the location inside the load-bearing walls, whether an attic will be installed and what the appearance of the building as a whole will be.
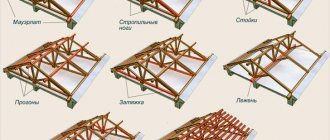
What does the rafter system consist of?
For the construction of the roof frame, softwood with a moisture content of no more than 20% is used. To increase their service life, wooden blanks are treated with antiseptic solutions. The entire rafter system consists of the following elements:
- The main support of the frame are two elements made of timber. The Mauerlat is placed on the outer wall, and the bench is placed on the inner wall.
- Vertical posts are needed for rafter legs.
- Slanted or, as they are called, slanted rafter legs form the ribs of the slopes. Their greater length requires the use of thicker blanks due to the increased load.
- Narozhniki form the surface of the slopes.
- The struts are installed to the rafters at an angle of 45°.
- The crossbar connects two rafters, positioned horizontally.
- The sheathing serves as the basis for laying the roofing.
It should be noted that the standard size of lumber is 6 m. Longer rafters used are made type-set or glued.
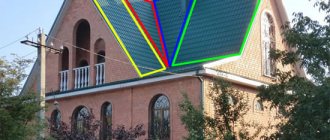
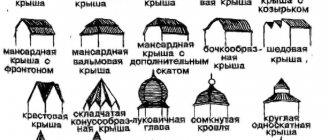
Hip roof options
The name “hipped roof” combines several roofing options that have structural differences.
Classic hip roof
A single-level hip roof is geometrically a tetrahedral pyramid. A two-level roof is a more complex structure: the upper part is a pyramid, the middle part is a cube or parallelogram, the lower part is a truncated pyramid. It was as if the top of the roof had been cut off from the base and lifted up. The middle part is sometimes made in the form of a glass lantern or finished in the color of the walls.
Two-level hip roof
A hip roof can have not only four slopes, but also six or eight slopes. This shape is more reminiscent of a cone than a pyramid, and is most common when building gazebos with a round base. The most difficult thing in implementing such a design is connecting the rafters in the center.
Hexagonal roof
Roof rafters of eight gentle slopes
- hanging;
- layered.
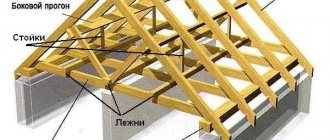
A hanging rafter system rests exclusively on the walls of the house, while a suspended rafter system has a support located in the center of the building and rests on a load-bearing wall or on a pillar specially erected inside the house.
a - design of hanging rafters; b - design of layered rafters; 1 - rafter; 2 - crossbar; 3 - tightening; 4 - stand; 5 - strut; 6 - run; 7 - lying down
The choice of design depends on the size of the span (8 m - a hanging system is suitable, 12 m - a layered system is required) and the maximum length of the beam for construction (when connecting a rafter leg in length, installation of a vertical support is required).
In practice, a layered system is often used as it is more reliable and maintainable. If the house does not have a suitable load-bearing wall or pillar for support, the base can be created from timber by bandaging at the level of the mauerlat.
Gazebo with hipped roof
A gazebo with a hip roof will become a standard design solution, and, subject to proper calculation and arrangement, it will be distinguished by its reliability and durability. It will not be difficult to assemble a hipped roof yourself. This design is suitable for a gazebo in the form of a rectangle or square. The first option is an assembly of a hip structure with two triangular and the same number of trapezoidal slopes. The second option is a hipped hip roof, consisting of 4 isosceles triangular slopes.
The hip roof for a square gazebo consists of four identical triangular sections
A hipped roof is an excellent choice when building a gazebo, since it allows the use of any roofing covering, and its convenient design provides a free viewing angle; it can easily be arranged, for example, in the Chinese style, adding length to the overhangs and several curved diagonal rafters.
At the preparatory stage of work, a drawing of the future roof is made, taking into account the main factors:
- the weight of all rafters and their additional elements;
- roofing and waterproofing masses;
- level of climatic loads, layer of snow masses;
- the weight of the builders servicing the roof;
- loads from equipment that is planned to be installed on the rafter system.
The installation features, for example, the spacing of the sheathing slats and rafter system, directly depend on what the slope of the slopes will be and what materials are chosen for covering the roof. And all this affects the overall weight of the building.
You can extend the service life of a wooden gazebo by pre-treating all its elements with special antiseptic impregnations, as well as a fire retardant. All these compounds can be applied quite simply with a regular brush or roller.
The support for the hipped roof of the gazebo can be wooden, brick walls or racks of the supporting frame. If brick is used in the work, the structure will be capital and will require the construction of a solid foundation capable of withstanding heavy loads. The construction of a hip roof on such a gazebo is generally similar to the installation of a roof on a residential building or other large structure.
Small hip roofs can be assembled on supports made of pillars, which must first be well secured
If the gazebo is installed on wooden poles, then you should first check the strength of fastening of its supports; they must stand strictly vertically, and for the rigidity and stability of the frame, they are tied with jumpers from below. Jumpers are also mounted on top, which will serve as strapping for the pitched structure. Due to the high load, the supports can gradually move apart, so it is recommended to fasten them at the upper ends with diagonal jumpers in advance, and lay wooden or steel pads at the joining points.
c4c50210488d14f2c09b4a27ac7a1e39.jpe c2bf80f3ede45a498a41da644b834532.jpe
Step-by-step instructions for installing a hip roof for a gazebo
- First, a ridge beam with special struts and vertical supports is attached.
- Next, diagonal rafters are laid to form the roof slopes. This stage involves the possibility of increasing the length of the overhangs with the help of overhead boards - “fillies”, which extend the sloped rafters.
- Then the installation of central and intermediate rafters and frames is carried out.
- To protect wooden elements from moisture, a coating of a waterproofing membrane is laid on top of the rafters.
- A sheathing is installed on the waterproofing layer, and if additional ventilation equipment is needed, a counter lath is also installed.
- At the final stage of work, the roofing material is attached.
A hip roof is assembled in the same way as a regular hip roof, excluding the installation of a ridge beam. In this case, a bunch of diagonal rafters are connected into a ridge unit.
Comparative characteristics of frame types: tent and hip
The category of roof with four slopes includes 2 types of frame systems, which schematically look like square (hipped structure) and rectangular (hip roof) envelopes. In our country, the envelope roof is quite popular. The main feature of hipped roofs is the absence of gables. To construct the rafter system of a hipped roof, in both cases hanging and layered rafters are used. Their assembly methods are standard for roofs with any number of slopes.
Distinctive features of hipped roofs of various designs:
- In the case of a hip frame, the roof consists of four isosceles triangles whose vertices touch at one point. In this case, the functions of the ridge are assigned to the central support beam in layered structures, or to the top point of the hanging rafter truss.
- A hip-type roof assumes the presence of two triangular and two trapezoid-shaped slopes. In this case, the trapezoidal slopes are adjacent to the ridge beam with their upper ribs, and the triangular slopes with their vertices. In this case, all four slopes touch each other with lateral ribs.
Studying the plan of the rafter system of a hipped roof, we can conclude that the choice of the configuration of a hipped roof depends on the shape of the building. That is, square houses are covered with hipped structures, and rectangular houses are covered with hip roofs. In this case, you can use any roofing materials, both hard and soft.
When drawing up drawings of the rafter system of a hipped roof, you should clearly indicate the geometric shape, as well as indicate the position of individual elements and projections of the slopes with exact dimensions.
To support a hipped structure, you can use a mauerlat, which is the top frame on concrete or brick walls, as well as the top crown of a log frame. Layered technology is used in cases where it is possible to install upper and lower supports under each rafter leg.
472a6d6d87433316ae8a10165e63d447.jpe
Some recommendations for installing layered rafters:
- The Mauerlat must be reinforced to withstand thrusting forces in the event of rigid fixation of the rafter legs with wooden plates or metal corners.
- If the upper part of the leg is fixed rigidly, and the lower part is hinged, the Mauerlat can be fixed in the usual way. In this case, when the load on the frame increases, the rafters will be able to move slightly.
- The bursting load and pressure on the Mauerlat will be leveled by using rigid fastenings on the lower part of the rafters and hinged fastenings on the upper heels.
When constructing hip and hip frames, the following specific components of the rafter system of a hipped roof are used:
- Diagonal legs from which the ridges of the slopes are made. In hip-type frames, such slanting legs combine the corners of the roof with its highest point. Hip frames involve joining the ridge beam consoles to the corners using diagonal rafters.
- Cornices (half-legs) are elements mounted at an angle of 90 degrees to the cornices. Since they connect to diagonal rafters and are parallel to each other, their length will vary. Roof slopes are created from such elements.
The same structural elements are used to create valleys, with the only difference being that the corners are made concave.
It is the installation of slanted rafters that poses the greatest difficulty. Moreover, these elements will bear an increased load, since they serve as a supporting element for fastening in the upper part of the ridges, that is, they act as a ridge. Therefore, before starting work, it is necessary to calculate the rafter system of a hipped roof.
In general, the process of erecting a roof with four slopes includes the following steps:
- Laying mauerlat on walls made of brick or concrete. In log houses, this element is the upper crown.
- Installation of a central support beam under a hip frame or assembly of support structures for a hip roof.
- Installation of layered rafter legs under one or another structure.
- Attaching diagonal rafters that align the corners of the roof with the central peak or ends of the ridge.
- Marking and installation of spigots.
If a hanging type of rafter system is assumed, then the first stage of creating a tent structure will be the placement of a central truss in the shape of a triangle. When creating a hip-type structure, several trusses are attached at the starting stage.