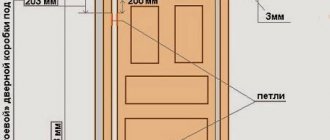
Door frame components
First of all, you should familiarize yourself with the structure of the interior door frame:
- hinge beam - this is the part on which the hinges are cut and the door is hung
- the false beam is the part that meets the door. The counter part of the lock crashes into it.
- lintel - upper “ceiling” beam
- threshold - lower part
Thus, in order to assemble the door frame, you need to correctly connect all its parts. But before you start, you need to decide on the dimensions and choose the appropriate material. Doors should look aesthetically pleasing and be easy to clean.
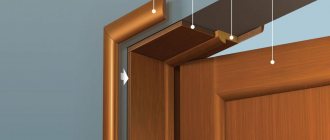
Fastening the door structure
To secure the door leaf to steel hangers, metal fastening elements are used, designed to connect frames under plasterboard slabs. At least 4 such fasteners are needed.
Do-it-yourself installation of an interior door frame in a wall opening step by step:
The fully finished door leaf (already with fittings) is hung on hangers fixed in the frame. Cardboard spacers are inserted into the gaps between the canvas and the box frame. After this, the hangers are screwed onto the outside of the door frame.
Next, the door block is inserted into the wall opening and secured with wedges. The structure is leveled and the places where the suspension is attached are marked. In these areas, the material is selected, that is, a recess is made for the plates. After this, the door is leveled again and the plates are fixed to the wall.
The recesses with inserted hangers must be plastered, and the resulting voids must be filled with construction foam.
If a through installation option using anchors is used, holes for such fastenings are made in advance on the side of the box profiles. To do this, marking is done first. 2 anchors are fixed on each side.
At the point where the fastening is located, first drill a hole with a diameter of 14 mm (for the plug) with an electric drill, then a hole with a diameter of 10 mm (for the anchor). Next, the door frame is installed in the opening, fixed, and holes are drilled for anchors in the concrete wall of the opening. The installed anchors are covered with platbands.
This method of fastening is quite durable and, accordingly, more reliable.
Choosing material
I don’t have a definite answer here, since the choice depends on your preferences and budget. I will give examples of the most common materials used for door frames.
MDF doors
MDF is a wood fiber board. The doors are cheap, but they look good. The advantages include lightness and environmental friendliness. The disadvantages are reduced impact resistance, poor noise insulation and short service life.
Laminated solid wood
Glued board or "euro-timber".
These doors are not made of solid wood, but of parts glued together under high pressure. The joints on them are practically invisible. The doors are quite durable and cost a little more than MDF. Price and quality are acceptable.
Solid wooden doors
Doors are much more expensive than glued ones. Strong and durable. The disadvantage is incorrect processing by the manufacturer, as a result of which the wood is excessively saturated with moisture.
Doors made of chipboard and fibreboard
Wood-fiber or wood-pressed boards. These doors are very cheap as they are made from leftover material. The advantage of these doors is good mechanical strength and fairly good sound and sound insulation. The disadvantage is low moisture resistance, as well as the presence of a volatile substance in the glue, which has a detrimental effect on health. Another aspect is the complexity of installation, since the screws in such doors do not hold well.
In addition to those described, there are also plastic, glass, aluminum, and veneered ones. Doors with honeycomb filling, laminated, etc.
The choice of material is up to you, but it should be appropriate and practical.
Installing an interior door frame into an opening
After all the preparatory steps for installing the door frame in the opening have been completed, you can begin installation. In order to prevent the U-shaped structure from “driving”, it is necessary to install auxiliary strips (spacers) on it; two are enough – at the bottom and in the middle of the rack.
In order to check the correctness of the frame geometry, you must use a plumb line or level. It is easy to construct a plumb line using twine and a bolt, tying it to the head.
Having placed the structure in the indicated place, check the verticality of the racks again. Don’t be too lazy to do this; if it’s uneven, the door won’t close. This procedure is carried out on both sides of each rack.
The box is installed using anchor bolts. They will fix the door block and prevent its deformation. To do this, you need to drill 3 through holes in the racks directly into the opening, and then tighten the bolts.
The gaps between the door frame and the opening are eliminated using polyurethane foam. In order not to stain the front side of the structure, it is necessary to cover it with masking tape. Fill the voids with foam carefully, taking into account the fact that when it hardens, it increases the volume by 30-40%. To prevent the box from moving, it is necessary to install wooden spacers. After the foam dries, they are removed.
Proper sizing is the key to success!
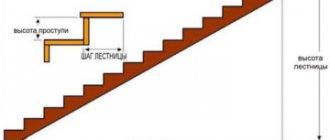
The standard sizes of door leaves are
- height 2000 mm
- width 600 mm, 700 mm, 800 mm and 900 mm
All other sizes that go beyond the scope are usually custom-made items. (I mean single canvases, not swing ones)
You need to add 70 mm to the size of the door leaf - this is the standard width of the door frame. If the dimensions of the door frame are different, then the size will naturally change up or down. And we also add 6 mm - this is the technological gap between the leaf and the door frame.
Now you need to check how the door frame fits into the doorway. If it needs to be expanded, then we are not in a hurry to break everything at once. We soberly assess the situation - we may have to strengthen the opening with lintels. If you need to reduce the opening, then we fill it with bricks, or “sew on” bars - it all depends on the situation.
IT IS IMPORTANT TO KNOW:
To help you understand what size doorway is needed, look at the formula:
Door leaf size + door frame size + 6 mm tech. gap + 60 mm (30 mm on each side for mounting foam and wedges that will be needed when installing the box)
Usually the dimensions of doorways are controlled at the construction stage, but in older private houses (like mine) there are “hard” discrepancies.
The next important dimension is the gap from the floor to the door leaf. Before calculating it, you need to check the level of the floors for the width of the door “swing”.
You can do this in two ways:
- Using a hydraulic level
On the side walls of the opening we place marks at the same level. We measure the distance from each mark to the floor plane. The difference that you get when measuring should be added to the minimum height of the posts so that when opening the door does not rest on the floor. If you still “miss” this moment, then you can eliminate it only by trimming the door leaf, and this is still a “handjob” :(
2. Using a laser level
If you are the happy owner of a laser level, then everything becomes much simpler. We set the level and, using a construction square, determine the curvature of the floors. The obtained values are taken into account when setting sizes.
The minimum gap is 10 - 15 mm, depending on what kind of floor covering is planned. But it is better to immediately lay linoleum, or carpet, or laminate, and then carry out the installation.
See the table of correspondence between door blocks and openings.
And here is another table of typical door frame sizes
Installation
If the work is done without an assistant, it is more convenient to mount the frame without the door leaf and hang the door later. With this method, the frame needs 1-2 spacers, which can be cut from a block or other available material. To prevent the ends of the spacer from damaging the box lamination, wrap them in fabric.
Step-by-step installation of the box is performed as follows:
- Raise the frame and install it in the opening. If the door does not have a threshold, then you need to leave a technological gap between the end and the floor. Its size is 1.5-2 mm. You need to place wood chips of this thickness under the edges of the box.
- To fix the box, drive small wedges between it and the wall in the upper corners (side and top). Check the structure for verticality and horizontality, and for compliance of the edges with the plane of the wall.
- Install a spacer across the opening. Secure the box with wedges next to it.
- Drill holes at two points on the sides to secure the door to the wall. Use a hammer drill to make holes in the concrete and drive capsules of dowels or anchors into them. Screw in the fastening screws.
- Fill the gaps between the frame and the wall with polyurethane foam. Before this process, it is necessary to cover the frame with wide construction tape, since foam can get on its surface. Fill gaps to ½ of their depth: foam expands greatly. It will take 24 hours to cure. The spacer wedges must be cut or removed.
If the width of the box is 3 cm or more less than the opening, then additional installation will be required before installing it. These are bars of the required thickness, which are secured with dowels to the wall inside the opening. After this, install the frame of interior doors with your own hands according to the above instructions.
Assembling a door frame without a threshold
Let's look at assembling a door frame with your own hands using an MDF frame as an example. We will connect the upper parts at 45°, as this is the most aesthetic way.
1.First of all, you need to trim the parts of the box. This is done in order to eliminate irregularities or manufacturing defects.
IT IS IMPORTANT TO KNOW:
If you have to use hand tools, it is better to use a fine-toothed saw or a hacksaw. Start making cuts from the veneer side so that chips, if any, remain on the invisible side.
2. We “saw” the loop beam and the vestibule at 45°. It is best to do this with a miter saw, but if you don’t have one, you will have to work with a miter box. To avoid unevenness when cutting, the miter box must be secured. We use a hacksaw with a fine tooth.
3. Next we move on to the most difficult part - “sawing” the top of the box - the lintel. You need to clearly set the size and not miss the corners. You can use a tape measure, but there is an easier way. To do this, we apply the lintel to the top of the door and mark the marks “in place” with a sharp pencil. To maintain the technological gap, you can use packaging cardboard - its width is just 3 mm.
4. Mark the height of the loop and false beams. I told you how to find out the required height a little higher. This is the height of the door leaf + the top gap of 3 mm + the bottom gap. If the floors are level, then 10 mm is enough. When opening, the door leaf should not catch or rest against the floor. You should not create a very high gap - 10 - 15 mm is enough for normal air circulation. If the room is damp, then larger values are allowed.
IT IS IMPORTANT TO KNOW:
If there is a difference where the doors are installed and there is no way to correct it, then the height of the racks may be different. The highest point of the difference is taken as zero.
Next, we cut off the racks according to the marks.
IT IS IMPORTANT TO KNOW:
We constantly and meticulously check all the applied dimensions before washing down. If the box turns out to be smaller than the canvas, you will have to buy a new beam.
5. After all the components have been sawed down, we assemble the MDF door frame together, having previously drilled holes with a drill of a smaller diameter to prevent the frame from splitting. For connection we use 50 cm wood screws. It is more convenient to carry out work on the floor, placing cardboard or other material under the box.
IT IS IMPORTANT TO KNOW:
When you tighten the door frame, press its parts as tightly as possible, since the screws will stretch them.
Well, this is approximately the result you should get.
Installation details
Installing an interior door frame is a complex procedure that requires certain skills and patience. You need to start with preparing the working tool, as well as choosing a fastening method. In most cases, installation is carried out using anchors , which securely fix the frame.
Taking measurements
To get the dimensions of the box, you need to measure the opening in the wall where it will be installed. The width and height of the wall opening are measured in at least three places: at the edges and in the center. To calculate the parameters of the box, the smallest results are taken.
The diagonals and thickness of the opening are also measured. The strong difference in the lengths of the diagonals indicates that the corners of the opening are not straight and it is heavily tilted to one side. In such a situation, the opening is first leveled, and only after that the measurements are taken again.
Required materials and tools
Assembling an interior door together with a frame is quite simple if the household has the necessary materials and a standard set of carpentry tools:
- Mounting plumb, level;
- Miter box;
- Hammer;
- Chisel;
- Plane;
- Wooden wedges;
- Hacksaw;
- Fastening elements;
- Screwdriver;
- Construction foam;
- Pencil;
- Square;
- Yardstick.
Making a box
After preparing the material, tools, and taking measurements, you can proceed directly to the manufacture of the door frame.
Cutting material
It is recommended to use ready-made wooden blocks with grooves into which the canvas will be inserted.
The blanks are laid on a horizontal plane with the grooves facing up. The height of the box is measured and marked on them (the thickness of the threshold, if provided, must be taken into account).
Next, the top bar of the structure is measured and cut out. When cutting out individual elements of the box structure, it is necessary to take into account the way they are connected to each other.
Connecting parts
Box elements can be connected in several ways.
Using grooves. For self-manufacturing of the structure, this option is quite complex, but more reliable.
Connecting individual elements of the box at right angles using screws. This is the most common technique among beginners because it is the simplest.
Another common way to connect box parts is diagonal technology. The edges of the parts that need to be connected to each other at right angles are trimmed using a miter box at 45 degrees and secured with screws.
Treatment
All wooden elements are pre-treated with special agents before assembly: against insects and mold, and against fire. After assembling the structure, the finished product is varnished, painted in the desired color or finished with other decorative materials.
How to assemble?
The procedure for installing the box begins with its assembly. This design can be of several types. Today, U-shaped frames are increasingly used, which eliminate the presence of a threshold. But there are also rectangular designs that are also used quite often.
Factory models are often pre-assembled as they are pre-finished to create a beautiful finish. If you decide to build a box from a wooden beam yourself, then it needs to be thoroughly dried and polished.
Assembling the box involves performing several sequential operations:
- Initially, you need to lay the bars on a flat horizontal surface. Often, a floor is used for this, which is covered with paper or film to prevent damage to the door leaf.
- Assembling the box begins with measurements. It is important that the width of the opening is slightly larger than the door leaf itself.
- When all the data is known, the elements of the box should be connected into a single structure. They can dock in several basic ways. The simplest connection is considered to be a 90 degree connection. To do this, the top bar at the ends is cut at a given angle.
It is important that the cut surface is smooth and without distortions. After this, the vertical support is attached to the transverse bar and screwed.
- These elements can also be connected at an angle of 45 degrees. To do this, a corner is cut off on each block. After joining both structures, they should also form 90 degrees. Please note that even the most minimal deviations should not be allowed, since the operation of the entire system depends on this.
- When you have adjusted all the bars, you can connect them together. To do this, use nails or screws. It is advisable to drive 2 fasteners into each docking side. It is important that after assembly the box is held as firmly as possible and the elements do not move relative to each other. If you plan to organize a threshold, then it is attached to the supports like a top bar. It is also important to connect this part as smoothly as possible.
- After assembling the box, you should begin attaching the hinges. To do this, the frame is laid on the floor and leveled. After this, grooves for the hinges are cut out on one side of the vertical post. Experts recommend placing them at a distance of 20 cm from the top and bottom edges. The grooves are formed using a chisel or a router.
- When the hinges are attached, you should place the door leaf inside the frame and mark their locations on it. To do this, the product is aligned with the frame, and then the loops are applied and the locations are marked.
The grooves on the door are cut in the same way as on the box.
How to file a door frame at 45 degrees?
Elements with a round cross-section are sawn at an angle of 45◦. In order to make the correct cut, use a miter box or miter saw with a rotating table.
Door frames can be assembled with your own hands without the use of special tools. In such cases, you can saw off the desired angle without a miter box, using a ruler and a protractor for marking.
During installation, the structure is secured using self-tapping screws, which are screwed in at an angle.
Assembling the box at an angle of 90 degrees
With this option, assembling the door frame is easy and quick.
- It is necessary to saw off the required size of the racks and the horizontal crossbar at a right angle.
- Select the extra part of the vestibule.
- Place the box elements on the floor, level them and secure them at the ends with self-tapping screws (2 each).
In order for all sides to remain parallel to the door frame, you can attach the door and check how it will stand in the opening. Connecting the door frame at 90 degrees is considered by specialists to be a fast installation technology.
Assembling a box with a threshold
There is no significant difference between installing door frames with and without a threshold. Thresholds have recently lost their relevance. But despite this, such a system has many fans. This is explained by the fact that it is stronger and more reliable than a structure without a lower transverse bar. Such systems can withstand significant loads and are suitable for installing solid wooden doors. Thresholds are considered a prerequisite for bathrooms. Regardless of what type of design is chosen, anyone can assemble an interior door frame.
- Vertical and horizontal planks are prepared in advance.
- Cut at 45 or 90 degrees.
- The prepared elements are placed on a flat surface.
- The racks and crossbars are alternately fastened using self-tapping screws.
How to install correctly?
Installing a door frame with your own hands involves performing several sequential operations:
- Before installing the product, you need to take measurements of the structure and doorway. It is important that the structure fits into the hole, which should be slightly larger than it.
- After this, you need to carefully lift and insert the box into the opening. The structure must be installed on a flat surface to prevent distortions. The ends of the product must coincide with one of the sides of the wall. This is important if the frame width is less than this value.
- It is important that the box stands level in all planes. Therefore, you need to align it and fix it in this position. For this purpose, wooden spacers are used, which are installed between the frame and the wall.
How to attach?
Fastening the structure is the final stage of installation of this product. This process consists of several successive steps:
- Several mounting holes are drilled in the fixed box. In this case, a wood drill is used, which only goes through the frame.
- To form holes in the wall for the dowel, use a long concrete drill. It is used to make marks through previously drilled holes on the surface of the vertical supports. Please note that the diameter of the drill should not be larger than the hole in the wood, since then you will not be able to fix the system with a self-tapping screw.
- At this stage, you need to remove the box and drill holes of larger diameter in the marked places on the wall. They must fit under the plastic dowel or anchor that will be used for these purposes.
- When everything is ready, the box is put back into place, leveled and secured with wedges. If all is well, you can screw the frame to the wall with self-tapping screws in several places. In this case, it is important to constantly monitor the position of the box relative to various planes.
- The procedure is completed by filling the cracks with polyurethane foam and hanging the doors on their hinges.
Replacement methods
Very often, interior doors are installed in place of already worn-out systems. This, in turn, involves dismantling the old box. To replace the old structure, you can use several methods:
- Dismantling with destruction of the frame. This approach involves removing the old box using brute force. Here they use both crowbars and saws, with which they divide it into several separate parts. After this, the installation of the new system is already carried out.
- Dismantling the structure while preserving the frame. If the doors are still in good condition and can be used in another place, remove the frame carefully. To do this, sequentially remove all screws or other fasteners. Then the foam is removed, which additionally fixes the product. This will allow you to easily remove the box later while maintaining its integrity.
This step-by-step guide is not universal, since replacing the box takes into account specific design features.
Installing handles, latch or lock on the door.
The door handle is most often installed exactly in the middle of the door. Since the height of the door is 2 m, the handle is placed at a height of 1 m. But for ease of use, especially for small children, the height of the handle can be reduced, for example to a height of 95 cm.
Accordingly, the lock is installed at the same height.
Installation of a mortise lock.
In order for the lock to install neatly on the door, you need to know a little trick.
We attach the lock to the door leaf as shown in the photo below. Be sure to drill holes in the door leaf before screwing in the screws.
We attach the lock to the door leaf.
Using a utility knife, cut out the laminated door covering around the lock. This action should be done carefully and slowly, pressing the knife blade well against the lock. As a result, we get a perfect cutout for the front lock bar.
Using a knife, cut along the contour of the lock.
We tear off the laminated coating.
We mark the place for installing the inside of the lock.
The photo shows the marked location for the interior of the castle.
We drill out a place for the lock.
Using a chisel, remove excess material from the door.
Now you need to mark the place for the lock handle. To do this, we place the lock on the side of the door so that the front of the door is flush with the end plane of the door. Mark with a pencil the location of the handle. Markings for the handle must be done on both sides of the door.
Mark the location for installing the handle shaft.
We drill holes according to the markings on both sides of the door. First on one side, then on the other. Under no circumstances should you drill through the door, as the drill may pull out a lot of material from the door. Therefore, we install a plywood backing in the opening for the lock to prevent the hole from breaking where the drill exits.
Drill a hole for the handle shaft.
We put the lock in place and fasten it with the screws included in the kit.
Latch insert into the door.
Installing a latch on a door is a little easier than installing a lock. First of all, we drill a hole from the end of the door with a feather drill with a diameter of 24 mm. The latch is installed in such a hole quite tightly, and the front strip of the latch completely covers the hole.
Install the door latch.
We install the latch in place and make an incision around its face plate with a stationery knife. Then we take out the latch and, using a chisel and a hammer, make a recess under the front strip of the latch.
Using a chisel, select a recess.
All that remains is to drill a hole for the handle shaft. To make such a hole, we will do the same as when inserting a lock. We place the latch on the side of the door so that its front panel is flush with the end of the door.
Mark the hole for the handle shaft.
Now use a pencil to mark the center of the hole. On the other side of the door we do the same and drill holes on both sides.
We install the latch in place and screw it to the door with self-tapping screws. Before screwing in the screws, do not forget to drill holes for them with a diameter of 1.5-2mm.
Assembling a door frame with a threshold
The easiest way to assemble. The fact is that the threshold is usually mounted at 90°.
The threshold is mounted on the entrance or “entrance” doors, separating the cold room from the living room. In addition, the threshold gives the door frame additional strength.
Preparing the doorway and checking the floor level are absolutely identical to assembling without a threshold, but further steps have their differences.
So, here are the step-by-step assembly instructions:
1. File the lintel to its original dimensions. The length of the lintel will be equal to the length of the door leaf + 6 mm for the gap. You need to make two such blanks - this will be the threshold. Do not forget to trim the workpieces, since the factory cut may not be even.
2. On loop and bevel beams, it is necessary to remove the thrust quarter.
To do this, we connect the end of the vertical post and the horizontal one and put a mark with a sharp pencil.
IT IS IMPORTANT TO KNOW:
The size must be transferred with maximum clarity so that there are no gaps. Repairing them in the future is not problematic, but it will ruin the aesthetic component of the doors.
We make a cut to a depth of a quarter with a hacksaw or jigsaw. Be extremely careful not to touch the work surface. It is not possible to fix the “jamb” on MDF doors.
Then, using a chisel or a utility knife, carefully remove it. We repeat the operations for all angles.
IT IS IMPORTANT TO KNOW:
If you use a chisel, then under no circumstances turn it over with its top sharpened side down. When carrying out work, the working part will crash into the material and all the work will go down the drain. The same rule applies when inserting loops.
3. Connect the box. We also drill holes and tighten them with self-tapping screws. The only difference is that galvanized screws are used for the threshold if it is the threshold of an entrance door. They are less affected.
Removing the old door
Not all apartments begin renovations from scratch. Often they simply replace the old door with a new one. In this case, it is necessary to dismantle - remove the old door block, and prepare the opening for installation of a new one. Usually the procedure is carried out without preserving the old leaf and door frame, so it is carried out by roughly breaking them out. But neatness won’t hurt if the owner doesn’t want to re-finish the walls and corners of the doorway.
First, remove the door panel. The door can be removed from the card hinges by lifting it, but the universal hinges must be unscrewed from one side.
Removing the old door
Remove the cash, screwed with self-tapping screws (unscrew it with a screwdriver or screwdriver). If the cash is nailed down, pry it open with a wide chisel and remove the nails using pliers.
Determine where it will be attached to the opening. Usually attached to the hinge recess.
Cut off all the foam used to seal the door frame. Removed with a sharp knife.
Advice. When sealing the door frame with plaster, arm yourself with a chisel: lightly tap it with a hammer to remove all excess.
Remove the solid frame from the doorway. Place it on a horizontal plane and disassemble it. If preserving the canvas and box is not necessary, then you can remove them using a hammer, ax and crowbar. There is no special algorithm of actions here - break with all your might. This method will bring a lot of pleasure.
Door frame tenon connection
One of the ways to assemble door frames is a tenon joint. It's not as common as 45° and 90° assemblies, but it does exist.
The joining of parts occurs through tenon joints (see picture)
Usually the achieved rigidity is quite sufficient, but galvanized nails can be added to enhance the strength characteristics.
Preparatory work, their features
The door should close without effort, withstand nervous slamming, and not open spontaneously. In order for the design to meet the requirements, preliminary work must be carried out correctly before installation:
- dismantle the old structure;
- take accurate measurements;
- cut and assemble beams;
- equip with the necessary fittings;
- align correctly in the opening.
Plastic and metal-plastic door blocks are supplied fully assembled and require virtually no preparatory work. And all the rest are more often sold with an unassembled door frame - a set of bars of arbitrary length. Therefore, the first step is to begin the important process - taking measurements and assembling the structure. Then you can only secure the door hatch using one of the following methods.
Dismantling the box
When an old structure is replaced, it is dismantled. To do this, use a nail puller, having previously cut the vertical beam on both sides. This is done to press out the structure.
If the old structure uses anchors or nails that cannot be unscrewed, they are cut off with a grinder.
Before installation, check the verticals of the walls to take into account differences. The door frame is placed in such a way that it does not go deep into the opening, and subsequently the trim is adjacent to it. They do this using a building level.
Taking measurements
At this stage of work, inaccuracies and errors are unacceptable, otherwise this will lead to complications during operation and the acquisition of a new design. The main task is the accuracy of determining the canvas and opening, calculating the size of the lintel with racks, taking into account technological gaps. During measurements, pay attention to the following points:
- The thickness of the timber must be at least equal to the thickness of the canvas;
- Measurements are taken with one tape measure;
- The opening and the canvas are measured in length on both sides, and the identified deviations are taken into account in the work;
- A gap of 1 cm is left on the outside of the beams that are in contact with the opening;
- There are 3 mm gaps inside. If the structure has a threshold, then the gap is made around the perimeter;
Attention! If the box does not have a threshold, then a gap is left between the canvas and the floor: 8 mm above the linoleum, 15 mm above the carpet
- The places for sawing off the rack are inside the beams;
- If the size of the doorway is small, then it is enlarged. If it's big, reduce it.
Washed down the timber for the box
The next stage is the correct sawing of the bars and their connection into a whole structure. To do this, use an end saw, a device for cutting boards with a hacksaw. There are two methods for joining parts.
The first option is difficult to implement, but looks beautiful - it washed down the lintel and vertical posts at an angle of 45 degrees. The elements are connected to each other with self-tapping screws, for which holes are drilled at right angles to the cut. Holes in the MDF frame are drilled in advance so as not to damage the workpieces. Self-tapping screws are selected with a thread up to the head, and a drill is taken with a diameter of 3⁄4 of the fastener.
The second, simpler method is to cut at an angle of 90 degrees. A fine-toothed hacksaw is used in this work. Vertical beams with a threshold are equal to the sum of the length of the door leaf and a gap of 3 mm at the top/bottom. If there is no threshold, then a gap of 1 cm is left at the bottom. The lintel crossbar is equal to the sum of the width of the canvas and the gaps on both sides of 3 mm. The bar is attached to the posts on each side. The block for the threshold is sawn off at an angle of 90 degrees. The box must be assembled on a horizontal surface.
Fastening accessories
The fittings can be installed before assembling the box or on the finished structure. For some models, the surface of the timber is cut to the thickness of the canopy, but for others this is not necessary. Loops are: universal, right and left.
The standard indentation is 200 mm from the bottom and top edges of the door leaf with a deviation of 5 cm to the sides. The third loop is installed 500 mm from the top level of the canvas. The fastening location is calculated taking into account the technological gap - a retreat of 23 cm. When fastening the loops, they ensure that the flag is installed flush with the canvas and frame. The notches are made using a chisel or cutter.
The location of the handle, regular or with a snap mechanism, is determined by the owner, but the standard installation location is considered to be a distance of 90-120 cm from the floor.
Installing a box in an opening
For all types, one rule applies - the frame is temporarily fixed in the opening. To do this, use 4 metal plates - hangers, which are used for installing metal structures for drywall.
The structure is leveled, fixed with plates and adjustments are made with the door leaf inserted. If required, it is wedged with wedge bars.
Important! If the plates are left after installing the box, then a recess is made under the outer part of the plate to cover it with plaster.
To finally secure the door hatch into the opening, several fastening options are used.
Installation of fittings and door leaf into the frame
The hinges must be screwed to the assembled frame. The hinges may be different, but despite this, the installation of hinges is not much different:
- We make markings on the vertical post, taking into account the opening side of the door leaf. Step back 200 mm from the top edge and attach the hinge strip to the beam. Using a pencil, outline the outline along which we will make a notch to secure the loop. Make the same markings for the bottom loop.
- Using a chisel, chisel and hammer, remove the excess wood to create the desired groove.
- Try on the loop, if everything is fine, fasten it into the seat.
- We will do the same manipulations with the canvas.
- After installing the hinge, we lay the panel inside the door frame.
- We check for the presence of the necessary gaps, place cardboard so that the canvas does not move while installing the block in the opening.
The most crucial moment comes - installing the kit in the doorway.
Video on how to properly foam a door frame in an opening
To be honest, installing an interior door is an undertaking for a professional; it is better to entrust such work to an experienced craftsman who has the necessary tools and experience at his disposal, but if your hands are itching, we are always ready to help with advice, call us!
5 rules before going to the store
There are several rules that I try to adhere to before going to the store for tools or spare parts:
- 1) — Make a shopping list so that you don’t forget anything and don’t buy too much.
- 2) — Take a photo of the unit being repaired or the assembled spare part, a nameplate with markings if there is one. This makes it easier to explain to the seller, show the photo and he will immediately understand you.
- 3) - Take exact measurements, do not trust “measurements by eye”.
- 4) - Do not buy “for future use”; such purchases usually gather dust in the pantry or garage, and if they break down again, they cannot be found and you have to buy them again.
- 5) - Do not buy used tools or spare parts, no one knows how long they will last and who knows, perhaps the “unheard of cheap” electric drill was stolen. As you know, free is only in a mousetrap.
If you have any doubts or need advice, call us 8922-722-91-00 or in our VKontakte group. We will always help, we DO NOT charge money for consultation.
I hope that you liked the article, if you want to correct the author or share your thoughts, leave a comment below. I recommend joining one of our groups on social networks:
and then you will be aware of new articles and I will be glad to see your ideas.
Features of installing a wooden box
The wooden frame can be treated with paint and varnish material or not. Depending on the condition, the mounting method is selected. Wood is a material that allows you to correct all the flaws and successfully hide the attachment points.
If the structure is not painted, it can be safely installed using plates and anchors. Places are hidden with putty (acrylic sealant) of the required shade. When applying the coloring material, everything is hidden.
If the box is painted, then the indicated methods can be used if the bolt landing spots are hidden with the same putty, colored wood-look sealant. Finish the work with paint and varnish material to match the color.
From all the many methods of installing a door frame, you need to choose one that is fast, convenient, reliable, and easy. But in any case, you should not neglect the basic rules.
How to install a door frame:
Choosing a new door
In order for the installation of the door block to be successful, everything needs to be carefully thought through, measured, and selected. Study the opening that you plan to close with a beautiful facade. In old rooms, walls and openings do not have ideal lines. The same can be said about new houses. Measurements of the opening must be careful from all sides.
The correct choice of door frame and leaf depends on the accuracy of measurements.
If the door is not made to individual sizes, you must choose a ready-made option that has certain standards. By taking measurements, you can understand what to do with the doorway, which should not differ much in size from the standard doorway. For example, with a portal width of 900 mm, you can choose an interior door of 800 mm. The remaining millimeters will be required for the door frame and technological gaps.
Having determined the size of the product, we select the door configuration. On the shelves of construction stores you can find three types of kits:
- single leaf - you need to independently purchase a door frame (usually a wooden beam without decorative finishing), hinges, a lock, extensions, platbands;
- a leaf with a door frame made of the same material (solid wood, MDF), can be equipped with platbands;
- a complete set of door block assembled at the factory - installation requires only strength and assistants to level the door.
The choice of product depends on the consumer. The longest and most difficult way to install a frame is to purchase the first version of the door, when all the elements of the block must be purchased and assembled yourself. Therefore, let's look at this option in more detail. After studying our instructions, you will be able to install any door without the involvement of unauthorized persons.
Assembling box elements at an angle of 90º
Assembling interior door frame elements at an angle of 90º with your own hands is faster and easier than at 45º. In this case, the horizontal posts and the top crossbar are cut with a hacksaw at a right angle. To do this, mark the required length of wooden beams.
The box is first assembled on a flat floor. The individual structural elements are fastened together with self-tapping screws. Using a corner, the angle of 90º is checked. The parallelism of two opposite horizontal posts of the frame can be checked by applying the door leaf.