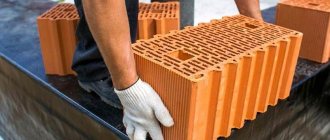
Features of concrete blocks
Concrete is the main binding component of building blocks. The remaining components included in the composition determine the specific characteristics of the material. Let's present the most popular types of concrete masonry blocks:
- expanded clay concrete blocks;
- ceramic;
- foam blocks;
- cellular concrete;
- gas silicate.
The blocks have different sizes and parallelepiped shapes.
Advantages of concrete blocks
The material has a number of advantages:
- sound insulation;
- installation speed;
- thermal insulation;
- durable (over 100 years);
- strength;
- resistance to rodents and microorganisms - mold and mildew;
- low weight with significant density;
- inexpensive (relative to brick -35%).
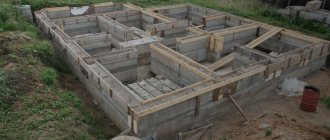
The cost-effectiveness of hand-laid concrete blocks does not only depend on the price of the brick. This includes a lightweight foundation, low transportation costs and quick installation. Building a foundation for block masonry is a simple task: the blocks do not require a heavy foundation, a simple tape will do.
Flaws
There are few of them, but they significantly limit the use of building blocks. For example, block walls are not able to withstand the weight of concrete floors; additional reinforcement with a special belt or the use of timber will be required.
Comparative characteristics
Comparing their characteristics and calculating construction costs helps to select blocks suitable for construction in each specific case.
The suitability of the material is assessed according to the following parameters:
- Strength, which refers to the ability of a building stone to withstand compressive loads.
Block strength test
- Density is the weight of one cubic meter of material in kilograms. The larger it is, the higher its strength. But dense materials put serious pressure on the foundation, forcing it to be massive and buried, thereby increasing the cost of foundation construction. In addition, thermal conductivity and the need for additional wall insulation directly depend on this indicator.
- Thermal conductivity is a measure of a material's ability to conduct heat. The higher it is, the more money you will have to spend on insulation.
- Frost resistance reflects the ability of a material to maintain its structure during periodic freezing and thawing. It is expressed in the number of complete freezing and defrosting cycles. It is clear that the higher the frost resistance, the longer the constructed building will last.
Note. During testing, the material is completely frozen throughout its entire thickness. But the walls of heated residential buildings do not completely freeze, so the frost resistance of wall blocks can be considered relative. Frost resistance of 35 cycles is considered sufficient for middle latitudes.
- Water absorption is the ability of a material to absorb moisture from the environment. The lower it is, the better, since, accumulating in the structure of the material, moisture worsens its thermal insulation properties and causes destruction upon freezing.
To determine water absorption, compare the weight of the samples after drying and after saturation with water.
Now let's compare these characteristics of different wall blocks. For analysis, we will take only their structural varieties used for the construction of load-bearing walls of low-rise buildings.
| Block type | Strength class or grade | Density, kg/m3 | Thermal conductivity, t/M*k | Frost resistance | Water absorption,% |
| Concrete | M100-400 | 800-1500 | 0,4 – 0,6 | 50 | 8-10 |
| Expanded clay concrete | M50-150 | 700-1500 | 0,3-0,45 | 50 | 50 |
| Aerated concrete | B2.5-3.5 | 600-900 | 0,14 – 0,28 | 35 | 12-20 |
| Foam concrete | B2.5-7.5 | 600-1000 | 0,18 – 0,26 | 35 | 10-16 |
| Arbolite | M20-50 | 600-900 | 0,2 – 0,3 | 25 | 75-85 |
| Ceramic | M100-150 | 700-900 | 0,1 – 0,2 | 50 | 12-15 |
Materials and tools
You should take care of tools and materials before starting work. The set depends on the selected blocks. Let's list everything:
- Measuring tools: tape measure, level, plumb line, square.
- Mallet and trowel.
- Trowel (several, different sizes).
- Forests.
- Cord.
- Bulgarian.
- Electric drill.
- Level or hydraulic level.
- A stiff bristle brush.
- Wall material.
- Metal mesh or reinforcement in rods.
- Concrete mixer or mixer.
- Container and raw materials for the solution.
Preparation of the solution
For the installation of concrete blocks, both cement and adhesive compositions are used.
Mortar of cement and sand
For a high-quality solution of concrete blocks, you need high-level cement, not lower than M 400. You will need homogeneous sand, without lumps of clay. Large inclusions need to be removed.
There is an ideal ratio of mortar for laying concrete blocks with the following proportions of sand and cement:
- 1 tsp cement;
- 3 hours of sand.
Water is added at the rate of 0.7 to cement.
The required plasticity is obtained by taking into account how wet the sand is and adjusting the mass with additives.
The solution is prepared in small portions, stirring constantly so that the mixture does not separate or set.
Gas silicate glue
Universal composition, suitable for use when laying any block products. It has a high level of adhesion, which allows you to make a seam of minimal thickness - no more than three millimeters.
To make your own glue, you will need a ready-made dry mixture, water, a plastic container and an electric drill. The composition must be stirred until completely homogeneous at low speed. It is important to maintain the given proportions. The batch size will determine the speed of your work. When laying it, it will become clear what it should be like so that the batch of glue goes into use and does not have time to harden.
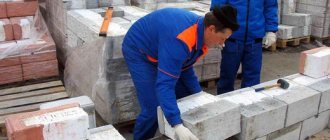
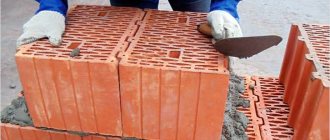
Block laying
Step-by-step instructions for laying concrete blocks with your own hands:
- Future corners are marked and the cord is pulled out. This is necessary for even laying.
- A layer of mortar is applied to the waterproofing material, with a block on top. It is pressed firmly to the base.
- The jointing is being carried out. It depends on the final finishing.
- Adjacent blocks are stacked similarly. Don't forget to control the styling. It should be smooth at all stages.
- The second row is laid in the same way.
- The third row can be laid using adhesive foam. It is applied with a pistol in 2 rows.
- All walls are built up simultaneously to provide reinforcement at the same level.
- Every five rows it is necessary to strengthen the walls: grooves are made along the perimeter, reinforcement or mesh is laid in them. Some blocks have special niches.
- The roof puts a serious load on the walls. To distribute it evenly, you need an armored belt after laying all the rows. It is made on site using wooden formwork, frame and concrete. Strength is gained under the film within 7 days.
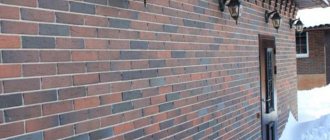
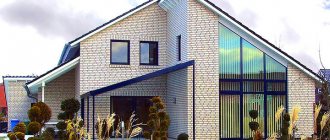
- The masonry can be considered complete and the façade cladding can begin.
These were general tips. The technique of laying various blocks has its own characteristics. Let's take popular varieties as an example.
Expanded clay concrete blocks
They consist of a concrete mixture and foamed clay (expanded clay). The voids allow for reinforcement.
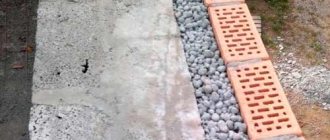
- We waterproof the foundation using rolled roofing felt: we fix it on a cement screed.
- We start laying from the corner and move along the perimeter.
- We determine the horizontalness of the masonry using a level. It is important that the beginning and end of the row coincide.
- The system is of a ridge type; there will be no through gaps, so vertical joints are not filled with mortar. The horizontal seam is no more than ten centimeters.
- Build all the walls at the same time: load-bearing and internal.
- Installation can be done either with ordinary concrete mixture or with adhesive cement.
Advice: make the height of non-load-bearing walls 2 cm less than load-bearing ones. This way you will reduce the load on the partitions from the floors. The gap created by the difference in height can be easily filled with polyurethane foam.
Aerated concrete blocks
Also called gas silicate. They are characterized by high porosity, which leads to gradual decompression of the material. In the future, cracks will appear and the structure will begin to collapse. There is a way to avoid these troubles by providing reliable waterproofing and preliminary reinforcement of the walls.
When you finish laying the perimeter, take a break for 12 hours.
Laying is easy due to the light weight and size of the blocks.
- Concrete blocks of this quality are laid using glue or cement. If you are installing on cement, make the seam 6–10 mm; if you are installing on cement, make no more than 3 mm.
- Start laying with a level foundation with mandatory waterproofing.
- Make a solution of concrete blocks in a ratio of 4:1 (sand and cement).
- The bottom of the block needs to be wetted. Otherwise, moisture from the solution may transfer into the aerated concrete and the wall will not be strong.
- Masonry is made from the highest part of the foundation. To determine it, use a level or level.
- It is important to align the bottom row of blocks horizontally.
- All blocks can then be planted on glue.
- The fourth rows must be reinforced with metal or fiberglass reinforcement with a diameter of 8 mm.
To finish aerated concrete walls, use ready-made gypsum plaster. The vapor permeability of gypsum will protect concrete blocks from destruction.
Foam concrete blocks
Blocks provide a smooth surface, this is their advantage. Allows you to save on leveling materials.
- Lay a solution of sand and cement on the surface of the foundation in a layer of about 2 cm, and on top - a waterproofing layer (bicrost, roofing felt). Then you can lay out the first row.
- Watch out for the formation of voids in the seams, they are unacceptable. A notched spatula will help to distribute the glue evenly. The seams must be filled.
- If cement mortar is used when installing blocks, it is necessary to wet the blocks with water. The reason is the porosity of the material.
- To improve the operation of the blocks, plasticizers are added to the solution.
Advice: make the height of non-load-bearing walls 2 cm less than load-bearing ones. This way you will reduce the load on the partitions from the floors. The gap created by the difference in height can be easily filled with polyurethane foam.
Cellular blocks
- Level the base, wait until the foundation gains strength, and begin laying.
- Use glue as a mounting compound. For the first layer - cement-sand mortar. To enhance the plasticity of the mixture, liquid soap or a plasticizer is added.
- Laying begins from the corners, observing the direction: a row in one direction, the other in the opposite direction.
- After installing the corner elements, the walls begin to be erected.
Disadvantages of foam concrete blocks and how to get around them in construction
The main disadvantage of laying walls from aerated concrete blocks is poor sound insulation. This property manifests itself when constructing internal thin partitions. When designing, leave a small space for sound insulation - optimally - from 15 to 5 cm on each wall, depending on the material.
The impossibility of constructing load-bearing walls for heavy reinforced concrete structures. If the load is too heavy, static or dynamic, the material crumbles. Wooden floors can be laid on aerated concrete walls. If a more solid supporting frame is required, it will have to be built separately.
The technology of laying walls from aerated concrete blocks requires mandatory reinforcement for structural strength and additional insulation.
Builder tips
Here are some practical tips from builders on how to lay a concrete block correctly.
- Before use, the blocks must be treated with a wet brush - the surface will better absorb the glue and the masonry will become stronger.
- Use corners instead of jumpers.
- Use fishing line when filling the space between corners. Pull it between the upper inner edges. You will get a clear outer line. It will be more convenient if the fishing line is colored.
- Do not apply the solution with a trowel, it is much more convenient - block by block, rubbing evenly.
- Place each block at some distance from the previous one: it will move on its own and grab a little of the mounting mixture.
- Do not hit hollow blocks when leveling: the products are fragile and easily damaged.
- As you work, you will need parts of the blocks. If you don't have experience breaking blocks, use an angle grinder.
- With the adhesive method of installing masonry concrete blocks, the seam is thinner, and the thermal insulation of the room becomes better. Despite the higher price of the glue, the costs are justified due to the low consumption compared to the cement mixture.
- Sometimes the last row of blocks does not match the desired wall height. This is not scary - the blocks can be easily trimmed with a hacksaw.
- Check the diagonals between the corners and the evenness of the masonry immediately and often, then the defect cannot be corrected. Use construction and laser levels, plumb lines. If you want maximum accuracy, you will need a level.
- The internal ends are insulated with polystyrene foam.
If the blocks have a clear geometric shape, you can use glue. The wall will be monolithic, and the seams will be thin.
Laying blocks seems to be a complex process that requires serious skills and experience. Anyone can master this technique if they want. We hope our information was useful!
Technology of work execution
How to build a wall from blocks if the foundation is already ready? For installation of enclosing structures, it is recommended to follow the instructions provided:
- Drawing right angles. Work begins with drawing right angles on the foundation, for which a building level is used. They also check the diagonals of the building, which must be level. If any defects in the base are identified, they are leveled using gas blocks. Otherwise, after several rows of masonry, all non-joints will be visible to the naked eye.
- Reinforcing rods are installed along the edge of the structure. They are designed to pull a fishing line, which indicates the direction of the masonry.
- Installation of building envelope elements on the mortar. How to lay the first row of gas blocks? In this case, it is usually recommended to use a cement-sand mixture (proportion 1:4). First, lay the corner foam blocks, carefully checking them with a building level in all directions. This process should be approached responsibly, excluding even the slightest deviations. To move the gas block in the desired direction, use a rubber mallet.
- The first row of blocks is mounted on a solution that will ensure a reliable connection with the underlying structures. The end sides of the material are connected to each other with special glue. It is also used for the installation of all subsequent rows.
- During the installation process, it is recommended to constantly remove the solution that protrudes out. To do this, use a spatula and a grater.
How to lay the first row of blocks on the foundation