Due to the excellent thermal insulation properties and environmental friendliness of the material, the construction of houses from ceramic blocks is becoming more and more common.
These products are durable, reliable and have proven themselves in the construction of residential buildings. Ceramic blocks consist of natural material – clay – and have a microporous structure.
Features and characteristics of the material
The product is an improved version of conventional brick. This is a large-format building material with voids inside and grooved edges on the sides. Its light weight and large dimensions make the construction of housing practical and reduce the time required for the work.
The high energy efficiency of the block is achieved due to the porous structure and components included in its composition. During the production process, wood shavings are added to the clay batch, which are burned out during subsequent firing, and microscopic pores appear in their place. They increase the thermal insulation qualities of the material.
Inside, the ceramic block is a hollow multi-slot structure. Due to air-filled voids and micropores, the material has low thermal conductivity.
Ceramic blocks in questions and answers
Are there cost savings when building with ceramic blocks?
Eat. You can save on insulation, as well as on the foundation. For ceramic blocks it will not need to be made too powerful, since the weight of walls made of blocks is at least 2-2.5 times less than brick walls. You will also save on the solution.
Ceramic blocks look very fragile - there are many voids. Is it possible to build load-bearing walls of a house from them?
The fact that the blocks are hollow does not affect the strength of the walls in any way. Most ceramic blocks have a strength grade of M100, which allows the construction of load-bearing walls of almost any generally accepted height.
How to fix some household item, carpet, furniture, etc. on a wall made of ceramic blocks with your own hands?
Very simple. Drill a hole with a drill and install the dowel. For very heavy structures, you can use chemical anchors.
What plasters can be used for walls made of ceramic blocks?
To plaster external walls, you can use lime and cement-lime plasters. You can also use special warm mixtures with perlite or expanded clay, which were discussed above.
For interior walls, ordinary lime-gypsum mortars are suitable.
Block sizes and proportions
Because of their shape, the blocks are very practical for laying walls. The technology of their production itself involves the use of high-precision equipment. As a result, the products have very precise dimensions.
Ceramic blocks are joined together using vertical grooves. On their inner edges there are several longitudinal grooves, which serve to tightly connect the material without the use of mortar.
This method of installation does not in any way affect the thermal conductivity of the wall. Since the vertical seam is closed, the edges of the grooves and the wall are subsequently plastered on both sides. For practical plastering, there are small longitudinal grooves on the outside of the blocks.
Block sizes vary. Their length is 25, 30, 38, 44, 50, 51 cm, and their width is 23, 24, 25 cm. There is one rule - the height of the product is always a multiple of the brickwork, which greatly simplifies the work.
The thickness of the structure depends on the length of the product, since the grooves are located on its long side, and with this part the blocks are laid across the wall.
Load-bearing walls are made from products whose length is more than 30 cm, and internal partitions are made from 25-centimeter ones. Narrower products are used for cladding inside buildings and monolithic belts.
When building walls, it is more profitable to use large-format ceramic blocks, since less mortar is consumed and less physical effort is spent than when working with other materials.
How much does it cost to build a house from ceramic blocks? Video:
Advantages of single-layer house walls made of warm ceramics
Especially in areas with mild winters, it is more profitable and easier to build a private house with single-layer stone exterior walls. Modern building materials make it possible to build a single-layer wall of reasonable thickness and required strength that is sufficiently heat-saving for the specified climate.
Compared to two- and three-layer walls, a single-layer external stone wall design has the following advantages:
- The total cost of building a house with single-layer external stone walls with a masonry thickness of up to 51 cm, at least, does not exceed the cost of building a two-layer, and less than a three-layer wall. Such walls make it possible to ensure high consumer properties of housing
, and at the same time reduce the cost of construction in areas with less severe winters. - The homogeneous design of a single-layer stone wall provides greater durability, environmental friendliness, and better resistance to mechanical, fire and climatic influences.
In the thickness of a single-layer wall there are no less durable and impact-resistant insulation and polymer films, there are no ventilated gaps, there is no risk of moisture accumulation at the boundary of the layers, and protection from rodents is not required. - A house with external single-layer walls made of stone materials has a predicted durability of 100 years, and the service life before the first major repair is 55 years. For comparison, the duration of effective operation of buildings insulated with mineral wool or polystyrene boards before the first major repair is 25-35 years. During this period, a complete replacement of the insulation is required.
- A single-layer wall is least susceptible to accidental or deliberate damage.
- A single-layer wall is the key to the absence of hidden defects:
it is impossible to place insulation poorly in it, since the insulation is the masonry material itself; it is impossible to perform a bad vapor barrier in it, since it does not need a vapor barrier; the entire wall is in front of your eyes and you don’t have to worry about the state of the foam or mineral wool hidden in its depths - nothing is hidden in the wall. - Laying a single-layer wall is faster
, as it is made from large-format blocks and does not require additional work on wall insulation. - For laying single-layer walls, as a rule, blocks with a tongue-and-groove side surface are used, which makes it possible not to fill the vertical joints of the masonry with mortar. As a result, the consumption of masonry mortar is reduced by 30-40%
.
For example, in Germany, approximately 50% of private houses are built with single-layer walls made of autoclaved aerated concrete (gas silicate) or porous ceramics. According to the results of a survey on this site, 10% of readers chose single-layer walls for their home.
Read: Which material is better for a single-layer wall - ceramics or aerated concrete?
Porous ceramics are made from raw materials and in a process that is similar to the production of ordinary ceramic bricks. The difference is that components are added to the clay-based mass, which form pores when fired.
Hollow large-format blocks and bricks are made from porous ceramics. The hollowness further increases the heat-saving properties of products made from porous ceramics.
Masonry of a house wall from large-format blocks of porous ceramics with brick cladding of the facade
The compressive strength of porous bricks is higher than that of blocks. But a brick wall turns out to be more thermally conductive compared to masonry made from large-format blocks. In addition, brickwork is more labor intensive. For low-rise construction up to 3 floors, it is more profitable to use large-format blocks rather than porous brick .
On the construction market there are blocks of several standard standard sizes, from which single-layer masonry can be made with a thickness of 25, 38, 44 and 51 cm.
When laying a wall, large-format hollow blocks made of porous ceramics are placed with their long side across the wall.
The thickness of the wall is equal to the length of the block.
For single-layer walls, blocks with a masonry thickness of 38, 44, or 51 cm are used. For double-layer walls with facade insulation, the masonry thickness is most often chosen 38, 44 or 25 cm.
A single-layer wall made of large-format blocks of porous ceramics 44 cm thick with masonry on a heat-saving mortar will have a heat transfer resistance of 3.33 m2*K/W. Such a wall complies with Russian energy saving standards for private houses located south of the St. Petersburg - Kazan - Orenburg line. North of this border, blocks with a masonry thickness of 51 cm are used, or two-layer walls are chosen from blocks of porous ceramics, with a masonry thickness of 25 - 44 cm and the facade is insulated with mineral wool or heat-insulating slabs made of low-density aerated concrete.
In addition to standard-sized blocks, they produce small-format additional blocks - halves and blocks of a size convenient for dressing masonry in corners.
Porous large-format blocks, as a rule, have a compressive strength of 75 or 100 kg/m2 (M75, M100). The strength of porous bricks and small-format blocks can be M150, M175.
For construction, it is advantageous to choose a ready-made house project, which initially involves laying walls from porous large-format blocks. The horizontal dimensions and height of walls, openings, and piers in such a project will be chosen so that the need for cutting blocks is minimized. It is better to adapt the design of a house with walls made of other materials to walls made of large-format ceramics.
Pros and cons of using ceramic blocks
Ceramic blocks are becoming increasingly in demand in the construction of budget homes and commercial buildings due to their cost-effectiveness and performance characteristics.
The material has the following advantages:
- high thermal insulation;
- environmental cleanliness;
- low thermal conductivity;
- increased sound insulation;
- frost resistance;
- the material is non-flammable and has good vapor permeability.
The material retains its characteristics for a long time. Its service life reaches up to 150 years.
The material is fireproof because it is produced by high-temperature firing. It is non-flammable and belongs to fireproof products.
Ceramic blocks have the ability to maintain the required humidity in the room. Walls made of them perfectly retain heat and create a healthy microclimate in the room.
As for the disadvantages, the main ones are fragility and increased moisture absorption. The material should be transported carefully and stored in closed areas.
Insulation of walls made of porous ceramics
When building a house in areas with harsh winters, walls made of warm ceramics require additional insulation.
The outside walls are covered with a layer of highly efficient insulation - slabs of mineral wool or extruded polystyrene foam.
Foam glass slabs are glued to the wall masonry. A plaster metal mesh is placed on top. The mesh and insulation boards are fixed with dowels to the wall.
Less commonly used are more expensive thermal insulation boards made of foam glass with a double-sided coating of fiberglass. Fiberglass provides good adhesion to cement-sand mortar and other building materials. Compared to traditional insulation, foam glass insulation is more durable, has increased compressive strength, does not get wet, does not burn, is environmentally friendly, is not damaged by rodents, and is vapor-tight.
Thermal insulation slabs made of low-density aerated concrete (gas silicate) are another, relatively new material that is gaining popularity for insulating facades. Some manufacturers have learned to make and produce aerated concrete with a density of 200 kg/m3 or less, with a fairly high strength index.
When insulating walls, at the boundary between masonry and insulation, there is a risk of water vapor condensation and moisture accumulation in the wall.
Read: Dew point, vapor barrier and ventilated gap.
For walls made of warm ceramics, the following facade insulation options are most often used:
- Facade insulation slabs made of mineral wool with a density of at least 125 kg/m3 or heat-insulating slabs made of low-density aerated concrete are fixed to the wall. The facade is finished with thin-layer vapor-permeable facade plaster over insulation.
- The walls are insulated with mineral wool slabs of medium density 45 - 75 kg/m3. Insulation boards are placed between the lathing of the ventilated facade.
- Walls insulated with slabs of mineral wool or low-density aerated concrete can be lined with brick, but a ventilated gap must be provided between the cladding masonry and the insulation .
- When insulating with extruded polystyrene foam or foam glass, thin-layer facade plaster over the insulation or brick cladding without a ventilated gap is used to finish the facade.
When insulating walls with polystyrene foam, extruded polystyrene foam or foam glass, it is important to choose the correct layer thickness. If the insulation thickness is too small, steam will condense and moisture will accumulate at the border with the wall masonry . The thickness of the insulation from these materials is selected based on the calculation of moisture accumulation in the wall. Consult local planners on this topic.
When insulating walls with mineral wool or aerated concrete, moisture accumulation in the wall does not occur regardless of the thickness of the insulation.
When choosing a method of finishing a facade, it should be taken into account that the service life of mineral wool and polymer insulation is much shorter than that of brickwork facing. Under brick cladding, it is recommended to use more durable mineral insulation - heat-insulating slabs made of low-density autoclaved aerated concrete or foam glass slabs with double-sided fiberglass coating, for example, the FOAMGLAS® BOARDS WALL BOARD W+F brand.
Thermal insulation slabs made of autoclaved aerated concrete have a density of 100 - 200 kg/m3 and a dry thermal conductivity coefficient of 0.045 - 0.06 W/mOK. Mineral wool and polystyrene foam insulation have approximately the same thermal conductivity. Slabs with a thickness of 60 - 200 mm are produced. Compressive strength class B1.0 (compressive strength not less than 10 kg/m3.) Vapor permeability coefficient 0.28 mg/(m*year*Pa).
Well-known brands of thermal insulation slabs made of cellular concrete in the construction market are: autoclaved aerated concrete “Multipor”, “AEROC Energy”, as well as non-autoclaved aerated concrete “Betol”.
Thermal insulation slabs made from autoclaved aerated concrete (gas silicate) and foam glass are a good alternative to insulation made from mineral wool and expanded polystyrene. True, quality costs money.
Watch a video on the topic of laying the walls of a house from porous large-format ceramic blocks:
⇆
More articles on this topic
- Self-learning room thermostat for gas boiler
- Ventilation of the attic and upper floors of a multi-storey building
- How to make drainage around the foundation of a house with your own hands
- House with monolithic walls made of large-porous expanded clay concrete
- Vertical layout of the site during the construction of a private house
- Dry heated floor without screed in a wooden house
- Setting up, power adjustment, errors of the BAXI gas boiler
- How to reduce the high gas consumption of a boiler for heating a house
How to build a house from ceramic blocks?
Construction of a house from porous ceramic blocks begins with preparing the land.
Factors to consider when choosing a site:
- the size of the house itself;
- existing communications;
- nearby infrastructure;
- entrances to the site.
The next step is choosing a house project.
After all the preparatory steps have been completed, they proceed directly to the earthworks and construction of the foundation.
Since the material is light in weight, it is not necessary to build a permanent foundation. A strip or column foundation is quite suitable. The procedure for carrying out earthworks also depends on the choice of one or another type of base. The quality of the soil itself and the level of groundwater also matter.
Before starting masonry, it is necessary to waterproof the foundation, since ceramic stone absorbs moisture. Bitumen roll material is used, the sheets of which are laid overlapping.
Solutions used
The walls are laid using innovative technologies and materials. The following types are used: one-, two- and three-layer.
When constructing external load-bearing walls, a dry heat-insulating mixture based on perlite is used as a solution. Internal partitions are constructed using cement-sand mortar.
The thermal resistance of the walls of the house depends on the type of solution, its consistency and method of application. Under no circumstances should you pour a liquid solution directly from a bucket onto a horizontal row of ceramic products.
During such work, about a third of the solution is lost and the performance of the material deteriorates. When the voids are filled with mortar and there are wide seams between the blocks, the latter begin to collapse. This occurs due to different thermal expansion of the solution and ceramics.
The appearance of such a wall is also not very good. It has uneven seams, different masonry line heights and smudges on the surface.
Therefore, the laying of ceramic blocks is carried out using an adhesive perlite solution. A properly prepared mixture allows you to make a seam between rows of no more than 10 mm, which corresponds to the technical characteristics of laying the material.
This method improves the thermal insulation qualities of the masonry and reduces heat loss through the seams.
There is an option to use it instead of a solution of polyurethane foam. It is applied to the surface of the laid row in two parallel lines, retreating from the edge of the row by 40 mm.
A wall made of ceramic blocks uses four times less mortar than a similar wall made of simple brick.
The solution should be of such a consistency that it does not fall into the voids of the blocks. This can be avoided in another way - by laying a fiberglass mesh on a row or by adding plasticizers to the mixture.
It is better to build houses from ceramic blocks at above-zero temperatures and preferably with a warm solution. If work is carried out at low temperatures, antifreeze additives must be added to the mixture.
Warm ceramics. Grooving and drilling. Recommendations from experts. Video:
Features of masonry walls made of large-format ceramic blocks
It should be noted that wall materials for single-layer walls have mediocre, both mechanical and thermal properties . We have to improve them with various design tweaks.
A large-format ceramic block is pressed against an already installed block and lowered vertically onto the mortar so that no gap is formed in the vertical seam between the blocks.
Hollow ceramic blocks are cut using special stone-cutting saws - hand-held or on a stone-cutting machine.
To lay communications in the masonry of the wall, you have to punch holes - fines. Horizontal and vertical fines along the entire length of the wall or the height of the floor are allowed to be made with a depth of no more than 3 cm. Short vertical fines located in the lower third of the floor height are allowed to be made up to 8 cm deep.
Deeper grooves weaken the wall's masonry. Therefore, their dimensions and location must be indicated in the project and confirmed by calculations. Deep and extended fines are especially dangerous for walls less than 30 cm thick.
After laying communications, the grooves in the external walls are filled with heat-saving mortar.
Connection of external and internal walls from large-format ceramic blocks
Internal walls can be load-bearing , taking the load from the structures lying above - floors, roofs, and self-supporting - partitions.
Internal load-bearing walls are erected simultaneously with the laying of external walls. Load-bearing walls must rest on the foundation. In turn, load-bearing walls serve as support for the floors and roof truss system.
1 - load-bearing internal wall, 38 or 25 cm; 2 - thermal insulation, 5 cm; 3 - outer wall
Internal load-bearing walls are connected to the outer wall using masonry bonding. To do this, insert a block of the inner wall, position 1 in the figure, into the outer wall, position 3, to a depth of 10-15 cm. The blocks are inserted not in each row, but every other row. In the second course of masonry, the inner wall block is simply adjacent to the outer wall masonry block.
Partitions in the house serve only to separate rooms. They do not bear the load from the overlying structures of the house. The laying of partitions can be done simultaneously with the construction of external walls, but it is more convenient to do this after the construction of the frame of the house.
In any case, the height of the partition should be 2-3 cm below the ceiling so that the ceiling cannot put pressure on the partition. The gap between the ceiling and the masonry of the partition is sealed, for example, with a strip of mineral wool.
Non-load-bearing internal walls and partitions can be connected to external walls using galvanized steel anchors, placing at least 3 of them in the masonry joints.
along the height of the partition. The basis for partitions made of masonry materials can be a ceiling or a concrete floor screed on the ground. The ceiling or other foundation must be designed to bear the load from the weight of the partition. If necessary, strengthen the base by installing a monolithic reinforced concrete beam under the partition.
The thickness of the masonry is chosen based on the need to provide the necessary sound insulation between rooms. Blind partitions without doorways that separate living rooms from other rooms in the house are recommended to be made from ceramic blocks with a masonry thickness of 25 cm.
Other partitions are made of ceramic blocks or bricks with a masonry thickness of 12 cm.
To improve sound insulation, it is recommended to fill vertical joints in the masonry of partitions and internal walls with mortar.
Read: Soundproofing frame partitions made of plasterboard.
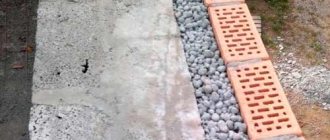
Foundation and basement of a house made of ceramic blocks
If the foundation of the house is made of prefabricated concrete blocks, then a monolithic reinforced concrete belt must be installed on top of the blocks. The masonry of walls made of large-format ceramic blocks should be supported by a continuous strip of reinforced concrete.
The thickness of the single-layer walls of a house made of large-format blocks is quite large: 38 - 51 cm. To reduce construction costs, the width of the foundation (basement) walls is made smaller than the load-bearing walls of the house. The wide wall of the house overhangs on one or both sides over the narrower wall of the basement. Vertically, the wall of the plinth falls behind the surface of the masonry walls of the house.
Without performing calculations, the width of the plinth wall can be made 20% narrower than the thickness of the masonry made of porous blocks. For example, with a block masonry thickness of 44 cm, the width of the plinth wall can be reduced to 35 cm. Reducing the width of the plinth wall by 30% is allowed, but must be confirmed by the designer’s calculations. The horizontal surface of the wall overhang above the plinth is plastered from below.
To protect the ceramic walls of the house from splashing water and moisture when the snow melts, it is recommended to choose a height of at least 30 cm above the level of the blind area.
Ceiling in the wall made of large-format ceramic blocks
1 - compensation tape; 2 — seam reinforcement (if necessary); 3 - reinforced concrete belt; 4 - thermal insulation 10 cm; 5 — additional ceramic block; 6 - wall made of ceramic blocks; 7 - a cushion of cement mortar no less than 2 cm. 8 - prefabricated monolithic, often ribbed ceiling; 9 - concrete screed 5 cm; 10 - thermal and sound insulation.
At the level of supporting the floors on load-bearing walls made of ceramic blocks, a continuous reinforced concrete belt is installed, pos. 3 in the picture. A continuous belt is installed on top of all load-bearing walls of the house. A monolithic reinforced concrete belt forms a rigid frame that absorbs the vertical and horizontal loads of the floors, as well as the upper floors, and evenly transfers them to the load-bearing walls of the house.
The installation of a monolithic belt is mandatory if the floor is made of monolithic or precast reinforced concrete. Reinforced concrete belt is also required in seismic hazard areas. The minimum dimensions of a monolithic reinforced concrete belt in section are 150x150 mm.
By the way, you can also use large-format ceramic blocks to install floors in your home.
Read: How to make a prefabricated monolithic frequently ribbed ceiling from large-format ceramic blocks.
The length of support of a prefabricated reinforced concrete, prefabricated monolithic or monolithic floor on a wall made of large-format porous ceramic blocks must be at least 125 mm.
Steel and wooden beams of prefabricated floors rest on a monolithic reinforced concrete belt with a width of 150 mm and a height of at least 100 mm. The belt is installed under the ceiling.
In one-story houses, wooden floor beams can be supported on a masonry of three rows of solid ceramic bricks. There is no need to make a monolithic belt in such houses.
Window in the wall made of porous ceramic blocks
1 - seam reinforcement (if necessary); 2 — additional ceramic block; 3 - thermal insulation 10 cm; 4 - window; 5 - masonry made of large-format ceramic blocks; 6 — reinforced concrete lintels; 7 - reinforced concrete belt; 8—frequently ribbed ceiling; 9 — heat and sound insulation slabs; 10 - concrete screed 5 cm; 11 - compensation tape.
As lintels over window and door openings, item 6 in the figure, it is recommended to use reinforced concrete products - crossbars, specially designed for walls made of large-format ceramic blocks. Such lintels have dimensions convenient for placement in the wall and do not require adjustment to adjacent wall elements.
In a single-layer wall, it is recommended to place a window or door along the thickness of the wall, closer to its middle. In this position, heat loss in the slopes at the junction will be minimal.
Heat loss through windows can also be reduced by using modern designs. When making heat-saving windows, the number of chambers in a double-glazed window is increased, special glass with a selective heat-reflecting layer is used, and the thickness of the window frame is increased.
It is recommended to install roller shutters on the windows of a private house from the outside. Closed roller shutters not only protect windows from burglary, but in severe frosts they reduce heat loss through the windows, and in the summer heat they reduce overheating of the house from the sun's rays. It is better to foresee the installation of roller shutters on windows in advance, at the design stage of the house.
Connecting the roof to a wall made of ceramic blocks
1 - mauerlat beam; 2 - monolithic reinforced concrete belt; 3 — additional block made of porous ceramics; 4 - masonry of the wall from large-format blocks; 5 - insulation boards
The roof of the house rests on walls made of large-format ceramic blocks through a monolithic reinforced concrete belt, position 2 in the figure. A continuous belt is installed on top of all load-bearing walls of the house. A monolithic reinforced concrete belt forms a rigid frame that absorbs the vertical and horizontal loads of the roof and evenly transfers them to the load-bearing walls of the house.
Wall construction technology
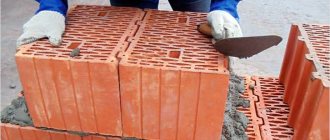
The construction of walls is carried out using a certain technology. First, a layer of thick mortar is applied to level the base. They start laying blocks from the corners with whole blocks or special corner elements. You can also use half blocks. The products are easy to process and can be easily cut into pieces.
Then the horizontal rows are installed, monitoring the vertical and horizontal levels of each block in the row. To do this, use a cord stretched between the corners and a building level.
The layer of mortar on horizontal rows should not exceed 15 mm, so as not to reduce the thermal insulation properties of the block. It is laid in compliance with the dressing rules when constructing the walls of a residential building, that is, it is shifted by 10 cm in relation to the block of the previous row.
Vertical seams between ceramic blocks are not filled with mortar, since the products have a grooved connection system. Each subsequent block is inserted into the groove of the already fixed one and adjusted to each other with a rubber hammer. The connection must be tight.
In the case of joining a cut half and a whole block, apply a layer of mortar to the vertical seam and connect them tightly. To ensure that the material does not absorb water from the solution, it is moistened with water before starting work.
When constructing internal partitions and external walls at the same time, the first row is connected with mortar. Already in the second row, the block of the inner wall extends 15 cm into the outer one. When constructing internal walls, grooves of the appropriate size are later made on the external walls.
A house using ceramic blocks can be built much faster than a brick one. Because larger material is used.
The final stage of building a house is the installation of rafters and roofing work, as well as the installation of windows and doors. After their complete construction, the walls are plastered and tiled, and finishing work is carried out inside the house.
Do-it-yourself bricklaying and types of schemes. - there is more useful information here.
Then the walls are additionally insulated. Moreover, blocks larger than 38 cm in length do not need to be insulated. Their thermal insulation properties are sufficient to retain heat indoors. Walls built from 25 and 30 cm blocks must be insulated from the outside.
The thickness of the insulation depends on the temperature zone in which the house is located. As a rule, mineral wool with a thickness of 60 to 100 mm is used. To prevent moisture from accumulating in the wall, the vapor permeability of the ceramic block and insulation must be the same.
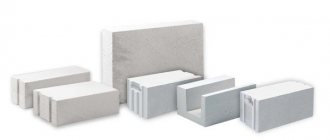
Types and sizes of ceramic blocks
According to GOST sizes, ceramic blocks are as follows:
- Length – 250, 380, 398 or 510 mm;
- Width – 180, 250 or 255 mm;
- Height – 140, 188 or 219 mm.
The minimum size of a stone block is 250x120x140 (i.e. 2.1 NF - 2.1 from the size of a standard brick 250x120x65). In addition to the 14 standard sizes specified in the standards, some manufacturers produce blocks with other dimensions. But it is best to buy GOST products. They simplify the calculation of wall thickness and allow you to use ordinary bricks side by side in masonry without any problems.
The outer walls of a ceramic block are always larger than 8 mm. The thicker they are, the denser and stronger the stone. However, as the density increases, the thermal conductivity of a ceramic block increases. Here you need to look for a middle ground. It all depends on how many storeys the house will be and whether it is planned to insulate its external walls.
Table of characteristics of a ceramic block of the Braer brand
| Characteristic | Format | ||||
| 10.7NF | 14.3NF | 7.1NF | 5.2NF | 12.4NF | |
| Length, mm | 380 | 510 | 510 | 380 | 440 |
| Width, mm | 250 | 250 | 130 | 130 | 250 |
| Height, mm | 219 | 219 | 219 | 219 | 219 |
| Weight, kg | 17 | 24 | 13 | 9,5 | 19,4 |
| Brand, kgf/cm2 | M 75-125 | M 75-125 | M 75-125 | M 75-150 | M 100-125 |
| Frost resistance, cycle | 50 | 50 | 50 | 50 | 50 |
| Water absorption,% | 11-14 | 11-14 | 11-14 | 9-11 | 11-13 |
| Quantity on pallet, pcs. | 60 | 40 | 72 | 108 | 40 |
| Loading rate per vehicle 20 tons, pcs. | 1080 | 800 | 1440 | 2160 | 960 |
| Emptiness, % | 59 | 59 | 49 | 49 | 59 |
| Thermal conductivity, (W/m °C) | 0,14 | 0,14 | 0,166 | 0,166 | 0,139 |
Like standard brick, its larger counterpart is divided into ordinary and facing products. The former are used in the construction of internal partitions, as well as external wall structures, which will then be covered with facade finishing. The latter have a polished side and are intended for laying exclusively external walls of houses. They no longer need additional decor on top.
Useful tips
In order for a house built from ceramic blocks to be comfortable for living and durable, typical mistakes in its construction should be avoided.
Under no circumstances should blocks be laid with the long side along the wall line. This completely disrupts the adhesion of the blocks to each other and negates their thermal insulation qualities.
It is unacceptable to combine the material with brick or any other building material. This disrupts the thermal conductivity of the wall and leads to moisture condensation and mold.
You should carefully monitor the bandaging of the wall and the thickness of the seams between the blocks. Violation of this rule will lead to uneven loads and reduce the thermal insulation properties of the wall.
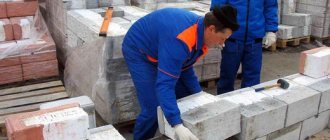
Building a house from ceramic blocks, step-by-step instructions
If a ceramic block is chosen as the wall material, you need to think in advance whether you will hire craftsmen or install it yourself. In the latter case, you need to work carefully, and we’ll tell you exactly how now. It is necessary to arrange waterproofing on the foundation, after which a layer of mortar is evenly applied. The installation of blocks begins from the corners, where whole ceramic blocks are placed and aligned horizontally. Moreover, the solution is used only in horizontal joints; vertical joints are joined dry using a tongue-and-groove system located at the ends of each block. To level and adjust the blocks, you must use a mallet. When using a solution or special glue that contains water, all work should be carried out up to +5 degrees. If there are breaks in work, cover the top of the wall with film to prevent moisture from getting inside. This way you can build your own house.