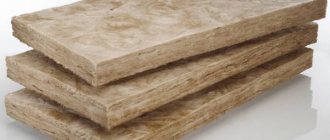
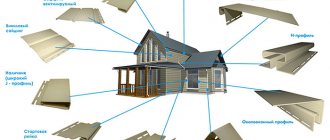
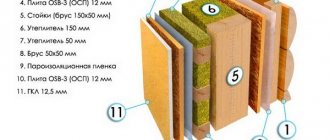
A little about polystyrene foam
Installing expanded polystyrene boards under siding is a profitable solution for creating an optimal thermal insulation layer. In addition, the material has good sound insulation characteristics, is environmentally friendly and is not subject to combustion.
Despite the fact that polystyrene foam is not flammable, it melts when exposed to high temperatures or open fire. At the same time, combustion products are released into the atmosphere, which, if they enter the human respiratory system, can cause injuries incompatible with life. Currently, two types of polystyrene foam boards are used in individual construction; any of them can be used to insulate your own home from the outside, followed by finishing for siding:
- Regular foam;
- extruded.
| Type of insulation | Thermal conductivity, W/(m*K) | Water absorption,% | Density, kg/m3 |
| Styrofoam | 0,03 | 0,1-0,2 | 25-35 |
| Extruded polystyrene foam (expanded polystyrene) | 0,028 | 0,3-0,5 | 32-38 |
The table shows the average values of material coefficients; depending on the manufacturer, they may differ slightly from those indicated.
Features of the material
Polystyrene foam is 98% air, which allows it to retain the maximum amount of heat in rooms. Therefore, this material is used not only for insulating the walls of residential buildings, but also for ceilings, floors, basements, foundations and warehouses.
Is there really one reason why polystyrene foam has become so popular? Not at all. There are other positive qualities inherent in this material.
Advantages
Let's start, as usual, with the advantages, because it is thanks to them that home owners choose polystyrene foam for insulation:
- Sound and thermal insulation of premises.
- Light weight, which helps reduce the load on load-bearing walls. This means that expanded polystyrene is also suitable for very old buildings.
- Versatility of use. It can be used for both interior and exterior work, for residential and non-residential premises.
- Moisture-repellent properties.
- Affordable price. The cost of polystyrene foam is quite low compared to other materials.
- Duration of operation. This advantage can be considered relative, since unprotected foam is quickly destroyed when exposed to sunlight. But if it is covered with facing material immediately after installation, the service life will be up to 30–35 years.
- Safety. The foam is coated with antipyrines, which prevent the heat insulator from smoldering and releasing caustic substances.
- Prevalence. This insulation can be found at any hardware store. At the same time, slabs of different densities and thicknesses are presented at one point.
As we see, there are really a lot of positive aspects, and now it becomes clear why those who want to insulate themselves buy polystyrene foam.
Flaws
Pros are pros, but each material also has several disadvantages. They should not be ignored at all, and sometimes a few disadvantages can outweigh a large number of positive aspects. Polystyrene foam also has its disadvantages:
- fragility. A slab of any density and thickness breaks easily. This must be taken into account during the cutting and installation process; it is advisable to be as delicate as possible with this material;
- low vapor capacity. You should not rely on natural ventilation if the house is lined with foam plastic. Vapors will accumulate in the rooms, and this will lead to a deterioration in the microclimate. This material is categorically not suitable for insulating wooden buildings;
- does not tolerate exposure to ultraviolet radiation and some paints and varnishes;
- if the foam is not coated with fire retardants, it easily ignites and produces acrid smoke;
- love of rodents and birds. Rodents settle in slabs and make their own nests. Birds pick holes in slabs that are not covered with facing material.
Having familiarized itself with all the advantages and disadvantages, the buyer makes his choice whether or not to purchase this insulation.
Prices for different types of primer
For reliable adhesion of the insulation to the walls, a primer is required. There are various types of compositions on the building materials market:
- Acrylic primers from other manufacturers cost from 330 rubles per 10 liters. They are suitable for all surfaces except metal. Dries in 5 hours.
- Alkyd primers are suitable for wooden surfaces. Their cost is from 80 rubles per 1 kg.
- Polyvinyl acetate primer dries very quickly, within 30 minutes. Suitable for all types of surface. Its cost is from 110 rubles per 1 kg.
- Epoxy primers are used to treat concrete walls.
- Mineral primers are widely used for exterior brick walls.
When in doubt, it is better to purchase a universal primer. It is suitable for any surface. For interior work, Ceresit CT 17 is recommended. The price of a ten-liter container ranges from 430 to 700 rubles.
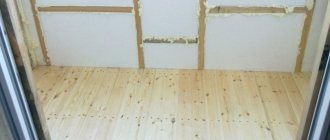
Step 3: installation of insulation under window openings and near radiators
Installation of slabs begins with the location of batteries, window and door openings. These areas are carefully measured, and then the values are transferred to the insulation for further cutting. The forms cut according to the markings are applied to sections of the wall for additional verification. If the dimensions match, proceed to subsequent installation.
To begin with, the construction adhesive is diluted according to the instructions, stirred and left. Next, the glue is applied in an even thin layer to the slabs. Usually one of the application schemes is selected for this. The classic version involves coating the edges of the sheet and several points in the middle.
The processed fragment is applied to the wall, leveled and pressed. The remaining slabs are laid until the area is completely filled. This scheme is suitable for frame walls and for insulating loggias and balconies with foam plastic.
Step 4: insulating the walls
The walls are insulated from bottom to top. The next row moves a little. To eliminate unevenness, a level is used after each row. After installing the foam on all surfaces, the structure is left for 3 days for the glue to completely harden.
Step 5: caulking and doweling
If gaps form between the insulating sheets, you can use polyurethane foam. Large gaps between the sheets are filled with pieces of insulation and then blown in with foam. After 3 hours, excess foam is cut off with a knife, and the joints are coated with glue.
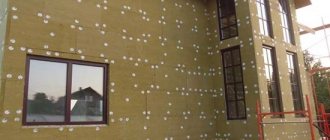
The finished foam layer is additionally secured using mushroom dowels. Installation of fastening umbrellas will prevent unwanted peeling of the material and ensure long-term operation.
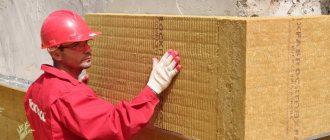
Step 6: reinforcement and plaster
To protect the insulating layer from external influences, it should be covered with finishing materials. Plaster is often used. It requires preliminary installation of reinforcing mesh. It is cut into strips the size of the height of the wall and, holding it, the plaster solution is applied with a spatula. The layer thickness must be at least 5 mm.
To securely connect the mesh strip to the next one, you must leave a two-centimeter edge. The next strip is overlapped by about 1 cm.
Reinforcement is first carried out along the perimeter of the openings and in the places where the batteries are installed, then along the corners and slopes. And open surfaces are processed last.
Pros and cons of insulation from the inside
Before doing the work yourself, you need to study all the nuances. Thermal insulation of indoor walls is not the right solution from the point of view of such a science as heating engineering. This method becomes only acceptable if it is impossible to use another. The disadvantages of insulating the walls of a house from the inside are as follows:
- reduction of usable area of internal premises;
- the measures taken do not prevent the walls from freezing, and therefore do not protect them from destruction;
- the point of dew (condensation) appears inside the load-bearing wall of the house (there is a high probability of moisture accumulation).
The dew point is at the junction of the wall and the foam, so to avoid condensation it is extremely important to apply a vapor barrier
Insulation with foam plastic from the inside can only be done if there is a serious need for it. Most often, DIY work should be done in the following cases:
- Thermal insulation of premises in a multi-storey building. To insulate an apartment with polystyrene foam from the outside, you will need to hire industrial climbers. Such services are expensive, so an alternative option is to use protection from the inside.
- Insulation of house walls with new cladding. When doing work with your own hands in a private house, it is necessary to take into account the condition of the facade finishing. If the external work was completed relatively recently, dismantling the cladding is not practical from an economic point of view. In this case, it is also possible to fix the thermal insulation from the inside of the walls.
Styrofoam harbors mice
And one more fact that needs to be pointed out when assessing the pros and cons of foam insulation is that mice breed in the material.
Expanded polystyrene is an ideal habitat for them, because it is warm and soft. Therefore, when insulating with polystyrene foam, block the access of mice. To do this, you can finish the places where rodents can enter with mineral wool, which mice do not like.
Therefore, although polystyrene foam has a number of positive qualities, we should not forget about its disadvantages. Therefore, it should be used thoughtfully and in accordance with all the technological features of the material.
How to properly insulate a house with foam plastic from the outside
Everyone knows that a significant percentage of heat loss occurs on the walls of the house, especially if they are not insulated. In this case, even a modern and efficient heating system will not cope with high-quality heating of the room. If you know how to insulate the outside of a house with foam plastic with your own hands, you can save a lot and not need to hire a specialist.
Advantages of external wall insulation with foam plastic
Insulating a house from the outside can be done in two ways: outside and inside. Experts advise carrying out work from the street side, in this case:
- the usable space of the house is preserved;
- there is no need to perform an additional layer of vapor barrier;
- a multilayer structure is provided that prevents moisture from entering the room;
- the heat-saving properties of the house increase, which allows you to save money by reducing heating costs.
Which polystyrene foam is better to insulate a house?
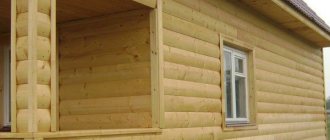
You may be wondering whether it is possible to insulate a wooden house with polystyrene foam, and also how much such insulation costs. Wooden houses, just like ordinary ones, need insulation. The heat will quickly escape through the timber, which means the house will become uninhabitable in the winter. The price of insulation depends on the size of the house, as well as which company you use. You can save money by insulating the outside of your home yourself.
How to choose polystyrene foam for cladding a house? For insulating facade work, the best option is foam in the form of sheets, the thickness of which is at least 10 cm. Knowing how thick the foam is to insulate the outside and inside, you can achieve good results and save on heating your home.
There are 2 types of foam:
- Fragile. This material breaks and crumbles easily.
- Building. It is very dense, but at the same time light. It cannot be pushed.
Both types are excellent for insulation work: the denser one retains heat well, while the porous one can withstand distortions and is cheaper.
Find out how to insulate the walls of aerated concrete houses
Positive properties of polystyrene foam for external insulation
- ease of use, easy attachment to the surface;
- affordable price;
- seismic resistance;
- not subject to rotting;
- high heat-saving characteristics.
The disadvantages of foam insulation are as follows:
- It is an artificial material, so environmental friendliness is questionable.
- Flammable.
- During the combustion process, harmful substances are released;
- Mice really liked it as a place to live.
Step-by-step instructions for insulating the exterior of a house on your own
It will be useful at work:
- sheet foam;
- fasteners;
- assembly adhesive;
- reinforced mesh;
- putty;
- primer;
- drill;
- sharp knife;
- spatulas;
- hammer.
Step 2: preparing the walls
Step 3: foam installation
If the outside wall of the house has been properly prepared, then the process of gluing the foam sheets will take a little time. The glue is applied to the sheet using a spatula, the excess is removed with a notched spatula. Additionally, glue is applied to the wall surface. A sheet of foam plastic is carefully applied to the wall and lightly tapped to secure it.
Step 4: fixation with nails
The external surface of the house is left for 3 days for the glue to dry, after which it is secured with special type of nails. They are hammered along the edges and, for reliability, one in the center.
Step 5: Gluing the mesh
A layer of glue is applied to the foam, then a mesh is applied. Using a spatula, you need to smooth it out and add adhesive if necessary. First, the mesh is stretched over the corners, then distributed over the entire surface. From the edge you need to leave 10 cm of mesh without glue, for joining with the next layer. When the surface dries, sand it down and apply finishing putty or decorative plaster on top.
As you can see, the technology for insulating the facade of an ordinary or log house with polystyrene foam is simple, and if carried out correctly it will give tangible results. Now you know how to carry out external insulation of a house with polystyrene foam with your own hands and you can decide for yourself whether it is worth insulating with this material or not.
Reinforcement and plastering of foam plastic
Sometimes the insulation of a facade with polystyrene foam needs to be extended over two seasons - left to overwinter at some stage. Without harm to materials, it can be left only after applying a leveling layer. Simply attached polystyrene foam (EPS) cannot be left. It is recommended to keep it even packed in packs indoors and not outside. So you can only stop after plastering.
Sticker of reinforcing mesh on corners
The mesh is used as a façade mesh for exterior work (the inner mesh will simply crumble from the glue). Density 140-160 g/sq. m. First, glue the corners. All corners are reinforced - both external and internal, and slopes. Important! From now on, you need to use a universal composition, and not the one on which the foam was glued. The glue is diluted a little thinner than indicated in the instructions - it should stick well to the spatula, but be easily pressed through the mesh.
For reinforcement, you can use a ready-made corner with a mesh, you can cut strips from a roll (30 cm wide) and glue them. It’s easier to work with a ready-made corner, cheaper - with a piece of mesh. If you make it from a roll, cut strips across the roll, you get pieces a meter long. Fold them in half lengthwise and press the fold well with a spatula. You need to fold it so that the edges of the mesh are wrapped inward (it was in a roll). If it turns out the other way around, they will stick out from the layer of glue and it will be difficult to work.
Corner reinforcement mesh
Either way the work is almost the same. A strip of mortar 6-7 cm wide and 2-3 mm thick is applied to the corner on both sides. If you are gluing not a finished corner, but bent strips of mesh, then the length of the area filled with mortar should be 5-7 cm shorter than the cut piece (93-95 cm).
A corner or piece of bent mesh is placed on top. Running a spatula over the mesh, lightly press it into the glue. Herringbone movements - from top to bottom and to the side.
About half of the mesh on the sides remains without glue. This is normal - it will be easier to join it with foam reinforcement in the plane of the wall. Also, without glue, a strip remains at the top if you glue from pieces. When gluing the next piece above, apply glue directly to this “empty” mesh and cover it with the next piece on top. This way the joint is the same thickness as the entire corner.
When forming an angle, we try to make it even. If you can’t do it with a regular spatula, you can use a corner one (pictured above). It won't be difficult - just move from top to bottom with one click.
Foam reinforcement on walls
Polystyrene foam and EPS are reinforced by applying a layer of plastic mesh, which is pressed into the adhesive composition (universal). The procedure is as follows:
- Apply a layer of glue (universal composition) to the wall with a spatula (width at least 350 mm). The width of the strip is 5-7 cm narrower than the mesh (the mesh is usually 100 cm wide).
- Roll out the mesh from top to bottom, so that 5-7 cm from one edge are free of glue.
- Pass the spatula over the mesh, pressing it into the glue. They try to make the surface smooth.
The mesh is rolled out onto the laid layer of glue and pressed into it with a spatula.
- The second strip of glue is applied, starting from the section of the “empty” mesh. A new piece of reinforcement is applied close to the one already laid. It turns out there are two layers of stack at the junction, but the thickness of the glue is the same as on the rest of the wall.
It can be seen that part of the mesh remains without solution
The glued mesh is left to dry. It should take at least half a day, or better yet, a day. Then take a grater with sandpaper and smooth out all the unevenness.
What do you need for work?
Before proceeding with the installation of foam plastic, the necessary materials and tools are purchased and prepared.
Materials:
- Styrofoam;
- Adhesive composition suitable for the material;
- Polyurethane foam;
- Dowels;
- Primer and plaster;
- Construction mesh for reinforcement;
- Starting bar.
Tools:
- Drill (it’s good if you have a mixer attachment);
- Notched trowel for applying adhesive;
- Regular spatulas;
- Construction knife;
- Container for diluting glue;
- Roulette;
- Level;
- Drill;
- Graters with teeth of various sizes.
It is important to purchase the “correct” polystyrene foam to insulate walls. To do this, its density should be about 25 kg per cubic meter
The thickness of the slabs should be at least 8 cm, most often 10 is used.
You can attach the foam with glue or dowels. But as practice shows, both are better. The pasted sheets are fixed in several places with nails for greater strength.
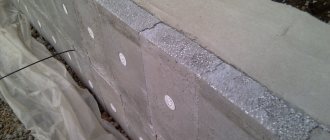
If desired, a starting profile profile is installed at the bottom of the wall, which serves to secure the position of the sheets and prevents them from sliding during installation. It also prevents damage to the foam by rodents, so if there is a problem with uninvited guests visiting, then it is better to use it.
Rules for choosing polystyrene foam for facade insulation
PSB-S-25 foam is best suited for façade insulation. There are several reasons for this:
- this material has sufficient density and strength for installation on any supporting base;
- has a degree of thermal conductivity low enough to prevent heat loss from the interior;
- is light in weight;
- easy to transport;
- is characterized by low cost;
- self-extinguishing;
- durable.
Foam plastic for facade insulation
The most important indicator of the quality of PPP is density. It depends on the production method and the characteristics of the foam granules. During sintering, polystyrene foam granules swell; when pressed, they stick together. The stronger the pressing, the tighter the granules adhere to each other. The degree of thermal conductivity and vapor permeability of the product at the outlet directly depends on this.
What's bad about low-density foam?
With a low density of EPS, its structure is relatively loose, since the distance between the granules is significant. These gaps are the reason for the good vapor permeability of the material. But the polystyrene foam granules themselves, due to their higher density than the air between them, allow steam to pass through much worse.
This leads to the accumulation of moisture inside the insulation, which is removed more slowly than required. As a result, the plaster applied to the foam will attract moisture and gradually deteriorate. The same can be said about other materials adjacent to the insulation, or located next to it. Therefore, it is so important to make sure that the foam purchased in the store is of sufficiently high density.
What is sold under the brand name PSB-25
The high demand for polystyrene foam has led to the emergence of a large number of large and small manufacturers and distributors of polystyrene foam on the market. They all understand that this material is chosen as insulation primarily due to its low price. This fact, coupled with high competition, forces manufacturers to win back their market segment by reducing prices, which cannot but affect the quality of their products.
For this reason, the situation on the market is such that under the PSB-25 brand they sell products whose quality does not stand up to criticism. This also applies to foam plastics of other popular brands.
Video - Polystyrene foam PSB-S 25 TU and foam plastic PSB-S 35 TU
It is important to know: for many years, the production of polystyrene foam has not been standardized by GOST to the extent necessary. Each enterprise that manufactures PPP develops its own technical specifications (TS) regulating the technological process. This gives the owner of the enterprise freedom of action, and he has every right not to comply with previously adopted standards.
Foam production diagram
The need to reduce the price of the finished product forces the manufacturer to reduce the cost of the material. GOST according to PSB-25 allows the production of a product with a density of 15 to 25 kg/m3 under this brand.
This has led to the fact that building materials stores under the PSB-25 brand offer foam plastic, the density of which is significantly lower than 25 kg/m3. But, as mentioned above, this is not consumer deception. This is permitted by the standards body.
How to find out the density of foam plastic
How to determine the density of foam plastic
The density of PPS is calculated as follows: 1 m3 of this material is weighed. The resulting value is an indicator of density. That is, 1 m3 of PSB-25 should weigh 25 kg. In practice this is extremely rare.
The most common situation is that foam plastic with a density of 16.1-16.5 kg/m3 is sold under this brand. You can check the density of the sample directly at the retail outlet where it is purchased.
As a rule, all building materials stores or market pavilions are equipped with equipment for weighing goods. It is necessary to take a sheet of foam plastic of the required thickness and calculate its volume. To do this, multiply the length of the canvas by its width and height (thickness). Then you need to find out the weight of this sheet and divide the resulting value by the volume indicator.
Example calculation for a sheet 2 m long, 1 m wide, 2.5 cm thick:
- calculate the volume of the sheet: 2 m x 1 m x 0.025 m = 0.05 m3;
- weigh the sheet;
- divide the weight by the volume.
Calculations can be done using a calculator, which is available on any mobile phone. This approach will help you buy the insulation that will serve flawlessly for many years.
Video - How to determine the density of foam plastic
Advantages of the material
Despite its cheapness, polystyrene foam is a high-quality and safe material. Information about toxicity is just a myth. The main property due to which it is actively used in house cladding is its high thermal insulation qualities.
The material also has many more advantages:
- High noise insulation properties.
- Light weight, which reduces the load on the foundation and walls.
- The material is water-resistant and does not deform in high humidity.
- Does not ignite.
- Durable and does not lose its properties for about 50 years.
- Prevalence and accessibility. You can buy polystyrene foam at any hardware store.
But all these advantages apply only to high-quality material and with proper installation. How to properly cover a house with polystyrene foam?
Advantages and disadvantages of use
Finishing the facade with polystyrene foam and plastering are considered one of the most profitable ways to insulate a house:
- foam plastic cladding has high thermal insulation properties;
- the cellular structure of the finishing material determines excellent sound absorption characteristics;
- The panels are not difficult to transport due to the low weight of the product. Also, due to the lightness of the material, there are no difficulties in installation work;
- polystyrene foam is resistant to pathogenic microorganisms;
- the material is offered in a wide variety of models;
- foam finishing is sold in the budget segment;
- If the installation technology is followed, the cladding can last at least half a century.
An important advantage of using this cladding is the ease of installation. Any beginner who has the minimum necessary knowledge and skills can handle the work of decorating the facade of a house with polystyrene foam and plaster.
Disadvantages of foam cladding:
- Due to their high toxicity, some types of foam finishing cannot be used when arranging the facades of residential buildings;
- the material is highly flammable and releases harmful substances when burned;
- foam sheathing is an attractive object for rodents and insects;
- significant waste during installation work due to the high fragility of the material.
Foam cladding is an attractive object for rodents and insects.
Due to the high fire hazard, foam plastic cladding is not used when arranging the facades of public buildings, buildings of children's institutions and hospitals.
Where can I use it?
A universal material that can be used to insulate any surface:
- Roofs and walls.
- Floor and plinth.
- Industrial buildings and residential buildings.
This is one of the simplest methods of insulation, which is why many people use foam plastic. The house will become comfortable and warm, and the insulation itself is very reliable. The installation work itself and the material are inexpensive, so if you wish, you can hire a team of workers for these purposes.
To insulate walls, foam sheets are more often used, and crumbs or balls are used for the roof. The floor and base are often insulated with extruded polystyrene foam.
What tools and materials will be needed for the job?
The foam is laid with glue, then fastened with disc nails. To complete the work, the following set of tools and materials is required:
- spatulas 100 and 200 mm wide. Use a narrow spatula to scoop up the adhesive solution from the container and apply it to the walls with a wide spatula;
- fine-toothed blade. Used for trimming cladding panels;
- primer with antifungal composition;
- glue;
- drill for drilling holes for fungi;
- hammer;
- dowels with a wide plastic cap;
- plastic dowel nails;
- painting mesh and profile corner with mesh sides;
- starting bar complete with fastening;
- spatula 300-400 mm for leveling layer;
- plastic grater and sandpaper with 400-500 grit.
There are two types of glue used for laying polystyrene foam:
- special composition for gluing foam sheets to the wall;
- universal composition for all stages, including gluing panels, fixing mesh and leveling layer.
From the point of view of economy, it is advisable to buy different adhesive mixtures, since the universal option is sold in the expensive segment.