Foundation
Date of publication: 08/21/2018
0
1858
- Choosing the type of foundation for an extension
- Preparatory work
- Basic principles of arranging the foundation of an extension
- Connection of the foundations of the extension and the main one
- Step-by-step guide to laying the foundation for an extension
- Expert advice
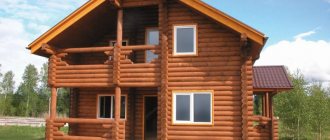
The foundation for an extension to a house can be concrete, stone or wood. The supporting structure for an extension to a frame house is easy to make yourself.
DIY foundation for an extension
Wouldn't an extension be possible without a foundation?
Everyone knows what role the skeleton plays in the human body; similar functions are assigned to the foundation.
In fact, this is the basis that is responsible for the reliability and durability of the building. Also, it is the foundation that ensures warmth and dryness in the room. If the base is of poor quality or does not suit specific conditions, then dampness will appear inside, the floors may become deformed and completely deteriorate. It also levels the ground level and prevents carcinogenic gas from entering the living room from the soil.
Extension base
The choice of foundation should be treated with particular care. After all, it is necessary that it can easily withstand loads and correspond to the type of soil. At the same time, there is no need to overdo it, for example, if you can pour a strip or columnar foundation, then there is no point in replacing these simpler options with a complex monolithic foundation.
Firstly, it is too expensive and not worth the investment.
Secondly, the first ones are much easier to perform and you can do them yourself even without outside help, but you won’t be able to lay a concrete slab on your own.
It is mainly built from stone or concrete, but there are also wooden structures. If the construction is lightweight, then you can give preference to a shallow foundation located above the freezing point. But most often its depth should be below this level.
According to its purpose, it is divided into load-bearing and combined. The latter, in addition to standard load-bearing functions, must also provide seismic protection.
There is also a special type, which includes “swinging” and “floating” foundations, their pressure corresponds to the pressure of the excavated soil.
Construction of frame walls
Timber is used to construct the walls of a frame extension. Vertical posts and beams are made from it. First, the main frame of the walls is assembled in a horizontal position, and then it is erected vertically.
Installation rules:
- Determine the lower beams of the strapping and make a cut on them every 50 cm for vertical beams.
- Install the racks into the grooves and secure them with special screws and corners.
- Assemble the upper beams for strapping.
- They fasten the veranda together with the house using vertical beams.
- Anchor bolts are used to secure the veranda posts to the house.
- The resulting veranda frame is immediately sheathed on the outside with boards, plywood or OSB to increase the rigidity of the structure.
- Next, the frame is insulated, the roof is built and secured, and then doors and windows are installed.
Useful: Building a warm frame house
Basic principles of building a foundation for an extension
Before you start making a foundation for an extension, you need to decide on the method of tying it to the existing country house. In this case, attention should be paid to the condition of the foundation of the house and the soil conditions in the area.
If the main structure has been in operation for a long time, more than 3-5 years, then we can say that all shrinkage processes have long been completed.
Therefore, in such situations, it is permissible to use the method of rigidly connecting the main foundation with the foundation for the extension. At the same time, experts recommend abandoning the use of this method of bonding foundations if the area is dominated by heaving soil.
This is largely due to the fact that the old and new structures will react differently to such soil, so the foundation connections may partially or completely collapse over time.
The foundation is anchored using anchor connections. To do this, holes are made in the foundation of a country house of a diameter that is suitable for installing reinforcing rods. It is necessary to drill holes to a depth of 25-40 diameters of the reinforcing rod.
For 1 sq. m of surface in a vertical plane will require approximately 5-6 reinforcing rods. The length of the reinforcing rod should be such that the inserted part and the protruding part are approximately equal.
If the foundation of a country house is of a strip type, or if there is heaving soil in the area, then the connection is best done using expansion joints.
When using this binding method, a rigid connection between the foundation structures of two buildings is not used - a small technological gap of several centimeters in length is specially left between the foundations (its exact value is determined by special calculations).
To form a technological expansion joint, before starting to pour the cement mortar, a block of the required thickness, wrapped in polyethylene, is inserted in the contact area of the two bases.
As soon as the poured cement mortar hardens and acquires the required strength characteristics, the block can be removed and the resulting technological gap can be filled with suitable insulation (mineral wool, polyurethane foam, etc.).
The use of this solution will allow the new and old foundation to cope with loads, without having a negative impact on each other, due to the absence of a rigid ligament.
Separately, it is worth noting that when choosing a method for linking two foundations, it is necessary to determine the soil conditions in the area, the groundwater level, and also clarify many other nuances.
To do this, it would be right to invite a professional designer, even a private one. Without special skills and experience in this area, it will be very difficult to independently perform a soil analysis on the ground.
How to make and pour a foundation for an extension to a brick or wooden house
When completing the construction of a main private house, the question quite often arises: how to make a foundation for an extension to the house and what supporting building structure is best to use for such (relatively light) structures in the form of a terrace or veranda?
It also makes sense to take into account what kind of house the building will be built on: wooden or brick.
If you look closely at houses, cottages and other residential structures that were built a long time ago, you will see that in most cases they have various extensions that are an integral part of such structures. These extensions can remain integral with the overall structure.
In most cases, they were built with their own hands without a foundation, which is why some of these extensions often separate, rise relative to the main structure in winter (due to heaving of the soil), or crack. These occurring defects are due to the fact that during their construction, sufficient attention was not paid to the foundation and technology of their construction.
Let's consider the algorithm for building the correct foundation for an extension with your own hands, if you decide to add an additional room, kitchen, veranda or room to your house.
Foundation of an extension to a brick house
In the case of a brick suburban building, in most cases, a strip reinforced concrete foundation is chosen for the extension. In the field of private country house construction, a monolithic version of the foundation is sometimes used. This is partly due to the fact that almost everything can be done independently, without hiring third-party specialists.
Work on laying the foundation for an extension to a brick suburban building is carried out in the following order:
- The first step is to level the site intended for the foundation. Next, marking is done, with special attention paid to right angles. All markings are performed using the most standard mathematical and geometric calculations, using available tools.
- Upon completion of site marking, excavation work is carried out. Here it should be taken into account that the foundation of the extension must be deepened below the freezing level of the soil. Then trenches are made for pouring the strip concrete base.
- Along the bottom of the resulting trenches, using crushed stone or sand (often both materials are combined), a cushion is made, the thickness of which should be determined in accordance with the ground conditions of the area. As a rule, the thickness of the crushed stone or sand cushion does not exceed 15-20 cm.
- Next, work is carried out to create a rigid connection to the existing foundation of a country house, or conditions are prepared for creating an expansion joint.
- Regardless of the size and weight of the extension to the house, it is strongly recommended to reinforce the foundation structure. For this purpose, reinforcing rods or ready-made reinforcing mesh are used.
- After this, it is necessary to make wooden formwork. It can only be placed on those areas of the future foundation that will be located above the ground level.
- To fill the foundation, it is recommended to use a high-quality cement mixture that was prepared in accordance with the manufacturer's instructions. Experts advise choosing a grade of cement not lower than M400, which will allow you to obtain the necessary strength characteristics.
- In the process of pouring cement mortar, it needs to be compacted, doing this with the usual cutting of reinforcement. Of course, compacting cement mortar most effectively can be done using an internal vibrator, but not everyone has such a tool (it can be rented from construction companies).
- If work on the installation of a foundation structure is carried out in the summer, then it would be correct to pour water on the cement mortar 3-4 times while it hardens, which will eliminate the possibility of cracking of the base during the process of gaining strength.
It must be remembered that the optimal time for the cement mortar to harden and acquire all the necessary strength characteristics is 3 - 4 weeks.
This is discussed separately in the instructions for the material. Before the expiration of this period, you should not carry out any construction work on the construction of the extension.
Foundation for a frame extension
If you intend to make an extension to an existing country house from timber or on a frame basis, then you can choose more economical and simple types of foundation: columnar or pile.
The cost of carrying out work and purchasing materials in this option will be reduced significantly.
- The installation of a columnar foundation for any structure is carried out using cement mortar. At the same time, pillars (supports) are placed only in areas where the main points of the extension are located (junctions of walls and partitions, corners of the building). Additional supports are installed in increments of 100-150 cm. Concrete pillars are also laid below the freezing level of the soil. It is imperative that each pillar be reinforced, and anchor connections are installed to secure the timber. Installation of the piping is carried out immediately after the cement mortar has hardened. It is also strongly recommended to carry out waterproofing work on the structure.
- If you plan to build a veranda or utility shed, then the foundation can be completely made using screw piles. Before starting work, a project must be drawn up, which takes into account the areas for installing piles and their number. By and large, the construction principle here is the same as in the case of a columnar base. During installation, the piles are screwed into the ground and then trimmed. To strengthen the structure, the piles can be additionally filled with concrete. But if in the future it is planned to dismantle the building, then it is not worth pouring concrete.
In conclusion, it is worth noting that before starting work, it may be worth hiring specialists to assess the soil conditions in the area and draw up a competent project.
Choosing the type of foundation
The type of foundation is determined based on the total weight of the extension, the composition of the soil base, the depth of freezing and the groundwater level. Let's consider the main types of foundation structures.
Strip foundation
The foundation of an extension on a strip foundation
Based on the depth of foundation, foundations are divided into shallow and deep.
Shallow foundations are intended for houses made of lightweight structures, in the absence of a threat of soil heaving. The shallow foundation is a monolithic reinforced concrete beam on a sand cushion with a continuous reinforced belt. When constructing such a foundation, drainage is required.
The base of a deeply laid foundation is located below the freezing depth in order to avoid the occurrence of deformations from heaving of frozen soil.
Concrete strip foundations can be monolithic, prefabricated or combined in design.
A strip monolith made of reinforced concrete is the strongest and most reliable foundation.
The prefabricated foundation is erected from ready-made reinforced concrete blocks, beams and slabs.
Combined structures are built from ready-made factory blocks and concrete. This type of foundation is used for complex house plan configurations.
Columnar foundations
The foundation of an extension on a columnar foundation
Columnar supports are placed under light extensions. The pillars are placed in all corners of the base plan, at the junctions of load-bearing walls and at points of load concentration. The distance between the centers of the pillars is from 1.2 to 2 meters. A frame is made between the supports on top (reinforced concrete or metal rand beams), connecting the entire structure into a single support system.
Laying pillars brings significant savings in materials compared to a strip monolith.
Pile foundations
Screw piles are sometimes used for extensions. Screw piles are metal pipes with coarse threads or blades at the lower end. The process of installing supports is similar to screwing a screw into wood.
The advantage of installing such a base is its quick installation, which does not require excavation and concrete work.
Bored piles
The foundation of the extension is on bored piles.
A reinforcement frame is inserted into the drilled holes in the ground and filled with concrete. Such supports are called bored piles.
The complexity and high cost of the work determine the feasibility of using bored piles on loose and fluid soils, where the installation of other foundations is impossible.
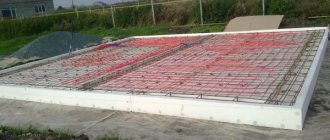
Slab foundations
The foundation slab is made in the form of a monolithic platform or from intersecting monolithic strips. Such foundations are erected on all types of soil. Monolithic reinforced concrete slab is a structure with powerful spatial rigidity. On uneven, highly compressible soils, only this type of foundation is laid.
The advantage of a monolithic reinforced concrete slab is its versatility, reliability and independence from groundwater levels.
This type of foundation design is not used on terrain with a height difference of more than one meter.
Which types of base to choose from?
In this paragraph, we will consider what types the foundation for an extension is divided into. Tape can rightfully be called universal, because it is perfect for both heavy and lightweight structures. It is located only under external and external load-bearing walls.
It is mainly poured from concrete; to make the structure more reliable, it should be reinforced with iron rods. If you are going to make this type of base with your own hands, then it is better to give preference to the prefabricated version. The disadvantages include high cost.
Universal strip foundation
But the columnar one, on the contrary, refers to budget options. But it is advisable to use it only if we are talking about lightweight structures, for example, you need to attach a frame extension to a wooden house.
The supports are special pillars located at intervals of 1.5 to 3 meters. These pillars must be placed at the intersection of load-bearing walls. It is best to make such elements from brick or reinforced concrete, but larch beams can also be used. However, such supports are expensive, and wood is not durable.
If you are going to build a rather massive building, and weak soil predominates, then you should give preference to the pile type of foundation. This design consists of supports connected by means of a strapping beam.
Necessary materials
It all depends on what type of foundation is chosen.
The main building materials that will be needed are as follows:
- Concrete. If the foundation is strip, concrete is poured into the trench. If a columnar foundation is chosen, concrete blocks are used. It consists of a binder, sand, water and fillers. The binder can be: cement (classic version);
- lime with silica materials (silicate concrete);
- organic polymer.
- polystyrene foam, polystyrene foam;
How to make a foundation for an extension to a house - step-by-step diagram
Step 1: Selecting a Base
The new foundation must fully correspond to the type of the previous foundation. In addition, the load and soil type are taken into account. For example, if we are talking about a massive extension to a brick house, then it is necessary to lay a strip or make a pile foundation. But if the additional room is adjacent to a wooden dwelling, then it is possible to get by with a cheaper columnar option.
Step 2: Calculations
Regardless of whether you choose a rigid connection type or a separate foundation, the depth and width, as well as the dimensions of the foundation pillars, if any, should be the same as those of the foundation of the house. Determining these parameters is quite simple. It is necessary to dig a hole next to the wall of the house and measure the dimensions of the base.
If there should be no questions about how to measure the depth of the structure, then to measure the width, you should take a rod, bend one of its edges 90° and insert it in a horizontal position under the foundation. Then we turn the rod until its bent part rests on the reverse side. After this, you need to make a mark on the rod and pull it out. By measuring the distance from the hook to the mark, we know the width.
Step 3: Preparatory work
Before pouring the foundation for the extension, it is necessary to carry out preparatory work. If you decide to give preference to a rigid connection, then we dig a trench of the given dimensions and drill holes in the existing base. Moreover, their diameter must exceed the thickness of the reinforcement.
Metal rods should also be prepared. It is necessary to make a longitudinal slot at their end and insert a special wedging insert into it.
Step 4: Frame Formation
We drive the reinforcement with wedges into the prepared holes. The number of rods is taken at the rate of 20 pieces per square. In this way, the frame of the future foundation is formed. To ensure a reliable connection of the following parts, it is necessary to leave the edges of the reinforcement about 300 mm long, which will subsequently need to be welded.
Step 5: Installation of formwork
Now you will need wide wooden boards. We form the formwork of the given dimensions. We securely fix its walls with supports, earth, cinder blocks, etc. You can cover the inside of the formwork with polyethylene. The latter is especially true if you are pouring only part of the foundation and you will have to reuse these boards.
Step 6: Pouring the Mortar
We prepare a mixture of cement, sand, crushed stone and water. It is very important to keep the proportions correctly. For example, for M300 you can take 10 kg of cement, 30 kg of sand, 40 kg of crushed stone, mix everything well and fill it with 40 liters of water.
If the concrete is too dense, you should dilute it with liquid, but only add it in small parts so as not to spoil the solution. We pour concrete into the formwork and wait several days until it completely hardens. We moisten it periodically, otherwise cracks may appear.
Step 7: Formation of a columnar foundation
Making such a foundation is important when a lightweight extension is adjacent to a wooden house. We drill holes so that they are below the freezing level of the soil. We form a sand cushion and install fiberglass reinforcement.
This material has excellent properties and does not require additional treatment with waterproofing compounds. Formwork of specified dimensions is also formed and filled with concrete. This foundation for an extension is the easiest to implement, and everyone can create it with their own hands.
Step 8: Construction of a separate foundation
But when the number of storeys of the main and adjacent housing is different, then a separate foundation should be made in close proximity to the previous one. The distance between the two bases is from 2 to 5 cm, depending on the number of floors of the new room. The higher it is, the wider the seam is selected.
We fill this gap with heat-insulating materials or tow. Then a special decorative overlay is attached to the wall of the home. It is very important to correctly mark the base. To do this, we pull the cord onto the pegs around the perimeter of the future site and check whether the diagonals are equal.
If a heaving type of soil predominates on the site, then the floor of the extension must be made so that it is not lower than the flooring of the main housing by the amount of possible deformations.
Step-by-step guide to laying the foundation for an extension
Let's look at the example of a columnar base of an additional structure:
- Preparation and cleaning of the area followed by leveling.
- The marking is done according to calculations and plan.
- Wells are being prepared whose depth is below the soil freezing threshold.
- Sand is placed at the bottom of the hole, filled with water and compacted to form a cushion.
- Installing reinforcement or fiberglass to strengthen the base 20 cm above the soil level.
- The formwork of the above-ground part is constructed.
- Pouring with concrete mortar. Climatic conditions and soil characteristics of a given region affect its composition and must be included in the project.
- Waterproofing is done in four layers alternately: bitumen, roofing felt, etc. in the same way.
The finished base should be moistened with water or sprinkled with wet sawdust. The moistening process begins 8-10 hours after pouring. This procedure will help the base dry evenly without cracks, and should be continued for 3 days.
How to make a foundation for a house extension using reinforcement
Upon completion of the soil study and assessment of the amount of shrinkage of the existing structure, a decision can be made on the possibility of combining the two foundations using a rigid method. Reinforcement allows you to create a single structure that is not subject to deformation.
Remember that reinforcement of the foundation and other building elements is possible only on hard soils that are not prone to seasonal heaving. We will consider the order of work using the example of a strip foundation, as it is most used in small-sized construction.
There are different types of structures that differ in construction technology and strength characteristics.
To build a foundation for an extension to a house with your own hands, follow the following sequence:
- Clear the surface of vegetation. Uproot trees and shrubs to prevent roots from damaging the integrity of the foundation.
- Mark the outline. Use a cord, pegs and a construction tool to control the corners, since it is difficult to mark the foundation of the extension without using it.
- Dig a trench of the estimated width. The depth is determined visually - it should not exceed the size of the existing base. Plan the walls and bottom of the trench.
- Carry out measures to secure the reinforcing bars in the existing foundation. Drill holes and hammer metal reinforcement into them. For more reliable fastening, make a cut at the end of the rod and insert a small liner, which, when driven in, will wedge the reinforcement.
- Install the formwork. Form a reinforcement frame inside and tie it to the prepared rods.
- Fill the formwork with concrete mortar.
After the final hardening of the concrete, proceed with further construction.
Connecting the extension to the house
The most important point in the construction of an extension is the choice of option for connecting the extension to the house.
Here you have to choose from two options:
- Independent building. Selected if the construction site has unreliable soil with poor load-bearing properties. It is better to build an independent structure that will not be connected in any way to the main house. A technological gap is determined between the two buildings, which is filled with thermal insulation and waterproofing materials.
- Attaching an extension directly to the house. This option is more labor-intensive and requires compliance with all the necessary technologies and a lot of calculations and research. First of all, you will need to correctly build and connect the foundation of the extension to the base of the house, using reinforced rods.
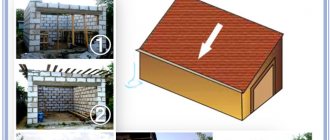
The roof of the extension goes under the roof of the house. The wall located between the extension and the house must be protected from water entering through the joint between the two structures.
Extension to a house on screw piles
Setting up a screw foundation for an extension to a house with your own hands is a feasible task even for novice builders.
Pile base - a structure made of many piles (a special type of pillar with a helical tip), united by a cement mortar tape, and in some cases without it
The only nuance that is worth considering is the need for a qualified assessment of the soil and selection of piles with characteristics suitable for this type of soil. It is advisable to entrust the soil investigation and subsequent selection of piles to specialized organizations.
Pile installation work can be carried out independently using basic tools. Advantages of a screw base:
- no need for excavation work. Given the current design of the site, this point is important;
- relatively low cost of work. Explained by the possibility of installation without the use of hired labor;
- speed of installation. If the area of the attached room is small, the piles are installed within 24 hours;
- time factor. When pouring concrete foundations, a long time passes before the construction of walls begins. Using piles, construction can begin immediately;
- possibility of reuse. If plans have changed and it is decided to move the extension, then the piles are unscrewed and installed in the required location.
It is not difficult to build a screw foundation for an extension on your own. To install one pile, three people will spend from 15 minutes to 1 hour, depending on the complexity of the soil and the length of the pile. After screwing, trimming is carried out, followed by concreting of the trunks.
A small extension to the house can be built on a shallow, pile-screw, strip foundation, as it is considered the most economical
Preparing to pour the foundation
After the owner of the house has decided on one type of foundation or another, he does the axial marking of the base of the extension with his own hands. Then excavation work is carried out and a sand and crushed stone bed is installed. Waterproofing is placed on the pillow in the form of two layers of roofing material or one layer of polymer film.
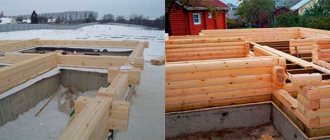
Pit for the strip base of the extension
The width of the trenches and the outer boundary of the pit should be wider than the foundation as much as would allow for the smooth installation and dismantling of the formwork.
The formwork can be made of wooden panels, metal panels and other materials. They carefully check whether the verticality of the formwork walls is maintained correctly, the reliability of the fastening of stops, clamps, spacers, ties and other fasteners. Properly installed formwork should not have any gaps. Carefully inspect all joining seams. If gaps wider than 4 mm are found, they are sealed immediately.
Any leakage of concrete mixture from the formwork can significantly weaken the foundation. Correctly executed fencing geometry allows the difference in diagonal lengths between opposite corners of the formwork to be no more than 20-30 mm.
Before pouring concrete, check the integrity of the waterproofing surface. The internal space of the formwork is cleared of debris and foreign objects. The installed reinforcement frame should not come into contact with the surface of the formwork. To do this, special clamps are installed at the points where the reinforcement elements meet the fence.
Preparation of concrete mixture for pouring
To properly pour the formwork, the developer needs to organize the process of preparing the concrete mixture and its continuous supply to the unloading points. Watch the video on how to properly prepare a concrete mixture.
If a small extension is being built with your own hands, then depending on the volume of concrete work, you can install one or two concrete mixers. In the case of a very small base size, you can get by with a construction trough or any suitable container and available tools.
The owner of the house needs to know what brand of concrete he will prepare with his own hands. Therefore, it is necessary to prepare a supply of cement, sand, solid filler (crushed stone, gravel) and a container with water. Determine how many materials will be needed for one batch.
Foundation for a do-it-yourself extension to a house on slabs
It is advisable to equip a slab base when:
- High groundwater. Not rigidly connected to the main building, the slab has an increased tolerance for shrinkage.
- Weak soils with reduced bearing capacity. Having an increased contact area, the concrete slab will protect against uneven subsidence of the structure.
It is difficult to attach a slab base rigidly to the existing base due to the different thickness. It is better to separate it with an expansion joint.
Foundation for an extension to a house made of foam blocks
Often the weight of the structure being completed differs from the weight of the existing building. Foam blocks are a porous building material. It is characterized by light weight and does not require a powerful base. Let's figure out how to properly make a foundation for an extension from foam blocks.
Considering the difference in weight, and, consequently, the different degree of shrinkage of structures, it is worth abandoning the rigid ligament and building a free-standing base. Use a closed circuit. It will ensure a tighter fit of the structure.
This is a lightweight material that will place minimal stress on the soil
Carry out the work using the developed technology:
- mark the perimeter of the base using pegs and cord. Control the size of the diagonals and the size of the angles. For a complex configuration, divide the contour into several rectangles and control the geometric dimensions of each element;
- prepare a trench 30–40 cm wide. Fill the bottom with a sand-gravel mixture and compact it;
- install the formwork. The part protruding above the soil surface must be tightly fitted to avoid leakage of the solution;
- Lay waterproofing material in several layers around the perimeter of the existing base, which is an expansion joint. You can use roofing felt, mineral wool or boards treated with special impregnation;
- lay the reinforced frame in the prepared trench;
- fill with concrete. Let stand until completely hardened.
Rigid docking methods
There are three main methods for rigidly joining the base of an extension to the foundation of a house:
For joining to a strip foundation, the so-called “tape-to-tape” method is used. Pairing using this method occurs in several stages:
- First you need to dig a trench about 2 meters long along the base of the existing house. You should not open the entire foundation at once, this can lead to cracks along the walls of the house;
- Every half a meter in the foundation, holes are drilled in a checkerboard pattern for reinforcement with a depth of about three quarters of the thickness of the base and a diameter equal to the thickness of the reinforcement;
- reinforcement with specially prepared longitudinal slots is driven into all holes, except the outer ones. It is necessary to drive wooden wedges through these slots so that the reinforcement is held tightly in the concrete.
Reinforcement with a periodic profile is driven into the outer holes. For better driving, it would be correct to shape the edges of the reinforcement into a cone using a grinder. The optimal diameter of the selected material is 14-16 mm.
At the final stage, all pieces of reinforcement are tied into a single frame, along the edges of which it is necessary to make an extension of 30-40 centimeters for tying into the main foundation of the extension to the house. The reinforcement frames are welded together.
If the foundation is not closed, then the reinforcement is driven into the base of the house one and a half times more often.
The following method is suitable for houses built from gas silicate.
As a rule, when constructing such structures, builders leave slabs extending from the basement of the house by about 30 cm. This will allow the ends of the reinforcement in the slab to be exposed and joined to the slab foundation of the extension. This method is called "slab-slab".
Most often, it is customary to make a foundation for an extension to a house with the formation of an expansion joint or a separate foundation. When choosing this option, the base of the extension must be poured in close proximity to the foundation of the house.
Under the entire perimeter of the extension it is necessary to make a major tape (grillage). The intermediate space between the bases must be properly separated from each other with waterproofing and thermal insulation materials so that during shrinkage the old foundation is not subject to mechanical damage from the extension.
As waterproofing, you can use roofing felt as the cheapest of all possible options. To pour the foundation for an extension to a house correctly, you need to be guided by the same rules and regulations as when building a regular house.
Saving money when choosing materials to make a foundation may turn out to be imaginary and lead to unnecessary and considerable additional expenses during the operation of the building. It would be correct to buy only high-quality components, starting with the purchase of fittings and ending with the purchase of sand and cement.
But, of course, the most ideal option to achieve rigidity and real reliability of the house structure is to calculate everything from the very beginning of construction. It would be correct to pour the entire foundation monolithically.
And until the family budget has funds to build up the entire base area of the building, the area for an extension to the house can simply be covered with some kind of flooring. With this option, the foundation will shrink naturally, and the strength will be maximum.
Methods for pairing foundations
Based on the choice of options for connecting the extension to the house, there are two ways to connect the bases:
- Rigid connection using reinforcement. It is acceptable if the house has been standing for at least 15 years and the foundation is stable. Used in dense soils.
- Application of expansion joint. A simple and economical option. Can be used on all types of substrates. Roofing felt is mainly used as an insulating material.
Experienced developers make a continuation of the foundation for the extension at the time of construction of the main housing. This greatly facilitates the construction of the extension in the future.
In Russian conditions, it is recommended to connect the foundations of the house and the extension with a tooth and anchors. A cushion is made under the foundation of the extension: 15 cm of gravel and 15 cm of sand. The tooth is reinforced in 2 levels with steel reinforcement. The anchors connecting the foundations are made from the same reinforcement. In the old foundation, holes are drilled for anchors, into which the anchors are walled up. The anchors are connected to the reinforcement frame of the extension foundation by tying with wire, without welding.
Results
If you want to increase the area of suburban real estate or country houses, you need to take a responsible approach to the work, analyze all factors in order to avoid mistakes associated with shrinkage of the building.
Remember that the implementation of such a serious project as the completion of a foundation requires a clearly developed action plan, correct calculations and special construction preparation. Using these recommendations, you can complete the work yourself, which will save financial resources.
However, if you lack confidence in your own abilities, use the services of professional builders. Good luck!
Sources
- https://remoskop.ru/fundament-pristroyku-sdelat-blok-chastyu-tselogo.html
- https://VseOBalkonah.ru/pristroj/kak-sdelat-fundament-dlya-pristrojki-k-domu.html
- https://1pofundamentu.ru/fundament-pod-pristrojku-k-derevyannomu-domu.html
- https://oboiman.ru/brus/kak-zalit-fundament-pod-pristrojku-osnovanie-na-zestkom-armirovanii.html
- https://pobetony.ru/stroitelstvo/kak-sdelat-fundament-dlya-pristrojki-k-domu/