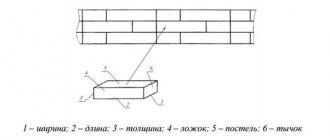
Creation of brick cladding
Before you start laying bricks, you need to mark the location of doors, windows and, if any, other architectural details.
This is necessary in order to minimize material costs. Based on these measurements, lay out the first row of bricks. Each brick laid with a butt must be pinned to the required size, since when cladding walls of half a brick, the masonry should be carried out no more than 8-10 cm. If the extension is more than 6 cm, the cladding and the wall are tied together with nails, the length of which is 100 mm. It happens that this length is not enough, then it can be increased using steel wire with a diameter of 2 mm.
When using sand-lime bricks for cladding a house, the offset should not be more than 6 cm, especially when laying the cornice. It is correct to cover the newly laid masonry with insulating material. This will protect the seams from the solution being washed out of them in case of rain.
https://youtube.com/watch?v=6kkwdNo3jkM
To create a solution with which the masonry will be carried out, the following proportions must be observed: cement - 1, lime paste - 1, sand - 4. To bring the mixture to normal, you need to add water at the end of the batch. All ingredients must be added in the following sequence:
- Water.
- Lime.
- Cement.
- Sand.
Having made the first batch, gradually adding water, you can calculate how much is needed to create the desired consistency, and next time fill the entire volume with water at once.
If you need to unstitch the seams, it is important to know that the surface of the mortar dries quite quickly. The correct seam should not be thicker than 13 cm
You can check the size using a ruler.
There should be lintels at the cladding openings; it is best if they are made of concrete, which ideally matches the color of sand-lime brick. In the absence of concrete lintels, hidden ones can be built. To create them, steel reinforcement with a diameter of 6-8 mm is most often used. The rods are inserted into each brick row under the opening right up to the eaves.
The gap that appears can be hidden with expanded clay or other heat-insulating material. Just don’t put roofing felt in the gap, which will interfere with the heating of the cladding in the cold season. The cladding work has its own characteristics and rules, so if you are not sure that you can do it yourself, it is best to contact professionals who will do it quickly and qualitatively. At the same time, your home will be reliably protected from cold, rain and other natural vagaries.
Carrying out cladding work
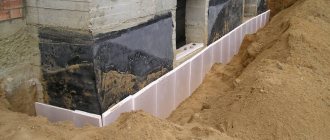
When finishing the basement, a gap of about 2-3 cm is left between the foundation and the brick for air ventilation. If necessary, fill the gap with insulation, but still leave room for ventilation to prevent moisture accumulation. In the bottom (first) row of masonry, at a distance of 1 m from each other, it is recommended to leave the seam between the bricks empty. This is also done for thermoregulation.
You definitely need to worry about fastening the base of a brick house with the lining. This can be done in 2 ways:
- Using anchors. They are fixed in the load-bearing wall at one end, and the other is placed between the cladding masonry.
- Using dowels and wire. The dowel is driven into the foundation, wrapped with wire, the other end of which is fixed in the masonry.
The connecting elements should be located at a distance of 50 to 70 cm from each other horizontally, and every 4 rows - vertically. In those places where there are openings, the ligaments should be placed more tightly. All work is done using cement mortar: take 1 part 500 grade cement to 4 parts sand. Or a solution with the addition of lime: 1 part cement, 8 parts sand, 2 parts lime. Having finished laying out, we must not forget about the low tide if the base is protruding. This will prevent moisture from getting between the wall and the finish, and as a result, prevent the destruction of the foundation.
Calculation of material for the base
Before you start laying the plinth, you need to calculate the required amount of brick. Firstly, this will allow you to purchase material from one batch. Secondly, you can save money on this without buying too many products.
Only an experienced specialist can calculate the exact amount of brick taking into account the thickness of the mortar and the percentage of defective material. However, there are several ways that allow you to carry out the calculation yourself.
Method 1
To do this, you need to know the volume of one brick, the dimensions of the building and the height of the base.
Brick calculation
- First we calculate the volume of the brick. The standard product has the following dimensions: 25*12*6.5 cm. Therefore, its volume will be 0.25*0.12*0.065=0.00195 m3.
- Now we determine the volume of the base. For example, a building has a size of 9*10 m, the optimal height of the plinth is 1 m, its minimum thickness should not be less than half the length of the brick. This means that the volume of the base will be equal to (9+10)*2*1*0.12=4.56 m3.
- Next, divide the volume of the base by the volume of one brick: 4.56/0.00195=2338.46. That is, to build a basement for a 9*10 m house, 2339 bricks will be required.
Method 2
In this case, the length of the brick, the length and height of the base are taken into account. https://www.youtube.com/embed/7eMW4EYB_uE
- We calculate the number of bricks required for one row of masonry. To do this, divide the length of the building by the length of the brick: (9+10)*2*0.25=152.
- To determine the number of rows, you need to divide the height of the base by the height of one brick: 1/0.065=15.38.
- Next, the number of bricks in one row for the resulting number of rows of masonry: 152 * 15.38 = 2338.
Comparing the results, we get approximately the same number in both cases.
Preparing the base for cladding
To reduce costs and time, there is an acceptable compromise. The foundation body can be made of any material. Most often, a reinforced concrete monolith or block structure is made, but the cladding can be made of brick. For this purpose, manufacturers have long mastered and launched the production of facing stones of various types, sizes and qualities.
The body of the base can be made of any material, and the cladding can be made of decorative brick
The decision to use these materials should be made at the level of foundation formation. This moment is very important, since it is not enough to just stick stone cladding on the wall; it also needs to be supported on something.
Of course, you can put a metal strip on the side of the foundation, but it will weaken the waterproofing and will collapse over time in wet conditions. Therefore, the surest way is to lay out a special ledge with your own hands.
When constructing formwork for pouring the foundation of a house, you need to correctly calculate the size of the supporting part for the cladding device. When carrying out measures to waterproof the foundation, the seat for the cladding cannot be missed. It must also be carefully insulated.
This process is necessary both for the finishing itself and for the entire building, as it will best protect the entire structure from moisture penetration. By the way, such work can be done with your own hands. Typically, waterproofing of vertical surfaces is carried out with bitumen-based mastics.
What functions does the basement perform in a country house?
Not everyone knows, but the base is intended not only for decoration and a beautiful appearance of the house:
- The basement part of the building will protect its walls from moisture penetration.
- The base also takes on a certain load from the walls and ceilings of the house.
- Provides a high level of thermal insulation of interior spaces.
- After finishing it gives the building a complete look.
If the base is low, then the country house will visually appear smaller, and if the base is tall, then the building will visually stretch upward. When designing a country house, it is necessary to take into account the type of basement being constructed. It can sink, protrude, or be flush with the wall of the house. Regardless of which construction option is chosen, it is necessary to make special vents in the basement that will ensure a normal level of ventilation of the interior.
The height of the basement in an average country house is about 60-70 cm. But in some cases the height of the basement reaches 100-150 cm, because the building has a basement, in which it is extremely convenient to equip not only utility rooms, but also residential ones.
Cladding the basement of a house with brick requires careful attention, because if the work technology is violated, the structural elements of the building will be affected by moisture and temperature changes, which will soon lead to their destruction. The plinth must be faced with the correct brick chosen for this purpose.
Cladding technology
The technology for forming the cladding is slightly different and depends on the building in which it is created - a new one or an existing one. It is worth considering each of them in more detail.
During the construction of a new building
The foundation is laid across the entire thickness of the wall being built, i.e. for brick and gas block. Waterproofing the base is also done for the entire wall. Next you can start laying the walls. Decide for yourself what to put first: brick, gas block or all at the same time. But brickwork has a large number of seams in height, but you need to understand that they are noticeably thicker, but the blocks can generally be laid with glue. This creates a difference in shrinkage, but it is not significant unless we are talking about buildings with many floors.
Fastening aerated concrete and brick when cladding a new building
Fastening facing bricks to aerated concrete is done using conventional reinforcement. You can make it yourself from a rod or wire of the required diameter. In addition, steel tape is suitable for these purposes.
But in any case, you need to pay attention to the following points:
- The sum of the cross-sectional areas of the reinforcement is no more than half a square centimeter per square meter of new masonry.
- The number of reinforcement products per square meter is 3-5 pieces.
- Near corners or openings at a distance of 20-25 cm, you need to make another row, the step of which is 25-30 cm.
Instead of connections, you can also use factory-made products, which at the same time provide for fastening the insulation.
When installing ties, it is necessary to ensure high-quality anchoring - that is, they should be immersed in the solution, alternating it at approximately a distance of 10 diameters.
Cladding the external walls of an existing building
In such a situation, it is necessary to build another foundation for the masonry. It doesn’t matter which type is chosen, the main thing is that it can cope with the additional load, i.e. withstood the walls, ceilings, roofing, etc., which are already supported by the foundation.
When forming such a cladding, the connections are secured with dowels. It is better to make through holes in the wall and mount the rods with washers from the inside. The rods can be attached to blind holes. Try not to use a standard solution; epoxy resin-based glue is suitable for this case.
Self-anchoring bolts are suitable for fastening, because they are almost instantly and quite efficiently attached to aerated concrete blocks and the seams located between them.
How to determine the amount of facing bricks in 1 m2 of masonry
The construction of any building begins with drawing up an estimate of the building materials that will be required for the implementation of a specific project.
The consumption of facing bricks required to form walls depends on the linear dimensions of the brick blocks, the thickness of the cement mixture seam, as well as the height of the walls and the method of laying briquettes.
It is unlikely that it will be possible to determine the number of blocks with the accuracy of a brick, but it is quite possible to calculate the approximate number of pieces per 1 m2.
Why exactly the consumption of blocks in m2 is calculated? The answer is very simple and lies literally on the surface: this parameter allows you to understand how many briquettes will be required for the construction of any building, even the most complex architecture.
Features of counting the number of bricks
To correctly calculate the consumption of bricks, you need to perform the following steps:
- Decide on the thickness of the masonry. The walls are formed in half a brick, which is 120 mm, a whole brick, the length of which is 250 mm, one and a half briquettes - 380 mm, two blocks - 510 mm, and also 640 mm, which is equivalent to two and a half clinkers. The warmer the climate in the location of the building being erected, the thinner the walls can be made. For middle latitudes, a masonry of 2.5 bricks is considered ideal. Also, the thickness of the walls is directly influenced by the number of floors of the building being erected, the type of arches used, as well as the type and depth of the foundation. The higher the structure, the greater the load the walls will have to withstand, so for multi-story buildings they make masonry with 2 or more bricks.
- Select blocks for masonry. To understand how many facing bricks are needed to form 1 m2 of wall, you need to know exactly the dimensions of the purchased briquettes. Bricks are produced in single size (250×120×65 mm), one-and-a-half (250×120×88 mm) and double (250×120×138 mm) formats.
- Increase the dimensions of the brick spoon and butt by the thickness of the seam. As a rule, the cement mixture is laid out in a layer of 10 mm on horizontal surfaces, and 12 mm on vertical surfaces. Since two building blocks are in contact with the seam, to take into account the thickness of the seam, when calculating the number of bricks in 1 m2 of the wall, half the value of the seam is taken, i.e., the length of the spoon is increased by 6 mm, and the height of the butt by 5 mm. Based on these data, the area of the spoon is calculated.
- Then 1m2 is divided by the area of the converted brick spoon. The resulting value is the approximate number of facing bricks that will be used to form each m2 of a wall half a block thick.
- We divide the thickness of the walls by the recalculated width of the brick butt and obtain the coefficient by which it is necessary to increase the previously obtained number of bricks.
There are several methods for laying building blocks, but all of them are used to give the facade of a building a certain aesthetic appearance and have virtually no effect on the amount of brick per m2 of wall.
The exception is patterns that are specially formed from bricks during the construction of external walls of buildings.
In any case, it is the dimensions of the briquettes used that are the key parameter that determines the consumption of materials during construction work.
Important nuances
After calculating how many building blocks will be needed to lay each m2 of wall, the resulting value is increased by 5-7%. This gap is necessary to cover defects and damage, which is inevitable when transporting building materials.
How many blocks are needed to construct a particular building? To determine the final consumption of briquettes, first calculate the total area of all the walls of the object being built. To do this, the height of the walls is multiplied by their length and the dimensions of the windows and entrance doors provided for in the construction project are subtracted.
The final area value is multiplied by the number of bricks in each m2 of masonry. The required number represents the number of clinkers required for the construction of a given facility.
Correctly carried out calculations will not only determine how many bricks will be needed to erect a building, but also significantly reduce the cost of purchasing building materials.
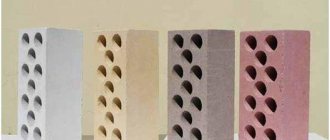
Types and characteristics
Decorative facing bricks, which can be used to decorate the base of a house, are available in four designs. Depending on the raw materials used and manufacturing features, it can be:
- ceramic;
- clinker;
- hyper-pressed;
- silicate.
Each type is distinguished by certain properties and has its own advantages and disadvantages.
Ceramic
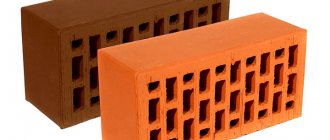
Ceramic brick
It is produced by firing a mixture of clay and pigment, which gives the material a particular shade. Ceramic bricks for cladding the foundation of a house can be either solid or containing voids. Due to their lower weight, products of the second type can reduce the load on the supporting structures of the building.
Ceramic bricks are characterized by the following:
- resistance to fire and low temperatures;
- strength;
- the ability to maintain its parameters for a long time;
- low thermal conductivity coefficient;
- environmental Safety.
Among the disadvantages of the material are the high cost and the tendency to form a whitish coating on the surface, which reduces the attractiveness of the building from the outside.
Hyper-pressed
It can be obtained from crushed limestone with the addition of cement and dye by pressing under high pressure. This type of brick is not fired, but is not inferior in strength to clinker and ceramic analogues. It is resistant to low temperatures and can be easily machined, and its low thermal efficiency is compensated by insulation. Thanks to its interesting texture, reminiscent of natural stone, finishing the foundation with hyper-pressed brick allows you to embody any design ideas for home decoration.
Clinker
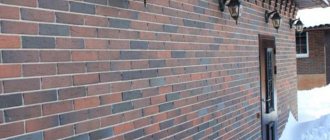
Clinker brick is both beautiful and reliable
It is a modified version of ordinary brick, which is made from a special type of clay by processing at high temperatures. The result is a material of increased strength with a dense structure.
It absorbs a minimal amount of water, withstands intensive use and is used as a base finish, and is also used for paving paths and framing window and door openings. The main disadvantage of clinker is its high thermal conductivity.
The use of sand-lime brick is not advisable because, along with its low cost, it is characterized by increased moisture absorption and poor resistance to low temperatures.
How to choose the right brick for cladding the plinth and foundation?
The base can be lined with ordinary building bricks, but only if the foundation is designed to withstand significant additional loads.
Technical characteristics of bricks.
If the building is installed on a columnar or strip foundation, it is better to choose a lighter-weight facing brick for cladding. To serve as a good screen that protects the house from bad weather and heat loss, brick, like any other finishing material, must:
- Have a low moisture absorption coefficient. Only such material can withstand low negative temperatures.
- Be frost resistant. Frost resistance can be determined by counting the number of thawing and freezing cycles that it will endure before it begins to deteriorate.
- Have a high tensile strength: the plinth bears part of the weight of the walls.
When choosing a brick for finishing the basement, you should pay attention to several recommendations.
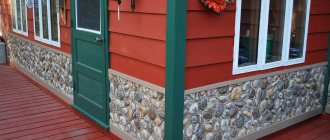
- Buildings in which the base contrasts in color with the walls look best.
- The appearance of the materials used for cladding must correspond to the overall style of the house.
Cladding work involves a number of stages designed to create a good screen to protect the house from atmospheric agents and give it an attractive appearance.
Return to contents
Methods for expanding foundations
Each type of foundation has its own expansion methods. But they all have a common approach - there must be a rigid connection between the old and new foundation using metal anchors and embedded elements.
Expansion of slab foundation
To “top up” the foundation for brick cladding of a house that stands on a slab, there is only one way of incrementing - driving anchors along the end of the slab.
Although there is a “classical” method, when concrete is broken along the perimeter of the base, choosing a “quarter” measuring 20-30 cm. In this way, the reinforcement is exposed in order to weld a new frame to it. But in this case it is not suitable.
The technology for expanding the slab using anchors looks like this:
- At the end of the slab, markings are made for anchors in two or three levels - depending on the number of meshes in the reinforcement cage. To prevent the anchors from getting into the reinforcement, indentations are made from the top, bottom and side edges by an amount slightly larger than the protective layer of concrete - about 6-7 cm. The distance between the anchors depends on the thickness of the rod and the size of the cells of the slab's reinforcement frame. In low-rise construction, with a rod thickness of 12 mm, the cell size is usually 200 mm, and the anchor spacing is the same.
- According to the markings, holes are drilled with a length equal to 35 diameters of the reinforcing bar (for 12 mm - at least 400 mm). The diameter of the drill should be 2-4 mm larger than the diameter of the rod. It is necessary to drill at a slight inclination towards the horizon and in different directions - in this form, the anchors jam better under load.
- The rods are cut to the required size - the length of the anchorage plus the width of the foundation overhang for facing the house with brick.
- Clean the holes from crumbs and dust - clean with a metal brush and blow through with a compressor.
- Fill the holes with a solution based on polymer-cement compositions or epoxy resins (chemical anchoring).
- The rods are inserted to which the new reinforcement cage will later be attached.
Expansion of strip foundation
A monolithic strip foundation is expanded using the same technology as a slab. But if two or three rows of anchors are enough for a shallow foundation, there will be more of them for a deep foundation.
A prefabricated strip foundation made of blocks or rubble stone is also expanded by pouring a monolithic strip around the perimeter of the house. Prefabricated foundations have a shorter service life and can withstand smaller loads, so this expansion method allows you to strengthen the foundation and improve its load-bearing capacity. A monolithic tape along the perimeter is akin to a reinforced concrete cage, with the help of which old foundations are strengthened.
Expansion of pile foundation grillage
If a brick house stands on stilts, then solving the problem of how to clad a house with brick if there is no space on the foundation can be done in two ways:
- Additionally, install a bored pile foundation around the perimeter, and rigidly tie the grillages together. Steel beams - using welded connections from rolled steel. Drill holes in reinforced concrete beams, install embedded elements (reinforcement outlets, dowels, anchors) and weld them together.
- Strengthen each support and expand the existing grillage.
The second method is only suitable for a shallow bored pile foundation, and it is similar to the method of strengthening a pile foundation with a reinforced concrete cage:
- during the work, a jack is installed near the pile, which should take the load;
- Around the pile, soil is removed to a greater depth than the heel of the pillar (to the thickness of the crushed stone-sand preparation);
- in cross-section, the pit must have a margin of at least 40 cm than the corresponding size of the pile;
- pour a layer of crushed stone and sand onto the bottom;
- the support is drilled in several places;
- anchors are inserted and wedged into the holes;
- install formwork;
- install the reinforcement cage and tie it to the anchor outlets;
- Concrete is poured and compacted.
Foundation cladding
An option for finishing the foundation of a house with stone-like plinth panels.
The base of a house on screw piles can be covered with brickwork. To do this, a corner is welded along the perimeter to the piles, then the cladding is placed on it. At the same time, we must not forget about ventilation and communication passages. A novice amateur builder can handle such work, since the height of the masonry is small, but you will still have to try.
Laying bricks on a metal corner:
- A corner measuring 120 × 120 is welded around the perimeter while maintaining the same level.
- The base is treated with an anti-corrosion mixture.
- The first row is laid out with seams of 5 mm.
- Builders recommend raising the corners first, and then the main area.
- The rows are laid with dressing in half a brick.
- The upper boundary of the masonry is covered either with angular bricks or with galvanized sheathing.
Facing screw piles with bricks makes the house look more presentable. Other advantages of brick cladding:
- material resistance to external factors;
- additional insulation of the building;
- Possibility to use the basement.
Work order
In order for the work to be completed in the shortest possible time, you should count and prepare consumables, prepare access roads, clear the work site and prepare tools.
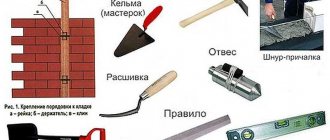
Materials and tools
The set of tools and materials needed to expand the foundation are practically no different from those needed when carrying out standard concrete work to pour the main foundation. You should prepare:
- shovels (bayonet and pick-up), trowel;
- measuring instruments (tape tape, level, water level) and marking devices (pegs, construction cord);
- electric tools (grinder and hammer drill);
- axe, hammer, wood saw;
- cement, sand, crushed stone, reinforcement, formwork boards, binding wire.
Making the foundation
The place for the additional foundation is thoroughly cleaned, the formwork, if any, is dismantled, only cleaned soil is left, and markings are carried out. Add 20 cm to the width of the future additional foundation - this will provide space for formwork and simplify work in the trench. Using pegs and a cord, the building is demolished, focusing on the width.
A trench is dug to a depth of up to 0.5 m; this should be done carefully, trying not to “injure” the soil at a given depth, since loosened soil, even carefully compacted, subsequently gives sediment.
In the old foundation, at a distance of 10 - 15 cm from the upper boundary, holes for reinforcement are drilled with a hammer drill. The pitch between the holes is 50 cm, the depth is 15 - 20 cm, the diameter corresponds to the reinforcement (10 -12 mm). The reinforcement is cut into segments of 30 - 35 cm and hammered into the holes, leaving 15 cm outside. This reinforcement will serve as a kind of anchor fastening, ensuring rigid adhesion of the old and new foundations. After this, the trench is cleared of crumbled earth, a sand cushion is poured onto the bottom, which is spilled and compacted.
Preparing the reinforcement frame
The formwork is made from planed boards and installed at a given distance (30 cm), secured with struts. Then they begin to reinforce the future foundation. You can tie the reinforcement directly into the trench, but given its small width, it is wiser to prepare sections of the reinforcement cage at the top and then secure them in the trench.
After this, you can begin pouring concrete, which is best ordered from a specialized enterprise.
After 2 - 4 weeks, when the concrete has completely set, the formwork is dismantled. Then the foundation is protected with waterproofing, the remaining ditch is filled with earth, after which you can begin to clad the house.
Pouring the foundation
When all the measurements have already been made, you can move on to how to pour the foundation itself. For it to be durable, the sequence of actions must be as follows:
The foundation is made of brick on a concrete strip base.
- First you need to make the formwork and install it in the right places. You can use planed boards. It is necessary to calculate the level of the foundation, and the formwork itself should be located about 30 cm higher. You need to check that the boards are wet. If this is not possible, it is recommended to use polyethylene film. The edges need to be secured on the outside.
- Next you should prepare the fittings. It must be laid in the foundation itself. Metal pins should be installed approximately 4 cm from the base of the building. This distance should also be to the formwork. Between the reinforcements you need to make a distance of 60 cm. It is recommended to tie the rods together. This will increase the strength of the frame.
- Now you need to start preparing the concrete. The formwork is filled with this solution. Experts do not recommend immediately filling the entire depth with the solution. This needs to be done in several passes - 2-3.
- The layer should be approximately 20 cm thick. After each layer you need to wait 2 days. If this procedure takes place in fairly hot weather, then the layer must be covered with an additional pillow. This will work as a waterproofing solution so that the moisture in the concrete will be retained and the setting will be much more effective.
- You also need to think about the communications that will be routed through the foundation layer. For example, sewer and water pipes may come out. Experts do not recommend embedding such structures directly into a concrete wall. It is better to make a special belt for them or wrap certain areas on the pipe with film so that during the process of pouring the foundation itself, their integrity is not compromised.
There are times when a house that is planned to be faced with brick does not have a foundation. Then you need to arrange the base on which the finishing will be done.
After such preparatory work, you can begin the process of lining the walls with brick.
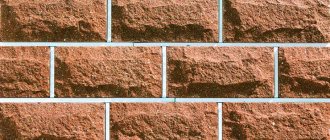
Cladding the basement level with bricks
Cladding the basement with brick is an excellent solution if the building is built from a similar material. This is how it acquires integrity and solidity. Decorative or red fired brick can be used for work. It is not recommended to use silicate products due to their lack of resistance to moisture and unpresentable appearance.
Scheme for finishing the base with brick or stone.
Clay brick for the plinth itself is an excellent insulation material. It can be attached directly to the foundation or by building a wall next to it to create a ventilation gap.
The gap is filled with insulation or left empty, since air is an excellent heat insulator. The finished structure looks very beautiful and solid. It does not require any care or maintenance. But finishing the basement with brick creates an additional load on the building structure. Such a solution should be considered at the design stage.
Since the brickwork cannot simply hang on the plinth, proceed as follows:
- A separate strip foundation is made for the brickwork in close proximity to the existing one. You can provide a small protrusion on the foundation at the design and pouring stage. This will significantly save time and effort when carrying out finishing work.
- Gluing the brick to the base is carried out using temporary supports made of timber or cement blocks. The supports are removed immediately before installing the blind area. It is made from asphalt or concrete. After hardening, the blind area takes on part of the weight of the brick cladding.
//www.youtube.com/watch?v=gga371GwFb8
It is somewhat easier to work with decorative material. The facing brick is light in weight, which does not have a significant effect on the structure. In addition, there is a huge variety of models of this material.
Today you can purchase facing tiles in the form of individual strips or in the form of plinth panels that imitate part of the brickwork. Lightweight materials based on polystyrene or polyurethane foam are used as the basis for facing tiles. It is fixed to the foundation with polymer glue, which creates an excellent protective layer for concrete.
Cost of material and installation
The price of a brick depends on the material from which it is made , as well as on the region of Russia.
Bricks are measured in pieces - the calculation of the material is described in the paragraph above. In Moscow and the Moscow region, silicate bricks and red clay bricks are purchased at a price of 12 rubles per piece. In the regions of Siberia the price is slightly lower - from 10 rubles.
Clinker bricks will cost more - the average cost will be 27 rubles per piece in Moscow (in other regions the price will reach 24-25 rubles per piece).
The cost of covering the base with brick starts from 1,500 rubles. per sq.m.
Finishing the base with panels
Finishing with siding has a number of advantages that must be used during construction. As a rule, the panels are mounted on a steel or wooden frame, which creates additional volume. It is advisable to fill the empty space between the panels and concrete with insulation. For this purpose, polystyrene foam or basalt wool is used.
Decorative siding is made from metal, polyvinyl chloride, cement-based mixtures and composite materials. The front layer of the panels can be imitation stone, natural wood or colored fabric. The resulting surface is sufficiently durable and presentable in appearance. A brick building takes on a completely new style with siding trim.
Scheme of finishing the base with panels.
The sequence of panel cladding is as follows:
- Carrying out markings. For this, a tape measure, level and marker are used. The size of the frame mesh should be adapted to the parameters of the insulation material.
- Drilling holes in concrete. Installing plastic dowels in them. A puncher and a hammer are used.
- Frame assembly. To do this you will need a screwdriver, a hammer, a level and a steel profile. It is not advisable to use wood as it has a limited service life.
- Installation of insulation. The best option is to glue it to concrete. To increase the reliability of fastening the insulation, anchor bolts with wide heads are used.
- Fastening the panels. This is quite simple to do, since all siding models have a system for fixing parts together.
You can cover the base with panels in just 1 working day. This design is lightweight and does not weigh down the foundation at all.
How to select and calculate the required materials?
When choosing the option to finish the base of the house with brick, it is important to make sure that the foundation of the building is suitable. Since the brick appearance of the base will weigh down the building, the foundation must be strip and very strong. In such cases you can use:
- Solid building brick that meets all relevant requirements.
- Acid-resistant brick, which withstands the effects of alkalis and acids, has sound-proofing and heat-insulating properties and a high strength coefficient.
- Silicate, but only in regions with low humidity. Its advantage is its low cost.
- Clinker brick. It is highly durable, has a beautiful appearance and a wide variety of colors that do not change during its entire service life.
In cases where the foundation is columnar or pile, there are options: build a false foundation or make a suspended plinth to connect the cladding to the base. And then use facing bricks for the facade or clinker tiles (the so-called “brick” option). In this case, it is necessary to worry about insulation.
To correctly calculate the materials for lining the base, you need to know the height and length of the surface that needs to be covered. Since the standard brick size is 250 mm in length, 120 in width and 65 in height, we obtain a surface area of 250 * 65 = 1625 sq. mm, that is 0.1625 sq. m. That means per 1 sq. m will need approximately 62 pieces. We multiply the number of square meters of the base by 62 and get the desired result. This is a calculation for laying half a brick (without taking into account the seams between the bricks) - a common option for masonry for finishing a facade. Plus you need to worry about reserves in case of battle.
Why is it important to finish the base?
It is wrong to think that finishing of this kind is only a design decision. It performs some other functions:
- Despite the fact that the foundation is the strongest part of the house, it also needs protection from external factors. Finishing minimizes the influence of precipitation, sudden temperature changes and high humidity, direct rays of the sun;
- Since the foundation is located closest to ground level, it is most susceptible to contamination, not only by dust and soil residues, which are harmless, but also by various aggressive substances that cause destruction of concrete joints. The plinth finish not only prevents this process, but also cleans well;
- This material also protects the base from biological life forms: mosses, fungus, mold;
- The basement finishing should also include insulation under the outer layer of material;
Insulating the foundation is an important point. On the one hand, the entire internal space of the building is located higher, and there is no need to insulate it. But that's not true. The foundation is a kind of cold accumulator. Even a well-insulated floor will not save you from penetration of low temperatures from the foundation. A significant part of the heating is wasted just like that. But that's not the worst thing. In winter, due to severe freezing, the foundation collapses regardless of the material, be it stone, concrete or brick.
Choosing a brick for the base
The use of ceramite with dry technology for the base is unacceptable. They not only have low strength, but also low moisture resistance. Laying a plinth made of this type of brick will lead to destruction. The choice of brick for the plinth must be approached responsibly.
There are many types of bricks
There are main types of ceramite that will cope well with this task. We will look at what kind of brick is needed for the base below.
Red brick
This choice will be the most thoughtful and optimal. Due to its characteristics, this ceramite is best suited for laying load-bearing walls of an underground floor. It will serve you for a long time regardless of the amount of moisture and other vagaries of the environment.
But water absorption into ceramite cannot be avoided. When purchasing, be sure to check the brand of material. Brand M-150 will not survive more than 60 times of freezing. Look for more frost-resistant options. Better buy the M-250 brand.
Why is moisture resistance and strength preferred when choosing between red and silicate ceramite? Silicate is fragile and absorbs moisture. Water gets into the cracks and pores of the brick. When it freezes, it increases in volume and begins to destroy ceramite from the inside.
For this reason, it is important to choose the right material
Even when building the main house with silicate, it is better to cover the upper part of the foundation with red. After all, the entire structure is supported by the lower structure, and for this you need durable material.
Red ceramite is also chosen for financial reasons. It is relatively inexpensive and finding it in every city is not a problem.
Red ceramite for the base is the right choice.
Clinker brick
This is the strongest brick currently available. It has great compressive strength, lasts a long time and looks aesthetically pleasing. Does not require additional cladding. Moisture resistant.
It meets all the characteristics, but is not used as often because it is too expensive. Mainly used for lining stoves and fireplaces.
Sand-lime brick
Silicate ceramite is not the best choice. The manufacturing technology of this product will not allow the material to be moisture resistant. If moisture acts on silicate for a long time, it will swell and lose all its performance characteristics. After a while it will collapse. You can use such a brick if the climate is arid and there is not much rainfall.
But even when laying with such material, additional waterproofing will have to be done. Silicate is quite durable, so under these conditions it will last quite a long time. The design will be reliable. Laying with sand-lime bricks will cost much less than any other. In addition to your finances, you will save energy and time.
Acid resistant brick
Very complex composition. To make it, specialized clays with the addition of dunite are used. This is a mineral rock.
It is poured at a temperature of 1300 °C. The result is a material that can withstand harmful substances. Neither acids nor alkali will harm acid-resistant ceramite.
This type of brick is one of the most durable
Very durable. It is not affected in any way by temperature changes and high humidity. Does not conduct heat or sounds. Does not absorb moisture. The size is equal to a regular brick.
Keep powder away from children and pets.