Preparing the base
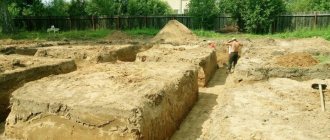
It’s good if you install the floor on a concrete slab: for example, adjacent to a cottage. But more often the garage is on the ground. And this is not a suitable base for the floor. It must be removed to a depth of approximately 25 - 50 cm, to “clean” soil, without organic matter. It turns out to be a shallow pit, which will be filled with bedding: layers of crushed stone and sand.
Zero level
At this stage, it is important to determine the zero level mark and “adjust” the floor level and concrete thickness in the new garage to it. It should not be below the threshold, because you will have to make a drainage system for melt and rain runoff. It is also undesirable for the finished floor to be higher than the threshold: this is an unjustified waste of materials and is simply inconvenient.
The zero level must be “beaten” along the walls of the garage before backfilling. This is done using a level or electronic level: turn on the display of the horizontal plane at the level of the entrance to the garage, transfer the resulting lines to the walls. You can use a water level: the measurements will be just as accurate, but it is less convenient to use.
Minimum and maximum parameters of the protective layer
When calculating the thickness of the protective layer of concrete for reinforcement, one should be guided by the above codes of rules (SNiPs) and other regulatory documents developed on their basis.
Thus, according to SP 63.13330.2012 “Concrete and reinforced concrete structures”, the minimum protective layer of concrete for reinforcement is 10 mm, but not less than the diameter of the rod.
SP 50-101-2004 provides more specific information.
Longitudinal reinforcement:
- 30 mm – thickness of the protective layer for strip foundations and prefabricated types;
- 35 mm – for monolithic foundations with additional concrete preparation;
- 70 mm – protective layer of concrete for reinforcement in the foundation without preparation.
Transverse reinforcement:
- 10 mm – walls and slabs less than 100 mm thick.
- 15 mm – concrete structures with a cross-section of less than 250 mm and a wall more than 100 mm.
- 20 mm – concrete structures with a cross-section of less than 250 mm.
The following regulation SP 52-101-2003 indicates even more specific situations:
- 20 mm – reinforced concrete structures located in enclosed spaces (normal/low humidity levels);
- 25 mm – structures located in enclosed spaces (high humidity levels);
- 30 mm – structures located in open space;
- 40 mm – structures located in the ground.
The next interesting document, which, however, is not normative, is a reference manual edited by A.B. Golyshev “Design of reinforced concrete structures”. Many professional builders claim that the most valuable practical calculations are presented here. The book makes the following statements:
- 30 mm – thickness of the protective layer for prefabricated and beam foundations;
- 35 mm – monolithic foundations on concrete preparation or on rocky soil;
- 70 mm – monolithic foundations without preliminary preparation.
This manual also regulates the protective layer of reinforcement on the end sides of transverse and longitudinal rods that run along the entire length/width of the structure:
- 10 mm – prefabricated elements up to 9 m long;
- 15 mm – monolithic elements up to 6 m long with reinforcement diameter up to 40 mm;
- 20 mm – monolithic elements with a length of 6 m with any reinforcement diameter.
It is worth noting that the maximum protective layer of concrete for reinforcement is not regulated in any document.
For your convenience, below we have collected all the numbers in a single table.
Thickness of concrete floor layers in a garage
Before building a garage floor, you need to calculate the thickness of all layers to purchase materials.
- Crushed stone or gravel - layer thickness 10 cm.
- The sand layer must be at least 5 cm.
- The concrete floor itself: screed, insulation and waterproofing, approximately 10 - 12 cm thick.
The thickness of the screed in the garage can be controlled using markings on the walls of the garage. If the room is wide, then several stakes are placed in the center. Markings of the floor level and layers are applied to them.
Cushion for concrete floor
The sand and gravel cushion must be laid evenly and compacted using a vibrating machine. It is better to buy crushed stone rather than gravel for backfilling. It is easier to compact, and the stability of the floor depends on the quality of the compaction. Buy 70% medium fraction crushed stone. The rest is a fine fraction of crushed stone. If the consumption of crushed stone (gravel) and sand is large, then part of the soil without organic parts can be poured onto the bottom. Sand should be used sifted, without clay inclusions.
Pit in the garage
If you are planning to make a hole, then first of all dig a foundation pit of the required depth and width under it. Concrete the floor of the pit, and then work on a sand and gravel bed throughout the entire garage. When the floor has gained sufficient strength and the backfill is ready, you can remove the brick walls of the pit.
- Level the bottom of the pit. Compact it using a hand tamper or vibrating platform.
- Fill and compact crushed stone. This must be done in 2–3 steps in layers of 3–5 cm, since it is impossible to compact the entire volume of crushed stone efficiently. Crushed stone of medium fraction is poured underneath, and fine crushed stone is poured on top. Before compacting, each layer is leveled with a rake, and the level is checked by markings on the walls. Tamping should be carried out until no trace remains of the person’s weight on the surface.
- Fill and compact sand. It is also poured in several steps, 2-3 cm each. The poured sand is leveled and moistened (shed), and then compacted.
- If there is a hole, then it’s time to line its walls. They should be slightly higher than the floor level so that water does not collect in the hole.
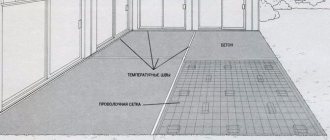
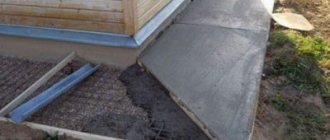
Damper gap
Despite compaction and other precautions, the concrete floor on the ground must be made “floating”, that is, not rigidly connected to the walls of the building. This will help avoid cracking of the slab. To create a damper gap between the concrete floor slab and the walls of the garage, use a special damper tape (it is sold in hardware stores). You can also lay thin strips of foam plastic (10 mm thick) around the perimeter. The width of such strips should be slightly larger than the width of the slab being formed (15 cm). Excess foam can then be cut off.
Optimal screed thickness
How thick the floor screed should be, its type, and the required mixture composition depend on the following factors:
- the presence of unevenness and differences in height of the base base;
- what exactly the mixture is poured onto (on the floor slab, on the insulation layer or on the pipes - in the case of a heated floor);
- what kind of coating the surface is being prepared for;
- characteristics of the room (floor load, humidity, temperature, etc.).
Basic base
The more significant the unevenness and height difference, the thicker the layer of mortar is needed. For minor defects, the minimum thickness of the floor screed will be 20 mm. If you have to deal with large differences (more than 60 mm), then there is no need to talk about the minimum thickness. In this case, it makes sense to make a solution from a mixture of coarse sand, cement and water; its height will vary from 100 to 150 mm.
Advice! If you want to save on concrete mix, use expanded clay or crushed stone as a partial leveling.
If you think that you can determine the unevenness of the floor “by eye,” then do not be fooled: your eyesight may let you down. It is better to use a special level for this.
Classification
There are 3 types of screed depending on its thickness.
The first type is a thin subfloor. To fill it, self-leveling mixtures are used, which allow you to create a layer of up to 20 mm. In this case there is no need to use reinforcement.
The second type is a screed up to 70 mm high. In this case, reinforcement from metal mesh or reinforcement bars is necessary.
The third type is a layer of maximum thickness up to 150 mm, which is a monolith with internal reinforcement.
Composition of the screed mixture
For unevenness and height differences of less than 20 mm, it is better to use self-leveling mixtures, with which you can achieve an even and thin layer. After drying, you can immediately lay the floor covering on it. Self-leveling mixtures spread over the floor independently, without human intervention. They include:
- gypsum or cement;
- fine sand;
- plasticizers that improve quality indicators;
- glue;
- pigments.
Attention! The minimum and maximum thickness of the screed of a certain composition are indicated on the packaging by the manufacturer.
Self-leveling floor is a type of self-leveling mixture that is applied to a concrete base or cement-sand fill. This composition is used as a finishing coating or as a thin layer of screed from 2 to 20 mm.
Advice! For a self-leveling floor, the recommended thickness is no more than 20-30 mm: otherwise, it may crack over time.
Concrete remains an indispensable material for rough pouring due to its relative cheapness. SNiP recommends the following mixture composition:
- sifted sand;
- cement;
- gravel or crushed stone (fraction size from 5 to 15 mm);
- water.
Today, very often, instead of crushed stone, lighter fillers are used, which also have thermal insulation properties. The most common of them are expanded clay and expanded polystyrene (pellets). The first is used only as a component for pouring the subfloor, and the second is used for finishing. The height of laying the mortar is in the range from 30 to 50 mm and is used in cases where there is a need to remove irregularities whose size is more than 20 mm.
For significant differences (more than 60 mm), sand concrete is used, which contains coarse sand instead of ordinary sand. The height of such a layer ranges from 100 to 150 mm.
In order to speed up the process of repairing the floor and in the presence of significant damage to the base, a dry screed is very often produced, which includes materials that do not require drying for a long time. It includes a layer of backfill material, for example, expanded clay, and on top of it there is sheet material (chipboard, plywood, GVLV). If necessary, hydro-, heat- and noise insulation is carried out. The thickness of such a “pie” can be 35-60 mm.
Waterproofing garage floor
In the garage, you need to ensure minimal humidity: for the best safety of the car and various things that will be stored there. To do this you will need waterproofing of the floor. The choice of waterproofing option depends on the location of groundwater under the garage. If they are far away, then you can limit yourself to plastic film (250 microns) laid on the sand. If the waters come close to the surface, then you need to use waterproofing or similar materials. The thickness of the concrete floor in the garage increases. The waterproofing panels are laid with an overlap of 10 cm and taped. The film should end above the damper tape. It is attached with tape to the wall and trimmed afterwards.
Concrete floor construction options
If the garage is heated, then an insulated floor must be installed. This will give big savings: it will not allow heat to go down. Slab extruded polystyrene foam up to 10 cm thick is used as insulation. Of course, this significantly increases the thickness of the screed in the garage and requires consideration when marking on the walls.
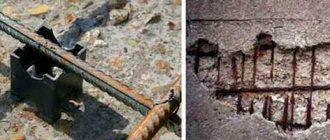
Why is a protective layer of concrete needed?
Steel in fittings, despite compliance with GOST standards, is still susceptible to external chemical compounds, i.e. there is a fairly high risk of corrosion.
Foci of corrosion lead to the formation of internal voids, which means the process of violating the integrity and homogeneity of the structure begins. This, in turn, reduces the performance characteristics of the base, deformations begin, cracks appear and ultimately destruction occurs.
In order to prevent erosion of steel, it is subjected to anti-corrosion treatment (galvanization). The essence of the process is that the outer layer of the product is covered with a thin film of just a few microns, which prevents the metal from oxidizing. But this method also does not provide a 100% guarantee that the steel will retain its original qualities, since any careless transportation can lead to damage to the protective layer and, accordingly, to the occurrence of corrosion. It is worth noting that the procedure itself costs quite a lot of money and leads to a significant increase in the cost of the material.
Therefore, the main task when constructing a foundation is to isolate the reinforcement cage from possible contact with moisture. A protective layer of concrete acts as a barrier, protecting the structure from possible chemical irritants.
Installation of concrete screed in the garage
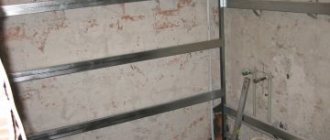
Garage floor reinforcement
For reinforcement, a ready-made road mesh for reinforcement is used: a cell with a side of 15 cm, wire thickness 8 mm. This is enough for a garage where cars will be stored. If we are talking about cargo transport, then it should be reinforced with a mesh with a mesh size of 20 cm and a wire thickness of 12 mm. The mesh cannot be placed on waterproofing: it must be located in the thickness of the concrete. It is necessary to raise the mesh above the surface by 4-5 cm. For this, special stands are purchased or pieces of brick (halves) are used.
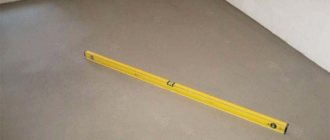
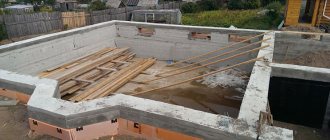
Beacons and slope
For a garage floor, a slope of 1.5 - 2% per linear meter is required. It should be directed towards the outlet or drain grate. You should think about the slope at the stage of installing beacons. These are long planks along which you can then level the poured concrete. They are sold in aluminum, but you can also use wooden slats, tubes, etc. The beacons are placed on posts made of thick mortar, along a long wall towards the doors. The step of their installation depends on the width of the rule - a wide mop with which the solution is leveled. With a rule width of 1.5 m, the distance between the beacons should be 1.2 - 1.0 m.
Permissible deviations of the protective layer of concrete
The tolerance for the protective layer of concrete is determined by SNiP 3.03.01-87 “Load-bearing and enclosing structures”. All possible deviations from the specified parameters are indicated here. Before calculating the protective layer of concrete for reinforcement, it is recommended to carefully study this set of rules. We will only pay attention to the most important table.
| Design Features | Permissible deviation |
| The thickness of the protective layer of concrete is less than 15 mm and the linear dimension of the cross-section of the structure: | |
| < 100 mm | +4 mm |
| 101-200 mm | +5 mm |
| The thickness of the protective layer of concrete is less than 16-20 mm and the linear size of the cross-section of the structure: | |
| < 100 mm | + 4 mm; -3 mm |
| 101-200 mm | + 8 mm; -3 mm |
| 201-300 mm | + 10 mm; -3 mm |
| > 300 mm | + 15 mm; -3 mm |
| The thickness of the protective layer of concrete is more than 20 mm and the linear dimension of the cross-section of the structure: | |
| < 100 mm | + 4 mm; -5 mm |
| 101-200 mm | + 8 mm; -5 mm |
| > 300 mm | + 15 mm; -5 mm |
A protective layer of reinforcement in concrete according to SNiP allows you to protect your foundation from premature destruction and will increase the service life of the entire building.
Preparation of the solution
M250 concrete is used for the garage floor. It is suitable in terms of strength and frost resistance, even for an unheated room. For a garage of 24 sq.m. (4x6 m) you will need approximately 2.5 cubic meters of ready-made concrete. Filling must be done in one day. Taking into account the slope and various losses, all 3 cubes of concrete are needed. This is a large quantity that can be provided by two mixers and a team of assistants. Or you can order a mixer to the pouring site. When pouring with a mixer, you will need a receiving tray that will direct the flow of solution to the center of the garage.
Leveling and maintaining concrete
After pouring, you need to treat the concrete with a submersible vibrator. This will make leveling easier and remove air bubbles from the floor. Then, using the rule, the solution is distributed level with the beacons. At the walls, the concrete is leveled with a trowel. You need to do this right away, because then it will no longer be possible to reach the walls.
To get a perfectly flat surface, 2-3 cm of liquid mortar is poured on top. After a few hours, the concrete will set, and you can grout the floor with a single-rotor trowel or manually. The floor will gain full strength in 3 – 4 weeks. Then it can be treated with toppings or polymer mixtures and painted.