What is a SIP panel
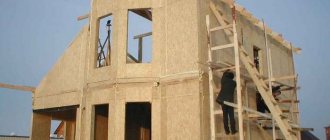
The construction of houses from SIP panels began in the second half of the last century in Canada. The technology is simple, the construction of a building requires very little time (from two to three weeks, depending on the complexity of the project), only a frame house can be cheaper, and even then not in all regions.
Houses are built from thermal insulation panels, which themselves have sufficient strength. In English, these panels are called SIP, which is an abbreviation for the following name: StructuralInsulated Panel. This translates as “Structural Thermal Insulated Panel”. It turns out, in theory, in Russian, the name of this material should sound like KTP. In reality, normal transliteration is used (replacing English letters with Cyrillic alphabet). As a result, the name “SIP panels” is in use.
SIP panel and installation method with beams
This material consists of two OSB boards, between which a layer of expanded polystyrene (foam) is laid. The result is a kind of sandwich (a construction “multi-layer sandwich”). Hence another name - sandwich panels .
When building a house, there are two types of assembly:
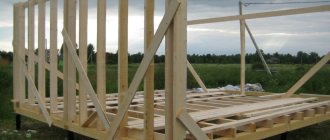
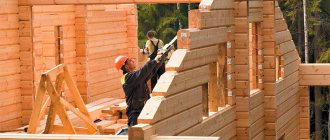
- With a frame (frame-panel technology). In private housing construction, wooden beams are used; in the construction of high-rise buildings (there are such), the frame is made of steel.
In frame technology, panels are connected using wooden beams
- Frameless technology involves connecting panels using thermal keys - strip inserts made of SIP panels of smaller thickness.
In our country, the first option is most popular. The wooden frame gives the structure additional strength. The load-bearing capacity of sandwich panels without a frame is more than enough for the construction of one or two-story private houses. But knowing that the house is built on solid timber is reassuring. This technology has one more advantage - maintainability. If there are problems, you can remove the damaged panel and replace it with a new one, which is impossible with frameless technology.
Types of SIP panels and their features
First, let's figure out what this material is. The abbreviation SIP (Structural Insulated Panel) came to us from the English language. In Russian, SIP stands for structural insulating panel.
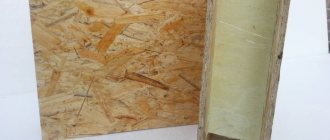
In essence, it is a sandwich panel, inside of which there is insulation - expanded polystyrene. Unlike foam plastic, it has higher strength and is not subject to combustion, which is very important. Sheet material, which can be different, is glued to both sides of the insulation. The thickness of the outer layer varies from 8 to 12 mm.
An example of one of the product options, clearly showing the panel structure
Panels can be of three types:
| Illustration | Product Description |
| Panels based on DSP. In this type of product, cement-bonded particle board is used as exterior finishing. This material has high strength and durability. The surface is very easy to putty, plaster or finish in other ways. The products have a characteristic gray color, which makes them very easy to distinguish. | |
| Panels based on SML (glass-magnesium sheet) . This option is made using glass-magnesium sheets, known for their strength and durability. When assembled, you get smooth walls that are very easy to finish. | |
| SIP panels based on OSB (oriented strand board). This type of board is also called OSB after its English abbreviation. They are made from wood shavings, laid in different directions and impregnated with composite compounds. This gives the products strength and durability. Today, this option has gained the greatest popularity among developers due to its ease of processing. |
In addition to the material used to make the top layer, the slabs differ in a number of important indicators. Let's look at them:
- Thickness of the thermal insulation layer. Most often there are 3 options: 100 mm, 150 mm and 200 mm:
- The 100 mm panel is used for the construction of interior partitions in the house;
- The 150mm panel is ideal for external walls;
- The 200 mm panel is used as floor slabs, although it can also be installed on walls if your region has very harsh winters;
Here is a comparison of materials in terms of thermal conductivity, as you can see, even 100 mm polystyrene foam has excellent thermal insulation characteristics
- Thickness of outer sheets . It varies from 8 to 12 mm. I recommend using slabs with a sheet material thickness of 12 mm. They have high rigidity, the surface is less susceptible to deformation and can withstand high loads without damaging the structure;
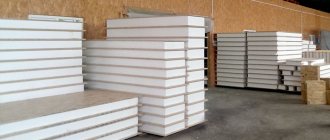
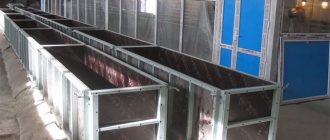
- Element size . Standard values are panels 125x250, 125x280 and 125x300 cm. Floor elements can be up to 7 meters long. But a feature of SIP production is that you can order elements according to your size. It will cost a little more, but you will have slabs of a certain size, and all you have to do is assemble them;
These are standard SIP panels, but elements of other sizes can be ordered
As for the cost, it depends on the manufacturer, the thickness of the insulation and outer sheets. On average, the price of a standard 1250x2500 mm panel is about 3,000 rubles. That is, a square meter will cost about 1000 rubles.
Advantages and disadvantages
Like any new technology for our country, building a house from SIP panels has its adherents and opponents. Opponents have the most important argument - the unnaturalness of the materials and the possibility of releasing harmful substances. Indeed, these boards consist of foam and OSB. Polystyrene foam is a common material and is only dangerous when it burns. OSB has also been on the market for a long time; it is made from pressed large shavings and wood chips. Resins containing formaldehyde are added as a binder. It is this binder that raises the most questions: formaldehyde is a strong poison and its presence in the atmosphere in large quantities causes poisoning.
Formaldehyde emissions must be controlled by the SES (sanitary and epidemiological station), and only safe building materials must be put on sale. So if you are planning to build a house from SIP panels, carefully choose the manufacturer - the quality of the material depends on his integrity. Panels assembled using German OSB are recognized as the highest quality and safest. Their formaldehyde emissions are E1 (safe).
Excerpt from GOST R 56309-2014 (date of introduction 2015-07-01): “Depending on the content (emission) of formaldehyde, slabs are manufactured in emission classes E0.5, E1 and E2.”
| Formaldehyde emission class of slabs | Application of slabs |
| E0.5; E1 | As structural elements of residential and public buildings, including for public premises, as well as products and structures used inside residential premises |
| E2 | For industrial products used outside residential premises |
At the same time, they easily tolerate high humidity, do not absorb water and are not deformed.
SIP panel Egger E1 2800x625x174 (Romania) is the best option for walls. Height - 2800 mm, thickness of expanded polystyrene - 150 mm. If you prefer “standard” ceilings with a height of 2.5 meters, then you should purchase Egger E1 2500x1250x174
German Glunz Agepan panels are also good, but few people use them. If we talk about Russian manufacturers, then you should pay attention to the products. Only safe and high-quality materials are used in production:
1. OSB-3 Kalevala Russia emission class E1; 2. Glue – TOP-UR (Russia); 3. Expanded polystyrene – PSBS – 25C Knauf (Russia).
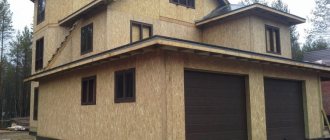
Speaking about the advantages of construction from SIP panels, it is necessary to pay attention to the fact that the technology has been thoroughly developed. Panels are produced for various elements of the house: external walls, partitions, interfloor ceilings, etc.
Each part of the building has its own panels
Why do people build houses from SIP panels? Because such a house has solid advantages:
- Light weight, which allows you to save on the foundation. Pile or pile-grillage foundations are ideal for this type of building.
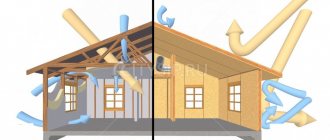
- Low heat loss, low heating costs. Expanded polystyrene is an excellent insulation material, and it is sandwiched on both sides with OSB sheets. This is what makes a sandwich panel house very warm.
- Low cost per square meter.
- Short construction time. The box of a two-story house can be assembled in a month.
- No shrinkage. There may be settlement at the foundation. The structure made from SIP panels has no settlement.
- Finishing work can begin immediately after the box is assembled.
In general, it is this set of properties that makes people choose a house made from SIP panels. They build both permanent residences and seasonal summer cottages. So, with a limited budget, building a house from SIP panels can be a very good solution.
Foundation for a house made of SIP panels
The biggest advantage of the material is its low weight. However, the lightness of the panels does not mean that the structure does not require a reliable foundation. Yes, in some cases you can save money on its arrangement. The following types of foundations are suitable for buildings constructed using Canadian technology:
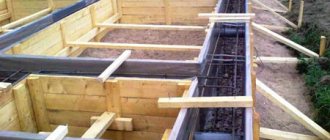
- strip (shallow) foundation;
- monolithic (reinforced concrete);
- pile-screw.
The latter type is considered optimal, since piles make it possible to create good conditions for SIP panels. High humidity is extremely dangerous for the material, but installing a ventilated subfloor to some extent solves the problem of protection from water. This foundation is durable and practical, because it is possible to add additional living space to the house with minimal effort.
Shallow strip foundation is the most popular type in private construction. It is also suitable for almost weightless frame buildings. If we compare it with the previous option, then there is only one drawback - the long period required for concrete to gain strength. Very reliable waterproofing of the foundation is mandatory.
A monolithic structure is the best structure for any soil, since this “solid foundation” will be a structure for centuries. However, it has a big drawback - high cost. For this reason, reinforced concrete slabs are not the most common type among owners who decide to build their own.
How to build it yourself
There are two ways to build a house from SIP panels with your own hands:
- Buy a house kit for a specific project from a company that deals with this, and assemble it yourself. Not all companies agree to this, but many have a supervising installation service. This is when a company specialist supervises your installation.
- Buy slabs. Cut them to the required sizes, purchase timber, do it all yourself. In this case, all responsibility for the quality of construction will fall on you. If you have carpentry skills or have someone to help you with, you can choose this option.
Briefly about what a house kit is. This is a set of ready-made SIP panels, wooden beams of the required size and fasteners for the construction of a specific house. All components are cut at the factory and numbered. When assembling, you use the resulting blocks in a certain order. The process is reminiscent of building a house from a children's construction set, only you are assembling a real house.
Building a house from SIP panels when ordering a house kit is like playing construction kit
A house kit is good if everything is done accurately. This is not only about the quality of SIP panels (it must be checked separately), but also about the use of dry wood (chamber drying) , and about the accuracy of the cut. The edges of the panels must precisely “grab” the beam, the two panels must be joined with an expansion gap of about 3 mm - all this is achieved using precise equipment.
Reference. The expansion gap is the required distance that is left between building materials that are subject to expansion (dilatation). If a house is being built in a region with a humid climate (for example, the Leningrad region), then it is imperative to leave an expansion gap, otherwise the OSB will swell. In dry climates, there is no need for a gap between OSB.
First floor flooring
Instructions for assembling the first floor floor from SIP panels are as follows:
- The first SIP panel is laid in the transverse direction, along the short dimension of the foundation. The size of the element is selected in such a way that when placed at the end of the strapping board, the overall dimensions correspond to the foundation;
- You can connect the panels to each other using the tongue and groove system. Today it is possible to assemble a floor up to 6 meters along the length of the panel, however, there are also solutions with increased strength that allow a size of 15 meters;
- if the assembly must guarantee maximum strength, it is worth laying an intermediate connecting beam or board between the SIP panels;
- After laying the surface, a binding board is installed around the perimeter of the finished floor, which increases strength.
All connections are foamed during assembly. The panels are connected to each other with self-tapping screws, the lower surface of the floor of houses made of SIP structures is waterproofed using bitumen mastic. If intermediate boards or timber were used, they are also attached with self-tapping screws to the strapping board. The instructions for assembling a floor from SIP panels are very simple; in practice, all the work is done in a few hours.
Construction stages: photo report
Construction of a house from SIP panels, like any other, begins with the selection and construction of a foundation. A pile foundation is considered optimal for a lightweight house. This is exactly what is done in most cases when starting the construction of a house using SIP technology. Sometimes it is impossible to install a pile foundation:
- on hard soils that are too expensive to drill (rocks);
- on unstable soils with low bearing capacity (peat bogs);
- in the presence of cavities in the rock mass.
In these cases, they make a strip or slab (more often USHP is an insulated Swedish stove). They are much more expensive, but more reliable.
A strip foundation or in the form of a slab is also suitable
Once the foundation has been selected and calculated, its construction can begin.
Making a pile foundation
Since foundations are most often made from screw piles, we will illustrate exactly how they are made. Piles are screwed into the ground manually (if the soil and strength allow) or using special equipment. The height of the heads is 80 cm above ground level, the distance between the piles is no more than 2.5 meters.
Screwed piles and caps welded to them
The heads are welded to the installed piles, and the strapping beam is attached to them (in this example, 200*200 mm).
Important! The joints of the timber must be located on the heads. When laying the strapping beams, do not forget to coat the locks with a protective compound (bitumen mastic) before joining.
There is no support under the joint - you can’t do that!
To protect against rotting and insects, the strapping beams are impregnated with a protective compound. Roofing material was laid in two layers under the timber (on the heads).
We attach the timber to the heads and coat it with a protective compound
This stage takes from 3-4 days to a week. It depends on the complexity of the soil, whether you work with the equipment or turn it yourself. Now you can start laying the floor slabs, but before that you should familiarize yourself with the methods of connecting them.
How to connect SIP panels: basic principle
When connecting panels, a wooden dowel (beam) or a thermal key (a piece of SIP panel of smaller thickness) is inserted between them. As mentioned above, in our country the technology using a frame is more popular, i.e. Dry timber is used as a key. It is this option that we will focus on.
The beam is inserted into the groove and fixed using self-tapping screws and/or nails, which are twisted/hammered through the OSB into the body of the beam. If you have a nail gun, we initially recommend tackling the panels with “yellow” wood screws 40-50 mm long, and then punching the joints with rough nails 50-65 mm long in increments of 10-15 cm.
The following can be used to fasten SIP panels: “yellow” wood screws, galvanized screw nails, galvanized rough nails. Do not use “black” hardened screws - they break off and quickly corrode
There is always a risk that the connection will be leaky, and the entire construction technology of SIP panels is based on the thermos effect, that is, on maximum tightness. Therefore, before assembling this unit (and any other), foam is applied to the side surface of the panel. It fills all the cracks, providing the proper level of heat and moisture insulation.
The main unit when connecting SIP panels: joining two panels end-to-end
Note! The picture above shows a dowel made from double timber. Often such recommendations are perceived incorrectly, and in order to save money, unplaned edged boards 50x150x6000 mm of natural humidity are purchased. Once the board dries, the joint is unlikely to remain sealed.
If you are not limited on funds, we recommend using solid timber from dry planed wood, chamber dried
When making a composite wooden dowel 100*150, in our opinion, it is preferable to use three dry bars with a cross-section of 50*100 mm - in this case the connections overlap (see video below).
If we are talking about wall panels, then it makes sense to insert and secure the dowels in advance.
The foam was applied, the beam was inserted, and secured with self-tapping screws. Foam was applied to the side edge of the second slab, the groove was placed under the protruding part of the beam, an expansion gap of 3 mm was set, and secured with self-tapping screws. The foam that came out of the seams during the installation process is cut off after polymerization.
This is what it looks like
This technique, with minor modifications, is repeated in any connection of SIP panels. The diagram of this node is presented above.
After cutting the slabs, it becomes necessary to remove polystyrene foam to the required depth. For these purposes, an electric thermal knife (cutter) for foam plastic is used. They come in various designs, but the thermal knife must be equipped with a limiter. Only in this case will you be able to remove polystyrene foam exactly to the required depth. “Overdoing” can lead to the appearance of cold bridges at the junction of the panels.
Electric foam cutter with installed cutting depth limiter
You can make the cutter yourself, but you should not forget about safety precautions when working with electric current .
First overlap
The first floor is nothing more than a floor that does not require insulation. As melted, it is assembled from SIP panels with a thickness of 224 mm and a width of 625 mm. With such a width of the slabs, the wooden beams are spaced at intervals of about 60 cm, which is enough to withstand the load.
If you have slabs with a width of 1250 mm, then they need to be sawn lengthwise into two equal parts.
When installing the ceiling, the panels should be laid like bricks in masonry - with the seams mismatching (staggered). This is necessary to ensure that the seams do not warp when humidity increases.
These are the pieces that floor blocks should be cut into when using 1250 mm wide slabs
To protect the bottom OSB board from moisture, each of the boards is coated on one side with the same bitumen mastic. You can use other compositions with similar properties.
Assembly of SIP floor panels for the first floor
When connecting the slabs, a mounting beam is laid between them (diagram in the previous paragraph). The beam is attached at the edges to the frame (with long nails), and the edges of the slabs are attached to it using self-tapping screws.
We cover the side sections of the slabs (all floors) with an edged board of a suitable size. We apply foam to the side surface of the slab using a snake, then we place a board and fasten it through the OSB with self-tapping screws into the end of the board.
Closing the floor sections
A starting (crown) board is laid on top of the sandwich along the perimeter, on which the SIP wall panels will rest. It is laid around the perimeter and in those places where partitions will be installed.
Method of fastening the first floor and thrust beam
The crown boards are fastened with nails/screws, but to be sure, they were secured through and through with studs to the pile heads. Holes were drilled for the studs. A pin is driven into them and tightened with bolts.
Walling
We continue the construction of a house from SIP panels: we are installing the walls of the first floor. For this work, it is advisable to have two assistants, then the process will go faster and easier.
We place the first panel so that it “fits” onto the crown board
Wall installation begins from one of the corners. When installing, the panel is “slipped” onto the installed starting board with a recess in the lower part (first apply a layer of foam to the board or the end of the sandwich). The panel is placed, aligned vertically, attached to the starting board on both sides with self-tapping screws in increments of 10-15 cm.
Assembly of the wall slab to the strapping beam
Foam is applied to the side surface of the installed slab, and another slab is set at an angle of 90°. An embedded board (end block) is pre-attached to its side part, the thickness of which is equal to the depth of the groove. Like the first one, this panel is attached to the strapping starting board.
We fasten the corner from sandwich panels
In addition, we fasten the corner using long self-tapping screws.
As a rule, self-tapping screws with a length of 220 to 280 mm are used
The length of the self-tapping screw must be such that it passes through the slab and the entire thickness of the embedded board. The installation step of this fastener is 40-50 cm.
The principle of assembling the first floor wall
Next, the walls from SIP panels are assembled according to the same principle: we place a beam between the slabs (if it was not inserted previously), and attach the next slab to it and to the bottom frame. Simple and fast.
In window and door openings, for more reliable fastening, you can install metal perforated reinforced corners. The element is optional, but adds rigidity and inspires confidence.
External walls and partitions are immediately erected
The installation of partitions from SIP panels follows the same principle: we attach a crown board and partition blocks to it. They can be the same thickness as for external walls, but thinner ones can be used. The decrease in sound insulation properties is compensated by the interior decoration.
To save money, partitions can be made using frame technology. Then initially only the frame can be installed, and its cladding can be transferred to a later period. It is more convenient to do this when the roof is already installed.
In a house, frame partitions can be made from SIP panels
Interfloor ceiling
To install floor slabs in the grooves of wall panels, boards are installed on foam and self-tapping screws. They create a harness for installing the ceiling.
Preparing the piping for the interfloor ceiling
Next we lay the floor slabs. If the partitions are assembled from SIP panels, their load-bearing capacity is quite high and no additional reinforcement measures are required. If the partitions were assembled using frame technology, we make the upper beams reinforced: they are assembled from three boards glued together. For greater strength, the beams can also be fastened on both sides with self-tapping screws.
Reinforced beams
Floor slabs made of SIP panels are laid on the finished frame. They should be no more than 625 mm wide and should be laid staggered (with the seams mismatched). Since the panels are narrow, there is a lot of wooden beams in the ceiling. Due to this, such a floor can withstand loads in places where there are no floor beams.
This is what it looks like from above
We fasten the laid slabs to the framing beam with self-tapping screws or nails. The edges of the OSB are at the top and bottom to each intermediate beam. After securing the installation of the ceiling, we close the open side sections along the perimeter of the building according to the same principle: foam + edged board. For greater rigidity, in those places where the floor beams pass, we fasten the floor panels with long self-tapping screws (220 mm) all the way through.
A couple more angles
This stage after assembling the first floor does not seem difficult. Everything is the same, only the work is at height, tightening the sandwich panels takes longer and is more difficult than installing them.
Second floor walls
The second floor in this project is an attic, so the wall panels are low. We also install partitions at the same time as the external walls. Before installing the roof, an embedded beam is installed in the upper open groove; roofing SIP panels will be attached to it.
The outside is much taller
Standard panels will have to be cut to fit the gables, since the shape is non-standard. The installation and connection of the wall panels themselves on the second floor is no different.
Roof made of SIP panels
Special sandwich panels are used for the roof. Under them, the ends of the slabs are cut at a certain angle, which is determined by the angle of inclination of the roof slope. Here, just as with flooring, you can get by with a minimum of beams, because each connection has its own beam. Therefore, the rafter system is not assembled.
For a roof made of SIP panels, beams need a minimum
Skate decoration
The roof of a small to medium sized house is made of SIP panels and usually has a central ridge beam. Here two planes of the roof converge. This node can be designed in two ways (in the pictures below). The first one is symmetrical. The sandwich panels are cut at an angle, and the top of the ridge beam is cut at the same angle. Two planes are fastened with long self-tapping screws through the panel to the beam on both sides. The fastener installation step is 30-40 cm.
Method of connecting two roof planes on a ridge beam with slabs sawn at an angle
In this method, there is no usual timber between the two slabs; they are connected only with foam. After the foam has polymerized, the excess is cut off, the seam is treated with a waterproof sealant, after which a protective strip - made of metal, plastic, etc. - is put on the ridge. - depends on the type of roofing chosen.
There is another way to join roofing SIP panels on the ridge. The second method does not require cutting the slabs at an angle, but one part of the panels must be longer (by the thickness of the roofing slab). The beam is still cut at an angle, the slabs are joined at right angles, and fastened through and through with long self-tapping screws to the beam.
Docking without undercuts
This connection uses embedded end bars. They are installed as usual - using mounting foam and self-tapping screws. To block the access of moisture to the under-roof space, the junction of the two panels is also additionally coated with a waterproof sealant.
There is an option to install a roof from SIP panels without a central beam. There are roofing options with two load-bearing beams that are located off-center. These can be either specially laid floor beams, or partitions assembled from SIP panels or using frame technology. In the second case, it is better to strengthen the beams (make them prefabricated with glue and nails).
If there are two rows of partitions or two load-bearing beams
The most difficult thing in this unit is to cut the embedded beams at the right angle. This can be done on the ground, which greatly simplifies the task. The panels are fastened through the slab with long self-tapping screws to the floor beams or mortgages in the partitions. Also, two planes are fastened together at the junction point - on opposite sides with long self-tapping screws.
Roof and wall panel connections
For laying SIP roofing slabs, wall slabs are cut at the required angle. The inner part of the OSB is higher than the outer part. The foam plastic is “cut” at the same angle, and the edges of the embedded beam are trimmed. It is this part that is the most difficult if you did not buy a house kit, but are building a house from SIP panels using standard panels, cutting them to the required dimensions with your own hands.
How to connect wall and roof SIP panels
If you have the appropriate equipment, cutting them at an angle is not a problem. The problem is cutting the foam between the OSB boards to the required depth. You can select the core using a thermal knife, and then remove the residue purely mechanically. Most likely, the cut will still not be smooth, so you will have to add more foam to fill the unevenness.
If the roof overhang is made without insulation
In the pictures, the roof overhang is also made of slabs with insulation. This is easier to implement, but it is an unreasonable expense. To save money, the length of the SIP panel is taken up to the intersection with the walls, and then only the timber goes (as in the photo). In this case, the beam is made composite: one part is longer by the amount of the overhang, the second is shorter and ends where the wall ends.
Features of joining roofing slabs
The connection of two roofing slabs occurs in the same way as others: timber, foam, self-tapping screws. But since precipitation is possible here, it is advisable to seal all seams.
Assembling a roof from sandwich panels
To improve the tightness, all seams on the roof are additionally coated with waterproof sealant. First, the hardened foam is cut into a plane with the roof, then a sealant is applied. After filing the overhangs, we can consider that the construction of a house made of SIP panels is completed. Install windows/doors, connect communications and the home is already suitable for habitation. Finishing can be done immediately after installing the box.
Assembling the walls of the first floor
The main thing where the instructions for installing SIP panels on the first floor of houses begins is the installation of a guide, a 100 mm beam. It is screwed to the foundation, with anchor bolts, directly through the floor structures where the walls will be placed.
This work must be carried out with the utmost care to ensure that even with errors in cutting wall elements, the general direction of the SIP panels will be respected. The correct installation of the timber is checked according to the instructions for the project and using templates.
Important to know: Interfloor ceilings in a house made of SIP panels
Assembly is carried out in the following order:
- The corner of the first floor is being assembled. First, one SIP panel is installed. Securely fixed to the guide bar. The installation accuracy is constantly checked;
- a second SIP panel is mounted at a right angle. The connection with the first one is thoroughly foamed. The accuracy of the angle must be ideal - it will set the direction and be responsible for the accuracy of placement of the remaining SIP structures;
- assembly of house walls - installation of subsequent SIP panels - is carried out using a tongue-and-groove system. The elements are attached to the guide beam and connected to each other with self-tapping screws.
The technology for assembling the first floor from SIP panels is also simple. More control and care will be required, but the work is not difficult. When connecting SIP elements of a house wall at indirect angles, either the instructions for the project or the laid guide beam will help determine the direction and actual dimensions of each structure.
The assembly of the first floor is completed by foaming the perimeter along the top and installing the trim board panels into the technological groove. It gives additional strength to the entire structure of SIP elements and will work as a place for attaching the upper structures.
Mice and other troubles
To save our readers from unnecessary headaches, we decided to talk about the mistakes made during the construction of one residential building. First of all, the material is intended for those who hire contractors for construction. However, it will also be useful for those who build a house on their own.
The facility was built under the “Rural House” program, and local would-be builders acted as the contractor. Unfortunately, the future residents did not pay due attention to the quality of the work. The result is natural - a large number of significant “jambs”.
Brief information about the house:
- Commissioning date: 2008
- Number of floors: 2
- Foundation type: strip
- Technology: frameless
- Panel sizes: 2740x1220x224 (floors), 2740x1220x174 (walls), 2740x1220x145 (dowel for connecting wall panels)
Problems appeared quite quickly and were associated with the most important part of any structure - the foundation. The strip foundation was filled with low-quality concrete, which led to the fact that when moisture entered, it began to crumble.
Under the influence of moisture, the foundation began to crumble
In extreme cold (below -30°C), another “jamb” was discovered - part of the plastic floor plinth in the kitchen froze.
It was decided to remove the bottom panels of the vinyl siding, remove the cold bridges where the wall slabs adjoin the first floor ceiling, and sheathe the foundation with corrugated sheets to look like stone.
After dismantling the lower siding panels, signs of field mice appeared.
During construction, the ends of the floor were not covered with boards. Pieces of plywood are installed, with large distances between them. Also note that the roofing felt does not start from the timber, but from the floor level
A brief explanation of roofing felt. At the time the house was built, vapor-permeable membranes had not been heard of in a particular locality. The contractor was going to lay plastic sheeting on the walls. The customer opposed this, and as a result, roofing felt was used.
It is clearly visible that the mice did not waste any time...
When the baseboard froze, mouse holes were found and the seam between the OSB was not foamed
As a result, the owner of the house had to mitigate the consequences using his modest construction experience.
The possibility of mice accessing the polystyrene foam was previously blocked, then the foundation was sheathed with corrugated sheets
Related errors:
- The lower part of the first floor ceiling has not been treated with bitumen mastic.
- SIP panels with a width of 1220 mm were laid on the floors of the first and second floors (they had to be cut in half lengthwise).
- Raw wood was used.
- The panel for making thermal keys is thinner than the polystyrene foam layer.
- The corners of the house are not tightened with long screws.
- Self-tapping screws are exclusively black.
There were other mistakes, but we do not talk about them, as they do not directly relate to the technology of constructing SIP houses.
Alas, the case discussed above is not the most severe - the fatal option is discussed in the video below.
The conclusion is very simple: you should not blindly trust the customer. All stages of construction must be supervised personally, or seek the help of a knowledgeable person from the outside.
If the construction is carried out by contractors, then the quality of their work can be assessed already at the stage of acceptance of the first floor slab.
Proven energy efficiency of SIP and SNiP requirements
Reviews from people living in SIP houses repeatedly note high energy efficiency. This means that energy reserves are used rationally, and with less energy consumption you get the highest level of energy security for the building.
Useful: How much money do you need to build a house?
In practice, this means that owners save up to 30% of energy consumption (electricity and gas, for example), and the room temperature remains the same. The thermal resistance coefficient R of polystyrene foam is 4.7 m2 °C/W. For comparison, according to SNiP “Thermal protection of buildings” in Russia, a number of requirements are put forward for the thermal resistance of the external wall of a residential building:
Required value of Rtr, m2 °C/W by city :
- Astrakhan 3,637
- Arkhangelsk 3,561
- Barnaul 3,543
- V. Novgorod 3.125
- Vladikavkaz 2,594
- Volgograd 2,788
- Voronezh 2,985
- Ekaterinburg 3,493
- Izhevsk 3,389
- Irkutsk 3,795
- Yoshkar-Ola 3,333
- Kazan 3,296
- Kemerovo 3,688
- Samara 3,079
- St. Petersburg 3,079
- Smolensk 3,086
- Syktyvkar 3,612
- Tver 3.155
- Tula 3,066
- Ulyanovsk 3,285
- Yaroslavl 3,256
- Moscow 3,130
Connecting panels to each other and to other structural elements
High-quality SIP fastening means the absence of cold bridges, ease of assembly of individual parts, and the strength of their connection. Each of the main structural units has its own characteristics.
Fastening panels to the foundation
To install wall SIPs to the foundation, waterproofing (roofing felt) is first laid on it, and trim boards are secured.
After this, the floor panels are laid. They are fixed to the base using anchors. The distance between fasteners should not exceed 2 m.
Installation of this type of SIP panels occurs as follows:
- Self-tapping screws with a diameter of 4.8 mm and a length of 95 mm connect the ceiling to the trim boards.
- Using 3.1x50 mm self-tapping screws, fix the wall panel to the DO. The distance between fasteners should not exceed 150 mm.
During the installation process, check the evenness of the SIP fastening using a building level.
Corner connection of wall elements
In the outer and inner corners (90°) the panels are joined together using wooden dowels. Typically these are boards 50 mm thick and 150 mm wide. An alternative for building a house is I-beams.
Useful: Half-timbered houses: style features and construction technology
Please note: the joints of individual elements are first foamed with polyurethane foam.
The dowel is attached to one of the walls using self-tapping screws 4.8 mm in diameter. The distance between them should not exceed 200 mm.
The panel of the other wall is fixed to the dowel with 3.5 mm screws, maintaining a pitch of no more than 150 mm. The protruding part of the OSB board is fixed to the end of the wall panel in the same way.
Joining wall and floor panels
This is a complex SIP connection unit at home, which requires the use of a large number of fasteners.
- The floor slab is fixed to the lower wall using self-tapping screws, the diameter and length of which are 6.3 and 240 mm, respectively. The distance between them should not exceed 300 mm.
- A trim board is mounted on top of the ceiling. To do this, use 4.8x95 mm self-tapping screws, screwing them in increments of 100-200 mm.
- Using 3.5x51 mm self-tapping screws, fix the panels of the upper wall to the trim board. The distance between them should not exceed 150 mm.
- OSB on the floor trim board is also secured with 3.5 mm self-tapping screws. However, a step of 300 mm is acceptable.
When assembling a house, all installation joints are pre-foamed with an appropriate composition.
Angle of connection between roof and wall
To connect the roof and wall, perform the following steps:
- A mauerlat is fixed to the wall panel - a support for the lower level of the rafter system. To do this, use 4.8x95 mm self-tapping screws in increments of up to 200 mm.
- A strapping board is attached to the end side of the SIP roofing. Self-tapping screws with a diameter of 3.5 mm are installed at least 150 mm apart from each other.
- The roofing elements are connected to the Mauerlat with 6.3x240 mm self-tapping screws. The distance between them should not exceed 300 mm.
Please note : fasteners with a diameter of 6.3 mm are also used to secure roofing panels to the ridge beam.