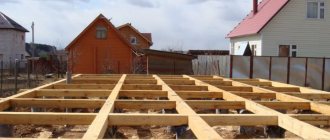
Installation of the bottom trim
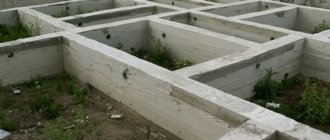
Before installation of the frame begins, the foundation concrete must have time to harden. Since the weight of a wooden frame is much lower than the weight of, for example, a brick wall, most often a strip foundation is used rather than a solid one.
The construction of pile foundations is allowed. Before laying the bottom frame beams, it is necessary to additionally level the surface of the foundation, for example, using a thin concrete layer. Although leveling can be done after attaching the bottom trim to the concrete - using an electric planer.
Before laying the beams on concrete, it is necessary to lay a layer of waterproofing (regular roofing felt will do).
Roofing felt should be laid immediately before installing the lower trim. It is forbidden to leave roofing material just lying on the foundation for a long time.
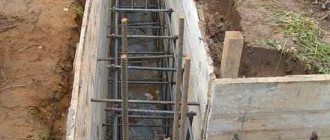
Most often, beams are attached to the foundation with anchor bolts. You can also leave the reinforcement outlets at the stage of pouring the foundation, this will make it easier to attach the beams. The length of the anchor bolt must be selected based on the fact that at least 100 mm of the bolt must be in the concrete.
The maximum step between anchors should be within 1.0 - 2.4 meters. If the beam is short, then it must be secured with at least 2 anchor bolts.
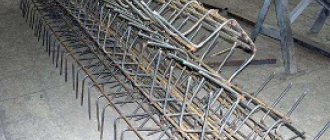
In the corners, the beams are connected to each other, despite the many connection methods, the most often used connection is a paw or half-tree connection. For greater reliability, the corner connection is reinforced with nails or using a wooden dowel.
To prevent the wood from splitting, the nail must be driven in at a distance of 1.5 - 2.5 cm from the edge of the beam.
The wooden dowel is made from hard wood and has a cylindrical or 4-sided shape. It serves simultaneously to connect the beams of the lower trim and to install corner posts. The length of the dowel is selected based on the fact that it should rise at least 100 mm above the surface of the beams of the lower trim.
When installing the dowel, you can lubricate the hole under it and the dowel itself with casein glue.
At this point, the installation of the lower trim can be considered complete. Before further work, you need to check the harness for distortion. To do this, the diagonals and angles between the beams are measured.
Frame or profiled timber
Even if there is money, it is unlikely that it will be possible to build a Winter Palace on 20 acres. After all, any choice of technology involves a compromise: each has both advantages and disadvantages.
Advantages of both options:
- low weight of the structure;
- high degree of work performed in the factory;
- low labor costs and costs for construction equipment;
- high speed of house assembly;
- the construction of a house does not depend on seasonal conditions.
Frame houses: pros and cons
Advantages of frame houses
The advantages of frame houses include:
- if everything is done correctly, then – ideal thermal insulation of the house;
- communications hidden inside the walls;
- light interior decoration, which has a positive effect on its cost;
- earthquake resistance (this advantage may seem surprising; although, if you remember that the cause of the decline of the Smolensk Principality was an earthquake, the desire to discount this advantage may disappear).
Disadvantages of frame houses
There are no perfect technologies. The disadvantages of frame housing construction include the following:
- the house will require care: fire retardants and antiseptics lose their qualities over time;
- high requirements for the ventilation system, which is a consequence of good thermal insulation (an open window is not enough - it can be a complex system in which the exhaust air heats the incoming air);
- the need for careful adherence to technology in the process of assembling a house: also, there is no 50% surgical operation; a similar approach should be applied to assessing housing construction.
Houses made of profiled timber
Advantages of houses made of profiled timber
The advantages of houses made of profiled timber, of course, include:
- environmental friendliness, although there is one “but”: the timber is always treated (there are fireproof and bioprotective impregnations, which cannot be avoided);
- low heat loss; there is nothing new here: 20 centimeters of wood is comparable to 70 centimeters of brickwork (the technology of profiled timber is made to minimize heating costs: protrusions and grooves, of course, help with the accuracy of installation, but they also have another task - in construction this is called removing “ cold bridges");
- Oddly enough, there is a frequent and worthy argument: “Grandmother had a wooden house” - here there is trust in the experience of ancestors, and support for traditions, and nostalgia.
- building a house from profiled timber will cost less than building a frame house.
Disadvantages of houses made of profiled timber
Wood is a time-tested natural material. However, it has not only advantages, but also some disadvantages:
- flammability;
- the tree can get sick: fungus, mold, woodworms (preventive measures will be required, not very frequent - once every 10 years is fine);
- installation of a house made of profiled timber does not immediately involve finishing work: it will take time for the house to shrink;
- the appearance of cracks in solid timber is inevitable - this is a property of wood, the same as the presence of knots;
- Communications cannot be hidden in walls made of timber: load-bearing structures cannot be damaged.
Timber-frame house: is it worth the candle?
Usmanov Pavel Alekseevich architect
In Russia they love timber - due to the prevalence, accessibility and traditional nature of this building material in the construction of houses. Also, many people appreciate our frame cottages - due to their strength, ease of construction and high energy-saving properties. Therefore, it was quite expected that at some point such construction technologies should “meet.” Many people were frankly not happy with the result. Why?
I, Pavel Usmanov, have been working as an architect for many years and during this time I have encountered a variety of approaches to the design and construction of frame-timber houses. Therefore, I am ready to explain what such cottages are like, how they are built and what their advantages and disadvantages are.
What will you learn about in the article?
- What is a timber frame house?
- How is the construction of a frame-timber house going?
- What are the pros and cons of timber frame houses?
What is a timber frame house?
As you might guess from the name, this is a house in which there is a frame and timber - but not everything is so simple. There are so many ways to use timber and organize the frame “skeleton” that it’s easy to get confused! At the same time, there are no single correct standards; each builder offers his own original solutions, which is easy to see even from the results of search engines for thematic queries.
Photo 1. Timber-frame house
Photo 2. House built using frame-timber technology
All this often leads to customers not understanding what kind of system they are talking about, and subsequent disappointments. To make it a little clearer, I will divide all the “frame-and-timber houses” on the market into three groups with conventional names:
- Hybrid cottages
. These are two-story houses, where the first floor is made of timber, and the second is made of a frame based on planed dried boards. This technique allows you to save money in comparison with a completely timber building - primarily due to the abandonment of a powerful foundation, because the second floor here is very light. And the speed of construction is increasing. But why compromise? After all, a classic frame house is built even easier, faster and warmer on its own. - Timber-frame houses
. In this case, the particle about timber in the title is not accidentally placed in the first part: the cottage is actually a house made of timber. The wall is created from a horizontal beam, and vertical posts, again made from timber, are attached to it from the inside - this essentially forms the frame. Such a system reduces the effect of wood shrinkage and makes it possible for complex architectural forms, but otherwise is inferior to full-fledged “frameworks”. - Frame and timber houses
. Actually, this is the simplest option, and therefore popular among many developers - especially in the regions. In its format and approach, such a cottage differs little from its Finnish and Canadian counterparts, but instead of dried and calibrated boards, it uses timber of natural moisture, and for different elements in the structure of the house this building material may differ in size (more on this below).
How is the construction of a frame-timber house going?
There is no point in talking about all three types of such cottages - each technology is very noticeably different in its concept.
Photo 3. House built using frame-timber technology
Photo 4. House built using frame-timber technology
I will focus on the third type, which is closest to the usual frame models - this way the consequences of abandoning boards in favor of timber will be more clearly visible.
- Foundation.
There are no strict requirements for the foundation of a building. You can choose for your frame-timber house the type of foundation that suits best. I will only voice a few general points. First: a shallow strip foundation is cheap, but not very reliable. Second: the option on piles is easily and quickly erected on moving soil and difficult terrain, but requires insulation. Third: USHP and UFF are the most durable and warmest, but the price is the highest. - Frame.
For load-bearing systems of a cottage, ordinary timber with natural moisture content is often used (I don’t build like this, I prefer dried, planed material). It is immediately mounted vertically, up to the top frame of the wall, the racks are supported by corners attached to the bottom frame. Frames are usually made from parts of different sections: in the corner the largest ones (150x150 mm), in openings - 100 mm thick, in the walls themselves even thinner, 50 mm. The joints are also laid with flax jute. After all, the timber will dry out over time, which can cause cracks to form. - Pie wall.
The multilayer filling in the openings of a frame-timber cottage is in many ways similar to other “frameworks”. In order from the inside to the outside there is an oriented strand board (plywood is also acceptable), a vapor barrier, mineral insulation, a membrane against wind and water and, if there is another sheet of OSB outside to increase the diagonal rigidity of the structure, then it will be necessary to make a ventilation gap so that the beams later They simply didn’t rot. - Finishing.
The optimal solutions for interior design when working with raw timber are imitation of the same timber and lining. If you want to hang wallpaper, then the gypsum fiber sheet can only be attached with a system of profiles, otherwise there is a high risk that it will warp when the wood shrinks in size. As for exterior decoration, I recommend taking a closer look at siding: it is affordable, neat in appearance and easy to maintain. And you can lay bitumen slate or flexible tiles on the roof.
What are the pros and cons of timber frame houses?
By tradition, I will start with the advantages of the described construction technology, especially since there are actually not so many of them:
- Prevalence of lumber.
High-quality calibrated and dried boards cannot be found everywhere, unlike timber, which is made by countless manufacturers in Russia. - Budget savings.
Even if you get the “correct” boards, the price of such building material for the frame will be very high. And the timber will cost much more reasonable figures, which captivates many buyers.
But this concept still has noticeably more significant disadvantages:
- Heat loss.
At first glance, the similarity of the frame and the wall pie means that the situation with thermal insulation is close. But in practice, racks and lintels made of timber create places for noticeable heat leakage. - House shrinkage.
One of the main advantages of traditional frame houses over wooden ones is that they do not change in size over time. The timber dries out, which can cause gaps and cracks to form in the walls. - Tree problems.
Wood with natural moisture is a capricious wood. It can become damp, rot, and fungus can easily grow in it. Yes, these problems can be dealt with with special forces, but this is an extra expense. - Duration of construction.
Timber-frame houses are not built as quickly as traditional frame houses. After all, the construction technology in this case is less technologically advanced, less light and less convenient. - More consumables and tools
. When creating a frame from timber, you cannot get by with just simple equipment - you need, for example, chain saws. Yes, and you need more consumables (like the mentioned hardware-corners).
What conclusion can be drawn from all this? It is obvious: a frame-timber house is inferior to Canadian and Finnish standards in almost all respects, and even for a country cottage it is better to choose a construction scheme made from dried boards. But in some situations, the use of timber is still the only possible option. In this case, in order to get a truly reliable building, where all the described shortcomings are minimized, you should contact our specialists, who have been dealing with frame models for many years and will be able to offer optimal solutions, and then competently implement them - and your cottage will be reliable and durable!
See how we can
June 24, 2020299
We are building a two-story house from aerated block (warm contour)
Construction of a house from aerated concrete blocks on the shore of Lake Ladoga. The work is being carried out by our foreman Sergei Khadutin. We are building a house for finishing (warm contour).
We are building a two-story house from aerated block (warm contour)
June 24, 2020
299
June 22, 2020261
Assembling a frame house for finishing at the Vyazemskoye community center
The cross frame is especially actively used in the construction of “Finnish houses”, which makes it possible to solve many issues simply and elegantly
Assembling a frame house for finishing at the Vyazemskoye community center
June 22, 2020
261
April 25, 2019840
House in the "Chalet" style with turnkey finishing in the forest landscape complex
During the period of “birth” and to this day, we have independently built and finished many different buildings, we have encountered houses that are amazing and unique in their architectural ideas, but a cottage in the “Chalet” style in the forest landscape 2 is the embodiment of a fairy tale!
A house that you can’t stop looking at; it rather resembles a cozy corner of paradise, somewhere far from the bustle and dust of the city, among the snow in an alpine village.
House in the “Chalet” style with turnkey finishing in the forest landscape complex
April 25, 2019
840
December 10, 20181313
Private gym - built from scratch
A team of designers, under the direction of the chief architect of the company, Usmanov P.
.
We developed an amazing project for the hall
as a free-standing structure.
The style chosen, taking into account all the buildings on this territory, is completely special, fashionable, modern, but fits so well into the surrounding landscape - BARNHOUSE. Literally translated it means barn, house. Private gym - built from scratch
December 10, 2018
1313
January 30, 20181221
Frame house construction - the smallest turnkey frame house
We bring to your attention a new product from our production - turnkey frame house This is a kind of unique building that will be able to melt the heart of the most strict and fastidious customer, and also will not ruin your wallet and will not take up much space if you do not have a decent plot of land.
Frame house construction - the smallest turnkey frame house
January 30, 2018
1221
View other works
Technology of construction of frame houses from timber
Scheme for covering the corners of a frame house.
The construction of frame houses with walls with a fence, which is made from horizontally or vertically laid logs, is much easier to work with and much cheaper than the construction of chopped walls, since the construction wood may not be of the highest quality. In terms of performance, frame walls are not inferior to log houses made of industrial wood. The lower and upper trim of the wall frame is made of timber with a cross-section of 20x20 cm. Grooves are made in the timber, the width of which is 5 cm and the depth of 6 cm. Ridges must be made on the catch to connect with the grooves of the timber. The frame posts are fastened with staples and connected to the frame with a tenon.
The technology for constructing such walls is simple. A layer of waterproofing made of roofing felt or glassine is laid on the base. The bottom trim is laid on this layer, the accuracy of the laying is checked according to the building level. Then corner posts are installed, which are covered with strong boards at least 5 cm thick. From the ground, the posts are strengthened with struts. The accuracy of the installation of the racks is checked using a plumb line.
A timber with ridges prepared to the size of the pick-up is inserted into it from above and immediately installed on the tow layer. When the entire beam is installed at the pick-up height, the top trim is installed on the spikes of the racks.
Basic structural elements of frame houses.
If the timber will be installed vertically in the recess, it should be dried first so that there is no need to caulk the walls again. For vertical installation of timber in a recess, a not very thick timber is suitable.
When laying timber horizontally, settlement of the walls is possible. The resulting gap should be eliminated by stuffing boards and tow. Then the cornice is hemmed.
Walls assembled from dry lumber can be plastered immediately after the ceiling and roof are installed. If the lumber is damp, then after it has dried, you should caulk the walls again. The walls inside are sheathed with roofing felt or glassine. In this case, the material is overlapped.
Then sheets of dry plaster are nailed, or they are plastered themselves using the wet method. For wet plaster, oblique lining is made from boards or shingles.
Frame house foundation
Calculation of foundation parameters is carried out to determine the supporting area and load on the soil, selecting the appropriate type of foundation and its dimensions. For frame houses it is possible to build the following types of foundation:
- Tape is a classic of private housing construction. Such a foundation can withstand even significant loads, including on moving soils.
- Pile-screw - often chosen for areas with difficult soils. Installation of a pile foundation can be carried out at almost any time of the year.
- Slab - it is based on a flat reinforced concrete support. Foundations of this type are erected on weak and heterogeneous soils with a significant groundwater content.
The fundamental parameters for calculating the foundation of a frame house are the mass of the building and the bearing capacity of the soil. Analysis of the results obtained allows us to assess the ability of the soil to support a house with a specific mass and support area.
House frame
The frame of the house consists of the following elements:
- Racks - represent the basis of the frame. Made from boards or timber;
- The “pie” of the wall of a frame house consists of insulation, wind and moisture-proof membranes, a vapor barrier layer, OSB boards, external and internal finishing.
The height of the racks, as a rule, is 2.5 meters, and their cross-section is mainly 150 * 150 mm. The pitch of the racks in a frame house is determined by the width of the insulation.
It is very important that it fits tightly and hermetically between the beams, without being compressed or deformed.
The thickness of the walls of a frame house is determined individually, based on the thermal conductivity parameters of the region. Mineral wool, glass wool, foam plastic and other materials can be used as insulation.
When calculating the cost of a metal or wooden frame of a house, it is necessary to take into account not only the costs of building materials and components, but also the installation price, taking into account errors for unforeseen factors:
- Fare;
- Construction of a construction shed;
- Complexity of the project;
- The need to rent construction equipment and tools;
- Simple construction crew, etc.
Floors for frame houses
The calculation of a wooden floor for a frame house is performed to find the cross-sectional parameters of the beams and determine their pitch. Properly carried out calculations are the key to the fact that the ceiling will withstand the given loads, without the appearance of deflections, which can cause significant discomfort while in the building.
To avoid possible errors when carrying out calculations, as well as to quickly correct the results obtained, experts recommend using special online calculators for wooden floors when designing. The following data is entered into the program:
- Height and width of the beam;
- Wood material and type;
- Span - this parameter reflects the distance between the walls across which the beams are laid. The greater the span, the higher the requirements for the supporting structure.
- Beam pitch;
- Floor reliability coefficient.
Special online calculators for wooden floors allow you to select the optimal structure configuration in a matter of minutes. When performing calculations, you must carefully enter the initial data into the program, focusing on reference and tabular indicators. An error in the design of floors can lead to the complete collapse of the building, the collapse of walls and the absolute unsuitability of the house for further use.
Roof of a frame house
The roof for a frame house is also made of wood. The material counting algorithm includes the following sequential steps:
- Measurement of design parameters. Determining the angle of the roof slopes - on its basis the length of the rafters will be calculated.
- Calculating the amount of timber - the rafters are located at a distance of 50 centimeters from each other. In order to calculate how many cubes of boards are needed for the roof, you need to divide the length of the slope of one side by 50 centimeters, and multiply the results obtained by 2.
- The section of the beam is selected depending on the roofing material (weight and quality), roof type, climatic conditions of the region, etc.
- Construction of the roof of a frame house is impossible without the use of various fasteners - nails, self-tapping screws, etc. It is impossible to calculate their exact number, so when drawing up estimates, you should rely on the experience of builders and the recommendations of salespeople in stores.
Lumber calculation
When building a frame house, the lion's share of the total cost is occupied by various lumber. Depending on the area, number of floors, number of rooms and other architectural features for the construction of the structure you will need:
- Profiled timber of various sizes;
- Edged boards with a cross section of 5 and 2 centimeters;
- Tongue board 2.5 centimeters.
To perform the most accurate calculations of lumber, you need to know the physical dimensions of the board, timber or slats. For each type of cut, the quantity is calculated separately, but the calculation system is always the same.
For example, let's take a board 25*175*5000 mm. Please note that all dimensions are indicated in millimeters; for ease of calculation, we convert them into meters: 0.025 * 0.175 * 5 m. To calculate the volume of 1 board, we use the formula:
V=abc, where a is length, b is width, c is height.
Thus, we get: V=0.025*0.175*5=0.021875 m³.
The volume of one cubic meter is calculated by the formula: V1=1/V - V1=1/0.021875=45.71428571428571 m³. So, we get that in one cubic meter there are 46 boards 25*175*5000 mm. We also calculate the area of one board: S=ab, or S=0.175*5=0.875 m³.
Now we have in our hands all the numbers necessary for calculations, allowing us to calculate the number of boards for any room. So, for example, if we are talking about a room with an area of 25 square meters, then through simple calculations we find that it will require 25 * 0.875 = 21.875 = 22 boards. In addition to the obtained result, you should add 15-20% for cutting.
For those who do not want to spend time and effort on independent calculations using the above formulas, today there are a large number of special programs and online calculators that carry out all the necessary calculations in a matter of minutes.
Calculation of SIP panels
SIP panels are a modern building material that consists of several layers firmly glued together with special mixtures. The basis of SIP panels is wood chips and polystyrene foam.
The use of modern technologies in their production has significantly improved the quality and performance characteristics of this material, due to which it is increasingly used in private housing construction.
Calculating the number of SIP panels required to build a house can be done independently or using an online calculator. In the first case, it is enough to calculate the area of all the walls of the house (including internal ones) and the area of one panel. When using an online calculator, you will need to indicate the size of the building, number of floors, type of foundation, roofing material, number of windows, etc.
Tools and materials
Wood is a fairly easy material to process. But to get smooth and clean cuts, you need to work with sharp, well-maintained and well-maintained equipment.
To work you will need:
- wood hacksaw;
- roulette;
- plane;
- building level;
- hammer;
- square;
- screwdriver
This list could well be expanded. The larger the set of tools the master has at his disposal, the easier the work will be.
Before starting construction, you must acquire the following materials and equipment:
- timber 100x100 mm;
- timber 50x100 mm;
- mineral wool;
- anchor bolts;
- self-tapping screws;
- nails;
- waterproofing material;
- shields;
- lining;
- siding;
- antiseptic drugs;
- fire retardant;
- steel corners.
The basis for calculations of building materials is the house diagram.
The diagram shows the placement in detail:
- racks;
- harnesses;
- crossbars;
- jib;
- window and door openings;
- lag;
- rafters;
- finishing and roofing materials.
After purchasing materials and preparing tools, you can begin to work.
Cost comparison
Pricing of frame houses
Every owner is looking for a home option that will not only be warm and reliable, but also cost less than others. Let's look at what goes into pricing frame houses.
The calculation will be given for a house with an area of 46 m2:
Any home starts with a foundation. Nowadays, for a prefabricated house, you can install a strip foundation or a columnar one. A prefabricated house weighs less than a timber house, so it does not require a massive foundation. A columnar foundation consists of supports that are installed at a distance of two meters from each other. The larger and taller the house, the more foundations will be required. Such a foundation has an advantage: you can always get under the house and water will not accumulate there. This type of foundation is well suited for areas where it is difficult to remove water from the site where the house is being built. A strip foundation is a more classic and frequently used option, but it will also be more expensive. If a columnar foundation costs 30-50 thousand rubles, then a strip foundation starts at 50 thousand; House frame. This is the main stage of construction. The frame consists of walls made of wood, internal and external decoration. It’s worth saying right away that to build a good frame house you need to use insulation
If the cost of constructing the frame is 100,000 rubles, then the same amount will have to be spent on insulation and interior decoration of the house. There are a great many options for insulation and finishing; An important part of building a house is building the roof. For a prefabricated house, a wooden base is being erected, which must be insulated and waterproofed
The roof can be covered with metal tiles or soft tiles Tigola or Shinglis. The cost of erecting a roof for a house is approximately 80 - 120 thousand rubles. The cheapest covering option is metal tiles - from 90 thousand rubles; The outside of prefabricated houses is sheathed with cement-bonded particle boards, but the house cannot be left in this form. It is cheaper and more practical to cover it with siding. Now there is a wide variety of this material on the market: all colors, shapes and sizes are available. Vinyl (cheaper) siding for our house will cost 40 - 60 thousand rubles. If you want the house to look like a timber house, then you can use a block house to decorate the walls. This covering is made of natural wood and is quite easy to install. The cost of finishing is from 80 thousand rubles. Do not forget that wood is less durable than plastic. This coating will have to be painted and treated against mold; Electrical wiring and water supply. We will specifically indicate this point, because work on lighting and supplying water to the house must be carried out before the start of interior decoration. The minimum cost of work is 60 thousand rubles: if there is a well or well on the territory; If you plan to heat the house, then the pipes are partially placed inside the walls. It is quite difficult to calculate the cost, since there are different types of heating: stove, boiler for wood, gas, water, fireplace; Interior decoration of the house. Finishing begins with the construction of plasterboard walls. Then you can use any available material: wallpaper, tiles, plastic panels, wooden cladding. Comparative characteristics of frame houses by their cost, depending on size
Timber for construction
The basis of any frame structure (as the name suggests) is the frame . It is made from timber and boards. The amount of timber and the sizes of individual parts completely depend on the chosen construction technology and the design of the house. Thus, to save money at this stage, you should carefully choose an ergonomic design and method of constructing the house.
Materials for constructing the frame
To build the frame of a house, you can choose different materials. Depending on this choice, the construction technology depends, and therefore the performance indicators of the finished home and the volume of the budget.
Useful: Do-it-yourself metal frame for home (LSFK)
Unprofiled planed timber . This material is most often used for the construction of a frame house. Non-profiled planed timber is a rectangular or square shaped timber that has undergone forced drying.
The dimensions of the sides of the bar are 100*100 mm. The beams are connected together using a board. As a rule, the buyer receives a house kit with ready-made timber. To facilitate the assembly of the frame, all bars, boards and components are marked at the factory.
Profiled timber . This type of timber has one distinctive detail - grooves and tenons located on both sides. The other two sides remain planed. Thanks to this feature, the installation speed increases noticeably.
This type of building material is also worth choosing for those who want to save a lot. The timber acts here both as a supporting structure and as walls. Additional interior finishing is also optional - the planed sides of the timber create an aesthetic and reliable canvas.
Glued laminated timber . Bars of this type are made up of pieces of timber (boards) glued together. All elements differ in the direction of the fibers. This option provides high assembly speed and greater deflection strength.
Materials for frame cladding
Plywood is waterproof . The finished frame can be sheathed with waterproof plywood. At the same time, when choosing a material, you should not confuse it with moisture-resistant plywood. The latter has a certain sensitivity to moisture (unlike water resistant). Waterproof plywood is made from coniferous or birch veneer. The veneer is held together with a special adhesive.
OSB (often called oriented strand board). The main raw materials for the production of this building material are wood chips glued together with a special glue. The top pillar of the slab consists of chips in the longitudinal direction, and in the inner layer the chips are glued together in the transverse direction. Due to its increased moisture resistance, this material can be used for cladding both internal and external walls.
SIP panels
The most convenient and economical option. In this case, the calculation of materials for the construction of a frame house takes place entirely at the manufacturer’s factory. The sip panel has the shape of a “pie”, where calibrated timber (for the frame) and polystyrene foam (for insulation) are located between two OSB boards.
The use of sip panels significantly reduces construction time and also helps to save on frame construction. The rigidity of the panels allows you to build a house without a frame at all.
Video: independent calculation of building materials
The easiest way to calculate the required amount of materials for walls is using programs. How to do this, watch the video.
What to choose
If you have to choose which option is better if you need to quickly build a house, then you should give preference to a frame one. But more monumental buildings are made from wood. They can last for generations if they are properly designed and built.
It is better to entrust the project of a building made of timber to professionals. They will be able to select the optimal wall thickness based on thermal engineering and strength considerations. It is also necessary to perform a full calculation of the foundations.
A frame building is a one-generation option. If it's built well it can last longer, but that's the original intention. The option is perfect for country house construction, but this does not mean that it is not suitable for permanent residence.
It is also worth considering aesthetic features. The timber always looks attractive and presentable. If necessary, a frame house can be easily given any shape. Modern finishing materials open up enormous scope for creativity and experimentation.
The decision is always made on an individual basis, depending on the existing conditions and preferences of the future owner.
Timber frame installation technology
Tools for mounting a timber frame.
First of all, before installation, you should choose the installation location. This takes into account the climatic conditions of the area, groundwater level, location of communications, soil features, etc. Due to the light weight of the frame structure, it can be erected on soft soils. Having decided on the location, you can begin installation.
In order to assemble a structure from timber, you need to prepare tools and materials:
- beam;
- anchor bolts;
- insulation;
- waterproofing material;
- wood antiseptics;
- building level, plumb line;
- carpentry tools;
- brackets, corners.
For long-term service of a wooden structure, the tree must be treated with special means of protection against atmospheric influences and pests.
Treatment can be performed at any stage of construction.
Step-by-step assembly of a timber frame
The frame conditionally consists of the following elements:
- upper and lower trim;
- racks;
- jibs that impart rigidity to the structure;
- special elements that are necessary for the construction of door and window openings.
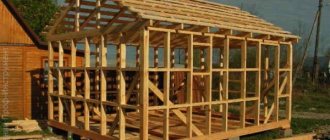
Frame assembly consists of the following steps:
Scheme of laying timber on the foundation.
- Foundation construction. The frame structure is lightweight, so it will be enough to make a strip foundation. You can use a pile foundation. After pouring, the concrete must harden well before starting installation work.
- Installation of the lower trim. Before laying the bottom trim, a waterproofing layer should be laid. You can use roofing material for this. Roofing felt must be laid before installing the trim. It should not remain on the foundation for long.
- Anchor bolts are used to secure the timber to the foundation. When pouring the foundation, you can leave allowances from the reinforcement, which can then be used to further secure the beam. The length of the anchor bolts should be selected taking into account the fact that the frame is made of 100x100 mm timber and the bolts should extend 10 cm into the concrete. The distance between the anchors should be from 1 m to 2.4 m. A short timber should be secured with two bolts.
- At the corners, the timber is usually connected with a half-tree or “paw” joint, although there are many different joints. To make the corner joints more reliable, they are additionally secured with nails or wooden dowels. Hardwood is used to make dowels. Dowels are used both for corner joints and for connecting the beams of the bottom frame. In this case, they should protrude 10 cm above the bottom trim.
- When the lower frame is ready, it must be checked for distortions by measuring the diagonals and angles between the beams.
- The next stage is the installation of corner posts. When using dowels, the racks are mounted directly on them. Before this, you need to drill holes in the racks corresponding to the diameter and length of the dowels. If the dowels were not installed, the racks are secured with reinforced corners. Corners when mounting intermediate posts make the structure more reliable. You can save on fastening racks using the cutting method. To do this, grooves are cut, the depth of which is approximately equal to half the thickness of the timber. Then timber is inserted into these grooves.
- When installing racks, you should check their verticality. Fastening the racks at the bottom is not enough to provide rigidity to the structure until the top trim is installed. Therefore, the racks are strengthened with jibs; you can use one jibs for several racks.
- When installing the top trim, the beams must be fastened together and attached to the racks.
- To increase the rigidity of the frame, braces are attached to the vertical beam, used for diagonal bracing. The cross-section of the braces may be smaller than the cross-section of the racks.
- At the final stage of mounting the frame, beams for the ceiling are installed. For attachment to the top harness the following can be used:
- felling;
- corners;
- brackets.
- Floor logs are installed in the same way as ceiling beams.
- The last stage is the installation of the roof. For the rafter system, boards with a section of 50x100 mm are used, which are attached to the ceiling beams in the lower part. The rafters are connected to each other by slats of a small length.
When installing a timber frame with your own hands, you must constantly monitor the verticality and horizontality of the structure so that it meets the geometric parameters.
Construction Features
Material selection
Before starting construction, you need to decide which timber to use for the frame house. In particular, you need to decide on the following points:
| Material parameters | Types and features |
| Timber type | There are two types:
Glued laminated timber has optimal moisture content. Therefore, frame houses made of laminated veneer lumber are stronger and more durable. However, the cost of this material is higher. |
| Section size | Determined during the design process by calculating the load. It is better to entrust this work to specialists or use ready-made projects. Most often, the house frame is made from 100x100 mm or 150x150 mm timber. |
| Wood type | It is necessary to give preference to durable varieties. For example, an excellent option is coniferous timber, as it is resistant to moisture, withstands loads well and at the same time has a low cost. |
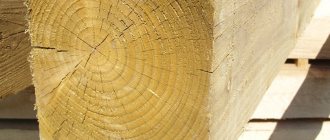
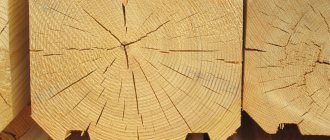
Solid timber with a section of 150x150 mm
When purchasing timber, you need to pay attention to its quality, namely:
- the absence of a large number of knots that reduce strength;
- humidity level – the value should not exceed 20 percent;
- no cracks;
- no traces of rot and mold.
It should be noted that the choice of material is a very important point, since the durability of the house depends on it. Therefore, it is necessary to approach it responsibly.
Note! Before using the timber, it must be treated with protective impregnation and fire retardant so that the structure is resistant to fire, rotting and other negative factors.
House frame
Frame assembly
As an example, let's look at how to build a house frame from 150x150 timber with your own hands. First of all, of course, it is necessary to complete the foundation.
Since the frame structure is light in weight, the base can be as follows:
- pile-screw;
- columnar;
- shallow tape.
The choice of foundation type mainly depends on the characteristics of the soil. On our portal you can find detailed information about choosing the type of foundation and the technology for its arrangement.
Frame diagram
After the foundation has been built, you can begin building the house.
The instructions look like this:
- Regardless of the type of foundation, a waterproofing material is laid on top of it (most often it is roofing felt), and then two embedded crowns are installed. The latter should be secured to the base with anchors, dowel-nails or other fasteners, after making sure that they are located horizontally;
Attaching the racks to the mortgage crown
- Next, vertical racks with a cross section of 150x150 mm are installed. You can fix them on the embedded crown in several ways - “in a groove”, which can be full or incomplete, as well as “butt”, using steel corners;
- then all the racks are strengthened with jibs. The latter can be secured with self-tapping screws;
- The top of the racks must be connected with strapping. If the building is one-story, then the harness can subsequently serve as a mauerlat;
- In the locations of window and door openings, additional racks are installed, which serve as the basis of the opening. In this case, the height of the opening is limited in accordance with the design by two horizontal beams. At this stage, you can immediately install doors and windows, since the frame structure does not shrink;
- additionally, the racks should be connected to each other by horizontal jumpers, which must be arranged in a checkerboard pattern;
- After assembling the wall frame, you should make the roof frame yourself. This stage does not differ in any special features and is carried out in accordance with the project.
At this point, the frame of the house made of timber is ready, now you can start covering it.
OSB boards
Frame covering
The process of covering the frame is carried out in the following sequence:
- First of all, you need to cover the roof. To do this, lathing is done, then a waterproofing film is laid and then the roofing material itself is attached;
- Next comes the exterior finishing. First of all, panels - OSB or other material - are attached to the frame with self-tapping screws;
- façade cladding material is mounted on top of the panels, for example, lining, block house, siding, etc.;
- the next step is interior decoration. As a rule, it begins with laying the logs and installing the subfloor;
- then a vapor barrier film is attached to the outer skin from the inside.
External cladding
- Next, a heat insulator must be placed in the space between the frame elements. It is best to use mineral mats for these purposes; they are vapor permeable and fireproof. The heat insulator can be secured using slats;
- then another layer of vapor barrier is attached on top of the heat insulator;
- To complete the work, a rough coating (plasterboard, OSB, etc.) or finishing material is installed on top of the frame. The choice depends on your own preferences, for example, interior decoration of a frame house with imitation timber will allow you to design the structure in the form of a log house;
- further work is carried out in the same way as in traditional house construction.
Advice! Recently, timber frame houses built using Finnish technology have become popular.
Their peculiarity is that the cladding is made of a special flat beam, which is connected to each other by a tongue/groove locking connection. Thanks to this, the structure is durable and “warm”.
At this point, the process of building a frame house can be considered complete.
Installation of the bottom trim
By the time the lower frame is assembled, the foundation should gain strength. Under standard humidity and light conditions, this takes 28-30 days. A frame or wooden house is lighter than a brick or reinforced concrete one. Therefore, a shallow strip or pile foundation is quite sufficient. Before installation, its surface is carefully leveled with an electric planer or using a thin layer of concrete.
A waterproofing membrane or ordinary roofing material is placed under the lower crowns. The seams are glued or coated with melted resin. Experts advise not to leave roofing felt for a long time in the sun or under precipitation. As soon as the waterproofing is laid, it is necessary to begin the installation of the frame, using anchor bolts or special embedded parts installed before pouring the concrete. The distance between the bolts is no more than 2 meters. At least 2 anchors are attached to short sections.
There are many ways to connect crowns in corners. But experts recommend the “paw-sampling” or “half-tree” methods. Additional strength is provided by nails, glue, and wooden dowels.
Nails should not be placed closer than 1.5-2.5 cm from the edge of the board. Otherwise, cracks and delamination of wood cannot be avoided. Pins - in the shape of a quadrangle or cylinder. The preferred material is oak or larch. The length of the dowel should be 10-15 cm greater than the height of the tier. Both the hole for the dowel and the dowel itself are lubricated with glue before installation to avoid displacement.
After installing each crown, it is necessary to stop work and check for the presence/absence of distortions, deviations from the vertical and horizontal. Diagonals, angles are checked, and their compliance with the design documentation.
To simplify the process, each wall or partition is assembled on the ground and installed ready-made. You will need a crane or winch, but this will make it easier to maintain the angles and geometry of the posts.
Between the beams of the lower crown, rough floor beams are mounted using 185/50 brackets. Steel thickness - from 2 mm. It is better to choose galvanized options.
Calculation of material sizes for the lower and upper framing of the frame
Dimensions of the beam section.
The main elements that you should pay special attention to include length, cross-section and materials necessary for fastening. The cross-section depends on what kind of insulation you intend to use during the construction of the house. If, for example, you use insulation with a thickness of at least 15 cm, then the section will have a width of 15 cm, while the height of the section should be at least 10 cm. The best option, of course, is a solid block of the dimensions indicated above, but if This is not feasible, then you can knock together one block from two smaller ones. The length of this part depends on the dimensions of the foundation. Accordingly, by measuring its length, you will get the total length of the bars necessary to strap the lower part of the house frame.
Hairpin device.
To attach this element to the foundation, it is best to use anchor bolts. Their diameter should be approximately 30-32 mm. Or these fasteners can be replaced with studs, which are inserted into the foundation before it hardens. Their thread should also be the same as the size of the above bolts. They, in turn, can also be attached to the foundation in advance or after it has strengthened. The studs must be selected in such a way that they are at a height of approximately 15 cm above the concrete surface, so the minimum length of the stud used in the tying process will be 30-35 cm. Despite the fact that in construction stores this product is presented in more impressive sizes (at least 1 m ), you will need to purchase a maximum of 3 studs to strap the lower part of the frame of a house with an area of 100 sq.m.
In order to fasten the harness, it is necessary to connect the bars together. Nails or pins are used for these purposes. Moreover, for each corner you will need one nail with a length of at least 15 cm, and a thickness (diameter) of approximately 0.5 cm. The dimensions and quantity of materials for the upper trim coincide with the specified quantity for the bottom trim. The only thing that is not required here is the use of fasteners to connect to the foundation.
Nuances of timber buildings
Several types of lumber are used for construction:
- sawn with a rectangular section. It is a log sawn into beams of certain sizes;
- profiled. The edges are equipped with recesses and grooves to facilitate assembly;
- glued. During the production process, wood waste is glued together under high pressure into a single structure. In the finished timber, the fibers have different directions, which significantly increases strength and resistance to shrinkage. The connection can only be made by steam treatment or using glue. The glued version is considered the most durable and reliable, but has a higher price.
The advantages of timber include
- environmental cleanliness. During the production process, even the glued modification uses a minimum of glue. The connection occurs due to high pressure steam;
- costs for interior or exterior finishing are reduced. It is enough to treat the surfaces with fire retardants and varnish. And you can live with maximum comfort;
- practically no additional insulation with mineral wool is required, the walls “breathe” due to the absence of hydro- and vapor barrier membranes;
- minimal load on the foundation. If a basement or underground garage is not planned, a shallow strip one is sufficient. On weak, heaving soils, a pile or screw foundation is installed.
But it’s unfair to talk only about the advantages of a house made of timber.
Disadvantages should also be noted
- long shrinkage periods. Experts say that at least a year or two should pass from the moment of covering the roof to finishing. The shrinkage time is slightly reduced when using laminated veneer lumber. Six months will be enough here;
- difficulties with the choice of heat-insulating materials. The use of polystyrene foam and expanded polystyrene is not recommended. They do not allow steam to pass through, but do not trap cold air either. As a result, the building becomes an analogue of a thermos or a greenhouse. It is recommended to use only mineral wool as insulation;
- During the shrinkage process, cracks and crevices may form in the walls if the source material has not been sufficiently dried. The owner of the building will have to periodically caulk the walls so as not to think about where the cold bridges come from;
- instability to fire. Wood is the favorite “food” of fire. Fire retardants - drugs that increase fire resistance - do not completely eliminate the threat of fire. They only give the owner a few extra minutes to evacuate and remove valuable property.
Some of the disadvantages are leveled out when using laminated wood. But some shortcomings are eliminated, others are added, and you need to know about them:
- The quality of the material depends entirely on the conscience of the manufacturer. In the original technology, fibers are glued together under the influence of steam, pressure and the wood’s own adhesive resins. The manufacturer, wanting to speed up the creation process, can add chemical adhesives. Such timber is no longer considered environmentally friendly. In addition, it is unknown how such a material will “behave” after years of operation;
- glued lumber costs several times more than standard sawn timber and sand-lime brick. The cost of the building will exceed the price of a stone mansion. Glued laminated timber is recommended for use if long walls are required. In other situations, sawing and preparation for installation will negate the strength characteristics.
Installation of racks
After installing the bottom trim, they proceed to installing the racks. Ideally, they are placed on the dowels of the bottom row by drilling holes of the required diameter and lubricating all contact points with glue.
Instead of dowels, you can use steel corners with galvanized screws for fastening. According to some experts, corners are preferable to dowels. If the issue of saving remains relevant, then the optimal way to attach the racks is to cut out grooves, but the strength will be lower than when using corners.
Expert opinion Sergey Yuryevich Construction of houses, extensions, terraces and verandas. All racks are installed in accordance with a pre-drawn plan, so that it does not turn out that window and door openings are not provided. Optimally, there is no more than 50 cm between the posts.
Depending on the method of installation of the racks, their length changes. If dowels or steel angles are used as a fastening element, then the length of the rack corresponds to the height of the floor. If fastening is done by cutting, then a certain number of centimeters are added to the groove on each side.
To prevent the racks from becoming loose during operation or moving away from the vertical position, each is reinforced with an additional bevel made from rough timber, slabs, and formwork.
Step-by-step construction instructions
Installation of the frame on the wall should be carried out after completion of the wet processes and before assembling the finished floor, on the ceiling - after completion of finishing and laying of utilities. All work is carried out in the following order:
- Marking;
- Frame assembly;
- Installation of sheets;
- Finishing work.
Marking
On the floor and ceiling, the position of the future starting beams of the frame is marked with a tapping cord, taking into account their thickness. Marks are transferred between the floor and ceiling using a laser level or a magnetic plumb line. At the same time, mark the location of the doorways and the places where the vertical posts are attached, taking into account the selected step.
Frame assembly
Along the marked lines on the floor and ceiling, the starting bars are secured with dowel nails, at least 3.5 cm long. Next, vertical bars adjacent to the walls are installed. Their length should be such that they fit tightly between the guides. The elements are fixed with self-tapping screws or metal corners. At this stage, the selected area of the room should be framed around the perimeter.
The insulation is embedded in the frame
At the second stage, vertical bars with the selected pitch are mounted. To provide additional rigidity to the structure, it is reinforced with horizontally located posts between them.
Laying communications
If you plan to place sanitary pipelines and low-current wiring (TV, Internet, telephone), this must be done after assembling the frame. To simplify the process of placing vertical beams, metal profiles can be used as starting guides on the floor and ceiling.
Installation of sheets
The sheets are placed on the frame, adjusted close to the wall and ceiling, secured with self-tapping screws from the center to the edges or simultaneously in the vertical and horizontal planes (alternately). The screw caps are recessed by 1 mm. A gap of 1-1.5 cm is left between the sheets and the floor and is subsequently sealed with sealant.
The joints between the sheets are sealed with putty with or without reinforcing tape, depending on the type of gypsum board edge. The putty composition is applied in 2 layers - starting and finishing and should not protrude beyond the seam. The corners are treated using reinforcing tape, bending it at the desired angle. After drying, the surface of the sheets is finished with the solution, followed by placement of the facing material.
Wooden frame for ceiling
The lathing for plasterboard on the ceiling is assembled in a similar way. Options are possible with installation of guides around the perimeter, when it is necessary to leave space between the ceiling and the cladding, or without them, with the beams being secured directly to the ceiling. Another option is to place double bars in the right places and place sheathing elements between them.
Selecting boards for various parts of a frame house structure
The board for different parts of the frame building is different; it has its own requirements regarding the size of the material and its strength.
Foundation
In this case, the board is used to arrange the strapping, which is mounted on a monolithic or strip type foundation. Another application is a reinforced concrete grillage. The strapping is needed to form fastenings for the walls of the future building.
The width of the strapping is up to 40 centimeters and it fits into one or two boards. The thickness of the board for framing a frame house varies. If the foundation is level, installing one row of boards will be sufficient. And if it has irregularities, then you will have to eliminate them by forming two layers of strapping. In this case, a board made of spruce or pine is used, 20-25 centimeters wide and up to five centimeters thick.
The use of “elite” wood species: larch and oak, will be a reasonable solution, taking into account the safety margin and service life of such wood. In any case, the tree must be treated with an antiseptic, fire-retardant and water-repellent solution.
House frame
The entire main load of the structure is distributed onto the frame of the house. That is why the boards used to form it must meet the strictest requirements in relation to their cross-sectional area.
To make vertical racks, you should use timber or boards with a thickness of at least four centimeters. Boards can be combined if necessary. Horizontal elements can be made from waste left after cutting vertical posts. The width of the board will depend on that of the walls and can reach 15-18 centimeters.
For the construction of the frame, spruce and pine wood, dried in a chamber, is suitable. Considering that such boards will not be visible, you can use material with defects on the surface. Just don’t forget about the mandatory treatment of wood with a protective substance that prevents the appearance of fungus.
Walls inside the building
In this case, the tree is not exposed to external influences from bad weather; it is subject to much less mechanical stress, so the requirements for wood material are not so high.
Thus, you can use needles of the second or third grade; the board size 2.5 * 8 cm is quite suitable for a frame house. If the project involves high ceilings, then boards with a width of at least twelve centimeters will strengthen the structure. The wood does not require any additional processing if heating is provided in the house.
Floors
Floors are a system of beams with different contents inside, separating the floors of a building. It can also be the floor on the 1st floor of the house, or the floor and ceiling of a higher level. Inside the ceilings there are logs, which are very thick, durable boards fixed edgewise to the walls. In the case of the first floor, they can be fixed to the frame of the house. It is recommended to use boards made of pine and oak, having a width of 20-25 centimeters and a thickness of 4-5.
When it is planned to install floors on the floor, the joists should be as thick and wide as possible, because the entire main load will be distributed on them - the floor covering, furniture, and the residents of the house themselves. If there is not a sufficient safety margin, the floor may begin to creak. In addition, you should use only dried wood, since deformation will have the most dire consequences.
A finishing or subfloor is installed on top of the logs. For roughing, you can use an unplaned board, the main thing is that it has an even geometry. The boards that are planned to be used to create a finished floor must be processed on a surface planer and carefully examined for any possible defects. It is recommended to choose a material made from pine needles, having a width of 10-20 centimeters and a thickness of 3.5 - 5 cm. A simple rule: the larger the pitch between the joists, the thicker and stronger the boards should be.
Absolutely any wood can be used for rough ceilings. As a rule, softwood lumber is used, having a thickness of two and a half centimeters. Decorative finishing is done on top of the rough ceiling, which can be made from walnut, oak, beech and other expensive and solid wood.
Roof
During the construction of the roof, wood is used to construct the rafter system (frame) and sheathing. It is best to use spruce and pine wood that is at least four centimeters thick, well dried and planed. The width should be selected based on the ridge beam or rafter span. Usually it ranges from ten to thirty centimeters.
The type of wood doesn't really matter. When the length of the beams is not enough, it can be increased using nails or ties.
To prevent the effect of “collapsing” of the rafters, it is necessary to install jibs, which are scraps from the board. Their function is to be spacers for the rafters of the roofing system. To create them, you can use any wood material.
Interior decoration using boards
You can use both boards and wood panels. They are used for finishing walls and ceilings. Floor boards must be durable and abrasion resistant. Wood material must be pre-treated with special impregnations that protect it from moisture, fire and fungus.
The most commonly used wood is hardwood: walnut, oak, yew, maple, cherry, boxwood. To make decorative elements, blanks with a thickness of up to two and a half centimeters are used. The front side must have a dense surface, be polished and without any defects. Working with the material involves preserving the natural texture of the wood.
What kind of fasteners and connection methods are needed?
The connection of frame parts and their fastening to the wall and ceiling is done using dowel nails. Holes are first made in concrete surfaces using a hammer drill with a drill whose diameter corresponds to the diameter of the dowel.
Additional fastening elements include metal corners. They connect vertical posts with horizontal ones. The guide wooden beams are fastened in increments of 40-60 cm (the distance between the nearest posts).
Metal plate is used for both walls and ceilings
The elements of the wooden frame are connected to each other using self-tapping screws at an angle or metal perforated corners. The installation of the beams on the wall is done with an indentation from it, using ceiling and floor starting profiles, or without an indentation, when the starting bars are not needed, and the vertical racks are attached directly to the wall. If it is crooked, it is leveled using special compounds or by placing wooden spacers in the right places.
Harness
The strapping is made from beams 150 by 150 mm, 200 by 200 mm, 200 by 250 mm.
Before laying the beams, the tops of the piles must be coated with mastic and two layers of roofing material must be placed on them. They will serve as waterproofing. The bars themselves are treated with an antiseptic.
The bars are installed on piles along the entire perimeter of the base. They are connected to each other in half a tree using nails 120 millimeters long. At the corners, the joints can be strengthened using metal corners secured with nails 50-60 millimeters long.
The strapping is fixed to the base using fastening screws. The beams are placed in the heads (in special grooves) and screwed.
It is necessary to lay a board on top of the strapping. It should cover the joints of the beams. This is where the frame racks will be mounted in the future. The board must also be treated with an antiseptic. The length of nails for fastening is 120 mm.
Subfloor installation
For the logs, timber 150 by 100 mm is used.
Step – 60 centimeters. The logs are attached to the harness using metal corners. Boards are fastened to them with nails.
Insulation is laid between the joists, and a vapor barrier film is spread over it. The last layer is plywood, which is laid on the logs around the entire perimeter.
Frame installation
For the frame, a board of 100, 150 and 200 mm by 50 mm is suitable.
First, the corner posts are installed. They are fixed using reinforced steel corners.
Next comes the installation of all other racks. Corners are also suitable for this purpose. All racks are equipped with jibs. They will prevent loosening.
Top frame beam
In the corners, the bars must be secured using notches, in other places - with steel corners. The corners are fixed with self-tapping screws.
To give the structure strength, diagonal slopes are installed.
Installation of ceiling beams
Installation is done in three ways:
- By cutting method
- Perforated brackets
- Steel corners
You can combine several methods, for example, corners and the cutting method. The beams must rest on the frame beam. Fastening is done with self-tapping screws.
Installation of the rafter system
Installing a roof is a labor-intensive process, so we included a description of it in a separate article, “Do-it-yourself roof of a frame house.”
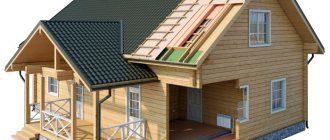
Exterior finishing
For this purpose, you can use siding, simulator of timber, stone or any other material intended for this purpose. The order of execution is as follows:
- First, a sheathing of bars measuring 40 by 50 is installed. The fastening step is 60 centimeters. You can also use metal profiles
- The lathing is treated with an antiseptic and fire-resistant compound
- Next comes the installation of finishing material using a certain technology.
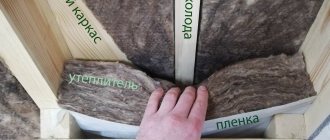
Insulation of the house
After finishing the exterior finishing, it is necessary to insulate all parts of the house - roof, ceilings, floors, facades.
The insulation is placed in cells between the bars. A vapor barrier film is attached on top.
Interior decoration
The house is ready!
All that remains is to do the interior decoration. There is no one to advise you here and you have the right to make it as you please.
In this article we told you step by step how to build a frame-panel house with your own hands. We hope the information received will be useful to you.
Photo report on the construction of a frame house with your own hands
In this section you will find photos of the construction of a frame house, which our reader built with his own hands on weekends.
Video of building a frame house with your own hands
Building materials for roofing
The building materials market offers such a wide range of roofing materials that any developer will be able to choose an option that suits its performance and budget.
Useful: Liquid thermal insulation: manufacturers, features of selection and application
Criterias of choice
Meanwhile, each individual house project includes recommendations for the construction of the roofing system and its coating. This depends on several factors:
- maximum permissible load on the structure, according to the characteristics of a particular project;
- roof configuration (architecture);
- taking into account the weight of a particular roof covering.
The most popular roofing materials for frame houses can be divided into several categories.
Ceramic tiles
This roofing coating is made from quartz sand, clay and various additives. The most practical and durable in use are glazed tiles. It has a smoother surface, which speeds up the removal of sediment from the roof.
There are several types of ceramic tiles in shape:
- tape;
- grooved;
- single wave;
- two-wave.
The average weight of one ceramic tile element reaches two kilograms . This type of roofing is chosen for its durability, lack of corrosion processes and frost resistance. However, there is also a significant drawback for frame construction - heavy weight. In this regard, it is not suitable for lightweight structures; reinforcement of the entire frame is required.
Bituminous tiles
In production, a mixture of cellulose and fiberglass is used to cover bitumen tiles. This roofing material is best suited for frame technology.
It is compatible with roofs of complex configurations, as it is quite light and flexible, and the damaged part can be replaced without dismantling the rest of the roof. However, this type of roofing also has disadvantages: a high combustion rate and fading in direct sunlight.
Metal tiles
This type of roofing consists of a galvanized sheet coated with a layer of polymers. In appearance, metal tiles are similar to ceramic tiles. At the same time, it is considered a universal covering for the roof of a frame house, thanks to some features:
- high installation speed;
- low weight;
- fire safety;
- low price.
The only disadvantage that can be called for this roofing material is the high noise level during rain.
Requirements for materials and rules of work
The design and construction code of practice contains the basic requirements that must be met to create a strong frame and subsequently place the sheets. Here are the main ones:
- All products and materials must have a hygienic certificate and fire certificates;
- In the space between the frame and the rough base, where operating conditions require it, it is necessary to place heat, sound, and fire insulating material;
- Water absorption of waterproof and water-fire-resistant plasterboard sheets should be no more than 10%;
- GKLVO sheets (moisture- and fire-resistant) are used in rooms with air humidity not exceeding 90% and temperatures not exceeding 30C. When using them, waterproof primers, putties, and paints are used to treat the surface;
- To fasten gypsum board sheets with a thickness of no more than 15 mm to a wooden frame, TN35 screws are used, with a thickness of up to 24 mm - TN45;
- When placing sheets longitudinally, the step of their fastening is no more than 60 cm, when placing sheets transversely - no more than 1.25 m;
- To improve the soundproofing properties of the structure, a sealing tape is laid between the guide beams, ceiling and floor;
- The sheets are fixed to the frame with self-tapping screws in increments of 25 cm, (spaced apart) with a distance from the edges of 10 mm (edge with cardboard), 15 mm (cut edge);
- The joints of the sheets, if they are located vertically, should fall on the center of the racks; if they are positioned horizontally, they should fall on additional bars placed between the vertical racks;
- The pitch of the supporting beams on the ceiling is 50 cm for a transverse gypsum board arrangement, 40 cm for a vertical one;
- The spacing of gypsum board fastening on the ceiling is no more than 17 cm.