You have probably already encountered the fact that there are very few good articles and videos on the Internet on the topic of building a wooden gazebo with your own hands. In this publication I will try to cover the maximum number of issues related to the construction of a wooden gazebo.
Ready-made gazebo
During the step-by-step instructions, you will be offered pictures and videos that will help you understand this process.
You can ask all questions in the comments below the article.
This publication appeared thanks to a video by a person from the site youtube.com under the pseudonym “ Azure ”. He made a 25-minute video with very clear comments, which I will also use in this article.
I apologize in advance for the quality of the photos. Since the video is of rather low quality, the photos will be corresponding. At the same time, everything will be quite clear and structured.
Site and foundation preparation
The proposed wooden gazebo measures 3 by 3 meters. Accordingly, the site must be cleared of tall grass and other debris in advance. Ideally, the ground should be level and firm.
To save material and time, it was decided to abandon a serious strip foundation, since there would be practically no benefit from it - the structure would be stable anyway.
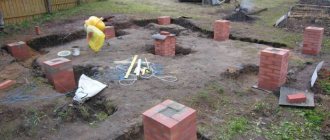
Despite the fact that the gazebo is square 3 by 3 meters, 12 foundation columns are used, not 9.
Area
Foundation
Timber for strapping
Ready-made pillars
The foundation was chosen to be columnar. It consists of 12 curb stones laid exactly level. Instead of curb stone, you can use any hard material, such as brick, tile or aerated concrete. Before attaching the bottom trim, it is necessary to put waterproofing on the posts; in our case, we will use sheets of roofing felt. The lower trim is made of timber 100 by 100 mm. Before laying on the foundation, the timber is painted, this is done to protect the wood and its aesthetic beauty. An important point is that the ends of the bars are cut at an angle so that the pillars of the future gazebo can be inserted into them. All this is presented in the photographs below.
Inserting a pole into the harness
Strapping fastened at an angle
Sawing the strapping at an angle
Photo gallery of gazebos
Below are designs of summer buildings, decorated in popular design directions. Here you can see both budget buildings and exquisite garden houses.
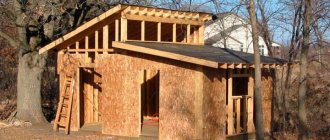
Construction of walls and installation of frames
As already mentioned, pillars are inserted into the lower frame, which form the basis of the entire structure.
It is important to prepare each of the four walls in advance, after which each of them is laid in turn on the base of the gazebo, raised and secured. In this case, the master decided to start from the front side, then from the back, and then started on the sides.
Bottom trim with roofing felt
Then it rises and attaches to the harness
The front part of the gazebo is laid on the base. Raising the side walls, we get the finished frame of the gazebo.
All work on fastening the walls and connecting them to each other is shown in the video, which will be attached towards the end of this article. You can find it through the content of the article, or by scrolling to the end of the entire publication and seeing it there.
One way or another, it is quite difficult to explain in words how the frame of a structure is erected; I recommend that you better watch the video.
Construction of a frame gazebo with a pitched roof
To avoid serious mistakes and minimize construction costs, you need to start with the simplest. As an example, we take a rectangular gazebo with a pitched roof and on a slab foundation.
Construction of a frame gazebo with a pitched roof
Necessary materials:
- large stone or crushed stone;
- sand;
- concrete solution;
- boards for formwork;
- timber 100x100 mm and 50x50 mm;
- boards with a section of 30x150 mm;
- wood primer;
- dye;
- slate or corrugated roofing;
- screws and bolts;
- reinforcing bars.
You will also need tools:
- shovel;
- building level;
- rule;
- hacksaw;
- jigsaw or circular saw;
- screwdriver;
- hammer;
- paint brushes;
- Bulgarian.
Construction of a frame gazebo with a pitched roof
Marking the base of the gazebo
Marking the future gazebo
Marking the future gazebo
Select a flat, open area of the garden and mark it. To do this, determine the location of one of the corners of the gazebo and mark it with a peg. Measure the distance to the remaining corners, place beacons, and stretch a string between them. The diagonals are measured in the resulting rectangle: if they are the same length, the markings are made correctly.
Pit preparation
Backfilling and compacting sand
Using a shovel, select soil to a depth of approximately 25-30 cm, level the bottom, and compact it thoroughly. The walls of the pit must be strictly vertical. Next, pour coarse sand in a layer of 10 cm, level it well and moisten it abundantly to compact it. Formwork made of boards up to 10 cm high is placed around the perimeter and reinforced with timber.
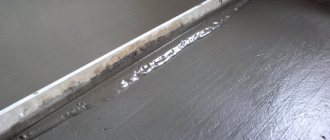
Pouring the foundation
Read more about the foundation of the gazebo
How to make a foundation for a gazebo? - This is a question that almost every novice builder asks himself. We have written a detailed article about the step-by-step stage of foundation construction.
In addition, we suggest reading an article about step-by-step technology for constructing a wooden gazebo, link to the article.
The pit is laid out with large flat stones or filled almost to the top with large crushed stone. At the corners of the perimeter, sections of reinforcing bars are driven between the stones; the rods should rise at least 10 cm above the finished foundation. Prepare a concrete solution and fill the foundation pit. The surface is leveled with a rule or smoothed with a trowel.
Foundation
Frame installation
For the frame, take 4 beams 100x100 mm and cut to the height of the gazebo. The front beams are left 15-20 cm longer than the rear ones to create a roof slope. After this, the supports are well treated with a primer and dried. At the lower end of each support, a small hole is drilled along the diameter of the reinforcing bars that protrude from the concrete at the corners of the base. Place the beams on the rods, align them vertically using a level and further strengthen them with metal plates and anchor bolts.
Frame made of timber
After installation, the side supports are connected to each other with 50x150 mm boards, and then braces for the rafters are installed. At a height of 10 cm and 0.5 m from the floor, the racks are connected by horizontal jumpers made of 50x50 mm timber. Vertical bars are attached between the lintels at intervals of 40 cm. The doorway is left free. All fastenings are carried out using bolts and steel angles, which are screwed to the wood with self-tapping screws.
All fastenings are carried out using bolts and steel angles, which are screwed to the wood with self-tapping screws
Gazebo design
Prices for various types of timber
timber
Roof installation
Roof diagram
Roof installation
Wooden logs
Roof of the gazebo
On the boards connecting the support beams, logs are stuffed in increments of 30 cm. The top of the logs is sheathed with 30x150 mm edged boards. Gaps ranging from 5 to 15 cm wide are left between the boards. Of course, all roof elements must be treated with an antiseptic primer and well dried. You can cover the top of the board with glassine and secure it with staples. Thin slats are placed on top of the film so that there is a ventilation gap between the roofing and the film. Slate is laid on the slats and secured with 120 mm nails with galvanized heads.
Arrangement of the gazebo
Painting the gazebo
After installing the frame and roof, all wooden surfaces must be painted. When the paint has dried, place a wooden table inside the gazebo and benches along the walls. Electricity is carried out from the house to the gazebo, a light bulb or lamp is hung. To give the room a cozy feel, you can cover the walls with thick, light-colored fabric. The interior decoration completely depends on the taste and capabilities of the home owners.
This version of the gazebo is basic. If desired, you can improve the design: install wooden gratings between the load-bearing beams, cover the walls with clapboard or waterproof plywood, lay logs on a concrete base and make a wooden floor. Instead of beams for the frame, you can take metal pipes, and replace the slate with polycarbonate or soft tiles.
Preparing and assembling the roof
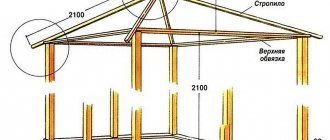
The roof in this case was assembled in advance. It is a gable structure and uses a rafter system. For the roof we will need the following material:
- 2 load-bearing beams 100 by 100 mm.
- 2 cross beams 100 by 50 mm.
- 8 rafters.
Use your finger to indicate where the roof is attached to the pole.
Cutouts for beams and rafters (side view)
Disassembled roof corner with cutouts (top view)
Assembled roof
Eight rafters with cutouts at the ends on both sides
In order to properly assemble the roof, it is necessary to make cuts in the rafters and four bars, and in bars 100 by 100 mm, cuts must be made on both sides.
This is done to ensure that all the material lies flat in its grooves and does not deviate to the side. In addition to the assembled roof, the photographs show places where cuts need to be made.
Installation of rafters
Once you have installed all four walls and the frame of your gazebo is ready, you can begin installing the roof.
Your task will be to install a gable roof consisting of eight rafters. If you install all the rafters exactly into the pre-cut grooves, then it will be level and, from a technical point of view, correct.
Ready frame
Lathing in steps of 35 cm (first - 25 cm)
Installation of rafters
After installing the rafters, it is necessary to make a sheathing on the roof with a pitch of 35 cm, on which the metal tiles will be laid. An important point is that the first step must be taken 25 cm so that the ends of your metal tiles do not bend.
Laying metal tiles
Sheets of metal tiles are laid overlapping each other. If you correctly took the 35 cm step, then the edges of your sheets will be exactly above the boards. This will allow you to correctly attach the metal tiles to the roof with self-tapping screws.
The self-tapping screw is screwed in under the rib; this is done to create the effect of the absence of self-tapping screws - if you look from the side, they are practically invisible.
The ridge is made from the remains of metal tiles - cheap and effective.
Preparing sheets for laying on the roof
We make a skate from leftover material
Fastening the roof with self-tapping screws
Layed sheets of metal tiles
Finished roof with ridge
We will make the ridge for the gazebo from the scraps left over from the sheets of metal tiles from the roof. Initially, the trimmings need to be aligned as much as possible, then slightly bent and attached to the gazebo. This will be a great saving of money; you will not need to buy extra roofing material.
Sketches of the gazebo
It is clear that you want a reliable, durable structure. Metal is unrivaled, the solution on the surface is a gazebo made of pipes. However, there is nothing to do here without welding skills. Therefore, the wooden option is more accessible for implementation.
Looking at the drawings, one may doubt the simplicity of the design. However, it is immediately worth noting that the option of a gazebo for the description was not chosen in vain - it guarantees results even for beginners who know nothing about carpentry. This is a great opportunity to “rehabilitate” for those who have heard at least once in their lives that “they didn’t hit a nail in the wall.” To make it more convincing, let’s look at why everything is so simple:
First, a small amount of tools is required:
- Household tools: shovels, buckets - can be found in every yard.
- Hand tools: a hammer, an ax - any owner can find them.
- Power tools you need are a drill and a belt sander.
Secondly, you need minimal construction skills:
- Dig.
- To nag.
- Pound.
The most difficult part will probably be measuring the dimensions correctly and tightening the screws. Thanks to the simplicity of the design, anyone can do this kind of construction of a gazebo with their own hands. Next, let's look at the drawings themselves.
From the sketch you can see that the gazebo is assembled in rows. For beginners, this is the main advantage: there are no racks or support pillars. After all, installing them in a vertical position, assembling parts into a common horizontal plane, and ensuring structural strength is the main difficulty for beginners. In addition, the situation is aggravated by the size of the gazebo - the larger they are, the harder it is to make the gazebo, because everything needs to be kept “under control”. And in this project, all constructive parts can be lifted even by one person.
Let's see the view from above. It shows the overall dimensions - the length of the lumber. It can be seen that this is a gazebo 4 by 4 meters, in the drawing it is a little larger, but this is not important - any dimensions can be changed proportionally. It also becomes clear that the gazebo is planned to be square, without a doubt - this is a plus, since marking the foundation like this is much easier to do.
Next comes information about the order of the walls. Please note that the bottom of the gazebo is supposed to be “translucent”. This will ensure structural strength while saving material - it’s easy to calculate how many rows in height can be raised due to “lightening”. The result is a visually light, beautiful gazebo, well ventilated, which is important for “non-permanent” buildings.
The following image draws attention to the boards framing the openings. Of course, these are the most important elements that increase structural strength. Although, the horizontal parts serve a more decorative function - it is advisable to make them and use them as railings. And vertical racks are really amplifiers; their presence is mandatory. They set and control the verticality of the openings - in common parlance this is called a “jamb”.
Moreover, it is not at all forbidden, and even advisable, to rethink this knot and perform it in the best traditions of carpentry - if the thickness of the walls allows it - cut the key inside and decorate the outside with a trim. But if the lumber is of relatively small thickness, and here 45mm is used. – make a “hugging” stand with overlays on three sides of the wall – outside, slope, inside. Then our wooden gazebo, or rather its walls, will gain strength, as they say, “with a margin.”
The following sketch of the gazebo is about the structural elements of the walls. The specified lumber is 45x130 mm profiled timber, which is perfect for the manufacture of small buildings - country houses. Even a more structurally complex hexagonal gazebo can easily be assembled from it. It is available in various cross-sections, with different numbers of tongues. Factory execution presupposes a guarantee of quality - such products require a complex, multi-stage technical process: drying, culling, processing on machines. However, the budget is appropriate.
In the future, we will consider how and with what, if necessary, you can replace it: of course, much more effort will be required during construction and the wood will dry naturally - all this is clear, but the gazebo will still be “thrown on the street,” so we will lose little in quality. Those who want to save money and tinker should be warned right away - the material should already be in stock, naturally dried. Therefore, there is no need to entertain vain hopes - the raw materials will not work from the sawmill and will definitely lead to “falling over”.
It is noteworthy that all the elements are structurally the same, they differ mainly only in length, they have notches made to join the corners - let’s call them bowls.
Separately, the structural elements of the roof are drawn in great detail and clearly: rafters and octagon - according to their number, for connection in the center. As you can see, the number of rafters is 8, but based on the number of walls, it will be a hipped gazebo.
The position of the rafters is also indicated by the top view. The roof itself is a pyramid, based on corner and intermediate rafters. Now their position is even more clear.
And finally, the development of one roof slope, looking at it, the feeling gradually returns that this is a drawing of a simple gazebo. It is easy and simple to calculate the amount of roofing material for the entire roof.
To complete the preparation, it can be noted that drawings and drawings greatly facilitate the preparation and calculation of materials for the construction of a gazebo. Moreover, they can easily be adjusted to fit the existing lumber - recalculated towards reduction or increase. The main thing is not to be too lazy to do this on paper, so that later you don’t have to look for a “way out of the situation,” because we are building a gazebo “for sure.”
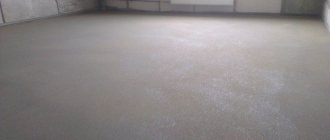
Covering the floor
In order to lay the floor smoothly and neatly, it is not enough to simply throw the boards and secure them. In those places where the boards will rest against pillars and beams, it is necessary to make cuts so that the board passes through these conditional obstacles.
Depending on how straight you can make the cuts in the boards, the fewer gaps you will end up with. The work is quite delicate, but even if something goes wrong, it will not be a serious problem. You can insert an additional block into the gap if things get really bad.
Let's start laying the floor
Installing the first board
We continue to lay the floor
We make even cuts in the boards for obstacles
Finished floor
When it comes to flooring, it is always important to secure the first board evenly. If you succeed, then everything else will go much easier. If something goes wrong and a corner appears, then it’s better to immediately pull everything out and do it again. It will be faster and more beautiful than adding something and leveling it in the process.
Choosing a foundation type
Depending on the materials used, gazebos are built with or without a strong foundation. In which cases a foundation is necessary, and in which cases you can do without it, we will discuss below.
With base
Stationary structures are created at a specific location on the site. This type of construction is more reliable and can be used all year round.
The type of foundation depends on the soil and the upcoming load.
Tape
The tape is poured under brick, stone, metal, wooden logs, timber gazebos. Recommended soil type is rocky, black soil and other immobile ones.
Detailed information about the types of strip foundations.
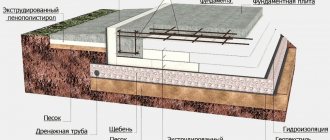
Monolithic
Selected if installed inside a stove or fireplace. The slab foundation is reliable and can withstand high loads, but the consumption of materials is high, so it is expensive.
Photo: site reinforcement before concreting
It is not recommended to build a monolithic foundation on moving soils or with a high groundwater level. Concrete mortar will crack when exposed to moisture.
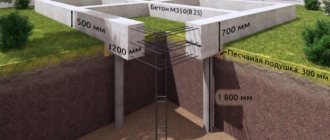
Columnar
The most popular type for summer buildings. Suitable for buildings from:
- wooden picket fence;
- metal frame covered with polycarbonate, plastic;
- brick pillars and wrought iron partitions.
A hole is dug under each of the pillars and reinforced. A support is fixed in it, the free space is filled with concrete.
Photo: installation of the lower trim on the foundation supports
The racks can be crushed, partially concreted or hammered, dug into the ground. It all depends on the upcoming load.
Pile
Screw piles are a metal pipe with a sharp tip and blades. Using special equipment, they are screwed into the ground to the required depth.
Piles serve as pillars or become the basis for them.
Photo: foundation on screw piles
They are used on complex swampy and peaty soils, where other foundations cannot be constructed.
From scrap materials
For budget construction, summer residents came up with the idea of using available materials as a foundation. One option is old car tires. They are laid throughout the site. The internal cavity is filled with concrete mortar.
Photo: foundation made of car tires
Another way is to use wooden cuts or stumps. They are placed in the ground, compacted tightly. But this raw material is not suitable for clayey, swampy soil.
Photo: preparation of building material
Both homemade foundations are suitable for light frame gazebos made of wood, polycarbonate, and dense fabric.
Without reason
No foundation is needed for seasonal portable structures. Its replacement will be a paved area made of stone, brick, and paving slabs.
Article: how to build a gazebo without a foundation
Prefabricated or modular structures are inexpensive, so you can purchase them ready-made, and to save money, try to make them yourself.
Cladding walls and gables with clapboard
For decoration and partial protection from atmospheric influences, we cover the gazebo with clapboard. These are small boards that are attached to the gazebo with nails with a small cap (it’s almost invisible). The lining overlaps each other.
The last plank most often does not fit properly, so it will need to be trimmed and made narrower. When installing lining on gables, the same principle is used.
The preparatory work before installing the lining is clearly shown in the video. They need to be done so that everything turns out smoothly and reliably.
Gable trim
Covering the first wall Covering all four walls
This process only looks simple. In order for everything to be smooth and without gaps, it is necessary to initially carry out some work so that the lining fits exactly in the places you planned. The video explains this process within 3-4 minutes, so you shouldn't have any questions.
Not a complicated gazebo
A simple do-it-yourself gazebo in the country is a wonderful holiday. Even the most comfortable country house or cottage does not provide such pleasure as relaxing in a gazebo in the fresh air. Some even manage to build a gazebo, simple in shape and design, within a day.
This is not a complicated gazebo, it is, first of all, an open gazebo. They are usually built near a fence, a solid wall of dense bushes. In practice, the back side of the gazebo will have natural protection from human eyes.
Such gazebos are cheap and look beautiful.
Closed gazebos, even the simplest ones, will cost more. If you have financial problems and want a closed option, then make a gazebo as an extension to the house. The back wall will no longer have to be built, and this will significantly reduce costs.
Installation of decorative grille
In our case, the decorative lattice is made from a board that we still have. First of all, a frame for the lattice is made, and then small slats are cut out. The slats are secured crosswise, after which the other side is also covered with a frame. We use nails for fastening.
Link to the full article on the manufacture and installation of a decorative lattice - Do-it-yourself decorative wooden lattice for a gazebo: options, photos, videos.
Lathing frame
Attached slats
Reiki
Finished side
Finished decorative lattice throughout the gazebo
Since we have a large article on the topic of decorative grilles, I will not focus much on this issue. Yes, and there are explanations in the video. Photos of the manufacturing process are presented in the slider below.
Gazebo made of pipes
For a person who can and loves to work with metal, a gazebo made of pipes will be not just a useful structure, but also an exciting creative process. And the gazebo itself, made from a profile pipe, will be your favorite place of solitude during relaxation.
This design can become a real decoration of the entire summer cottage.
Profile pipes are an excellent material for a gazebo frame. It is much stronger than round metal pipes or thick iron rods. It is much more convenient to work with it. This is truly a universal material. It is used to make not only structural structural elements, but also benches and tables for gazebos.
Metal gazebos are fire-safe, durable, and, at the same time, lightweight structures.
Construction material
To build a gazebo, a fairly large amount of material is used. A general list of what you need is presented below.
- Beam 100x100x3000 — 10 pcs (bottom frame, pillars, roof).
- Beams 50x150x3000 - 24 pieces (floor and benches).
- Beam 50x100x3000 - 18 pieces.
- Board 25x100x4000 (grids, roof lathing, etc.).
- Lining 14 square meters.
- Metal tiles 6 sheets of 1.8 meters each.
- Skate 3.5 meters.
- Ruberoid.
- Self-tapping screws, paint.
In addition to the material, you will need a tool - a jigsaw, sandpaper, a level, and the like. You can put everything on nails the old fashioned way, but let’s not do anything on our own :).
Required materials and tools
To build a cozy garden gazebo with your own hands, you need to prepare the following materials:
- Profiled timber 80x80 or 100x100 mm (for support posts) – 4-8 pcs.;
- Edged boards for tying the foundation - 8-10 pcs.;
- Lining for covering the gazebo frame;
- Profiled timber for tying the upper part of the frame – 4-8 pcs;
- Board or timber for the rafter system of a pitched roof – 6 pcs;
- Roofing material (we use bitumen shingles, but any other can be used);
- Wooden strip 2 cm wide for decorative sheathing;
- Metal corners and screws, rods 40 cm long (4 pcs.);
- Cement;
- Sand;
- Crushed stone;
- Boards for formwork.
From the tool you should prepare:
- Concrete mixer;
- Shovel;
- Roulette;
- Buckets;
- Hammer;
- Self-tapping screws for 75.
- Saw or jigsaw;
- Planer, sander.
Scheme and drawing
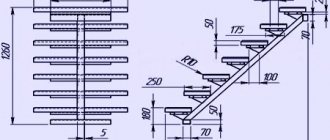
Unfortunately, I could not find a drawing of this gazebo, the dimensions of which are 3 by 3 meters. However, I found a very similar diagram that clearly shows the dimensions of the proposed gazebo. Since the technology for building a gazebo is the same, you can easily use the drawing that is offered to you below.
Scheme drawing of a gazebo 3.3 by 3.3 meters made of wood
Other DIY wooden gazebo options
On the site we often write about the construction of a wooden gazebo, as it is very popular. We try to use structures of different sizes and shapes in our articles. I would like to give you several links where you will find other options for building wooden gazebos in the same way as the construction described above was done.
Dimensions of the proposed building
- How to make a gazebo with your own hands: photos, videos, projects - the construction process from Vasily Popikov is shown. This is one of the most popular videos on the Russian Internet on this topic.
As we publish articles, we will add even more links here so that you are not limited to just a few options for wooden gazebos.
If you have any examples of your own, where the construction of such gazebos is shown in a high-quality and interesting way, leave your comment, we will definitely consider it and comment on it.
How to make a gazebo
Gazebos come in different types, shapes and sizes. For some dacha owners, a gazebo in the form of a canopy, rigidly attached to a simple frame made of logs or pipes, is sufficient. Others want their vacation spot to be aesthetically pleasing, comfortable, and convenient.
How many people, so many opinions and judgments.
How to make a gazebo? This question only plagues those who want to build a gazebo with their own hands. The Internet comes to their aid with master classes, recommendations and explanations.