A reliable ceiling in a frame house allows you to expand the architectural possibilities when designing it. By choosing a certain type of wooden beams, you can build a frame house with large halls and panoramic windows. ArtStroy usually draws up an individual housing project if the customer requires unsupported covering of areas of significant size. In this video, the head of the company, Andrei Ignatov, talks about one of these objects.
Where to begin
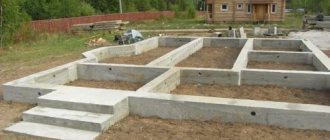
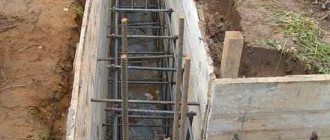
Before you start building the frame, you need to tie the foundation. However, first of all, it is necessary to check whether everything was done exactly at the previous stage of construction. We are talking, first of all, about the evenness of the foundation on which the harness will rest. The geometry of the foundation is checked as follows: first the horizontal surface, and then the corners. The entire surface of the foundation must lie in the same plane, deviation of no more than 1 cm is allowed. You can check the plane using a construction laser.
Checking the evenness of the foundation
If your difference is more than 1 cm, you need to smear the lower side with cement to the required level. In order not to make formwork, we take a more dense cement solution and simply carefully apply it on top.
The alignment of the corners can also be corrected with additional cement, but formwork will have to be done.
Fastening the strapping beam with corners
When the foundation is level, we lay the strapping. The strapping is needed to fix the frame of the future house to it. We talked in detail about how to strap a frame building in our article here.
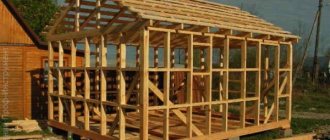
Frame house
A traditional frame house is built in several stages. A strapping beam is laid on a strip, slab or pile base. The racks are attached to it, the structure is tied together with the top trim and jibs.
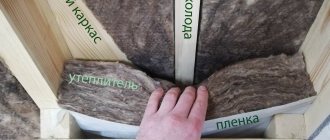
Insulation is placed in the space between the studs. As a rule, this is basalt wool. It does not burn, has low thermal conductivity, sufficient strength, and is environmentally friendly. The heat insulator is protected with a vapor barrier on the side of the heated room, and with hydro and wind protection on the outside.
External and internal finishing is carried out with cladding sheets and decorative panels.
The construction of a frame house usually does not exceed 2-3 months. All operations for cutting, preparing, installing and fastening materials are carried out on the construction site.
It is possible to implement individual projects developed by the developer, with an original layout and design of the interior space.
Methods for constructing a wooden base
The construction of the frame can occur in different ways. Some people assemble the walls one by one on the ground, and only then install them vertically. Others immediately install a wall frame, then insulate it, insulate it and sheath it. Still others make the frame of the entire building, including the roof, and only after that they begin to make layers of walls. You can choose any method convenient for you, but for now we will focus only on the construction of the frame.
House frame with roof
The basis of any frame building is wood. Her choice must be approached with full responsibility. This can be a board, technically dried timber, natural moisture timber or laminated veneer lumber. Glued laminated timber is the most preferable - it does not dry out, does not lose its shape, and is resistant to deformation. In second place is technical drying timber. And a natural board or timber with natural moisture during the construction of a frame can change its shape and crack when it dries, which will affect the quality of housing.
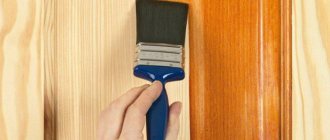
Do not forget to treat all wooden elements of the frame with impregnations - fire and bioprotection. This will protect your frame from bugs and make your home safer.
Complex frame elements
Various types of wood are suitable for a frame house, but it is better to choose coniferous wood. The resin secreted by pine creates additional protection against insects and fills the house itself with a pleasant pine aroma. In addition, oak, ash and other hard varieties are excellent for installing frames. The section of the timber should be 150/150 mm or 150/200 mm.
Lack of ventilation
Supply ventilation is an expensive pleasure, but vital in frame-type houses. According to sanitary standards, the air in living rooms must be completely replaced at least once an hour. Otherwise, there will be a deterioration in health caused by excess carbon dioxide and lack of life-giving oxygen. After all, a frame house works on the principle of a thermos.
In addition, in the frame, assembled from OSB, mineral wool and various foam plastics, the maximum permissible concentration of air is exceeded for phenol and other elements that are not very beneficial to health. In addition, lack of ventilation increases the humidity in the room. As a result, the glass fogs up and mold appears.
Useful: How much money do you need to build a house?
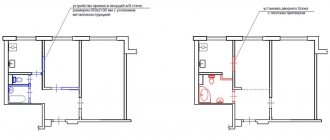
In some rooms in the house it is necessary to install ventilation valves, or install windows with micro-ventilation mode or equipped with slot ventilation valves. In the kitchen and in the plumbing unit, you need to install exhaust type ventilation. Abroad, frame buildings in which people constantly live are almost never built without supply and exhaust ventilation, equipped with an effective recovery system.
All eyes on the corners
When assembling a wooden frame, special attention must be paid to the corners, which are assembled using frame technology. The reliability of future construction depends on the quality of fastening of corners. That is why traditionally the construction of a frame building begins with the construction of corner posts.
Corner post for house frame
If the corner beam was fastened in the lower frame using anchors and nails, then when constructing the frame, the corner elements should be connected using metal corners and wood screws. It is best to opt for reinforced galvanized corners that are rust-resistant. The installation of the frame further depends on what the strapping beam was used to attach.
Location of racks in a frame house
If a dowel was used, then it is necessary to drill a hole of the required diameter in the end of the rack so that the dowel is tightly fixed in it. We make the depth of the drilled hole greater than the length of the dowel by about 1-1.5 cm. We install the vertical posts of the frame, which must be jibed. These jibs are often temporary; they are removed after installing other parts. Without jibs, work cannot continue, as there will be a risk of the timber or double boards slanting if they were used. The jibs will prevent the bevel in one direction or another, while the angle will become stable.
Corner elements of a frame house
If you did not use timber as corner posts, but double or triple boards, they are tied in different ways.
Important: pay attention to the quality of the timber, it should be smooth and not twisted. It is better to take an edged board from the central part.
Frame connection options
The option for tying the corner three boards, which is used most often, is as follows: the first board is placed vertically. It should form one of the sides of the angle. The remaining two boards are placed perpendicular to the first. Wood screws are used to fasten the boards; nails can also be used.
Option for corner posts made of timber or boards
Do not forget to take measurements while working and check that the angles are set correctly.
Technological diagram of construction
To build a good structure and avoid flaws, you need to familiarize yourself with the technology of constructing frame houses. Especially if you plan to build on your own.
Currently, there are only 2 thoroughly developed technological schemes for constructing the frame:
- balun , racks are installed throughout the house and at the full height of the building;
- platform , floors of the floor are mounted separately, and the installation of wall structures is carried out directly on them.
Installation of vertical posts and horizontal jumpers
After installing the corner posts, it is necessary to install other vertical posts of the frame. The step between the racks should be 60-100 cm. 150/150 mm or 150/200 mm timber is used as racks. This size is optimal for laying insulation.
House frame elements
In order to choose the pitch between the posts, you need to correlate the distance between the vertical posts of the frame house with the dimensions of the finishing slabs and panels that are provided for in the design of your building. Most finishing slabs have a width of 1200 mm, so it is best to make a rack pitch of 60 cm. It will make construction easier if the size of the finishing panels is equal to the size of the window openings.
Frame elements of a frame house with a window opening
You will have to install additional studs at the joints of the cladding boards if the width of the panels differs from the size between the axes of the studs.
Important: lubricate all iron elements with oil before use, which will protect them from rust. It is known that wood begins to deteriorate faster in places of contact with untreated metal.
To secure the frame in the desired position and increase its rigidity, install temporary braces during assembly. It is better to place 2 or more jibs on each vertical post.
Installation of temporary jibs to each rack
After the construction of corner and row racks, it is necessary to further strengthen them with horizontal jumpers. Jumpers perform several functions at once:
- secure the frame, increasing its rigidity
- minimize bending of posts
- separate the mineral wool type insulation, supporting the top sheet
- are the basis for fastening the internal and external cladding of a frame house
Horizontal jumpers in the frame
Sometimes it is recommended to fasten horizontal lintels with nails driven in at an angle. However, this method is fraught with cracks in the timber and distortion of the racks during nailing. Use corners.
Scheme of strapping and timber frame
After the frame is erected, the upper trim is assembled. It connects all the walls into one structure.
Wrong choice of lumber
The frame of the house is most often made of wood. But most of the lumber sold has so-called natural moisture, that is, it is simply raw. This especially applies to timber sold in the fall; almost all lumber harvested in winter has already been sold and stores receive newly harvested wood, slightly dried during delivery and storage.
The main mistakes of frame house construction at this stage are:
- use of insufficiently dry preparations;
- the use of boards and timber of insufficient cross-section, unable to withstand the loads arising during operation.
The use of undried workpieces leads to poor results: drying out with the appearance of gaps and distortion of the dimensions of structures; in addition, during the drying process, the lumber often twists and deforms. When drying a wooden beam, its dimensions can change by 5-10% across the fibers and about 0.1-0.2% along the fibers.
This means that if a beam with a cross-section of 15 cm of natural humidity was used for the frame and the frame was filled with mineral wool insulation, then after a year the gaps between it and the frame can reach a size of 1 cm. And if the timber is deformed during the drying process, it can, for example, turn around of its axis up to 15 degrees and even more. Structural fastenings may be torn out, and sheet metal cladding will also be torn out. In addition, such gaps reduce the thermal insulation of the house and contribute to increased vibrations.
To prevent the development of such processes for frame house construction, it is better to use wood material dried in special chambers. Or purchase and store it in a warehouse for at least one summer before use.
Another mistake is insufficient cross-section of the workpieces. The cross-section of edged boards in the frame must be at least 15x4 cm. Houses built from thinner materials do not have sufficient strength and are simply dangerous.
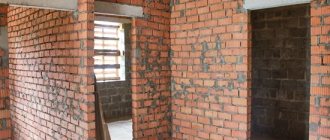
Damage detection
Using a chisel, it is easy to determine the degree of deterioration of the lower embedded beam and decide whether to completely or partially replace it. If the tip enters the wood easily, and when you move the chisel, the rotten inside is revealed, then there is only one verdict - change it immediately. Having walked around the entire structure, all areas of the house are checked using this method.
Perhaps there is damage to one of them, and then it is not advisable to carry out a full-scale repair of a frame-panel house - you can simply eliminate some areas, replacing them with new ones.
Repair tools and materials
The choice of wood should be approached responsibly - it must be without visible defects, and before work it is recommended to impregnate it with all kinds of protection and impregnation. So:
- The beam is 150 mm in cross-section; if it is possible to use a larger size, then it will be great - the frame house will receive even greater stability.
- Staples. They will be needed to fix the nodes.
- Saw. For a large replacement, you need to use a gasoline one, and small areas can be done with an angle grinder or a disc grinder.
- Jacks. Load capacity should not be less than five tons.
- Chisels, hammers, axes.
- A tool for laying a foundation or a welding machine for cutting a piled metal grillage.
- Nail puller.
In the process of insulation and waterproofing, appropriate materials will be required.
↑ Laying a floor made of wood
The tying of the pile foundation includes the beginning of lining floors made of wood. It is made from beams measuring 150×150 mm or 150×200 mm. This is affected by the thickness of the wall and the size of the gap between the piles. If the distance is very large, it is better to take thick timber. This moment will eliminate sagging.
In order for the foundation to remain rigid, strapping is needed. It is also used when the load is evenly distributed on the base and serves as a support for the floor.
For unhindered manual tying, perform the following procedure:
- The boards are laid around the perimeter of the foundation, the diagonal and size of the walls are checked. This stage includes the accurate and final marking of the walls in accordance with the approved project. Pay attention to waterproofing. It is laid out under the harness as roofing material.
- Now mark the place where the boards are connected, which should be on the pile. These are vulnerable places; they cannot sag.
- The beam is connected to an overlap of approximately 20-30 cm. The master cuts out “locks” from the end.
- The corners are connected using almost the same method.
- Using studs and bolts, the timber is connected to the foundation. Drill gaps in the head of the foundation and directly in the board. To make further installation comfortable, deepen the nuts with studs or bolt heads. The connection lines are nailed using nails, the size of which is 200 mm or 150 mm. It is affected by the size of the boards.
- After the perimeter is ready, we begin to tie the foundation under the internal walls of the room from the frame. In a similar way, the timber is attached to the previously laid outer one. To enhance the effect, metal mounting angles are also used.
The installation of the frame floor begins after the foundation of the room has been laid.
Is single frame a thing of the past?
A logical question, since multilayer structures provide so many benefits to the consumer. However, in the foreseeable future there is hardly any point in abandoning the traditional single systems that have been proven for centuries. The fact is that frame technologies have a solid arsenal of correct solutions. Each of them must be selected based on an analysis of many factors: comfort requirements, acceptable initial investment volumes or payback periods, etc.
For example, if a house is being built in a region with a mild climate or you are not afraid of its energy losses at the level of 60–100 kW/m2, compensated by standard autonomous heating, then it will be more expensive to deal with various volumetric frames. On the other hand, standards for thermal efficiency of building envelopes are gradually becoming more stringent. They are reviewed on average every 5 years. Therefore, if you want to keep up with the times or “not pay at all” for heating, then the frame house technology is DOK, 3-D, etc. - everything is yours.
However, when choosing such non-standard solutions, you should consider that:
- their implementation will require several large labor costs and flawless assembly of structures;
- investments in materials will be much more significant. For example, assembling a double volumetric frame will require twice as much board and insulation. But they are the main items in the cost of purchasing building materials for the construction of any frame structure;
- It is possible to get a truly energy-efficient or passive frame house, but only with an integrated approach to the issue of its construction. Thick multi-layer walls and ceilings must be complemented by the most modern window and ventilation systems, and the overall architectural layout must be carried out by a professional developer.
These factors affect the return on additional investments in construction, which may well take 10-20 years. You should not forget about this when deciding what type of frame to choose for building your home.
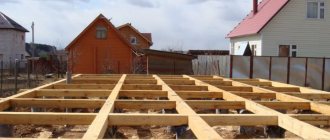
↑ Frame floors
At this stage, it is recommended to pay special attention to all communications related to the premises. This is a sewer with water. Gas and electricity are supplied later. However, if you do this right away, there will be fewer problems in the future.
Next, logs are installed on top of the trim. It is recommended to work with boards measuring 100x150 mm or 100x200 mm, when the gap between the supports is approximately 4 meters. It is not forbidden to sew two boards of 50×150 mm or 50×200 mm.
When the distance is up to 3 meters, they work with timber measuring 50x150 mm. It’s even better to take 50x200 mm boards.
Installing logs is not difficult. However, there are some features:
- The size of the gap between the joists affects the size of the insulation material. If mineral wool with a sheet size of 100 × 60 cm is used, the gap between the beams is made a couple of centimeters less than the width of the insulation itself (about 57-58 cm).
- The logs are attached using fastening angles and nails. They are installed 5 cm less, but not at the level of the trim. This is done so that an additional board of 50×200 mm or 50×150 mm fits into the perpendicularly fixed beams. The size is influenced by the size of the timber used, which will make it possible to close the existing gaps around the perimeter.
A board is nailed between the joists to increase the rigidity of the floor in a framed room. The size of the timber is affected by the size of the lag. Basically, these are 50x200 and 50x150 mm.
↑ Insulation and protection of the structure from moisture
Follow these steps:
- Attach a 150x25 or 100x25 board at the bottom perpendicular to the floor joists or similar. Most often this is done end-to-end. However, in the case of rigid fastening of the logs, every 40-60 cm is sufficient. It is recommended to fasten the board using self-tapping screws.
- The waterproofing membrane is nailed on top of the joists and the fixed board.
- Insulation is stuffed between the joists on top of the waterproofing. The climate zone affects the thickness of the layer. Its size is usually 15-20 cm.
- The insulation is laid in such a way that each joint is covered by the following layers.
- First, a vapor barrier, then an OSB board or plywood is stretched over the insulation. You can simply sew the board tightly.
Keep in mind that waterproofing and vapor barriers are installed with an overlap, following certain rules. It is necessary to avoid the formation of moisture inside and outside the insulation. The insulation is packed tightly, preventing the formation of cracks.
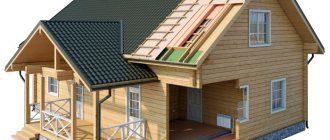
↑ Frame roof
Installing a roof for a frame building is less labor-intensive than for a block or brick house. Fastening the roof to the walls is easier.
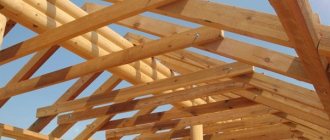
↑ Rafter structure and roofing
The rafter structure of a frame house is installed in stages:
- The extreme supports are installed under the rafters and the ridge. The grooves for resting on the frontal board are selected in advance.
- Install the middle ridge posts along a cord stretched between the outer supports. They are fastened with jibs, which are then removed.
- A 5x20 cm ridge beam is placed on the posts. To prevent the section from feeling bending loads, the beam is joined above the supports.
- The places where the rafter legs will be attached are marked.
- The rafters are cut according to the template. They are mounted, resting on a wooden beam on the inner surface of the outer wall and on a ridge beam.
- The structure is strengthened by constructing a support under each inclined beam, as well as wind struts for the rafters to increase the strength of the rafter structure along the axis of the ridge under two adjacent rafter legs.
- At the bottom of the rafters, cornice strips are screwed.
- The waterproofing film is spread parallel to the overhang, and installation begins from the bottom up. An overlap joint is required, no less than 8-10 cm. The waterproofing is secured with a stapler, the film between the rafters sagging up to 2 cm.
Install counter lathing. The bars for it have a cross-section of 4x5 cm; they will provide ventilation to the roofing “pie”. Counter slats between the roof and waterproofing will create a space where air will “walk.” 2.5x10 cm sheathing boards are laid on top of the counter lathing in increments of 25-30 cm. The spacing is selected in accordance with the wavelength of the metal tile profile. Wooden elements are nailed.
Next is the installation of drainage and roofing material, usually metal tiles:
- For gutters of the drainage system, hooks are attached to the eaves board, making a slope towards the drainpipes.
- The first 4 sheets of metal tiles are laid out without fastening. The sheets are aligned along the end and edges of the cornice and screwed with self-tapping screws. Using rubber gaskets, hardware is attached to the lower part of the wave.
- Mount ridge and wind strips.
↑ Advantages of buildings using frame technology
A house on a frame does not need a reinforced buried foundation. It is enough to build a half-meter strip or pile foundation and the transfer of the load from the house to the soil is ensured. Pile foundations can be concrete, metal or reinforced concrete rods buried in the ground. What are their advantages:
- speed of installation;
- either a complete absence or a small amount of excavation work;
- the time interval between the completion of installation of the base and the further construction of the frame.
The exception is foundations made of grillage and monolith. When constructing such a foundation, they wait until the concrete gains strength, which takes 10-15 days. It is not necessary to wait 4 weeks to begin installation work, because the installation of the frame is carried out gradually.
It is quite possible to build a frame house in 2-4 months. Builders today consider frame construction to be the most practical and cheapest way to purchase their own real estate. And if the house is built on its own, then the costs will be significantly reduced.