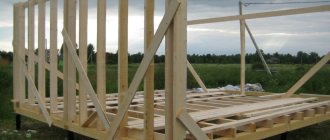
Description of facade decorative plaster
The very name “plaster” came to us from the Italian language. Derived from the word "Stucco", which can be translated as alabaster, lime or gypsum. It was these materials that formed the basis of the first façade plaster compositions.
The main difference from other finishing materials is that plaster is applied directly to the surface itself , without lathing or frame structures.
This allows you to achieve maximum evenness of the wall, without resorting to sealing small cracks and knocking down protrusions, by only increasing the applied layer of the composition itself. Work on decorating the facade can be carried out either on a bare wall or with an additional thermal insulation layer.
Decorative plaster
Recommendations for caring for decorative facade finishing
Over time, decorative plaster may require partial restoration or repair. Under the influence of various factors, cracks, chips or swelling may appear. It is quite possible to correct the situation yourself.
If there is swelling on the facade finishing, then you need to lightly tap the surface with a wooden hammer. In the place where the sound will be dull, there is delamination. Next, using a hammer drill or chisel, you need to remove the old material, clean the surface and carefully prime it. You need to wet not only the clean area, but also the plaster that is around it. Due to this, the new solution will adhere better to the old coating.
It is advisable to repeat the same pattern that was present earlier so that the repaired area does not stand out against the background of the rest of the facade. To make the difference less noticeable, it is best to cut out a rectangular piece. When the newly applied material has dried, it should be repainted to hide the joints.
In the case of cracks or chips, it is necessary to expand the damaged area and perform all the actions described above.
Decorative plaster for finishing the facade of a house will protect the building from the negative influence of the environment and give the building an attractive appearance.
Types of decorative plaster for the facade of a house
Depending on the base on which the mixture is created, decorative facade plaster is divided into the following types:
Acrylic
Made from acrylic resin (the same material used to create PVA glue). It is produced ready-made and does not require additional mixing with other materials. Most often used for finishing surfaces with foam and polystyrene foam insulation.
Advantages of using acrylic plaster:
- The acrylic mixture is a vapor-permeable composition, which allows the walls to “breathe” even under a layer of decorative finishing;
- Plaster has the property of increased elasticity , the coating completely closes small cracks and gaps on the wall;
- The composition of the acrylic mixture must include bactericidal additives that protect the facade from the occurrence of fungal formations, dampness and mold.
- The plaster is sold ready-made , which significantly reduces the preparatory stage of façade finishing;
- Wide operating temperature range;
- The surface with an acrylic finish does not absorb moisture and dirt ; it can be washed with ordinary water;
- Acrylic plaster is a quick-drying finishing material.
Disadvantages of using acrylic plaster:
- Has increased electrostaticity. Simply put, dirt and dust easily stick to it.
IMPORTANT!
It is possible to paint the mixture in any color using a special tint.
Acrylic variety
Environmentally friendly plaster "Lamb" is produced by Farbe on an acrylic basis. This material allows you to create a unique texture with grain sizes of 1.5 and 2.0 mm.
At the same time, Farbe plaster is one of the leaders in its class in terms of efficiency . The average material consumption is 2.7-3.1 kg/m2.
Farbe acrylic plasters contain no solvent. It can be applied without any threat to health even in poorly ventilated areas.
Use both inside and outside the building.
One of the most important advantages of Farbe acrylic composition is its resistance to mechanical stress and various environmental influences. This plaster performs well in the harshest climates and protects the house from the sun, snow, rain and wind.
Like any acrylic-based material, “Lamb” plaster can be easily tinted in any of the shades (Symphone, NCS, RAL). Even under the influence of solar radiation, the material is able to retain its original color for 10 years.
Mineral
The fundamental substance of mineral plaster finishing material is cement . It is distinguished by its efficiency, since all elements of the composition have a fairly low price. Available in bags.
Advantages of using mineral plaster:
- Full vapor permeability;
- Resistance to the harmful effects of biological organisms (mold, fungus, etc.);
- Absolutely fireproof material;
- After application and complete drying, such plaster will not shrink or crack ;
- Frost-resistant;
- Moisture resistant;
- Works effectively under the influence of both low and high temperatures;
- Eco-friendly material;
- Does not require additional care, easy to clean;
- Has a relatively low price.
Disadvantages of using mineral plaster:
- Release form: dry substance . To create a ready-made solution, the bagged mixture must be diluted in certain proportions. If the requirements are not met, the composition may become unsuitable for work;
- The installation of such finishing is a rather labor-intensive process and requires the worker to have certain skills and experience working with this kind of material ;
- The narrow range of colors significantly narrows the possibilities of using this plaster. It is possible to give the required shade only with the help of additional coloring of the already dried plastered base, which increases both monetary and labor costs;
- Susceptible to vibration vibrations;
- Guaranteed service life is only 10 years.
NOTE!
Subsequent painting of the plastered surface can only be carried out 2 days after its application.
Mineral variety
Silicone
The basic substance of this composition is silicone resin . It is in many ways similar to acrylic resins, but has higher elasticity. By purchasing such a mixture, you are purchasing a plaster composition that is ready for application.
Advantages of using silicone plaster:
- Thanks to its elasticity , it can tighten both existing cracks and cracks that arise during shrinkage on the façade of a building;
- High biological stability;
- It is a water-repellent finishing material;
- Vapor permeable;
- Even when exposed to low subzero temperatures, it does not lose its properties;
- Possibility of application both manually and mechanically;
- When applied, a strong bond is created between the surface to be plastered and the composition itself;
- Does not have an unpleasant odor ;
- Durability (guaranteed service life - 25 years).
Disadvantages of using silicone plaster:
- High price;
Silicone variety
Plastering facades not only helps solve design problems, but also significantly improves the performance characteristics of any building. A layer of plaster improves thermal insulation, protects load-bearing walls from precipitation and allows you to hide minor construction flaws.
The only drawback of classic plaster is its fragility and high consumption of material. It is much wiser to use polymer-based plaster as a more modern and effective finishing material
Compared to mineral-based materials, Farbe silicone plaster has the following advantages:
- elasticity that prevents the formation of cracks on the walls;
- the ability not to allow moisture to pass into the surface, but at the same time to release vapors outside;
- long-term preservation of the original color even in direct sunlight;
- ability to self-clean with rainwater.
The range of applications for silicone plasters can be expanded due to the possibility of tinting. There are about 2,500 different shades, allowing you to very accurately realize any designer’s plan.
In this case, the service life of the plaster is at least 25 years. In most cases, this means that a cottage that has been plastered once will not require cosmetic repairs until almost the end of its life.
Silicate
The fundamental substance included in this type of material is “liquid” glass . Most often used for plastering facades insulated with mineral wool boards or expanded polystyrene. Sold ready for use.
Advantages of using silicate plaster:
- Not electrostatic;
- Has the property of high elasticity;
- Vapor permeable;
- Hydrophobic;
- Easy to care for;
Disadvantages of using silicate plaster:
- Requires the finisher to have certain knowledge, skills and experience;
- Dries quickly;
- To finish this type of decorative facade plaster, it is necessary to carry out additional preliminary work on priming the base . This significantly increases the time spent decorating the exterior of the building.
Silicone variety
Tasks and differences of facade plaster
Using plaster for exterior work is one of the easiest options for relatively quickly transforming buildings. But the aesthetic side is not the only advantage of the composition. It must reliably protect the wall material from any “whims” of nature - from wind, rain, snow and other unfavorable factors.
The correct choice of the type of facade plaster will allow you to achieve what you want: ideally level surfaces, make perfect corners, and significantly increase the soundproofing characteristics of the building. The first materials had a minimal number of components: alabaster, gypsum and lime served as the basis. Nowadays façade plaster contains a large number of ingredients. Among them, depending on the type and purpose of the composition, there are sand, cement, acrylic, silicate (liquid glass), silicone, as well as other additives.
Material requirement
All types of facade plasters must meet several requirements. The list of required qualities includes:
- Maximum resistance to temperature changes. Otherwise, cracks will soon appear on the surface, then the slow (or not so slow) destruction of the decorative coating will begin.
- Frost resistance and moisture resistance. These are mandatory conditions, since the main task of any plaster is to reliably protect the walls of a building from the “attacks” of water, which sooner or later destroys almost everything it comes into contact with.
- Vapor permeability. Any coating must be able to “breathe”. If facade plaster does not have this ability, then the moisture accumulating under the coating will provoke the appearance of mold, which will soon “delight” the owners of the house from the inside.
- Fire resistance, ability to protect from sunlight. The first quality guarantees the safety of the building, the second property is necessary for the composition itself so that the decorative finish does not fade in the near future.
- Good grip on almost any surface. Otherwise, the plaster will not be able to “last” on the walls for long; it will soon begin to fall off from the base.
- Strength, durability. This is the main requirement for all materials, but especially for plaster, because this finish cannot be called elementary or cheap.
- Beauty, environmental friendliness, light weight, ease of application, easy care and quick cleaning of surfaces.
All such materials meet these requirements: some to a greater extent, others to a lesser extent. To find the right type, you need to know what to look for first.
What do you consider when choosing?
When considering (and looking after) the types of facade plasters, we must not forget about several important criteria. These include:
- Seasonal temperature changes, the predominance of high values over low values, or vice versa. Cold climates are especially demanding of such mixtures. Any of them has a limited number of defrost cycles.
- The proximity of the building to bodies of water or constantly high humidity in the region. The closer the house is to the sea, lake or river, the better quality and more reliable the material must be.
- Proximity to roads. In this case, the worst option is a building located within the city limits. There, the presence of dust and exhaust gases is guaranteed, which means that the walls will have to be cleaned frequently.
Regardless of the type and texture, any plaster material is always evaluated, taking into account the conditions for facing the house. Facade structures are simply required to withstand all the “surprises” of the weather and unfavorable factors due to the proximity of civilization.
All plaster mixtures have a base and a set of certain components. To find the right, optimal composition, you need to disassemble all types of facade plasters: evaluate their properties, learn about specialization, features of the cladding and methods of its application.
Types of textures of decorative facade plasters
To give the greatest aesthetic appeal, various types of textured application of plaster compositions are used.
Depending on the means and methods of creation, textures are divided into:
- Traditional . They are created on the basis of both mixtures of old and new generations. They have a texture depth of up to 0.5 cm.
- Modern . Created using only the latest materials.
Among modern textures the following categories can be distinguished:
- "Pebble" . Pebble textured plaster includes small granular formations with a size of 1 to 3 mm . It is a universal option, since based on it you can create both shallow bas-reliefs and “sgraffito”, “fur coat”, “polka dots”, etc. Giving relief is achieved by rubbing the composition applied to the façade with a plastic float. Additional tools such as a trowel, various rollers, brushes, etc. can also be used.
- "Bark beetle." One of the most common textured plasters. With its help, both vertical and horizontal, wave-like furrow patterns are created. It is applied similarly to pebble textured plaster.
- "Mosaic" . This type of texture is created on the basis of silicone or silicate plaster, to which coarse stone chips are added. Multi-colored granules form unique mosaic patterns on the plastered surface , reminiscent of mountain minerals. The application method is similar to pebble textured plaster.
Material texture
Getting different effects
When the decorative plaster mixture begins to dry out, you can begin to apply the design. The marks are applied vertically, horizontally, at an angle or in a circular zigzag motion, trying to achieve a resemblance to the passages of a bark beetle in a tree.
Adviсe:
- if you start making vertical stripes from top to bottom, then you cannot change the direction to the opposite from bottom to top;
- the same goes for horizontal, circular and zigzag movements.
Under no circumstances do we change direction.
You can start drawing only after it dries. It is difficult to determine how much time is needed accurate to the minute. But there is one caveat. When the mixture dries, it decreases in volume, and small granules protrude above the surface. As soon as the grout stops clinging to the entire surface with its sole, you can begin.
"Rain Jets"
This is the simplest but most effective way of applying a pattern to the facade. It is done by vertically sliding a grater from top to bottom. The “length of the jets” is adjusted by the plasterer. Here you need to adhere to strictly vertical movements.
Method "Vertical rain"
The higher the house, the larger the size of the granules.
"Slanting Rain"
These are the same “Rain Jets” only from a certain angle. This effect is more complicated than the previous one because you must strictly adhere to the once chosen angle.
“Slanting Rain” Method
Before you start using this effect, you must first try it on a separate surface to decide whether this method of decoration is suitable for your object or not.
"Bark beetle"
This is the simplest effect, it is not difficult to perform. To do this, you need to move the plastic grater randomly in all directions.
Achieving the effect using grout
For home use, you should not take a mixture with granules smaller than 3 mm. Granules that are too small will not give a good visual effect at altitude. The grooves will be barely noticeable.
"Horizontal bark beetle"
Although such effects are most suitable for interior work, they are quite appropriate for implementing design ideas.
Horizontal option
When using this effect, the main condition is not to deviate too much from the horizontal.
Two-colored bark beetle
This is a more complex and expensive method of applying plaster in two shades. There are two ways to achieve this effect.
First. Adding color to the solution and preparing the colored base at the first stage. The next step is to paint the protruding surfaces with a different color using a short-nap roller.
The second method is to first paint the entire wall with a long-nap roller. It is necessary to ensure that all recesses (paths of the woodworm) are painted. At the second stage, the protruding surfaces are painted with a short-pile roller.
Use of two-color bark beetle
Thus, the recesses will be one shade, and the overall tone will be different.
For finishing the exterior of a house, “Bark Beetle” fits perfectly. It should be noted that when selecting shades for painting, there is a rule. No more than three colors should be used. In exceptional cases, four. Moreover, the fourth shade should be no more than 5% . These could be window frames, protective strips on the roof.
The foundation must be in harmony with the roof. If you cannot find a suitable foundation color that matches the roof, then use contrasting or neutral colors.
Harmony of foundation and roof
His Majesty neutral gray color harmonizes with almost all shades. See how the color scheme was chosen to decorate the walls of a residential building.
Pay attention to the almost complete match of the shades of the foundation with the roof. Painting the walls white and light green.
Classic design in three colors
There are a lot of options for choosing decorative solutions. After finishing the finishing work, impregnate the facade with a water-repellent composition. This procedure will protect the walls from the destructive effects of moisture and low temperatures for many years.
Selection rules
When selecting a composition for finishing a facade, you need to pay attention to the following characteristics:
- Compressive strength. The value of this indicator should always be less than that of the surface to be plastered;
- Preferred type of plaster (choose the appropriate one based on the set of positive and negative qualities given above);
- By area of application;
Some compositions can only be used for certain types of walls.
- Can be used for exterior decoration of buildings;
- You should choose plaster for exterior work with a maximum adhesion value , because it is this that indicates the degree of adhesion to the decorated facade;
- Range of possible thickness of the plaster layer;
- Vapor permeability coefficient value . The higher it is, the better your walls will “breathe”.
- The amount of mixture in the package and its consumption per 1 sq. m. Using these values, you can not only determine how many packages are required for a particular building, but also calculate the economic benefit of the purchase.
Technology of applying facade plasters for external work on different surfaces. Consumption
In most cases, exterior finishes are applied to the walls in the same way, as described in the next paragraph. The exception is the so-called “complex” surfaces - timber walls, OSB, chipboard and insulated with foam plastic.
Finishing facades made of aerated concrete and surfaces with a layer of leveling reinforced coating
It is easiest to apply plaster mixtures to aerated concrete blocks and bricks. Apart from the usual steps of leveling and applying adhesive primer, no preparation of the walls is required. Additional work will be required when using thin-layer materials. In this case, you will have to use a roller to treat the walls with a coloring primer, matching the color of the future plaster of the facade.
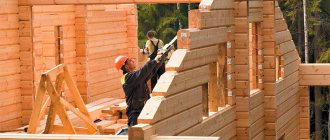
External facade finishing works
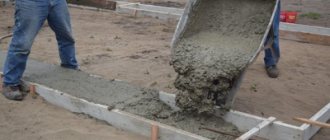
Manual application process step by step:
- Dry plaster for external use is diluted with water in the required proportions and mixed well. Full readiness will occur after 10-15 minutes of settling.
- If necessary, we tint the prepared volume.
- Scoop the mixture with a spatula and place it on the lower edge of a wide trowel.
- We apply the trowel with the mortar to the wall almost perpendicularly, reducing the angle as the tool moves almost to complete parallel.
Work on stretching pebble decorative plaster for exterior use
- Almost without pressure we move the trowel along the wall, stretching the decorative plaster to a layer of the required thickness.
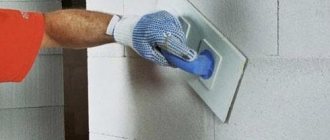
- Having passed an area of about 1.5 m2, we take a plastic grater and rub the surface until the desired texture is formed.
We repeat steps 3, 4, 5 and 6 until the entire facade is finished. Below is a visual description of the process.
Plastering external walls with your own hands. Video of bark beetle finishing:
Facade bark beetle plaster, application technology. In the video you can see the process of organizing a connecting seam between areas processed at different times.
External plastering using expanded polystyrene/penoplex and mineral wool
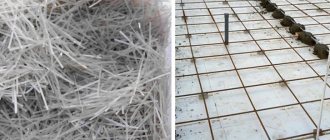
Both of these materials form difficult-to-finish surfaces, so this will require preliminary installation of a façade mesh for plaster. The first mistake that is usually made when reinforcing insulation is to apply the adhesive only on top of the membrane. The correct way would be:
We apply a special adhesive composition to the surface, immediately over an area of 1.5-2 m2. We take a piece of mesh in our hands and secure it in the corners with small thin sticks.
Plaster on polystyrene foam. Facade work requires the installation of reinforcing mesh
We take a wide (from 30 cm) trowel in our hands and, with slight pressure, move it along the mesh in different directions. The adhesive composition will bleed out, almost hiding the reinforcing membrane underneath.
Work to prepare the facade for decorative exterior finishing
We bend the edge of the mesh for plastering the facade, hanging onto the plinth, down and glue it with the same composition. To process the bend, it is better to use a spatula with the surface folded into a triangle. So we go through all the walls of the house. After the glue has dried, apply it again, this time on top of the mesh.
Processing the bottom edge of the reinforcing mesh
Next comes priming the surface and covering it with decorative compounds for exterior use. The process of finishing plastering is exactly the same as for aerated concrete walls, so we will not repeat it. The whole “pie” looks like this:
Before starting all work, the wooden facade is covered with construction paper
Applying plaster mixture to wooden walls
Plastering frame external walls on wood - timber, chipboard and OSB - involves two options for work. The first is exactly the same technology as when decorating walls with foam plastic, given above. The second one will be like this:
The outer surface of the facades is covered with construction paper, which will enhance the protection of the base from atmospheric agents. It can be attached using a construction stapler.
Before starting all work, the wooden facade is covered with construction paper
A large-mesh metal facade mesh for plaster is mounted on top of the paper. It can be secured with the same stapler. The inclination of the canvas and the degree of its adherence to the outer side of the facade depends on the evenness of the latter.
Work on the installation of plaster reinforcement
In this case, the layer of plaster will be quite thick, so an aluminum limiter profile is attached along the lower edge of the mesh.
The lower edge of the mesh for reinforcing the facade made of OSB
The first layer of reinforcing exterior plaster should be such that it almost hides the mesh underneath. After drying, apply a second layer to the facade - leveling. Finishing work is carried out in the manner described for gas silicate concrete.
Work on applying facade finishing to reinforcement
Consumption of working mixture for facades
The consumption of external plasters per 1 m2 depends on several factors. This is the nature of the filler, binder, type and evenness of the base. On packages with working materials, data is provided taking into account the specified criteria. The average numbers will be:
- Acrylic - from 1.5 to 3.0 kg/m2.
- Silicone - from 2.5 to 3.9 kg/m2.
- Mineral - from 2.5 to 4 kg/m2.
Mixture consumption per square meter
Since this type of finishing material involves mixing dry matter with water, to calculate the mixture consumption you need to resort to the following simple calculations:
First you need to look at the recommendations on the dosage of dry matter and the required water on the packaging.
For example, it states that for 1 square meter of surface, when applying plaster with a layer of 10 mm, 9 kg of dry base will be required.
Then, to finish the facade with a layer of plaster, the average thickness of which will be 2.5 cm (choose your value in accordance with the recommendations on the packaging), you will need:
9kg * 2.5 = 22.5 kg of dry matter per 1 square meter.
In order to find out how much plaster is needed to finish the entire facade, you need to multiply its area by the dry matter consumption per 1 sq. m . That is, for a facade with an area of 20 sq.m. the calculation will look like this:
22.5 kg * 20 = 450 kg . This number is the final mass of the dry mixture for finishing.
To find out the number of packages that you need to purchase to plaster the entire surface to be decorated, you need to divide the required mass by the weight of the dry substance in 1 package.
That is, if you plan to purchase 50-kilogram bags, then their quantity will be equal to: 450 kg/50 kg = 9 pcs.
IMPORTANT!
If the number of packages is not a whole number, then its value must be rounded to a larger number.
In the case of other types of plaster compositions, the situation is much simpler, since they are already ready for use. You need to look at the label for what area this particular amount of substance is designed for, and then calculate the required number of packages in accordance with your area.
Peculiarities
For interior work, the industry offers ready-made mixtures:
- acrylic;
- silicate;
- silicone;
- polymer cement.
Only polymer-cement compositions are sold in dry form. They must be prepared before use. To do this you need a low speed mixer, a bucket, and water. The main condition for high-quality plaster is a clean and smooth wall. To work, you need a stainless steel float and plastic grout.
It is important that the wall is level
Hallway decoration
To create a unique interior, it is not necessary to plaster the entire room. It is enough to select one or more walls. In order for the room to look aesthetically pleasing, it is necessary to remember that the “Bark Beetle” is not suitable for every style. For a small hallway, you should take into account the following: vertical stripes make the room higher, and horizontal stripes lower.
Tip When selecting colors, try to use no more than three. The hallway is where guests find themselves. In most cases, it does not shine with large areas and natural light. Therefore, when decorating the hallway, it is recommended to use warm pastel colors: beige, light brown, light orange.
Try to choose colors that are not too bright
Decorating the hallway in the “Loft” style
This style of room decoration seems primitive, but in terms of design costs it is one of the most expensive. The more the room resembles a workshop or utility room, the cooler the design. The texture of the wall with deep grooves is what the Loft lacks.
A room that looks more like a utility room
Bathroom finishing
This plaster mixture is very resistant to wet conditions and its use for bathroom decoration is quite justified. But it should be remembered that “Bark beetle” is not a ceramic tile. The bathroom should have good ventilation. The walls must be completely dry after moistening.
A good combination of shades for the bathroom
When plastering, consider the material of the base of the walls: stone, concrete, brick or plasterboard. If the walls are plasterboard, they must first be plastered with cement mortar over a reinforcing mesh. The bathroom has many plumbing fixtures plated with chrome or nickel . Therefore, the Techno style is best suited. Walls covered in two tones using metallic shades will highlight the Techno style in the bathroom.
Bark beetle in the bedroom
In order to make an original bedroom design, it is enough to plaster one of the bedroom walls in a minimalist style.
Minimalist style for the bedroom
Advice To decorate rooms inside a building, it is recommended to use acrylic, silicone or silicate plasters, which are ready for use immediately in buckets. You just need to add color and stir gently.
Silicone is the most expensive, but its performance qualities offset the high price . After drying, the surface becomes shiny and will last for decades.
Chalet style bedroom
Unusual, practical and affordable
To decorate a bedroom in a rustic style, it is enough to decorate one wall with a textured layer. The bark beetle will come in handy in this case.
The rustic style is characterized by:
- a lot of wood;
- stone;
- textured plaster;
- fireplace.
The wall made of stone blocks near the fireplace looks interesting, the surface of which is eaten away by a bark beetle . Local lighting of the surface will cast fancy shadows, emphasizing the relief structure.
In the living room
The living room is the central room in the house. Family gathers here for the holidays and receives guests. This room should be a source of pride for the owners. Smooth, white walls have long been out of fashion. The textured surface of the walls will help add zest to the design of the room.
A highlight in the design of the living room
Pay attention to the use of local lighting to accentuate the plastered wall. The living room should have a festive look, so it is recommended to paint it in two colors. When painting, there are two options: the base color is light or dark. It all depends on taste. The second color should be contrasting to the first.
Tip: To focus the attention of guests on some art object, decorate a small panel in the center of the wall. Here you can hang a bright painting or photograph and the living room in the art deco style is ready.
Examples of small and large rooms
Bark beetle plaster in the corridor also has a right to exist. The corridors in the apartments are not very wide. Sometimes it is difficult for two family members to stretch in a narrow space. There is always a risk of rubbing yourself against the wall. The bark beetle is so strong that repeated touching is of no use to it.
Tip To keep this small room looking fresh all the time, leave some paint after finishing and touch up worn areas on the walls from time to time.
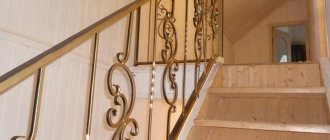
Decoration of the staircase
This is the structure you get if you combine horizontal and vertical movements. To obtain a more vivid effect, it is necessary to use mixtures with filler with a diameter of at least 3.5 mm.
Instructions for plastering using insulation
The installation of a decorative layer of plaster on the facade is carried out in the same way for all types of insulation.
The work is being carried out in the following order (photo below):
- Prepare the mixture (if mineral plaster is used), submit it to the construction site;
- Using a special adhesive composition, you need to glue a special façade reinforcing mesh to the heat-insulating layer.
- Grout the reinforcing layer using a special plastic float.
CAREFULLY!
You can rub over only after the adhesive base has completely dried.
- At this stage, you need to apply a layer of universal leveling agent, which will serve as the basis for further finishing;
- Grouting the leveling layer;
- If necessary, prime the base;
- You can start applying plaster.
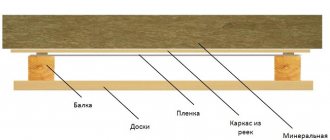
Schematic device
Plastering the facade
Silicate plaster
This composition has excellent vapor permeability. It is based on a silicate substance, which ensures the strength and stability of the coating. The material has plasticity, so it is suitable for application to any surface.
Elastic plaster for the facade is able to repel moisture and dirt, which ensures the preservation of the aesthetic appearance of the building. The binder in the mixture is potassium glass.
Features of silicate plaster:
- perfectly protects from wind and moisture;
- wide range of colors;
- silicate paints are applied to it.
The disadvantage of the material is its high cost. It cannot be applied to all types of finishing and insulation.
Brick finishing technology
The sequence of work on finishing a brick facade is as follows:
- Prepare and prepare the plaster mixture according to label requirements;
- Deliver the mixture to the construction site;
- Prime the brick wall;
- Attach metal beacons to the wall structure;
- Moisten the surface to be plastered to increase the drying time of the finishing composition;
- Stir the plaster solution until smooth;
- Spray the mixture onto the wall;
- Level the surface using a spatula from bottom to top;
- Having completed application to a large area, you need to apply a long rule over the entire surface. This will allow the layer of plaster to be leveled as much as possible;
- On the damp surface, use a scraper to scratch small grooves , which will serve for bonding with the next layer (rolling);
- After the first layer has dried, we begin to apply the finishing finish;
- Smooth and level the plaster layer.
Photos of design and effects of decorative plaster
Due to certain design and effects, you can create a unique interior and add luxury, style and good taste to it.
Under the stone
Thanks to the imitation of a surface made of stone, the room takes on a more noble and monumental appearance and becomes much more comfortable and functional.
The photo shows a living room and walls with a decorative coating that imitates stonework.
Under the tree
Decorative design that reproduces natural material, in the form of tree bark, boards, cross-cuts or other wood patterns, has a natural appearance and is practically no different from real wood.
Fabric imitation (velvet, silk)
This imitation of fabric texture looks absolutely exclusive and allows you to create an elegant, deep, unique design filled with comfort and warmth.
Under the skin
Decorative finishing with the effect of reptile skin, for example, snake, crocodile or other leather imitations, is a rather atypical and slightly extravagant interior solution. This design has a unique and exotic look, which allows you to create a very elegant and sophisticated environment in the room.
Pearl
With the help of subtle pearl shine and gentle tints, it is possible to create brilliant glossy accents in the room and give it solemnity and a little mystery.
World map (islands)
A geographical image with clearly marked continents, islands and other characteristic relief will be a wonderful decoration for almost any room.
Two-color
White-gray, black-white, beige-brown coating or plaster with a combination of other color pigments, such as pink and gray, blue and white and others, allows you to achieve the desired effect in the space and give it a special uniqueness.
Antique
Despite the rough, slightly shabby appearance, which is created using a special technique for applying patina, such decorative finishing in the interior looks very dignified, allows you to recreate the atmosphere of the past and give completeness and completeness to certain style directions.
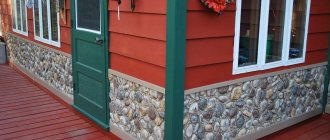
Combination with decorative stone
It is considered a very good and successful combination, characterized by strength, durability and noble appearance.
Do-it-yourself façade plaster on a wooden base
Sequence of work:
- Cleaning the wall;
- Applying notches;
- Create a sheathing from a specialized mesh with large cells, or build a frame from shingles;
- The further sequence is similar to the technology of plastering on brick (starting from point 6).
Installation of sheathing
Plastering a facade is a rather labor-intensive process that cannot always be done independently. However, using this finishing option, you can achieve maximum aesthetic appeal of your home.
Color palette for painting exterior decorative plaster using the example of Ceresit (Ceresit)
How to decorate the facade of a house if you don’t know what color to choose? In order not to get confused in hundreds of shades from light ash to mustard, you should combine all the colors into groups according to associations. For your convenience, samples are attached to each category that can be used for further wall decoration:
Sand . The color of the plaster ranges from light gray to orange. Natural sandy shades also include dull yellow, pinkish, and peach.
Water . In this category you can find blue, blue, aqua, grayish blue, azure. This is the most limited palette, but it is often chosen for the design of modern houses.
Earth . The main emphasis is on shades of red, brown, purple. Gray is also present in this group. Shades of clay, rocks, sunset color - these formats will visually highlight the architecture of the house.
Forest . The aesthetics of green color is expressed in many interpretations. From light green and light green to mint, ultramarine, pale green, marsh. Gray also comes in several formats as it forms the basis of every color category.
Wet plaster method
A well-known method of plastering walls. First, a primer is laid on the wall, then insulation and reinforced mesh. After this, the plastering process itself begins. This technology is good because it eliminates condensation, creating a warm and dry living space.
As insulation, you can choose polystyrene foam, OSB boards or mineral wool. These materials are resistant to moisture and have good thermal insulation.
Since many amateurs want to start decorating walls with plaster on their own, it is worth cautioning against errors in its dilution. The best way for non-professionals is to buy a ready-made mixture. It is convenient to store and transport.
There are types of plasters that can only be applied by professionals. If you want to create a complex pattern, it is better to contact experienced builders and look at photos of facade plaster on the Internet. For many, facade plaster has become a durable, inexpensive, and stylish way to cladding a house.
Do-it-yourself application technology on the external walls of a building
Regardless of which surface the first layer of facade plaster is applied to, you must adhere to the following rules:
- prepare the base;
- install beacons;
- reinforce the surface;
- spray;
- put the base layer;
- cover and wait to dry.
In order for the plaster to adhere well to the wall and last a long time, you need to carry out the work under suitable weather conditions. It is advisable that the weather outside is dry and windless. Temperature range - from 5 to 25 degrees.
- To apply decorative plaster to a brick wall, you need:
- Clean the surface from dirt and dust, check the installation and remove fallen parts.
- The brick is primed to increase its adhesion.
- Next, a reinforcing mesh is laid to ensure strength and reliability of adhesion of the wall to the inner layer of plaster.
- Spray, then put on the base layer and cover.
- Wait a few days for the plaster to harden.
- The aerated concrete surface needs protection from a damp environment, so plastering will preserve the visual beauty of the facade of a private house and any other building. The whole procedure is similar to the general technology, only a mixture for plaster is selected with the same vapor permeability indicators as the base. After applying two layers, begin decorating.
- Plaster on polystyrene foam and mineral wool is applied when the glue that secured the material to the wall has dried.
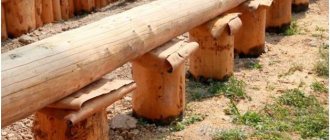
Polystyrene foam and penoplex have a smooth surface, so it is first covered with primer and then a solution is applied. The prepared mixture should be thick. The first layer, 2–5 mm thick, acts as reinforcement. Reinforcing fiberglass is placed on it and pressed with a wide spatula. Carefully treat areas of increased load (window, door, corner). - Wooden walls need to be finished with plaster, as it protects this surface from external irritants.
If the house is made of timber, then the space between the elements is covered with wooden planks. This will reduce the amount of solution wasted and increase the thermal insulation properties. Before finishing, the surface is coated with an antiseptic or water-repellent liquid. For reinforcement, shingles are nailed on the outside to create diamond-shaped cells. The rest of the process is carried out according to the standard scheme.
Materials and tools
For facade work on applying decorative plaster, you will need the following list of tools:
- Rule. It is necessary to control the correct application of the solution and to help level the surface. The rail should have a length of 0.5 to 2 m and be made of wood or metal.
- Trowel. Serves as an assistant when throwing mortar onto the wall. Made of metal or wood, with a wooden handle.
- Falcon. For measuring portions when taking material. This is similar to a trowel, only of a different size.
- Half rub. Smoothes out the mixture.
- Grater. Rubs the surface so as to make it even and smooth. At the same time, it perfectly forms the planned relief.
- Scraper. Cleans the surface.
- Bouchard. Gives roughness to the base.
- Maklovitsa. A brush that helps apply the primer.
- Plumb. Defines vertical. This is a cord with a weight at the end.
- Level. Defines vertical and horizontal.
- Square. Levels the surface.
- Putty knife.
Advice
To work, you need to purchase a mixture. The volume is calculated based on costs per square meter. To calculate the required amount of plaster, you need to calculate the total area of the surfaces to be treated and the thickness of the layer.