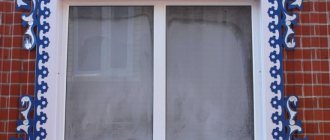
In most cases, carved frames are used to decorate the windows of wooden houses. But due to the fact that buying a ready-made platband today is quite problematic, it is easier to make it yourself.
DIY window trims
Important! All platbands, even the highest quality ones, have one significant drawback - they need protection from precipitation. The production of window trims traditionally begins with the preparation of everything necessary.
DIY window trims
Stage 1. Equipment
During the work you will need the following tools:
Tools for making wooden trims
- special tenon-cutting tool (necessary for making seams and eyes);
Tenoning tool - flat chisel 0.7-2 cm;
Flat chisel - knife-cutter;
- blunt knife;
Knife-jamb - round and semicircular chisels 2.5 cm;
- “caesariki” (another type of chisel, 0.5 cm);
- cranberries (1.5 cm chisels);
Klukarzy - 1.5 cm corner chisels (curved at an angle of 70ᵒ).
Stage 2. Material selection
For ordinary frames it is better to use pine, while for carved products it is recommended to take soft wood, for example, linden (the latter, moreover, is much easier to process by hand).
White linden wood
Pine wood
Important! The only disadvantage of linden is its hygroscopicity, which can be easily eliminated by applying several layers of paint and varnish.
Hard wood species should be chosen in three cases:
- with high climate humidity;
- when the air is too dry;
- in the presence of significant temperature fluctuations.
We recommend that you familiarize yourself with interesting material on finishing the basement of a house with your own hands.
Detailed technology with a step-by-step description will allow you to learn everything about finishing the base.
Hardwoods include birch and oak. They are quite difficult to process with hand tools, so you will need a milling machine, but such wood will last several times longer than linden.
Oak wood
Stage 3. Important points during manufacturing
Finished wooden trims should not prevent the doors from opening by at least 90ᵒ. Regarding other parameters, they are selected individually in accordance with the size of the opening. For fastening, you can use spikes or connect elements in half a tree.
Original platbands
Important! In the future, to apply large images to the surface, the upper part of the casing can be extended. Spikes are used for fastening, and the decoration itself is popularly called “kokoshnik”.
The lower part of the product is made in the same carved way and must include the bevel required for the drainage. It is typical that the thickness of the lower part should exceed the thickness of the upper by at least 1 cm.
How to make platbands
Small slats are nailed on both sides of the opening - they will hide differences in the walls (if any). The thickness of the slats should match the width of the gap, at least approximately. The final fastening is carried out only after careful adjustment of the joints.
Important! If the shutters open to the street, then the platbands need to be installed 3 cm above the window itself.
Manufacturing of slotted platbands
As a detailed answer to the question of how to make platbands for a window opening in a wooden house yourself, we will consider the technology for manufacturing and assembling a slotted platband.
Despite the fact that there are more complex options for framing frames (for example, with three-dimensional wood carvings), this description sufficiently conveys all the subtleties of this stage of facade finishing.
First, here is a complete list of operations that must be performed to make the casing:
- Drawing up a technical sketch and calculating the main dimensions.
- Selecting an artistic design for the product (drawing patterns, preparing templates).
- Preparation (or purchase) of necessary lumber and fasteners.
- Marking of parts and connections.
- Cutting blanks and adjusting sizes.
- Manufacturing the supporting frame of the platband (for those cases where the invoice has a slotted pattern).
- Transferring template designs to workpieces.
- Development of a cutting pattern and determination of points for drilling initial and final holes.
- Cutting out the picture.
- Chamfering and grinding.
- Antiseptic treatment and priming of all parts.
- Paint each part individually (especially if multiple color schemes are used).
- Installation of overhead parts on the frame.
- Installation of supporting slats on the wall of the house (if the house is made of timber or frame, this operation is not necessary).
- Installing a frame on a window opening.
Now let's look at the most difficult stages in more detail.
Selection of drawing
Let us immediately note that, without having practical experience in wood carving, the design for the casing should be chosen as simple as possible, without small details.
The easiest way is to take a ready-made template and print it in full size. It is best to do this on a large plotter, but you can use the sectional printing feature found in many graphics editors.
We recommend working out the color scheme right away, since the distribution of parts during painting depends on this. Both single-color patterns and combinations of several colors are acceptable.
Frame making
In the thorn
There are two different approaches to making a frame for the platband:
- Cutting out a solid frame from laminated board.
- Assembly of each element of the base from boards (frame, shield for decorative cornice).
The first option was discussed above, but to use it it is desirable to have the appropriate experience and skills.
The second scheme is classic and involves assembling a square frame from four planks.
Corner joints are made in two ways:
- “tenon and groove” method;
- overlapping
Overlapping
A tongue-and-groove connection is considered more reliable, but its manufacture requires special equipment (a milling cutter). The overlap joint is made using a simple hacksaw and drill.
Please note that the base of the platband may include not only a frame, but also a triangular panel for placing decorative elements of the cornice. When assembling it, the problem arises of connecting several boards into a single whole. If you exclude end gluing, this problem can be solved using anodized staples and screws.
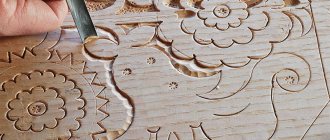
Production of carved elements
The slotted casing can be either applied or solid.
In the first case, the frame and patterns are made as separate structural elements. In the second, each frame strip simultaneously performs a functional and decorative role. The most popular is the first option (invoice), due to its manufacturability and versatility.
Cutting the pattern is done after transferring the pattern from the template to the workpiece. Through holes are drilled at the starting points of the cut and in the area of bends.
The working tool in this case is a manual or stationary jigsaw.
It is important to consider that the thinner the board, the more difficult it is to maintain the line of the design, so if the total area of the carved decorations is large, we recommend using a stationary jigsaw model.
If you still use a hand-held saw model, then in order to avoid distortions, the workpiece must be secured with a clamp on a horizontal plane.
In most cases, the cutting plane is strictly perpendicular to the outer surface of the board, but to give a volumetric effect, chamfers can be removed from the outside of the design.
After completing the drawing, the workpiece is cleaned of large burrs and chips (inside and outside), after which grinding is performed. The surfaces inside the decor are cleaned using a drill and a schreiber. It is most convenient to finish the external surfaces with a grinding machine.
Protective treatment and painting
All efforts to make a wooden frame will be in vain if measures are not taken to protect it from rotting and moisture deformation.
This is especially true for carved elements, since they are made from unstable wood species, as well as internal platbands installed in baths and saunas. In order to properly process carved and structural elements of the frame, we recommend following the following sequence of actions:
- Antiseptic treatment.
- Painting.
- Protective varnish coating.
The antiseptic composition can be used the same as that used to stabilize logs during the construction of log houses.
Painting should be started only after the antiseptic has completely dried. Please note that most modern protective compounds have priming properties, so a separate primer coating may not be necessary.
Narrow brushes are used to cover the inner surfaces of the pattern, and wide ones for the outer surfaces.
Varnish treatment is carried out before assembling the product: when painting of all products is completed and after the paint has completely dried.
To protect the trim on wooden windows, acrylic wood varnish is suitable.
In cases where plastic decorative overlays are used, all operations listed in this subsection apply only to frame elements.
Platband assembly
Corner mounting option
After all the necessary components have been manufactured and painted, they must be assembled into a single structure.
It is best to do this on a flat surface, before installing it on the window opening.
Attaching decorative elements to the supporting frame can be done in the following ways:
- self-tapping screws;
- finishing nails;
- blind wooden dowels with glue fixation.
In cases where it is necessary to cover the upper edges of the platband with carved patterns, the decorative element and the frame are joined perpendicularly. Reliable fixation in this type of joint is ensured by mounting angles.
Separately, we note that the most durable casing will be obtained by planting the decor on wooden dowels. At the same time, not only the contact area, but also the entire inner surface of the carved element is covered with glue (to prevent moisture from leaking in).
If you still use metal fasteners, then you need to select the most protected samples of screws and nails.
Tip: a good “camouflage” for screw heads is made from a mixture of fine sawdust and waterproof wood glue.
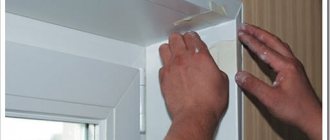
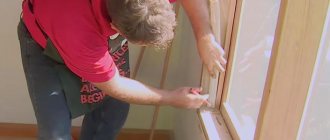
Window installation
In order to correctly install the assembled platband, it is highly desirable that this operation be performed by at least two workers.
This is necessary in order to accurately align its position before final fixation. Despite the fact that the installation of the assembled frame is carried out at pre-marked points on the casing, visual correction of its position will still be required.
It should also be taken into account that when assembled, the entire structure can be very heavy, and if you follow all the safety rules, then installation of such products should only be carried out from scaffolding.
Stage 4. Pattern selection
Schemes of patterned platbands Schemes of patterned platbands Schemes of patterned platbands Schemes of patterned platbands Schemes of patterned platbands
Since ancient times, platbands have been decorated with the most bizarre patterns, which were believed to protect the house from evil spirits and the evil eye. Today, the production of carved frames is carried out mainly by qualified craftsmen.
Important! To make window frames with your own hands, you must first select a good stencil that will allow you to create a pattern of any complexity, even without special wood carving skills.
Often, professionals themselves use stencils; without them, only one-time individual orders are carried out.
Stencils today are freely sold in a fairly wide range. They consist of the following components:
- bottom bar;
- top bar;
- vertical slats.
In addition, there may be additional decorative details - hangers, flowerpots, etc.
Stencils for platbands
Stencils
Installation of platbands on openings
Patterned window framing device
Assembly
When all the elements are ready, they are assembled into a single structure. To do this, use tenon joints (dowels) or nails without heads; wood glue plays an additional role.
If an overhead thread is used, the base is assembled first. With this method, the ends of the base are connected with dowels on spikes.
Installation of platbands on windows in a wooden house is also carried out using studded fastenings.
Installation
Installation of platbands on a tenon can be of two types: blind and through.
- Deaf. The spikes are inserted into holes on the trim or frame, and similar sockets are made in accordance with them. The advantage is that the fastening points are not visible.
- Through. To do this, cash is applied to the opening and through holes are drilled into which dowels with glue are driven.
Installation of window casing on a blind tenon fastening is done according to the following principle.
- The location of the tenons is marked on the surface of the frame and trim.
- Holes are made for them.
- The spikes are made from a harder type of wood and are 0.5 mm larger than the required diameter.
- The pins are inserted into the holes on the frame and the trim is placed on them.
First, before installing the element, you need to lubricate the joints with wood glue.
The installation itself is quite simple, but requires great precision; the slightest distortions and violation of compliance will not allow for a good fastening.
Installation of the structure must be carried out with maximum accuracy
Stage 6. Manufacturing of platbands
The template for the platbands is made of cardboard, life-size
Step 1. First, the design from the stencil is transferred onto the wood using carbon paper.
The resulting template is laid on the board and outlined with a pencil.
Step 2. Then take a jigsaw with a thin blade and cut out small curly elements.
Step 3. From the outside, the contours of the pattern are cut out so that the fabric runs along the edge of the workpiece.
Making platbands with your own hands
Making platbands with your own hands
Making platbands with your own hands
Making platbands with your own hands
Step 4. In any case, you will have to turn the saw in the workpiece. This is quite simple to do; you just need to use one of two existing methods:
- upon reaching the turn, several mutually parallel cuts are made (the saw should be able to turn to any angle inside the hole);
- you can go the other way - make a small loop that will allow you to enter from the other side.
Important! Modern jigsaws allow you to make cuts at an angle of 45-90ᵒ, thanks to which you can not only make the smallest cuts, but also give the decorative element a more saturated and voluminous shape.
Step 5. If it is necessary to cut out a closed figure in the center of the product, then a hole is drilled in the middle of the part to be removed. After this, the jigsaw blade will be easier to move in one direction or another.
If the workpiece is thin enough, then when processing it you can do without an electric drill. To do this, take a jigsaw and press it against the workpiece at a right angle. Next, the tool is turned on and the hole is scratched as the blade deepens into the wood.
Manufacturing of platbands
These are all key aspects of making window casings. Actually, the whole procedure comes down to repeating the steps described above many times, but their specific combination depends only on the skills and complexity of the pattern.
Carved platbands
Carved platbands, blanks
Carved platbands
It is worth noting that there are other manufacturing methods that differ from those described above. For clarity, we recommend watching the thematic video.
Video - Production of window casings
Find out which is best to choose platbands for plastic windows, and also consider the types and installation methods from our new article.
Prices for platbands and accessories for windows and doors
Platbands and trims for windows and doors
Basic Rules. What not to do
Below is a list of rules that will help you avoid the most common problems.
- It is recommended to use a board 3-4 cm thick as the starting material.
- Don't jump into complex patterns right away. First, it is better to practice on ordinary round parts that are easy to make with a drill.
- The width of the workpiece should be such that it is enough to cover the ends of the walls and protect it from moisture.
- Carved elements should be placed along the grain of the wood - this will prevent cracking.
- When choosing a stencil, it is better to pay attention to patterns with large elements, since small ones will look crumpled, as a result of which the finish will not have the desired decorative effect.
Important! Before starting work, you should calculate the future costs of time and money, as well as the feasibility of the idea itself. In the absence of high skills in working with wood and interest in the process itself, it is easier to buy ready-made platbands.
Moreover, it is advisable to first familiarize yourself with photographs of different products. This way you can find a suitable option or get inspiration for creating something yourself.
Platbands
Wood and tools for work
One of the key points is the choice of material. Different rocks are used for carving; they differ not only in their pliability, but also in their softness, density and even resistance to weather changes.
Pine is considered the best option for a beginner. Inexpensive, strong and durable, it is easy to cut and process. Other conifers will also be suitable. True, experts do not recommend using spruce; it contains too many fibers and knots, making it less easy to work with.
Planks made from hardwoods, including basswood, oak and cherry, although renowned for their durability, are expensive. And not everyone can work with them; you need to know the technique.
If you don't have woodworking equipment at home, buy edged boards. Moreover, the higher the grade of wood, the better; there will be no knots or chips on it. For blind and through products, choose boards with a thickness of at least 30 mm, and for overhead ones, 10 mm is enough.
The lumber should be chamber-drying with a moisture content of 10% to 12%. Such wood is less susceptible to deformation due to temperature changes, rain or snow.
Photo: Instagram – natasha_from_siberia
Photo: Instagram – olleg.bor
Photo: Instagram – natasha_from_siberia
Photo: Instagram – edi.013
List of tools that will be needed to make a through lambrequin
- Drill with various drill bits
- Jigsaw (it is better to use files with fine teeth so that the cut is neat and not torn)
- Sandpaper of different grades
- Flap sanding disc
- Grinder
Photo: Dipstroi
Photo: Instagram – reznoiuzor
Photo: Livejournal_valuh
Stage 7. Installing the product on the window
Now all that remains is to install the finished carved platbands on the windows, for which special glue is used. It is important that it is not organic, otherwise, due to its susceptibility to biological influences, it will harm the products themselves.
Installing the product on a window
You can also use plumbing glue - there should be no problems with it.
Important! If fastening will be carried out using nails, then the spikes and joints should be coated with an adhesive solution in advance.
Another option that can further simplify the installation procedure is to use self-tapping screws instead of nails. It will be easier, if only because there is no risk of damaging the casing or surrounding surfaces with a hammer.
Window trims
Important! Self-tapping screw caps are very easy to disguise. It is necessary to mix sawdust with glue and spread the resulting mixture on the caps. It is advisable to do this before painting the windows so that the hidden fasteners also acquire the required color.
The final painting procedure is also quite simple. Some protective material is applied over the finish (not only paint, but also, for example, varnish, impregnation). It is advisable to do this in any case, since such a coating significantly extends the service life of the products.
Platband arrangement diagram
Paint is known to flake off, so it is advisable to use a special impregnation instead. It is much easier to periodically renew the impregnation than to remove cracked paint. And the latter, as you know, will definitely crack.
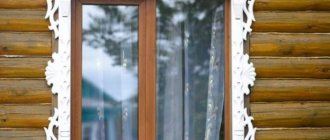
Why do we need trim on windows?
The construction of houses has always been improved throughout human history, and a wooden house has hundreds of small, but necessary elements. What functions do the platbands on the windows of a house perform?
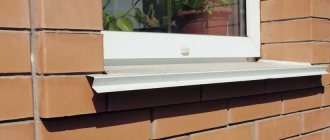
Firstly, this is protection. They close the gap between the window and the opening to prevent drafts, dust and moisture, and also as additional thermal insulation . Today, when installing modern window systems, the gaps are filled with foam, which is already a good insulator and seal. The only drawback of this material is its rapid destruction under the influence of temperatures and moisture. In this case, the platband will act as a good protection and finishing of plastic windows outside in a wooden house from the action of these harmful factors.
The design protects the plastic from the effects of temperature and precipitation
Secondly, the aesthetic function. Only in second place is decorating the gaps between the window and the opening. Smooth and straight or elaborately carved, they will embellish the home design.