SIP panels are widely used for the construction of residential and non-residential low-rise buildings: houses, dachas, outbuildings, warehouses and shops. The size and number of panels depend on the features of the project and the purpose of the room. Modern industry produces standard building materials in accordance with GOST. In addition, manufacturing companies develop their own technical specifications, which significantly expands the range of standard sizes.
Structure and thickness of SIP panels
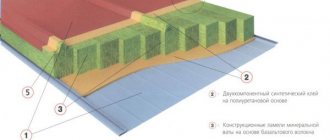
Sandwich panels consist of two outer layers of OSB boards and a central part of insulation - expanded polystyrene. The thickness of the slabs and core varies, so you can find materials with different parameters on the market. The most commonly used panels for construction are:
- 120, 170 and 220 mm, where the total thickness of the OSB boards is 20 mm, and the rest of the volume is occupied by polystyrene foam;
- 124, 174, 224 mm with a thickness of both OSB boards of 24 mm and an insulation volume of 100, 150 and 200 mm, respectively.
The larger the volume of the core, the higher the heat-saving properties and strength of the material will be.
As for other parameters, the most popular are panels 120-125 cm wide and 250-280 cm long. Much less common are slabs 300 cm wide and twice as long.
According to their purpose, all panels can be divided into roofing, wall and floor panels. Sandwich panels with a width of 60 and 62.5 cm are intended for arranging roofs and ceilings. For the construction of walls, slabs with a thickness of 12.4 cm, a width of 120 cm and a length of 250 cm are used.
How to distinguish a good SIP panel from a hack
Frankly speaking, the word “hackwork” is not used entirely correctly, because... even the cheapest SIP panel has the right to exist, but it must be used for the construction of various types of outbuildings and auxiliary buildings, protected by special types of finishing, etc.
How to distinguish an SIP panel that is unsuitable for the construction of a residential building?
- If the panel dimensions differ from the standard OSB sheet dimensions for our country (2500, 2800, 3000 x 1250) and have dimensions, for example, 1220 x 2440, then this means that an OSB board was most likely used for the manufacture of such a SIP panel Canadian-made, which is significantly inferior in its technical characteristics to OSB-3, which is installed on good sandwich panels.
- If, during a visual inspection, you see inclusions of bark, peeling of chips, or simply a too loose structure of the OSB, do not take such panels for building a house, even if the price is too attractive. By the way, if the price is radically lower than that of competitors, make every effort to find out what caused this.
- Before buying SIP panels, visit a place where expanded polystyrene is sold in your region and feel the density of good PSB-S-25. Compare your tactile sensations when choosing SIP panels. If it seems to you that the panel contains softer polystyrene, most likely it has a density of less than 15 kg/m3, and this is the lowest density for grade 25.
- Be sure to ask for scraps of polystyrene foam for a little experiment. They are required to be in production, because appear when cutting panels for a specific house kit. Try to set it on fire. It should extinguish in no more than 4 seconds after the cessation of exposure to an open flame, which is provided for by GOST. In practice, good self-extinguishing polystyrene should go out almost immediately (1 - 2 seconds) after the fire is removed. At the same time, it should not smell strongly or smoke.
- Feel free to just smell the polystyrene scrap. The pungent smell should alert you. Do the same with OSB. The current standards for both of these materials guarantee the absence of the release of any amount of harmful substances hazardous to health. Also, the raw materials for the production of PSB-S should already contain additives that repel rodents, but the desire for excess profits sometimes pushes unscrupulous manufacturers to purchase materials that are not of high quality.
The above procedures can really help you avoid buying SIP panels that are not suitable for building a residential building.
One more thing. Even if you buy ready-made SIP panels from a company and cut them yourself on site, inquire about the possibility of cutting panels at the enterprise. The fact is that equipment for the production of the panels themselves, made independently, can cost several times less than equipment for high-quality cutting of finished products. Therefore, the presence of the latter can serve as an indirect confirmation of the solidity of the company.
SIP panels for homes in mild climates
In warm climate zones, winter temperatures fluctuate between 0°C plus or minus a few degrees. Frosts down to -15-20°C are very rare. However, future residents often choose to build panels with a thickness of 174 mm or more so that the house is as warm as possible. In this regard, construction costs increase, since larger panels are more expensive. This approach is not entirely correct. For housing in an area with a mild climate, panels with a thickness of 124 mm are sufficient, and heat conservation can be improved with the help of finishing.
Useful tips for self-installation of SIP panels
If you are planning to build a house yourself using the material described, we will only support you and give you some useful recommendations that will help in such a difficult task.
- First of all, familiarize yourself with the technologies and methods of connecting such panels. As a rule, the most common mistakes are observed when the dimensions of the building do not take into account the thickness of the panels that meet at the corners.
- Second tip. The dimensions of door and window openings need to be determined (and if possible, then unified) in accordance with the dimensions of the panels you have chosen. Or vice versa. Select the dimensions of the products based on the efficiency of their cutting.
- Try to do everything so that there are no structures in which the waste of panels is unproductive, or there are, but in minimal quantities. Alternatively, you can immediately find a use for it.
- Decide how the cuttings of solid elements will be joined. Do not forget to add the required amount of timber at the same time.
- And the last piece of advice: using some kind of graphic editor, try to draw out the facades of the planned building with the actual dimensions of the panels (scaled, of course). In this case, you cannot make a mistake either with the size of the object or with the required amount of consumables.
Dimensions of SIP panels for houses in harsh climates
In many regions of Russia, frosts reach -30° C, and the average temperature in the cold season does not rise above -5-10° C. For such conditions, professionals advise choosing wall panels with a thickness of 174 mm. They provide good heat conservation and comfortable conditions for permanent living. It is not forbidden to buy panels with a thickness of 200 mm or more, it all depends on the financial situation of the buyer.
An important nuance: when choosing a material, not only climatic conditions are taken into account, but also the design features of the building. Houses above one floor require strong load-bearing walls made of 224 mm thick panels. Slabs of similar thickness and width of 625 mm are used for flooring, ceilings and roofing structures.
Key parameters of SIP panels – dimensions, approximate prices, features
Let's start with the fact that these panels are manufactured in three standard sizes, each of which, in turn, can have several thicknesses. Let's look at the features of each option.
- Products with dimensions 125x250 centimeters. Their thickness can be 12.4, 17.4 and 22.4 centimeters. The cost of one panel, accordingly, varies on average between 3200 and 3900 rubles.
- Products with dimensions 125x280 centimeters. The thickness is similar, that is, 12.4, 17.4 or 22.4 centimeters. The average market price is from 3,600 to 4,300 rubles.
- Products with dimensions 125x300 centimeters. The thickness in this case is still the same, but the prices are slightly higher - from 4,150 to 4,700 rubles per piece.
For more detailed information about the standard sizes of products, we recommend that you familiarize yourself with the table below.
Table. Dimensions of SIP panels, thickness and average market prices.
| Size, mm | Thickness, mm | Price for SIP panel |
| 1250 * 2500 | 124 | 3300 |
| 1250 * 2500 | 174 | 3650 |
| 1250 * 2500 | 224 | 3950 |
| 1250 * 2800 | 124 | 3700 |
| 1250 * 2800 | 174 | 4000 |
| 1250 * 2800 | 224 | 4380 |
| 1250 * 3000 | 124 | 4350 |
| 1250 * 3000 | 174 | 4500 |
| 1250 * 3000 | 224 | 4700 |
Dimensions of sandwich panels for country houses and change houses
For summer cottages, cabins and other outbuildings, professionals recommend panels with a thickness of 120-124 mm. They provide a comfortable microclimate in the room, where it will be quite warm in autumn and spring, and cool in summer. In addition, maintaining heat will require minimal heating costs.
It is better to entrust construction from SIP panels to professionals who thoroughly know the characteristics of the material. They will select sandwich panels of optimal thickness taking into account the purpose of the building and the architectural design.
What you need to cut SIP panels with your own hands
First of all, we need a high-quality measuring tool, including long, calibrated rods. First of all, this is due to the need for very precise marking of both sides of the panel, because It is unlikely that you will have a tool at your disposal that can cut through the entire thickness of a SIP panel in one go.
Next, we will list the minimum set of tools required for this work, and whether it is manual or electric is up to the owner.
We will need a tool for cutting OSB - a jigsaw, a circular saw or an angle grinder. At worst, use a hand saw, but maintaining strict perpendicularity with it given the heterogeneous structure of the OSB is unrealistic, therefore, it’s better not to try, you’ll get dirty during assembly and get huge gaps.
To cut polystyrene foam, we will need the same grinder, or any other tool that can make a slot between the OSB and the polystyrene block for the tool to work properly with nichrome wire for cutting foam.
Or make a cutter so that it doesn't require cuts. Practice shows that for the normal installation of the connecting beam, and this is precisely why such selections are made, you will still have to clean the grooves. But these procedures are not too complicated.
Recent objects
View all built objects
House made of Stone SIP sip panels in the Moscow region, Stupinsky district, Prudno village 185 m2
RUB 3,400,000
Reconstruction of a brick house. Second floor superstructure made of sip panels in Chekhovsky district 78 m2
RUB 970,000
Duplex for two families from sip panels in Podolsk 262 m2
RUB 3,700,000
House made of sip panels in the Moscow region, Klinsky district, DNP “Klinskiye Dachas” 148 m2
RUB 2,900,000
House made of sip panels in Chekhovsky district, Gorelovo village, 72 m2
1,000,000 rub.
House made of sip panels in Kaluga region, Rogachevo village 156 m2
RUB 2,600,000
PROPERTIES AND CHARACTERISTICS
Properties and characteristics of SIP panels
Canadian houses are very popular in many countries around the world. In Russia, too, more and more people prefer to build houses using SIP technology. Such interest in Canadian houses is observed due to their many advantages and relatively low price. The main element of the design of such houses are SIP panels, and it is their properties that largely determine the advantages of the house. A SIP panel consists of two OSB boards and expanded polystyrene glued between them, which acts as insulation. The simple design and inexpensive materials, however, provide a building material with a unique set of properties. Good thermal insulation, strength and lightness of the panels, together with the frame structure, make Canadian houses very strong, warm, durable and inexpensive to build.
Thermal insulation properties.
The thermal conductivity coefficient of polystyrene foam is 0.037-0.042 W/(m K)). For example, the thermal conductivity coefficient of wood is 0.12 W/(m K), foam concrete 0.29 W/(m K), brick – 0.7 W/(m K), concrete – 1.51 W/(m ·TO). That is, a wall made of polystyrene foam 10 cm thick corresponds in thermal conductivity to a wall made of wood 30 cm thick. Or a foam concrete wall 73 cm thick or a brick wall 175 cm thick.
The lower the thermal conductivity, the less energy will be spent on heating the house and, accordingly, lower energy costs. On average, the cost of heating a house made from SIP panels is 6–8 times less than the cost of heating ordinary houses (wooden or brick with insulation). Let's calculate the thermal resistance of a SIP panel with a thickness of 174 mm. (Thermal resistance is the reciprocal of thermal conductivity and is used for thermal calculations). The thermal conductivity coefficient of polystyrene foam brand PSB-S-25 is 0.039 W/(m K). With a thickness of 0.15 m, its thermal conductivity will be 0.039 W/(m K) / 0.15 m = 0.26 W/K. The thermal resistance (R) of 15 cm thick polystyrene foam will be 1 / 0.26 W/K = 3.85 K/W. The thermal conductivity coefficient of OSB-3 boards is 0.13 W/(m K). With a thickness of 24 mm (two 12 mm slabs), the thermal conductivity will be 0.13 W/(m K) / 0.024 m = 5.42 W/K, the thermal resistance will be 1/ 5.42 W/K = 0.18 K/ Tue The thermal resistance of the SIP panel will be equal to R (insulation) + R (plates) = 3.85 K/W + 0.18 K/W = 4.03 K/W. The greater the value of thermal resistance, the less heat loss occurs, the “warmer” the walls. According to building codes for Moscow and the region, the thermal resistance of enclosing structures for a permanent residence must be at least 3.13 K/W, for administrative buildings at least 2.55 K/W. It can be seen that the 174 mm thick SIP panel fully meets the requirements, moreover, it significantly exceeds them.
Physical and mechanical properties.
Although SIP panels are made of wood boards and polystyrene foam, they can nevertheless withstand quite heavy loads. For example, a SIP panel with dimensions of 2.50 x 1.25 m and a thickness of 174 mm can withstand a lateral load of 2 tons. It bends but does not collapse. This load corresponds to a load of 640 kg/m2. For comparison, reinforced concrete floor slabs that are used in construction can withstand a load of about 300 - 400 kg/m2. According to SNiPs, the calculated load on the operated floor is 150 kg/m2, the calculated maximum snow load is 180 kg/m2. It is obvious that the characteristics of SIP panels satisfy these requirements.
With longitudinal loads, SIP panels can withstand up to 11 tons per 1 square meter. That is, if you take a house with dimensions of 10 by 10 meters, then these walls can be loaded with up to 440 tons (the perimeter of the walls is 40 m. * 11 tons). Such characteristics exceed building standards for loads on building structures by a large margin. The question immediately arises, where does such strength come from, because the panels are made of wood board and, funny to say, foam plastic. Yes, the OSB board itself is quite flexible and bends even under not very heavy loads. There is no need to talk about polystyrene foam, even 150 mm thick. But when gluing these materials, which differ in their mechanical properties, a material appears that is several times stronger than the materials from which it is made. Structurally, SIP can be compared to an I-beam. The foam core acts as a transverse partition, and the outer solid layers act as analogues of the beam flanges. The thicker the core, the better the panel resists lateral bending. During longitudinal compression, polystyrene foam glued to the plates does not allow them to bend. During transverse bending, thanks to polystyrene foam, one of the SIP panel slabs is compressed, and the other is stretched, providing the entire structure with high bending strength.
The permissible panel deflection is measured as follows: the span length is divided by the deflection coefficient (L/480, L/360, L/240, L/180, where L is the span length). The larger the denominator in this equation, the less deflection and the stiffer the structure. Typically, the coefficient L/360 is used to calculate the load-bearing capacity of the floor, and L/240 is used to calculate the load-bearing capacity of the roof.
The table shows data on loads for SIP panels with a thickness of 174 mm.
| Deflection | Span length | ||||
| 3050 mm | 3660 mm | 4270 mm | 4880 mm | 5490 mm | |
| L/360 | 340 kg/m2 | 236 kg/m2 | 172 kg/m2 | 122 kg/m2 | 95 kg/m2 |
| L/240 | 454 kg/m2 | 358 kg/m2 | 259 kg/m2 | 186 kg/m2 | 141 kg/m2 |
What does this mean? For example, if you take a span of 3050 mm, put a panel 1 meter wide on it, and put 340 kg for each square meter of the slab, then the slab will bend by 8.5 mm (3050mm / 360 = 8.5mm)
It should be especially noted that SIP panels combine strength and flexibility at the same time. This allows houses built from such panels to withstand even strong wind loads and earthquakes without damaging the structure.
Panel weight.
The low weight of SIP panels is also not unimportant. The density of the foam used in the panels is 25 kg/m3, the density of OSB-3 is 550 – 650 kg/m3. Therefore, 1 m2 of SIP panels with a thickness of 174 mm weighs only 19 kg. For example, the weight of 1 m2 of a brick wall (one brick thick is 25 cm) will weigh from 300 to 475 kg. It turns out that a house built from SIP panels is approximately 20 times lighter than a brick one. The low overall weight of Canadian houses allows the use of lightweight types of foundations, and this significantly reduces the cost of construction. In addition, the weight of a standard panel is about 60 kg, which means that construction can be carried out without the use of heavy construction equipment. The light weight of the slab, together with its large dimensions, allows you to quickly build houses. All this significantly reduces construction costs.
Fire resistance.
Houses built using SIP technology have a third degree of fire resistance, which ensures fire containment for one hour. SIP panels are self-extinguishing due to the fire retardant they contain. The tightness of the house and the tight joints of the panels prevent smoke from entering the premises and the spread of fire. When burning, SIP panels emit 7 times less thermal energy than wood, and an order of magnitude less toxic substances, which reduces the risk of suffocation if you are inside the house.
Environmentally friendly.
SIP panels are a new building material for Russia. And we still have not yet conducted serious and comprehensive tests of this material. And the lack of reliable information (in Russian) leads to mistrust and numerous speculations, including about the harmfulness of OSB boards and polystyrene foam. SIP panels consist of materials that meet the highest environmental safety requirements. OSB board consists of 90% wood chips, the remaining 10% is natural resins, fillers and hardeners, synthetic wax and boric acid salt, which enhances the protective properties of OSB. Please note that there is no phenol, formaldehyde or butanol here. Expanded polystyrene is made from styrene, an environmentally friendly substance, the use of which is not limited by sanitary and hygienic standards. This material is hypoallergenic and is used in global production even for the manufacture of food packaging and tableware. It should be remembered that the technology for the production of OSB boards and SIP panels themselves came to us from North America and Europe, where environmental problems were seriously concerned much earlier than the word “ecology” itself became known to us. Scientific institutions in Europe and America have conducted numerous and comprehensive studies of SIP technology, and all materials from these studies have been published and are available, albeit in English. SIP panels do not emit harmful substances into the atmosphere, which is why they are used all over the world for the construction of social and medical institutions.
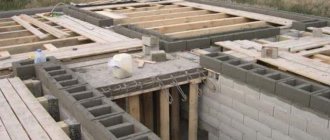
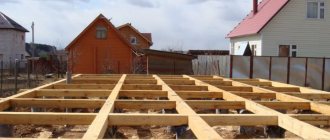
Construction stages: photo report
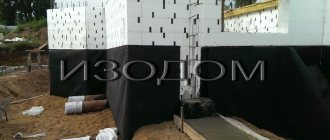
Construction of a house from SIP panels, like any other, begins with the selection and construction of a foundation. A pile foundation is considered optimal for a lightweight house. This is exactly what is done in most cases when starting the construction of a house using SIP technology. Sometimes it is impossible to install a pile foundation:
- on hard soils that are too expensive to drill (rocks);
- on unstable soils with low bearing capacity (peat bogs);
- in the presence of cavities in the rock mass.
In these cases, they make a strip or slab (more often USHP is an insulated Swedish stove). They are much more expensive, but more reliable.
A strip foundation or in the form of a slab is also suitable
Once the foundation has been selected and calculated, its construction can begin.
Making a pile foundation
Since foundations are most often made from screw piles, we will illustrate exactly how they are made. Piles are screwed into the ground manually (if the soil and strength allow) or using special equipment. The height of the heads is 80 cm above ground level, the distance between the piles is no more than 2.5 meters.
Screwed piles and caps welded to them
The heads are welded to the installed piles, and the strapping beam is attached to them (in this example, 200*200 mm).
Important! The joints of the timber must be located on the heads. When laying the strapping beams, do not forget to coat the locks with a protective compound (bitumen mastic) before joining.
There is no support under the joint - you can’t do that!
To protect against rotting and insects, the strapping beams are impregnated with a protective compound. Roofing material was laid in two layers under the timber (on the heads).
We attach the timber to the heads and coat it with a protective compound
This stage takes from 3-4 days to a week. It depends on the complexity of the soil, whether you work with the equipment or turn it yourself. Now you can start laying the floor slabs, but before that you should familiarize yourself with the methods of connecting them.
How to connect SIP panels: basic principle
When connecting panels, a wooden dowel (beam) or a thermal key (a piece of SIP panel of smaller thickness) is inserted between them. As mentioned above, in our country the technology using a frame is more popular, i.e. Dry timber is used as a key. It is this option that we will focus on.
The beam is inserted into the groove and fixed using self-tapping screws and/or nails, which are twisted/hammered through the OSB into the body of the beam. If you have a nail gun, we initially recommend tackling the panels with “yellow” wood screws 40-50 mm long, and then punching the joints with rough nails 50-65 mm long in increments of 10-15 cm.
The following can be used to fasten SIP panels: “yellow” wood screws, galvanized screw nails, galvanized rough nails. Do not use “black” hardened screws - they break off and quickly corrode
There is always a risk that the connection will be leaky, and the entire construction technology of SIP panels is based on the thermos effect, that is, on maximum tightness. Therefore, before assembling this unit (and any other), foam is applied to the side surface of the panel. It fills all the cracks, providing the proper level of heat and moisture insulation.
The main unit when connecting SIP panels: joining two panels end-to-end
Note! The picture above shows a dowel made from double timber. Often such recommendations are perceived incorrectly, and in order to save money, unplaned edged boards 50x150x6000 mm of natural humidity are purchased. Once the board dries, the joint is unlikely to remain sealed.
If you are not limited on funds, we recommend using solid timber from dry planed wood, chamber dried
When making a composite wooden dowel 100*150, in our opinion, it is preferable to use three dry bars with a cross-section of 50*100 mm - in this case the connections overlap (see video below).
If we are talking about wall panels, then it makes sense to insert and secure the dowels in advance.
The foam was applied, the beam was inserted, and secured with self-tapping screws. Foam was applied to the side edge of the second slab, the groove was placed under the protruding part of the beam, an expansion gap of 3 mm was set, and secured with self-tapping screws. The foam that came out of the seams during the installation process is cut off after polymerization.
This is what it looks like
This technique, with minor modifications, is repeated in any connection of SIP panels. The diagram of this node is presented above.
After cutting the slabs, it becomes necessary to remove polystyrene foam to the required depth. For these purposes, an electric thermal knife (cutter) for foam plastic is used. They come in various designs, but the thermal knife must be equipped with a limiter. Only in this case will you be able to remove polystyrene foam exactly to the required depth. “Overdoing” can lead to the appearance of cold bridges at the junction of the panels.
Electric foam cutter with installed cutting depth limiter
You can make the cutter yourself, but you should not forget about safety precautions when working with electric current .
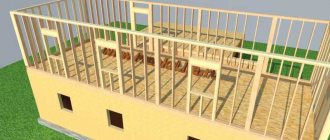
First overlap
The first floor is nothing more than a floor that does not require insulation. As melted, it is assembled from SIP panels with a thickness of 224 mm and a width of 625 mm. With such a width of the slabs, the wooden beams are spaced at intervals of about 60 cm, which is enough to withstand the load.
If you have slabs with a width of 1250 mm, then they need to be sawn lengthwise into two equal parts.
When installing the ceiling, the panels should be laid like bricks in masonry - with the seams mismatching (staggered). This is necessary to ensure that the seams do not warp when humidity increases.
These are the pieces that floor blocks should be cut into when using 1250 mm wide slabs
To protect the bottom OSB board from moisture, each of the boards is coated on one side with the same bitumen mastic. You can use other compositions with similar properties.
Assembly of SIP floor panels for the first floor
When connecting the slabs, a mounting beam is laid between them (diagram in the previous paragraph). The beam is attached at the edges to the frame (with long nails), and the edges of the slabs are attached to it using self-tapping screws.
We cover the side sections of the slabs (all floors) with an edged board of a suitable size. We apply foam to the side surface of the slab using a snake, then we place a board and fasten it through the OSB with self-tapping screws into the end of the board.
Closing the floor sections
A starting (crown) board is laid on top of the sandwich along the perimeter, on which the SIP wall panels will rest. It is laid around the perimeter and in those places where partitions will be installed.
Method of fastening the first floor and thrust beam
The crown boards are fastened with nails/screws, but to be sure, they were secured through and through with studs to the pile heads. Holes were drilled for the studs. A pin is driven into them and tightened with bolts.
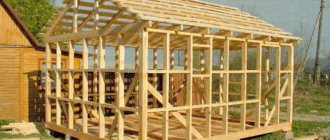
Walling
We continue the construction of a house from SIP panels: we are installing the walls of the first floor. For this work, it is advisable to have two assistants, then the process will go faster and easier.
We place the first panel so that it “fits” onto the crown board
Wall installation begins from one of the corners. When installing, the panel is “slipped” onto the installed starting board with a recess in the lower part (first apply a layer of foam to the board or the end of the sandwich). The panel is placed, aligned vertically, attached to the starting board on both sides with self-tapping screws in increments of 10-15 cm.
Assembly of the wall slab to the strapping beam
Foam is applied to the side surface of the installed slab, and another slab is set at an angle of 90°. An embedded board (end block) is pre-attached to its side part, the thickness of which is equal to the depth of the groove. Like the first one, this panel is attached to the strapping starting board.
We fasten the corner from sandwich panels
In addition, we fasten the corner using long self-tapping screws.
As a rule, self-tapping screws with a length of 220 to 280 mm are used
The length of the self-tapping screw must be such that it passes through the slab and the entire thickness of the embedded board. The installation step of this fastener is 40-50 cm.
The principle of assembling the first floor wall
Next, the walls from SIP panels are assembled according to the same principle: we place a beam between the slabs (if it was not inserted previously), and attach the next slab to it and to the bottom frame. Simple and fast.
In window and door openings, for more reliable fastening, you can install metal perforated reinforced corners. The element is optional, but adds rigidity and inspires confidence.
External walls and partitions are immediately erected
The installation of partitions from SIP panels follows the same principle: we attach a crown board and partition blocks to it. They can be the same thickness as for external walls, but thinner ones can be used. The decrease in sound insulation properties is compensated by the interior decoration.
To save money, partitions can be made using frame technology. Then initially only the frame can be installed, and its cladding can be transferred to a later period. It is more convenient to do this when the roof is already installed.
In a house, frame partitions can be made from SIP panels
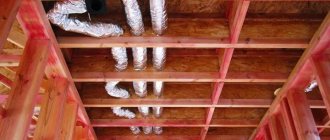
Interfloor ceiling
To install floor slabs in the grooves of wall panels, boards are installed on foam and self-tapping screws. They create a harness for installing the ceiling.
Preparing the piping for the interfloor ceiling
Next we lay the floor slabs. If the partitions are assembled from SIP panels, their load-bearing capacity is quite high and no additional reinforcement measures are required. If the partitions were assembled using frame technology, we make the upper beams reinforced: they are assembled from three boards glued together. For greater strength, the beams can also be fastened on both sides with self-tapping screws.
Reinforced beams
Floor slabs made of SIP panels are laid on the finished frame. They should be no more than 625 mm wide and should be laid staggered (with the seams mismatched). Since the panels are narrow, there is a lot of wooden beams in the ceiling. Due to this, such a floor can withstand loads in places where there are no floor beams.
This is what it looks like from above
We fasten the laid slabs to the framing beam with self-tapping screws or nails. The edges of the OSB are at the top and bottom to each intermediate beam. After securing the installation of the ceiling, we close the open side sections along the perimeter of the building according to the same principle: foam + edged board. For greater rigidity, in those places where the floor beams pass, we fasten the floor panels with long self-tapping screws (220 mm) all the way through.
A couple more angles
This stage after assembling the first floor does not seem difficult. Everything is the same, only the work is at height, tightening the sandwich panels takes longer and is more difficult than installing them.
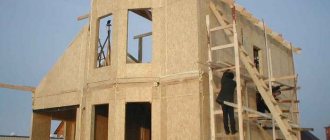
Second floor walls
The second floor in this project is an attic, so the wall panels are low. We also install partitions at the same time as the external walls. Before installing the roof, an embedded beam is installed in the upper open groove; roofing SIP panels will be attached to it.
The outside is much taller
Standard panels will have to be cut to fit the gables, since the shape is non-standard. The installation and connection of the wall panels themselves on the second floor is no different.
Roof made of SIP panels
Special sandwich panels are used for the roof. Under them, the ends of the slabs are cut at a certain angle, which is determined by the angle of inclination of the roof slope. Here, just as with flooring, you can get by with a minimum of beams, because each connection has its own beam. Therefore, the rafter system is not assembled.
For a roof made of SIP panels, beams need a minimum
Skate decoration
The roof of a small to medium sized house is made of SIP panels and usually has a central ridge beam. Here two planes of the roof converge. This node can be designed in two ways (in the pictures below). The first one is symmetrical. The sandwich panels are cut at an angle, and the top of the ridge beam is cut at the same angle. Two planes are fastened with long self-tapping screws through the panel to the beam on both sides. The fastener installation step is 30-40 cm.
Method of connecting two roof planes on a ridge beam with slabs sawn at an angle
In this method, there is no usual timber between the two slabs; they are connected only with foam. After the foam has polymerized, the excess is cut off, the seam is treated with a waterproof sealant, after which a protective strip - made of metal, plastic, etc. - is put on the ridge. - depends on the type of roofing chosen.
There is another way to join roofing SIP panels on the ridge. The second method does not require cutting the slabs at an angle, but one part of the panels must be longer (by the thickness of the roofing slab). The beam is still cut at an angle, the slabs are joined at right angles, and fastened through and through with long self-tapping screws to the beam.
Docking without undercuts
This connection uses embedded end bars. They are installed as usual - using mounting foam and self-tapping screws. To block the access of moisture to the under-roof space, the junction of the two panels is also additionally coated with a waterproof sealant.
There is an option to install a roof from SIP panels without a central beam. There are roofing options with two load-bearing beams that are located off-center. These can be either specially laid floor beams, or partitions assembled from SIP panels or using frame technology. In the second case, it is better to strengthen the beams (make them prefabricated with glue and nails).
If there are two rows of partitions or two load-bearing beams
The most difficult thing in this unit is to cut the embedded beams at the right angle. This can be done on the ground, which greatly simplifies the task. The panels are fastened through the slab with long self-tapping screws to the floor beams or mortgages in the partitions. Also, two planes are fastened together at the junction point - on opposite sides with long self-tapping screws.
Roof and wall panel connections
For laying SIP roofing slabs, wall slabs are cut at the required angle. The inner part of the OSB is higher than the outer part. The foam plastic is “cut” at the same angle, and the edges of the embedded beam are trimmed. It is this part that is the most difficult if you did not buy a house kit, but are building a house from SIP panels using standard panels, cutting them to the required dimensions with your own hands.
How to connect wall and roof SIP panels
If you have the appropriate equipment, cutting them at an angle is not a problem. The problem is cutting the foam between the OSB boards to the required depth. You can select the core using a thermal knife, and then remove the residue purely mechanically. Most likely, the cut will still not be smooth, so you will have to add more foam to fill the unevenness.
If the roof overhang is made without insulation
In the pictures, the roof overhang is also made of slabs with insulation. This is easier to implement, but it is an unreasonable expense. To save money, the length of the SIP panel is taken up to the intersection with the walls, and then only the timber goes (as in the photo). In this case, the beam is made composite: one part is longer by the amount of the overhang, the second is shorter and ends where the wall ends.
Features of joining roofing slabs
The connection of two roofing slabs occurs in the same way as others: timber, foam, self-tapping screws. But since precipitation is possible here, it is advisable to seal all seams.
Assembling a roof from sandwich panels
To improve the tightness, all seams on the roof are additionally coated with waterproof sealant. First, the hardened foam is cut into a plane with the roof, then a sealant is applied. After filing the overhangs, we can consider that the construction of a house made of SIP panels is completed. Install windows/doors, connect communications and the home is already suitable for habitation. Finishing can be done immediately after installing the box.