When renovating a room, few people will want to wallpaper the ceiling: thin sheets are very inconvenient to hold, and if their composition is traditional paper, then they may even tear. You can limit yourself to whitewashing and paint.
However, working at height with mixtures and liquids is also difficult - it requires preliminary surface preparation and is accompanied by prolonged physical activity.
It’s good that the construction market is ready to offer an alternative in the form of ready-made solutions.
Profile fastening
To do this you will need to prepare a profile rail. The rail can be longer or shorter than the width of the room. For the first case, the slats are sawed at an angle that is equal to half the angle of the room. For the second case, one corner is cut at half the corner of the room, and the second at 90%.
Next, take the missing profile link and do the same with it, taking into account that the bevel must be made for the opposite corner.
The two halves of the profile are glued together. Then the rail is screwed with dowels or self-tapping screws to the wall according to the applied level. As a result, the profile is attached around the perimeter of the room.
Watch the video of creating a ceiling with your own hands.
Whitewash
The classic version of budget finishing - whitewashing - requires thorough preparation of the ceiling surface. It is necessary to achieve a perfectly flat plane without visual defects; for this, repair solutions are used. Although whitewashing is considered the most affordable method of decoration, it is worth knowing that the work will require a lot of time and physical effort. Moreover, this is a short-lived cladding option; the coating will have to be renewed annually.
Film stretching
You should connect a fan heater and heat the room to +40 degrees. Then you can start unwinding the film; it is important not to lean the PVC film too close to the heat gun.
The installation of the canvas begins with the base corner, then the diagonally opposite corner is attached, etc. After securing the 4 corners, the sides are strengthened towards the center from the corners.
It is important that at the moment of fixing the film should be heated to +60. To install suspended ceilings made of fabric, the steps are as follows: first, the sides are secured, moving to the corners.
Note!
Do-it-yourself vegetable garden: new interesting garden crafts for the street at your summer cottage (photo/video review)
DIY ceiling installation: step-by-step description of how to make a ceiling. Review of modern structures and ideas for their design (105 photos)
- Do-it-yourself garage doors - a detailed description of the construction of various types of garage doors (120 photos)
Summarizing
So, there are several options for quickly finishing the ceiling. Each of them, of course, is good in its own way. Someone will want to build a complex structure from plasterboard sheets, while others will be satisfied with a flat ceiling surface covered with wallpaper. In any case, no matter which option you prefer, you should be pleased with the result. To achieve it, you need to select the right materials and tools, as well as have the desire.
By observing all the above conditions and recommendations, you can soon transform your room with a quick ceiling finish.
Making a plasterboard ceiling
The plasterboard material is made from gypsum coated with cardboard - it is environmentally friendly, non-toxic and non-allergenic. It is often used to create ceilings in residential buildings.
How to make a plasterboard ceiling with your own hands? To install this type of ceiling you will need the following tools: a triangle, a level, a screwdriver, a meter, a hacksaw, and a light.
How to do:
First, you have to decide how much you need to retreat from the main ceiling for the desired ceiling. By smaller standards, you will need 10 cm, because... the built-in lamp will require 9 cm.
Marks are made on 4 sides of the room to establish profiles. We measure the height of the room from all angles. Having chosen the lowest angle, we draw a mark from the floor to the desired height. Use a water level to mark horizontal points along the wall. We beat off straight lines through the points with a thread.
Note!
Insulate the foundation with your own hands - a step-by-step description of the use of the best materials and technologies (90 photos)
- Do-it-yourself pergola on a summer cottage: step-by-step instructions with photos and descriptions
Laying laminate flooring with your own hands: a detailed description of how to lay laminate flooring. Laminate calculation, step-by-step description and installation secrets (105 photos and videos)
Paying attention to the lines in the walls, we drill holes for dowels at intervals of 30-40 cm, then install the profiles.
We attach secondary profiles to the central profile slats. They are fixed where the plasterboard sheets will be joined. The result is a metal frame.
Electrical cables are installed. We make grooves for the wires; they are placed in the walls and go directly from the switch to the ceiling.
The next step is to secure the drywall to the profiles.
Ceiling finishing stages
Let's look at the stages of ceiling repair
To make the apartment look perfect, when starting to renovate the ceiling, it is worth dividing it into several phases. First of all, you need to clean it. It practically doesn’t matter what materials you are going to use, if the ceiling is not carefully prepared, even the best materials will not last long; they will either simply fall off or become very unpleasant to look at. Each technology requires its own preparation, some more, some less.
Preparing the ceiling for finishing
Of course, if the paint or mortar on the ceiling holds tightly, then they can serve as the basis for some kind of finishing. But if the ceiling is covered with dust or cracked paint, as well as old peeling whitewash, cleaning is necessary. In general, it is generally recommended to strip the ceiling down to a solid base and begin all other work from there. Read more about → preparing the ceiling for various finishes on the website following the link.
Plastering or leveling the ceiling with plasterboard is often a necessary stage of finishing the ceiling
Ceiling leveling
The next step should be to level the ceilings, if, of course, it is required. When you raise your head and want to cry a little from the gray crooked slab hanging over you, then to level the ceiling, it is best to use drywall. This is an excellent material - light, reliable, durable. And it’s relatively easy to work with, even if you decide to do everything yourself.
Leveling the ceiling with plasterboard without a frame
However, drywall should only be used in the hallway or living rooms. In the kitchen or, especially, in the bathroom, the use of plasterboard is undesirable, although there are moisture-resistant sheets. In the kitchen, ceilings lined with plasterboard will absorb the smells of the various dishes you prepare. In the bathroom, due to excess dampness, drywall can swell and, at a minimum, lose its aesthetic properties. At the very least, the glue simply won’t hold up and it will fall off, or its trim will fall off. So in such places it would be better to use plaster and ordinary water-based emulsion, paint or other materials that work well in conditions of high humidity and frequent temperature changes. The following panels are suitable for the bathroom: PVC, slatted ceiling, etc. If you use plasterboard, use moisture-resistant one, it is recommended for wet rooms.
In other cases, you need to use plaster to level the ceiling. Please note that a ceiling covered with plasterboard still needs to be finished; plasterboard is only used to level the ceiling and create a base for finishing.
Mounting drywall
It is quite possible to complete this difficult task of installing a suspended ceiling with your own hands after completing a few steps.
Note!
Do-it-yourself chimney - a detailed description of how and what to build an effective chimney from (110 photos)
Do-it-yourself dressing room: arrangement ideas, drawings, diagrams, projects and dressing room design options (125 photos)
Installing a window sill with your own hands - detailed instructions and step-by-step video description of how to install a window sill (85 photos)
Make a cut with a hacksaw with small teeth. Place the cardboard sheet on a large table. We mark on the front side and cut the drywall with a knife. Having moved the sheet from the table, we bend it until it breaks. Next, turn the sheet over and cut it.
Finish the uneven edge with a plane. All protrusions along the edges are cut off with a sharp knife.
We cut holes for ceiling lights and sockets.
We attach plasterboard to the ceiling. It is installed on the frame both longitudinally and transversely. We screw the screws 10-15 mm from the edge of the sheet. The pitch between two screws is 150 mm.
The joints are puttied. You need to putty after waiting 2 days.
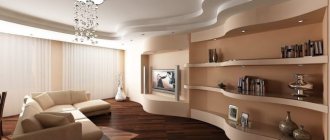
Design features of modern ceilings
Multi-level stretch ceilings
If you want your apartment to have the most beautiful ceilings, pay attention to complex multi-level structures made of stretched fabrics. To make the appearance of the ceiling surface more attractive, you need to carefully consider the lighting.
Such systems are available in several versions:
- stepped arrangement of tiers;
- curvilinear shapes;
- inclined position of one or more tiers;
- the levels are made in the form of smooth, even waves.
The most effective design for transforming a modern interior is provided by multi-level structures, the individual elements of which are made in the form of curved lines. At the same time, both film and fabric sheets can be combined on one surface.
How to make multi-level stretch ceilings - types and installation with your own hands.
Dropped ceilings
With the help of such systems, you can inexpensively finish the ceiling surface, but the effect obtained as a result will exceed all expectations. Most beautiful ceilings are represented by suspended structures that allow you to hide imperfections in the finishing of the base surface, wiring elements and communication systems. Thus, the time spent on repairs is significantly reduced, since there is no need to putty and carefully level the rough ceiling.
The most popular suspended ceilings are:
- plasterboard;
- rack and pinion;
- glass.
To construct a frame base for them, reliable materials such as aluminum, plastic, high-quality wood, and metal are used.
Installation of the second level on the ceiling
Many people are interested in how to make a two-level ceiling with their own hands. Using a water level, we place marks and apply them to the planned top using a tape measure.
We connect the placed marks with a beating cord. We install 27x30 mm profile guides throughout the room. We strengthen the profiles with 6x40 mm nails.
We find the central point of the ceiling and from it to the sides we measure the required distance and make marks. We make lines with a beating cord and attach a profile to them.
Let's use metal screws. Next we wind the profile in a semicircle. Using scissors for cutting metal, cut every 2.5 cm.
We twist the profile rail and attach a sheet of drywall to the main profile perpendicular to the ceiling. We do this along all the walls of the room, without touching the rounded elements.
In order not to break, but only to bend, drywall is wetted on one side with a rag. We twist the cardboard to the profile. The screws do not need to be pressed in, but leave 3-4 mm until the cardboard dries.
We fix the strips on the semicircle. We fix the free corners. We install the guide rail from the inside. To strengthen the profile, we attach a suspension. We twist the cut parts of the sheet to the profile.
Is it possible to make an inexpensive baroque ceiling
For ceilings that are not very level, surface preparation can take several days of arduous and dusty concrete scraping, priming, and leveling the ceiling base. In this case, you can do the finishing in a simpler way:
- The surface is treated with a deep penetration acrylic primer;
- The starting layer of putty is applied and leveled;
- After selective cleaning of the surface, you need to apply another layer of finishing putty.
All that remains is to clean and sand the surface with mesh sandpaper. If you make the finishing layer as carefully as possible, you will get a gypsum surface whose quality is indistinguishable from plasterboard cladding.
From a 10 kg package of gypsum putty, costing $2.5, you can make a ceiling covering 10 m2. With double processing, the price of one square of ceiling surface will cost $1 per 2 m2.
On the prepared surface you can make a beautiful graphic pattern, drawing, or paint the ceiling with acrylic paint. Decorative patterns of plaster and alabaster stucco are traditionally laid around the chandelier and along the perimeter. Taking into account the cost of paint and molding, it will cost about $2 per square surface to make a beautiful ceiling.
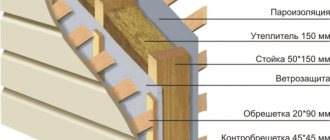
Wooden lathing for plastic ceiling
Before work, prepare: a wooden beam 40x25 mm, plastic panels, plinth for the ceiling, screws for wood.
To hide the protruding ceiling beams, you need to make wooden backings and place laths under the slats, attaching them with self-tapping screws.
We attach the beam to the ceiling with a self-tapping screw L-120 mm. The gaps between the screws are half a meter. Having finished with the perimeter, we install partition bars with a distance of 400 mm.
Wallpaper
Finishing ceilings with wallpaper will allow you to quickly and inexpensively update your interior.
To decorate the ceilings choose:
- paper wallpaper will help hide floor defects and will not take up excess space from the room. Cons – will not last long, will require careful surface preparation;
- vinyl and non-woven fabrics have a wide selection of shades and textures. Thanks to the relief structure of some types, wallpaper masks unevenness and defects in the base ceiling. Special compounds are used for gluing canvases;
- textile wallpaper. Linens are made from different types of fabric - cotton, calico, burlap, tapestry, linen. Advantages - decorative properties, disadvantages - short service life and fragility;
- Liquid wallpaper is one of the options for modern finishing of ceilings in apartments. They are easy to apply, harden quickly, and the damaged area can be repaired without replacing the entire coating. Minus - the material is afraid of moisture.
How to hang wallpaper on the ceiling - a step-by-step guide.
Installing a plastic ceiling
We use a miter box and saw the plastic baseboard with a hacksaw for metal at an angle of 45 degrees. We fix the cornice to the wooden batten with self-tapping screws and an L-15 washer, every 250 mm.
Attaching plastic panels
How to decorate a ceiling with plastic panels. It is good to cut plastic panels with a hacksaw or a knife. We cut it to the required size and insert it into the recess of the ceiling plinth.
The plastic panels are simply inserted. If you are installing a ceiling in the summer, then no gaps are left along the edges of the panels, and in winter the panels must be made shorter by 5 mm.
The gap is necessary to increase during the heat. Otherwise, the ceiling will bend. Having sawed off the panel to the required size, we slide it into the groove from the edges, then we move it towards the already exposed panel.
With a small pressure, the panels click into the lock hole and there are no gaps left. The plastic is also secured to the bars with self-tapping screws and washers.
Where and how best to finish the ceiling
Different rooms, depending on their purpose, require different ceiling finishes. More precisely, each type of finish may be suitable for a specific room, or maybe not. Let's take a closer look at all the finishing options and determine where and which one is best to use.
On our market there is a huge selection of materials specifically designed for finishing ceilings. They allow you to choose the right colors and textures for all types of rooms. In addition, a rich assortment makes it possible to select materials that are perfect for working in certain conditions. And you should be especially careful with this if, a few months after the repair, you do not want to deal with it again.
In living rooms, hallways and living rooms, you can use almost any material to decorate the ceiling. With the right selection of materials and high skill in performing the work, you can get a truly magnificent spectacle. Well, other rooms, as a rule, require a completely different approach. Therefore, in the bathroom it is better to use PVC tiles, panels, slats or paint - it is beautiful, reliable, durable and not afraid of moisture. Well, in the kitchen you can use plastic or again paint. Stretch ceilings are universal and fit everywhere, but in the bathroom there is a high probability of piercing it if it is located low.
Finishing the ceiling in the kitchen
The choice of material for finishing the ceiling in the kitchen needs to be taken more seriously than for other rooms.
Which is not surprising, because in no other room do finishing materials have to face such loads (well, perhaps even in the → bathroom). Daily cooking places special demands on materials and work, as they cause constant changes in temperature and humidity, and in addition, they impregnate soft materials with corresponding odors, and not always only pleasant ones. In addition, ceilings are often covered with layers of grease and soot, which in no way gives them an aesthetic appearance. If you want to save as much as possible, you can use simple water-based paints. They, unlike lime, are easy to clean and dirt can often be removed in a matter of minutes using a regular damp cloth. However, there are many better ways to decorate ceilings without spending too much money.
Of course, this can be done using plastic panels. And PVC can really be an ideal option. After all, PVC panels are beautiful, easy to install, allow you to choose exactly the colors you need, and simply stand up well to numerous washes and cleanings. Of course, if you use plastic panels, you don’t have to worry about them absorbing grease or unpleasant odors. After all, such weaknesses have never been noticed in plastic. Stretch ceilings are also suitable (they are suitable everywhere).
Bathroom ceiling
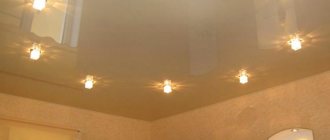
Bathroom ceilings must be moisture resistant. Any moisture-resistant material is suitable. A suspended structure is desirable in order to install beautiful lamps in it, install electricity, and provide ventilation.
In other rooms, the ceiling decoration is not limited in any way, except on the balcony.
Good luck choosing materials and working! Leave your tips and comments below. Subscribe to our newsletter. Good luck to you and good luck to your family!
Photos of ceilings with your own hands
Please repost
0