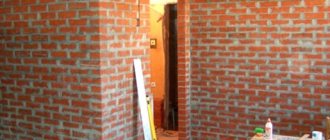
Interior decoration of rooms such as kitchens and bathrooms should be made from materials that can be used in rooms with high humidity. Such finishing should ensure excellent sanitary condition of the room and be resistant to the use of various detergents and antiseptics. The most rational is considered to be a ceiling made of PVC panels.
The entire installation process can be divided into the following stages:
- Preparing the room and material
- Frame installation
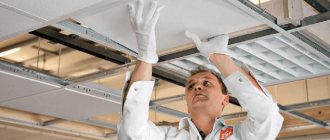
- Installation of PVC panels
Preparation of material and premises.
First, measure the perimeter and determine the area of the bathroom. Given these dimensions, you can easily calculate the required amount of material. In order to make a bathroom ceiling from PVC panels you will need:
- Wooden beam measuring 20x40mm or metal profiles (starting UD 25x27mm and CD profile 27x60mm). The supporting frame will be assembled from them. You also need fastening material, which any sales consultant will help you choose.
- PVC panels. Their choice today is so wide that it will be limited only by your taste and financial capabilities. Seamless or imitating lining, white or colored, matte or glossy, you can’t list all the variations. Additionally, purchase a starting profile for the panels or a special plinth that allows you to hide the unevenness of the cut.
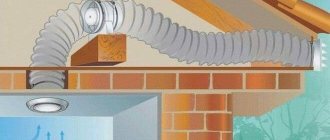
- Since the installation of such a ceiling involves the use of hidden electrical wiring, take care of the necessary electrical materials: wire, lamps, etc.
If you purchase materials in the cold season, be sure to let the panels rest in a room at room temperature, this will relieve the plastic of excess fragility.
For ease of installation, it is necessary to clear the room of unnecessary objects and furniture. It is better to install the ceiling after finishing the walls with tiles; we will explain why further. After completing all the preparatory operations, you can safely begin the installation itself.
4) Start of work
You need to start with markings for fastening the 30/27 profile. Take a level and a marker, use a tape measure to measure from the ceiling from 4/5 to 6 cm and set the starting marking point. The ceiling will be 1 cm lower than it. It is worth considering that if you plan to install spotlights in the ceiling, you will have to lower the ceiling to the height of their mounting bodies + 1.5 cm. Having marked the marking point, placing the top of the level on it and leveling it, we put the next point .
Next is important! The level must be rotated 180° with each mark. This will allow, if an untared level is used, not to make the plastic ceiling in the bathroom a complex geometric structure. Flipping the level will compensate for its inaccuracy. After walking around the bathroom, the last mark needs to merge with the first.
Frame installation.
As already mentioned, it is better to start installing the frame after laying the wall tiles. This is due to the fact that the tiles must lie strictly level, so it is enough to fix the UD profile to the wall above it.
Even if the tiles do not lie perfectly, this will not visually affect the assembled ceiling. The distance from the main ceiling to the PVC panels must be at least 5 cm to accommodate wiring and lamps. Then we proceed to install the CD profile, its direction must be perpendicular to the direction of laying the plastic panels. In this case, it is better to place the plastic in such a way that the seams go from the door to the opposite wall, then the joints will be less noticeable.
The CD profile must be attached to the ceiling using special hangers in one or two places to avoid sagging of the entire structure. After this, the electrical wire is laid out. It is recommended to lay it in a special metal hose, which will increase fire safety and make it easy to replace the damaged section of the wire.
6) INSTALLATION
Installing the remaining ceiling panels is quite simple. The PVC plate is cut to size, inserted into the decorative profile, and the self-tapping screw is screwed into the edge of the plate's fastening strip. You just have to take into account that the measurement of the next slab must be done after installing the previous one and do not forget about the electrical wiring terminals.
Lamps for plastic ceilings
Installation of PVC panels.
Installation of plastic is one of the final stages.
To assemble a bathroom ceiling from PVC panels, it is enough to have minimal construction skills. We fasten the starting profile or special plinth around the perimeter of the wall. We cut the panels to the required sizes using a simple method below.
After this, we bend the strip a little and insert it into the guides with the comb facing the wall. We fasten to the profiles using self-tapping screws with a press washer. The next strip is inserted into the groove of the previous one and fastened in the same way.
Installing the edge strip can cause some difficulties; there are several methods to solve this problem. If the guides were mounted on three sides of the wall, cut a strip of plastic to size and insert its cut edge into the guide. We insert the ridge of the panel into the groove of the previous one, and attach the starting profile or baseboard to the wall and UD profile using a special glue, the choice of which is now wide.
If all the guides are secured, then we cut the plastic strip so that its width is 5-7 mm less than the distance from the mounted strip to the wall. After this, with some skill it can be inserted into the groove quite easily. During the installation process, we cut holes for recessed lamps in the required places.
As you can see, everything is quite simple.
It's no secret that renovations in such an important room as the bathroom have always been a priority and have never been simple.
Most likely, this is due to the fact that the bathroom itself is a rather cramped room, and there are a lot of communications in it, which makes finishing difficult. We must not forget about the humid air that literally “hangs” in such a room. This may mean that humidity will contribute to the development of fungal mold if the materials for repair are not chosen correctly.
As a matter of fact, all these factors should be taken into account when choosing materials for bathroom renovation. And this is especially important for those who plan to carry out repair work themselves, without the help of specialists. And one of the important conditions that a material for finishing bathroom walls must have is its moisture resistance at a more or less reasonable price.
Therefore, finishing the bathroom with PVC panels is becoming more and more popular. Such panels can be called an almost ideal material for cladding walls even where there is high humidity. Such panels are made of PVC with a sufficient rigidity coefficient, which naturally affects the strength of the panels themselves.
Necessary equipment
To install a PVC ceiling yourself, you will need the following set of materials.
- Panels. There are two types of them on the market - ceiling-mounted and wall-mounted. They can easily be confused, so check with the seller for what specific work the material is intended for. How to determine the required number of panels for work? Calculate the area of one element, divide the area of your ceiling by it and get the number of blocks. To this result we must add 10-15 percent, which is attributed to cuts in blocks and inevitable damage to part of the material. When decorating a bathroom, slatted and sheet panels are used. They vary in size; sheet forms are larger and suitable for very quick installation.
We calculate the consumption of materials
- of metal profiles : UD and CD. The first is used to create a frame around the perimeter of the wall, and the second is designed to directly attach the ceiling structure and has a smaller width, but is thicker and stronger. It is possible to use a wooden profile, but in a bathroom this is associated with the risk of liquid accumulation in the wood and the settlement of microorganisms in it. To prevent this outcome, the wooden structure must be treated with a moisture-proofing agent.
- Suspensions.
U-shaped hangers
- Screwdriver and drill.
- Dowels.
- Level.
- Self-tapping screws with press washer.
- Assembly knife and hacksaw.
Decorative profiles are used to give the ceiling a preferred edging; their varieties are presented in the table.
Table. Types of decorative profiles for suspended ceilings made of plastic panels.
| Types of profiles | Purpose |
| Starting | Hides the ends of the panels |
| External and internal corner profile | Hides corner joints |
| h-profile | Connects two standard profiles if their length is not enough |
| F-profile | Completely hides all ends |
Ceiling profile prices
ceiling profile
+ Existing large selection of colors and shades
+ Moisture resistance. Water does not have any harmful effects on such panels, so mold does not form on PVC panels.
+ Availability and speed of installation. All work on wall cladding can be easily done independently. Moreover, even without having relevant experience in this matter.
+ Bathroom communications are perfectly hidden under PVC panels
+ If necessary, you can additionally insulate the bathroom or apply sound insulation to its walls.
+ Easy to use
+ Relatively low cost
+ Replacing a damaged panel is done in a matter of minutes.
As for the range of plastic panels, now there is indeed a very large selection. But, on what basis should you choose PVC panels so that they are truly of high quality? When choosing panels, be sure to pay attention to the following:
1. The number of stiffeners in the panel. Those. The more such ribs there are, the stronger the material will be.
2. Stiffening ribs must not be deformed or damaged. If this occurs, it means that the panels were not stored correctly.
3. The front part of the panel should be evenly colored. The drawing should be clear and have no blurred edges.
4. The dimensions of the panel along the entire length and width must be the same
When purchasing a panel, it is strongly recommended to purchase panels that belong to the same batch.
Don't confuse ceiling panels with wall panels!
Building materials stores offer a very wide selection of PVC panels. They are of different lengths and widths, they come in varnish, glossy, matte, wood or marble. It's up to your taste; the main thing is not to confuse them with wall ones.
The modern market offers many varieties of ceiling panels. All that remains is to choose exactly what is suitable for your interior.
The difference is in weight.
Plastic wall panels are heavier and stiffer. Ceiling ones are much lighter, which simplifies the work. Their fragility necessitates careful handling: a dent can be left even by hand, not with a tool.
Required tools and materials
If the panels have already been purchased, then the next step is to select the appropriate tool that will be needed to install the panels. Tools for these purposes you will need:
- – drill or hammer drill;
- – a hacksaw or jigsaw;
- – screwdriver;
- – construction stapler;
- - tape measure and level.
In principle, finishing the walls in the bathroom with PVC panels is done in one of 2 known ways: on the lathing or on the wall with gluing the panels with liquid nails. Therefore, if the choice is made in favor of liquid nails, then you need to take care of purchasing them.
Now you need to calculate the required amount of materials. In principle, such a calculation is done quickly and simply.
To do this, you need to know the area of the bathroom. Knowing the dimensions of the panel, its length and width, you can easily find out the number of panels needed for repair. Those. if the panel width is 0.25 m, the length is 2.7 m, then the panel area will be 0.75 square meters.
m. To find out the number of panels, you should divide the area of the bathroom by the area of the panels. See the article: How to calculate the area of a room, floor, ceiling and walls, it will help you calculate the area of rooms of any geometric shape.
7) LATEST PLATE installation features
The size is determined by measuring from the wall to the edge of the decorative covering of the penultimate slab. Measured on the back side. It is installed by filling in the final profile and moving it into the lock of the previous PVC panel. This task can be made easier by lubricating the friction points in the decorative stripes and panel locks with liquid soap or shampoo. To move the panel, you will have to make your own hook in the shape of the letter Z. The operating principle is simple. We insert the decorative panel F parallel to the plane of the ceiling panel and, turning it slightly, move the finishing panel into the lock. The ceiling in the bathroom is installed.
Preparatory work
Do-it-yourself finishing of a bathroom with PVC panels begins with preparatory work. At the first stage of which, it is necessary to free the room as much as possible from unnecessary things. Next, you should remove the tiles, if any, in the bathroom and take them to the trash.
If the panels will be installed using liquid nails, the walls should be leveled as much as possible using cement mortar and putty. Although it will be much better if the walls are covered with moisture-resistant plasterboard.
In principle, if the unevenness of the walls is small, then there is no need to level them. After all, plastic panels are flexible and can smooth out uneven walls. However, before installing the panels, it is advisable to coat the walls with a special antifungal compound.
If the panels will be installed on the sheathing, then it must first be installed on the walls. If there is a sheathing, then leveling the walls will not be necessary, because the panels in this case are adjacent not to the wall, but to the sheathing.
Cost of dismantling wall panels
The cost of dismantling work is calculated based on the total area of the proposed work. It will not be difficult to calculate the final amount using our dismantling calculator. Dismantling plastic sandwich panels can be more labor-intensive. If such blocks are used to construct an internal wall, they are firmly fastened together using a metal frame, which is located between the two panels. The ceiling or transverse wall often rests on it.
Removing wall panels made of PVC, chipboard and MDF – 110
rub. for 1 sq. m. The price for dismantling plastic (sandwich) panels may increase depending on the complexity of their disassembly.
Our repair team has extensive experience in dismantling work and all the necessary professional tools that will be needed at the repair stage. We remove and dismantle wall panels at a time convenient for the client. Call us at number 8 ( 495
)722-56-41
or, all consultations and visit of a specialist for measurements and coordination of work
are FREE
.
Dismantling the ceiling
The most versatile coating for finishing the ceiling are plastic panels due to their simple installation method, hiding its unevenness, the position of communications under them, and also at an affordable price.
Sometimes plastic cladding requires repair or refurbishment
If you inadvertently caused damage to the plastic, you need to disassemble the structure and replace such a panel.
Dismantling a plastic ceiling can be called a simple, quick and easy process. You can dismantle it yourself in an hour and for this purpose no special tools or professional skills are required. Of course, you can invite a specialist and he will fix the problem for a certain fee.
But if you yourself decide to replace any damaged sheet of plastic, you need to stock up on some tools and protective equipment before disassembling the plastic ceiling:
- preferably a wrench;
- a wood chisel, preferably wide (you can even use a knife);
- screwdriver;
- screwdriver;
- gloves (to avoid cuts from sharp edges of the structure).
When everything is prepared, you need to carefully examine the suspended structure in order to have an idea of its structure to understand the principle of dismantling.
Stages of installation of PVC panels
After completing the preparatory work, if the installation of the panels will be carried out on the sheathing, the next stage will consist of selecting and installing the sheathing itself. Due to the fact that there is a lot of humidity in the bathroom, it is best to use a lath not made of wood, but plastic or made from a special metal profile. Although, as an option, wooden sheathing is also suitable, which it is advisable to pre-paint.
Installation of the sheathing should be carried out taking into account the following rules:
1. Adjacent slats should be 50 cm apart from each other.
2. The sheathing slats must be perpendicular to the location of the PVC panels.
3. If the walls are uneven, then the sheathing must be installed with constant level monitoring. If there are unevennesses, they can be compensated for using wooden or plastic pads.
4. All elements of the sheathing must be located at the beginning and end of the surface that is to be finished.
AN EXAMPLE OF A PADDED FRAME, A WINDOW IN A BATHROOM IS RARELY SEEN, BUT THE PRINCIPLE OF BYPASSING THE OPENING SHOWN IN THE IMAGE IS CLEAR.
After completing the installation of the sheathing, you can begin installing the PVC panels. It must be said that the installation of plastic panels in the bathroom is carried out taking into account the following algorithm:
1. From the angle from which the panels will be installed, the profile called the starting profile should be strengthened with screws or a stapler.
In the image you can see different types of profiles that are used when installing PVC panels in certain cases.
2.
The fastening shelf of the panel should be inserted into the lower corner of the profile. It must be remembered that the wide shelf must be directed towards the direction of movement during installation. After installing the panel, it must be secured to the sheathing either with screws or a stapler.
3. Installation of all subsequent panels is carried out in a similar way.
4. In the process of joining panels, it is necessary to ensure that the connection is tight and has no gaps, and that the surface joints are barely visible.
5. In places where there are doorways, windows, etc., panels must be installed using special starting corners. See the image above to see what they look like.
6. The final stage involves the installation of skirting boards, which are necessary to hide the compensation gaps of the panels.
7. If individual panels form joints, i.e. the coating is not seamless; these joints must be sealed with a sealant, such as silicone. But if the panels are of high quality and the sheathing is made smoothly, then this should not happen.
From all of the above, we can conclude that installing PVC panels yourself is not very difficult. With their help, finishing a bathroom with PVC panels is quick. And you won’t need to spend a lot of effort and money.
To learn more about the rules for installing plastic panels, read our special article - How to attach plastic panels to a ceiling or wall correctly and without errors, in which all processes are discussed in as much detail as possible. In addition, watch the video below, which shows in great detail the process of installing plastic panels in the bathroom.
Installation of plastic ceiling surfaces in the bathroom
Before you start working on the ceilings in your own bathroom, you need to prepare a rough surface. It’s good when you already have a plan for placing lamps and exhaust ventilation at hand, and have a sketch or sketches of the future design. Making changes during installation is quite a problematic task. You must clearly know how many panels you need to use and in what order the structure will be installed.
The panel ceiling in the bathroom must be done, knowing exactly all the measurements and parameters. It will be very useful to come to the store with a ready-made working sketch and a tape measure to choose the optimal sizes of plastic panels. Trimmings during the installation process are inevitable, but you don’t really need extra material. The shortage of panels at the final stage of work will also be unpleasant.
Note: the length and number of aluminum profiles used to equip the frame of the future ceiling are measured in the same way.
Tools for work you will need:
- drill or hammer drill;
- crown for mounting lamps;
- building level;
- screwdriver or screwdriver;
- hacksaw for drywall or plastic;
- mounting knife;
- liquid Nails.
Almost all of the tools listed are freely available and are often available in your own household.
Features of plastic bathroom ceilings
For those who have an idea about finishing work and are familiar with the construction of suspended ceiling structures, there should not be any particular difficulties. The main thing is to follow the technology and sequence of actions. Today it is possible and realistic to make a plastic ceiling in the bathroom on your own and with your own hands.
The main condition on which the effectiveness of the work depends is the correct location of the frame guides and the accurately calculated number of profiles for the future frame. A plasterboard suspended ceiling requires the creation of a strong and massive frame with a large number of profiles, but with plastic panels a lightweight option is suitable.
The beginning of installation comes down to determining the required distance from the rough surface. As a rule, for prefabricated structures this distance does not exceed 7-10 cm. We focus on the tile seam closest to the ceiling surface and set aside the required distance.
We make marks for the future lower edge of the new ceiling in increments of 40-50 cm along the entire perimeter of the bathroom.
Making a frame
After marking work, the direct installation of the guides begins. Aluminum profiles are placed based on your marks and attached to the panels using self-tapping screws.
From a practical point of view, installation of the frame is simplified due to the lightness of the future ceiling structure. To achieve the required strength of the frame, this method of attaching profiles is quite suitable.
Once the guide profiles are installed around the perimeter of the bathroom, you can begin laying the stiffeners
This frame element is an important component that ultimately ensures the strength and stability of the entire stacked structure. Stiffening ribs or load-bearing profiles are attached to the rough surface with U-shaped brackets
It should be said that the need to install stiffeners arises when installation is carried out in large rooms. For small apartments, where the average bathroom measures 1.5 x 2.5 meters, there is no such need. Plastic panels have sufficient rigidity to independently withstand the created load.
Laying plastic panels
After installing the frame, we begin work on laying the panels. It all starts from the starting profile. By observing the sequence of installation, you can achieve precise fit of the cut pieces of plastic to each other. The starting profile is attached to a regular profile using ties.
It’s up to you to decide which plastic panels will be better for your bathroom ceiling, wide or narrow. Starting from the starting profile, the entire ceiling is gradually laid, panel by panel. Each piece fits into the existing groove of the previous piece. At the end of the work, when laying the last piece of plastic, a starting profile is not required.
The set is carried out up to the very last guide. Try to make sure that the last panel, which will probably be cut along its entire length, is located against the far wall.
What does PVC give?
The use of plastic sheets began relatively recently, but they have already gained wide popularity in the construction market due to their good price-quality ratio.
They are used for finishing both residential premises and offices. Ease of installation and attractive appearance allow you to quickly, efficiently and relatively inexpensively decorate any room. In apartments, the material is ideal for decorating the ceiling of the kitchen, and especially the bathroom.
Advantages of PVC panels:
- Remarkable moisture resistance, which allows their use in rooms with high air humidity (bathrooms, showers);
- Resistance at elevated temperatures, resistance to temperature changes;
- Ease and speed of installation (installation of PVC panels is possible even for beginners in the construction business);
- Light weight, allowing you to easily transport PVC panels and install them in the canvas;
- The use of PVC ceiling panels for the bathroom will allow you to cover uneven ceilings, disguise pipes, ventilation ducts, and hide electrical wiring;
- Installing a ceiling in a bathroom from PVC panels will increase sound insulation and reliably protect the ceiling from moisture accumulation and fungus formation.
Important! The ceiling in the bathroom made of plastic cladding has another advantage. It is not only easy to install, but also, if necessary, can be easily disassembled, gaining access to communications that require urgent repairs.
Once the necessary work is completed, you can install the plastic sheets back and your bathroom decor will be safely restored.
Pros and cons of plastic ceilings
Plastic is a fairly durable and moisture-resistant material. These two parameters determine all its main advantages. A bathroom is a room in which the air humidity level is periodically increased. Therefore, the main requirement for finishing material is resistance to moisture. Plastic responds to this in full.
Finishing the ceiling in the bathroom
In the bathroom, strong impacts on the ceiling are unlikely, so there is no need to install high-strength cladding elements. Plastic will successfully cope with mechanical impacts at the household level, expressed in accidental blows with a hand or any object.
Another advantage of such a ceiling is its simplicity and ease of maintenance. The glossy surface of the plastic, when exposed to steam, fogs up and becomes moistened, so small particles of perfume or cosmetics, cleaning products, dust and dirt that rise up can settle on it. In order to get rid of stains, just wipe the plastic ceiling with a dry or damp cloth.
Example of a plastic ceiling in a bathroom
These designs are also good because they can be quickly and easily installed. The light weight of the plastic makes it easy to work with; its flexibility for processing does not require powerful and expensive tools.
Material characteristics
PVC ceiling panels are divided into matte and glossy. Glossy sheets reflect light well, so they are better suited for ceilings. Although the matte options also look quite good.
Panels are also divided into seam and seamless. In the seam cladding, special locks are made to join the fabric, and the seams between adjacent panels are visible in the finished fabric. In the seamless version, they form a single fabric due to a very tight fit to each other.
According to the method of applying the pattern, plastic panels are divided into:
- Printed, the design is applied to the surface of the panels using a special roller, which is rolled over the surface;
- Film, a special thermal film is used to transfer the design, the design is transferred from it to the cladding surface under the influence of high temperature. Such options are more resistant to abrasion and the use of detergents.
In the assortment of construction supermarkets you will find many color options and designs to suit every taste.
Panels are available in both plain colors and with various patterns. This can be an imitation of marble or wood, geometric or floral patterns, even entire paintings. When choosing the color scheme of PVC panels for the ceiling in the bathroom, give preference to light colors.
The classic option is, of course, a white ceiling; it is ideal for any wall design, but using your imagination, you can choose an interesting color scheme for the ceiling made of PVC panels in the bathroom, as in the photo.
When purchasing plastic sheets for the ceiling, pay special attention to their quality, since any defect or flaw in the material will be especially noticeable on the ceiling. Also check that the characteristics specified in the accompanying documents correspond to the actual product being purchased.
Ceiling panels differ from wall panels in a smaller thickness; accordingly, their rigidity and strength are lower; this should be kept in mind when you buy, deliver them home and install them. They can be easily damaged if handled carelessly.
What to make a plastic ceiling in the bathroom from
There are several options for installing a plastic ceiling in the bathroom. The following materials can be used for this purpose:
- PVC panels;
- plastic lining;
- plastic slats.
Ceiling finishing materials
In order to choose the most suitable material for a particular case, it is recommended to familiarize yourself with the features, pros and cons of each.
| Features of the material | PVC panels | Plastic lining | Plastic slats |
| Color palette | All shades of primary colors, a wide range of designs | Mainly imitation of natural wood and solid colors | Plain |
| Surface type | Flat, matte, glossy | Flat and embossed, matte and glossy | Flat, glossy |
| Panel connection type | Tenon and groove | Tenon and groove | Gap and gapless connection |
All these materials require a frame, but each case has its own nuances of its installation and assembly. Step-by-step instructions for their installation will help you understand the features of plastic ceilings.
plastic lining for bathroom
Preparing for work
In addition to panels, you should stock up on PVC profiles. They are made from the same material as the sheets and are designed to make aesthetically pleasing and beautiful transitions in the corners of walls and ceilings.
Please note: to finish the ceilings you need to purchase special ceiling panels. They weigh significantly less than wall panels due to their smaller thickness. The thickness of the sheet is 3mm, while the thickness of the plastic for walls can reach 10mm.
Due to their lightness, ceiling panels provide less load on the fastening. But the disadvantages include the greater fragility of ceiling sheets; they can be easily broken during installation if carelessness is allowed in the work.
Before you begin installing a ceiling made of PVC sheets, think about what kind of lamps you plan to hang in the bathroom, what their power will be, and how to position them so as not to overheat the plastic cladding. In the case of installing built-in lamps, it is necessary to retreat at least 10 cm from the rough ceiling, or better yet with a margin, marking the level of the new ceiling.
You first need to calculate the required amount of materials.
To calculate the number of PVC panels, you need to determine the area of the ceiling (multiply the lengths of two adjacent sides), then divide it by the panel area indicated on the package, add 20% for the margin and round up to the whole panel.
If the length or width of the ceiling is less than the length of the PVC sheets, you can visually calculate how many pieces are needed.
To make a metal frame, we will need two types of profiles: UD profile 2.5x2.5 and CD profile 2.5x6cm.
To calculate the required number of metal profiles, we need a ceiling diagram.
We lay straight lines on it parallel to one of the walls, taking into account that the distance between the profiles should be approximately 40-50cm. By multiplying the length of the wall by the number of straight lines drawn, you get the required amount of profile 2.5x6cm. To determine the amount of 2.5x6cm rigid profile, calculate the perimeter of your bathroom ceiling.
In addition, you will need self-tapping screws for attaching PVC ceiling panels in the bathroom and dowels for attaching metal profiles (with a margin).
It is better not to use wooden beams and brackets for mounting the ceiling frame in a bathroom made of PVC panels, as this will affect the reliability and durability of the structure.
Ceiling plinth (usually 3 meters long) - divide the perimeter of the ceiling by 3 and round up to get the required number of plinths.
Calculation of PVC ceiling
The first stage of work involves calculating the number of panels required for installing the ceiling and determining their length. It is also important to determine the most convenient location of the panels.
For example, for a room measuring 1.5 by 1.7 m, you can take three-meter panels, cut them in half and install them crosswise.
Thanks to this solution, installation is more economical, since a minimum of waste remains. When buying material, you need to adhere to the rule: the panels must have a length equal to the length of one of the sides of the room, or exceed it. This is important to consider, since it is impossible to seamlessly connect the panels without creating seams.
You can calculate that based on dimensions of 1.5 by 1.7 m, 4 panels 3 meters long and 25 cm wide will be required. The calculation in this case is simple: the length of 1.7 m is divided by the width of the panels 0.25 m, then divided by 2.
The result is the number 3.4. Thus, if you round up, the number of panels for a ceiling of this size is 4 pieces. The same calculation should be used for any ceiling area.
Installation of panels in the bathroom
Necessary tools: hammer drill (can be a drill), metal scissors, screwdriver, hangers, knife, hacksaw, level, liquid nails (or glue), miter box, rag.
We carry out work in the bathroom in the following order:
- Using a level, along the perimeter of the walls we mark with a pencil or marker the places where the rigid profiles are attached. They need to be attached to the walls strictly horizontally; this will determine whether your ceiling will be level. The horizontal line on the wall will be the level of the new ceiling;
- Along the line along the walls, we fix a rigid profile of 2.5x2.5 cm with screws;
- Then we attach a 2.5x6 cm profile to the ceiling and wall profile using self-tapping screws, the distance between the profiles should be 40-50 cm;
- We attach plastic skirting boards to the wall, the joints must be trimmed so that they fit well together in the corners of the room so that there are no gaps;
- PVC plastic sheets need to be cut to fit the ceiling. It is better not to cut all the panels at once, but to cut each one separately as they are installed;
- We insert the first PVC sheet into the recess in the baseboard, screw it to the ceiling profile with self-tapping screws and a press washer;
- Then we cut the next sheet to the required size, insert it into the recess on the fixed panel, and screw it to the profile. This is how all PVC panels are installed, except the last one;
- The last PVC panel will need to be cut not only in length, but also in width. Then we insert it into the recess on the plastic baseboard and move it towards the previous panel so that there is no gap. We do not screw the last panel.
To thoroughly understand all the nuances of the work, before starting your own repair, look at the options for installing a ceiling in a bathroom from PVC panels in the videos posted on repair websites.
How to make a bathroom ceiling from plastic slats
False ceiling in the bathroom
Slat ceiling
Installing a slatted ceiling is a quick and effective way to decorate a bathroom. Most manufacturers of this finishing material offer ready-made kits for standard-sized rooms. For example, 1.7x1.7 m and 1.35x0.9 m. If the bathroom has other dimensions, they will need to be reported to the salesperson, who will select the optimal configuration for the slatted ceiling.
But the first thing you need to do is decide on the appearance of the finish. The fact is that manufacturers offer two types of slatted ceilings: closed (slotless) and open (slotted) type. Thanks to the “telling” names of these ceiling installation options, it is easy to understand that in the first case the canvas will be solid, in the second - with gaps between the panels.
One more nuance: you need to choose the design of the panels. The most popular are French and German. They differ in the profile of the panels. In French it is round, in German it is strictly rectangular. Therefore, when choosing a French design and a closed installation method, small depressions will be noticeable on the ceiling. Due to the play of light and shadow, they will give it a special appeal. If you need a strict and laconic design, you need to choose German.
The frame of the slatted ceiling is mounted not from wooden blocks and metal profiles, but using the following components:
- U-shaped profile (for wall guides);
- stringers (for longitudinal and transverse strips).
Frame installation
Installation of a slatted ceiling is carried out by alternately going through all the stages listed in the instructions for installing a plastic ceiling made of PVC panels. The slats are assembled not in the same way as in the case of PVC panels and lining (by the tongue-and-groove method of fixation), but by snapping them into special recesses in the frame strips (stringers). The panels are joined along the length using an H-shaped profile.
Installation of slatted ceiling
Do-it-yourself installation of slatted panels
Installation of slatted ceiling
Assembling a slatted suspended ceiling
A slatted ceiling, like any other plastic ceiling, will last at least 10 years. It is suitable for installing recessed lamps, is easy to clean, and has a glossy surface. Study marble baths at the link.
Slatted ceiling - photo
Installation of a frame for PVC panels on the ceiling
Metal frame for PVC panels in the bathroom
- The frame for PVC panels can be either wooden or metal - both types perform the same function, and in exactly the same way. We will consider the installation of a metal frame, as it is more complex in execution due to the installation of an additional profile around the perimeter.
- First of all, you need to set the height level of the ceiling frame. Often this is done even without a level, just along the upper edge of the installed tiles, but if you need to lower the ceiling a little lower, then this level around the perimeter is set using a tape measure, a pencil or marker and a building code.
- The distance you need is measured from the tile seam and a mark is placed. Along the length of the rule, another measurement is made on the wall and a mark is placed. The marks are connected by a line.
- Perhaps the walls in your bathroom are lined with ceramic tiles installed diagonally - in this case, use a water level and place marks on the wall at the required distance from the main ceiling. You can draw a line between the marks using a building rule or a long level, or you can mark this line with paint thread or a chokeline.
- On the main ceiling, using paint thread, beat off lines 40-50 cm apart from each other across the intended direction of the PVC panels.
U-shaped hangers
- Now, along the lines made on the main ceiling, you need to screw in U-shaped hangers or pawns, as they are commonly called among builders. The hangers are attached at a distance of 50-60 cm from each other.
Advice. To attach hangers to a concrete floor, you need to use a dowel with a cap on the sleeve, since the concrete slab has voids inside, and a dowel without a cap will fall inside the ceiling. This cap is found on impact dowels and on some dummy dowels.
CD profile nested in UD profile
- Now you need to screw the UD profile around the perimeter of the bathroom. It can be installed either along the marked line or along the top edge of the ceramic tile. If there are no mounting holes on the profile, then they need to be made 40-50cm apart. You can drill holes in the profile simultaneously with the hole in the wall by attaching the profile to the installation site.
Advice. If the profile will be installed on ceramic tiles, then holes in it can be drilled with a hammer drill only if the screed and glue under the tile have dried well, since the tile may crack. Start drilling with a hammer drill or a non-impact drill to penetrate the thickness of the tile, and then switch to hammer drill mode.
CD Profile Installation
- The fastening of PVC panels to the ceiling in the bathroom will be on CD profiles, which are used for installing drywall, so we measure such a profile to the required length and insert it into the UD under the screwed hangers.
- CD profiles will sag, and therefore this plane needs to be leveled. Considering that the bathroom is usually small, leveling the plane can be carried out according to the construction rule, applying it under UD profiles screwed to the wall.
The profile is fixed with a self-tapping screw to the U-shaped suspension
- Screw the profile aligned on the plane to the U-shaped hangers using special self-tapping screws for a plasterboard profile. Also secure the junction of the CD and UD profiles with the same screws. Bend the hanging ears of the dewlaps to the sides.
Execution of work
Step 1. Draw a work plan. It is not necessary to strictly comply with all the rules of technical design of drawings, but it is important to accurately record all dimensions and intervals.
Installation diagram of PVC panels on the ceiling
Reference! There is an option for decorating a PVC ceiling that does not require the creation of an iron frame. In this case, the fastening of the plastic blocks will go directly to the rough ceiling. The clear advantage of this method is maintaining the same height of the room.
Fastening plastic panels to the ceiling with “liquid nails”
But such work is only possible if the rough ceiling is in very good condition, if it is perfectly smooth and free of roughness and fungal damage. Here the fastening will be carried out using construction adhesive for plastic or liquid nails.
Step 2. Next, preparatory activities are carried out. If lime is falling off from the rough ceiling, then such areas need to be removed. All loose wires must be wrapped in corrugated plastic pipes, leaving them free exit only in those places where they will go into lighting fixtures. The old ceiling is treated with an antifungal solution.
Preparing the ceiling surface
Step 3. Then draw a horizontal line along the perimeter of all walls. It will indicate the mounting height of the panels. The line must be at a certain distance from the ceiling, which depends on the planned use of the resulting empty space. If nothing will be placed there, then a five-centimeter indentation is enough. If you plan to place ventilation or massive lighting fixtures, then the distance can increase to two to three tens of centimeters.
Step 4. The line is drawn using a level. If the bathroom is already tiled, then you can use its outer seams as a ruler.
Frame installation
Step 1. Before starting work, the tiles are covered with polyethylene or cardboard.
Expert advice
Step 2. The first to install is the starting profile, that is, the UD forms. You need to attach it to the wall so that the lower border coincides with the drawn lines. Cut into pieces the length of the entire wall.
You can use metal scissors to cut the profile
When the profile is attached to the wall, holes are drilled in it every fifty centimeters to insert dowels there; the depth of the hole is equal to the length of the dowel with a margin of 10-20 mm. There are dowels that can be driven in and those that can be screwed in with a screwdriver; the first type is more convenient to use. Before drilling into a wall, you must check it for wiring using a detector device.
Installation of a frame for plastic panels
Suspension mount
Step 3 . Then the CD profile is laid out. It is inserted perpendicular to the UD into its grooves. There are two ways to lay these elements: along a long wall or across it. They have different aesthetic effects: if when laid lengthwise the room seems more spacious, then when laid across it looks more compact. The longitudinal design has one drawback: since the profile sags between two grooves at a fairly large distance, it requires additional fastening to the ceiling in the form of suspended structures.
CD profile nested in UD profile
The hangers are fixed before installing the CD forms. To correctly calculate their future location, when installing the UD, make marks on them that will help you determine both the location of the suspensions and the location of the CD mounting.
Step 4. If a chandelier will be used for lighting, then you need to run one strip across all the others in the place where it will hang.
Chandelier prices
chandelier
Mounting a chandelier on a suspended ceiling
Installation of panels
A plinth is installed along the perimeter of the wall directly under the base profile; liquid nails or glue are used for fastening. The plinth is made of the same material as the panels themselves, differing from them only in their shape. Some types of skirting boards are fixed without the help of special means, being mechanically attached to the UD panel. This includes F-shaped skirting boards.
Installation of plastic panels on the ceiling
On a note! When installing a plastic ceiling, you will probably be puzzled by the problem of creating the correct angles. It is not necessary to do them for a wall panel, since this element is not striking anyway. But for skirting boards that are in plain sight and represent the edging of the ceiling, the design of the corners is necessary.
Working with a miter box
The most labor-intensive way is to cut them out using a miter box from standard products. But a miter box is not always at hand, and not everyone knows how to work with it. In this case, you can purchase special corner attachments that can easily be attached to the junction of two baseboards.
Corners for ceiling plinths
The panels are cut according to the dimensions of the wall. For convenience, you can make them a little shorter than necessary, but with a difference of no more than 5 mm. A profile strip is taken, one end of it is threaded into the groove between the UD form and the baseboard and fastened there. The other end of the strip is attached to the opposite groove; so that you can thread it there, you need to bend the strip slightly, but be careful, because at this moment it is easy to break. Each strip has fastening locks. The first inserted panel is secured to the baseboard using a screw. Subsequent panels are connected to each other using press washers. The latter has a half width, for which a standard panel is sawn into two parts. This panel is attached to the groove of the profile and baseboard without using bolts and washers.
Prices for ceiling plinths
ceiling plinth
Cut the last panel with a simple knife
Please note that the plastic panels are laid perpendicular to the direction of the CD forms. In other words, if the CDs were stacked along the long side of the room, then the plastic panel should go across it.
Reference! In addition to parallel and perpendicular, there is also a diagonal direction for fastening the frame. It requires more precise calculations for its implementation, but a rough guideline for planning is the parallel direction rather than the perpendicular one.
Example of diagonal arrangement of panels
Lighting
Space for lamps is allocated in advance. The functionality and safety of all wiring is checked. When laying plastic blocks, do not forget to move the ends of the wires away from the filled areas so that they do not become “walled up” between the ceilings. You should not spare the wires; even if they are carried out with a spare length, the risk of not reaching the planned location can jeopardize the entire arrangement plan.
Holes shaped like your lighting fixture are drilled into the required panels. The easiest way to make round holes is to simply put a special attachment on the hammer drill. The lamp is installed after the panels are installed.
Lamps for plastic ceilings
At this point, the process of installing a plastic ceiling can be considered complete. And this is another advantage of this material - it does not require any additional cladding. After completing the main work, such a ceiling is a full-fledged element of the home interior, and with its help the bathroom can change beyond recognition.
Suspended ceiling in the bathroom: step-by-step instructions
A detailed guide to installing a suspended ceiling in a bathroom can be found here. We also recommend reading about how to attach PVC panels to the ceiling.
Installation of PVC panels on the ceiling
Installation of PVC panels in the bathroom
- Perhaps you will install an L-shaped profile for PVC panels around the perimeter of the bathroom, or perhaps you will close the gap between the wall and the ceiling with a foam molding.
- If you installed an L-shaped profile around the perimeter, then before installing the first lining, cut off the connecting chamfer from it so that it fits more tightly into the groove of the profile. A tight connection does not allow dirt to accumulate in the gap and, thus, the ceiling will be easier to maintain.
- To install the last panel, cut it to width, taking as a basis the distance from the near edge of the penultimate panel to the L-shaped profile, taking into account its depth, and subtract 5mm from this. Start inserting the last panel from the chamfer side, and then tuck it into the L profile with a spatula or your finger.
- If the L profile was not installed around the perimeter of the bathroom, then insert the last panel and screw it along the edges with self-tapping screws and a press washer. PVC panels also need to be screwed to the frame with the same screws.
- In the case of installing a wooden frame, instead of screws to fasten the lining, use staples 10 mm long and hammer them in with a stapler. There is an opinion that in a humid microclimate the staples come out of the wooden slats, but this is just an assumption and practice shows the opposite.
For more complete information, we suggest watching the video:
Lighting installation
It is better to make holes for built-in lamps during the installation of the ceiling, using a drill with a crown attachment. Or use a regular drill and trim the hole to the required size with a knife. In this case, the panel may already be fixed to the ceiling or not yet, as is more convenient for you. At this stage, the wires for the lamps are released through the hole, and it is more convenient to install them after the installation of the ceiling is completed.
We install lamps
The last panel usually requires cutting along its entire length. The width should be 1-2 mm less than the distance to the wall. First, the cut element is inserted all the way into the starting profile, and then it is moved towards the previous panel and the joining groove is aligned. If there are small gaps left in the starting profile, they are covered with sealant.