How to make an arch with your own hands? This question worries many who dare to design the interior opening on their own.
A door arch made with your own hands will make you proud of yourself, thereby allowing you to add something original and unique to the interior of your room or bedroom. Despite the fact that many beginners are tormented by vague doubts, in fact there is nothing terrible in this work, the main thing is desire. If you have it, our detailed work plan will help you!
What is an arch and its varieties
An arch is an ancient architectural element that is increasingly used as an internal decorative element of an entrance or interior door, or rather a doorway. An arch is a universal opening in a wall that can give “volume” to a small room, and at the same time, zone a small apartment.
Door frame
Taking into account the wishes of the homeowners, thanks to arches, designers can turn different ideas into reality, giving the doorway a different look. Today, modern materials make it possible to give arches different geometric shapes, as well as to form intricate vaults. Most often for the manufacture of arches and their cladding they use:
- Brick.
- Wooden beam.
- Plywood.
- Tiles.
- MDF.
- PVC.
- GKL, etc.
The structure of the arch is a support for partitions and walls. But, since the doorways in high-rise buildings are not load-bearing, the only requirement that is put forward to them is to withstand their own weight (with finishing finishing material). If the wall is load-bearing, the material must be selected according to external loads.
Any version of the arch, which is mounted instead of a door, performs a purely decorative function. The frame of the structure can even be made from a lightweight profile for fiberboard or chipboard; you can also use wooden beams. The only important point is to securely fix the partition so that the decor does not fall off or become deformed after a few days.
The most common examples of interior arches
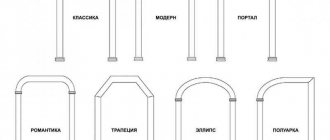
As we noted, the design of a house can be beautifully complemented with an arch, because there is a huge variety of its forms. They can be made in a classic or romantic style. Art Nouveau is also often used. No less popular are the ellipsoidal shape, trapezoid, “portal” and many others.
The first example is made as a regular semi-arch, in the shape of a semicircle. In the last photo you can see a square interior opening called a “portal”. This design method is carried out with strict adherence to rectangular outlines. All other samples are intermediate variations between the two basic forms.
But these are not all options. You can also experiment with side supports, use curved posts, etc. The form can be finished and decorated in different styles, the main thing is that the passage fits harmoniously into the home interior. In some apartments, classics and a round, correctly bent vault look great, in others - portals, it all depends on the taste preferences of the owners. Pay attention to the advice of experienced finishers:
- Classic arches are best done in apartments with high ceilings, at least 3 m.
- In panel-type high-rise buildings, it is better to frame the doorway in the Art Nouveau style.
- It is preferable to decorate wide doorways from the corridor to the hall in a romantic style, for which wide counters are selected.
- The finishing of the “portal” opening goes well with the interior of the room, which uses clear lines. “Portal” is ideal for houses made of lining, logs or timber. This combination is very elegant and harmonious.
Construction of the arch vault
When starting to build an interior arch with your own hands, special attention should be paid to the vault. Firstly, this is the most difficult part of the arch to manufacture, and secondly, its shape affects the entire structure.
In addition to the above-mentioned arch-portal, there are several more types:
- Classical or Romanesque arch (arch in the form of a semicircle); Art Nouveau arch (half a circle, dissected by a chord. It is similar to the classical one, but with a flatter arch); Pointed arches (the arch is made up of two circles that are leaned against each other ;); “Romantic” arch (similar arches are made in very wide openings. The vault is in the form of two arcs connected by a straight gap); Prism (the vault is made without any roundness, consists of straight lines, between which there are obtuse angles).
The sides of the vaults are also made of plasterboard. We cut out a recess of the required shape from the bottom of the sheets.
Since a prismatic interior arch consists exclusively of straight lines, it is easiest to make it yourself. To make a rounded vault, you will have to cover it in the lower part with bent sheets of plasterboard.
If you want to build an interior arch with your own hands, but have doubts about your own abilities, then you can use standard ones or make them to order. Arches can be chosen in various designs, textures and materials.
Wooden arches will look expensive and presentable, but they won’t be cheap either. In addition, the material is heavy in every sense. For DIY work, fiberboard or MDF is better suited.
Assembling the arch must begin from the top.
First we use the wooden dowels supplied in the kit.
We assemble a vault from two pairs of panels. We connect with PVA wood glue. After gluing, we wait for it to dry, and then the vault cornices from below.
Then we file down the flexible plate of the inner part of the arch - with a margin of at least 10 millimeters.
We assemble the vault from the two halves, the halves are glued to the inner panel.
We install the arch in place and fix it with self-tapping screws or liquid nails. It is necessary to finish the side panels according to the dimensions of the openings with a small margin in length and width.
We also file the trims, from the floor to the eaves, so that the cut is inside the arch. Then we install platbands into the cornice of the vault using dowels. To do this, coat the groove of the platband with glue and insert the side panel into it so that the top edge is immersed in the groove.
We do the same with the second half of the arch.
- Parket-sale.ru - A huge range of laminate, parquet, linoleum, carpet and related materials! Akson.ru is an online hypermarket of construction and finishing materials! homex.ru - HomeX.ru offers a large selection of high-quality finishing materials, lighting and plumbing fixtures from the best manufacturers with fast delivery throughout Moscow and Russia. Instrumtorg.ru is an online store for construction, automotive, fastening, cutting and other tools needed by every craftsman. Qpstol.ru - “Kupistol” strives to provide the best service to its customers. 5 stars on YandexMarket. Lifemebel.ru - a furniture hypermarket with a turnover of more than 50,000,000 per month! Ezakaz.ru - The furniture presented on the site is manufactured at our own factory in Moscow, as well as by trusted manufacturers from China, Indonesia, Malaysia and Taiwan.” Mebelion.ru is the largest online store selling furniture, lamps, interior decor and other goods for a beautiful and cozy home.
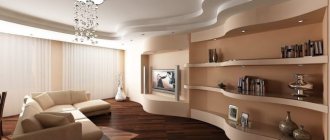
The interior with an arch looks very stylish and original
It is not necessary to contact designers to decorate a decorative arch in an apartment; anyone can decorate this element of the interior with their own hands.
The shape of an arched opening is practically not limited by anything except imagination, but quite often apartment owners, when renovating, limit themselves only to painting the plasterboard elements of the arch. Such designs look rather boring, creating a feeling of incompleteness. If the main style of the room is not minimalism, then the arch can be turned into a unique decorative element that emphasizes the integrity of the interior.
What materials can be used to form arches?
Arched plasterboard
To make an arched vault, you need to stock up on the following material:
- Sheets of drywall.
- Plywood.
- Fiberboard.
It is worth noting that it is best to sheathe the frame with sheets of plasterboard, because in the future it can be decorated with various decorative materials. But, if you need to create a more sophisticated shape, choose plywood sheets as they bend better. The preparation of the arched frame is formed from:
- Metal profile.
- Wood beams.
But, to build an arch, you can also take concrete, aerated concrete and brick, which are decorated with finishing materials. Despite the fact that such structures are solid, it is prohibited to erect them in high-rise buildings due to their heavy weight. It is also prohibited to make door frames from metal, which, moreover, will cost a pretty penny. And how to make an arch in an apartment with your own hands from metal? After all, this is a very labor-intensive process that requires the use of specialized devices. That is why plasterboard is the most acceptable material for finishing apartments.
How to make an interior arch. Step-by-step instructions (video)
Types of arches
Before you make a beautiful arch, you need to figure out what variations of arches exist.
We will consider only three of the most popular options, so as not to clutter your head with unnecessary, completely unnecessary information.
How to make an arch from wood?
A do-it-yourself wooden arch, or rather a wooden frame, is formed without much effort. But, in addition to wood blocks, you will also need sheets of plywood. The first thing to do is measure the width of the passage, subtract the thickness of the materials, after which we will get the optimal thickness of the wooden beams. Then an arc is drawn on the plywood, which is cut out with a jigsaw.
Subsequent installation is carried out with self-tapping screws (5cm), which secure the beams to the plywood. The arch in the doorway is also fixed with self-tapping screws, which are screwed in at a distance of 15 cm. The final stage is fixing the 2nd wall of plywood and its subsequent covering with sheets of plasterboard. Please note that you need to fix the drywall sheets with special self-tapping screws for working on drywall.
Types of arches
Arches can be classified according to several criteria: by the material from which they are made, by shape, style and method of finishing. Among the materials, plasterboard occupies a leading place - it is easy to work with, it is inexpensive, and can be molded into various shapes.
But the classic option for making arches is a wooden arch.
In appearance it looks like a carved door frame. There are also arches made of brick - if the arched opening is erected directly from brick during construction, then after completion of the work it is enough to varnish the material. But there is another way, when finishing bricks are used to clad the structure.
According to style, arches are divided into the following types:
- a “portal” arch with a regular rectangular shape; a classic arch with a regular arc in the upper part of the opening; a “romantic” arch in the form of a rectangle with rounded edges; an “Art Nouveau” arch with characteristic sharp corners; an “ellipse” arch, similar to oval.
The correctly chosen shape and finishing method will help emphasize the style of the entire interior and become a real decoration of the room.
Installing a plywood arch
How to make an arch with your own hands from wood without using natural material? Today this is not difficult, because wood can be replaced with plywood. In order to correctly calculate the amount of materials needed, including fittings, the first thing experienced finishers do is create a sketch.
Interior plywood arch
To work with plywood, you will need the following handy tool:
- Jigsaw (or hacksaw).
- Drill.
- Screwdriver.
- Sandpaper.
- Finishing equipment.
Since plywood is a rather unique material that allows you to create original and unusual shapes, you need to work with it following the step-by-step instructions:
- Measure the doorway and note what size the arch will be.
- Then you need to cut the strip and carefully process it.
- The resulting strip is slightly moistened and left for some time.
- After these manipulations, the plywood will be pliable and will easily take the desired shape.
- The prepared strip is bent in the required way and immediately inserted into the required doorway, carefully fixed and spacers installed in the corners.
Fastening a plywood sheet to a doorway
Forming an arch from plywood. After the canvas is installed, you need to wait a little until the sheet dries completely and takes its final form. At the next stage, you can act in two scenarios:
- Form inserts from wooden blocks and cover the surface with plasterboard.
- Use polyurethane foam to fill the voids.
Installation work
Before installing the arch, the structure of the chosen shape must be marked on a sheet of drywall. Next, you should cut out the shape strictly along the marked lines. An important nuance is to make an arch from two identical parts of the gypsum board. You need to first cut out the first half, and then in a mirror image, attaching the cut out first part, make the second half.
When both pieces are ready, you can mount them on the frame. And in order for the result to be pleasing to the eye, you need to construct the frame correctly. Step-by-step instructions for installing a frame for an arch:
- Fasten the profiles at the top of the opening. If the wall is made of brick, use dowels to secure it. Attach the profile to the walls. The frame should be mounted correctly at two points.
- Next, the profile needs to be given an arched appearance. You can bend the profile into an arc by first making cuts on the metal with scissors in increments of 5 to 10 cm. Using such cuts, the profile can be easily given the desired bend. You can bend the profile using a previously cut sheet of drywall, attaching the metal part to the semicircular shape. Dowels are used to secure the frame. In order to install the arch, you only need 2 curved arches.
- To increase strength, it is important to use bars or pieces of profile. They need to fill the space between the arcs.
- At this stage, the frame structure is ready, but the arch itself is not yet. When installing the lower part of the arch, the gypsum board needs to be bent. Or use the typesetting method of fastening. To prevent cracks from appearing, the material can be slightly moistened with water. This is why you need a needle roller. After getting wet, the material must be left in this state for several hours so that it softens.
- To temporarily fix the sheets, you can use tape. And after the arch is attached to the wall, you can make the final fastenings using self-tapping screws.
- After this you need 12 hours to pass.
- Then you can register.
Using this method, you can quite simply make an interior arch with your own hands. At the same time, if you follow the step-by-step instructions step by step, the work can be completed quite quickly. The voids can be effectively filled with polyurethane foam or left as is without filling the empty space. Pour the foam inside according to the instructions. After this comes the stage of facing work.
Installation of a plasterboard arch
Working with plasterboard, as with plywood, is very similar and does not cause difficulties, but is cheap. If you have the opportunity to build walls and form an arch at the same time, this way you can complete the work as quickly as possible. Before forming an arch, you need to prepare the surface step by step, namely:
- Remove the old door panel, decorative trims, trims and other fittings.
- Repair all damage to the walls to avoid troubles in the future.
- Get some tools.
- Draw up a detailed work plan and sketch.
You can install a plasterboard arch in different ways; below we will describe each method in more detail. The first option is the most popular:
- Take 2 sheets of drywall, one of which is cut in half.
- A U-shaped frame is formed in the doors using a metal profile.
How to form a frame from a profile
- One segment is fixed to the frame, having previously been marked into 2 equal parts and marking the center.
- A hole is drilled in the rail from the edge and in the center. The distance between them should be equal to the middle of the arc of the formed arch. To do this, determine what distance will be maintained between the edges of the semicircle.
- Then a curved line is drawn to connect the hole in the middle of the batten with the center of a piece of drywall sheet that is fixed to the frame. You should immediately check whether the height of such an opening is suitable.
- Then the sheet is removed and the excess is cut off, after which it is fixed again on the frame.
- The second sheet of drywall is installed on the opposite side. Taking a corner and the first segment (like a stencil), transfer the dimensions of the arc. Next, cutting out the arc and fixing it is repeated according to the same pattern.
- After the work has been done, a void is left in which the frame is mounted. To do this, the profile is cut and bent. The resulting structure is fixed to the racks and drywall. It is also worth installing jumpers for the reliability and strength of the structure.
Internal frame for an arch made of plasterboard sheets
- Next, cut out the required strip, bend it, and make deep cuts on the inside. You need to fix it without haste, with careful movements.
- That's all, the arch is formed. All that's left to do is to paste the wallpaper or paint it in the desired colors.
The second method is much more complicated. The masonry is formed using the following technology:
- Drywall pieces are fixed from the corners on both sides using a mixture of PVA glue and water.
- Drywall is cut so that each next fragment is smaller than the previous one.
- Work continues until the smallest fragment is installed.
- Self-tapping screws or anchors are used as additional fixation.
Forming an arch from plasterboard
This is only a preparatory process. Further it will be even more difficult. The next stage will require plaster and putty. Large expansions and other defects are sealed with plaster, and a smooth arc is created with putty. This is quite a painstaking work that requires a strong and experienced hand of a master, so it is better for a beginner to immediately purchase template blanks.
Wooden arch: beginning of installation
Choosing a wooden arch is justified if you have a good budget and want to complement the classic style of the interior. This is not only a respectable decoration at the entrance and exit, but also durable protection of the opening. Natural materials always look expensive and reliable, not only in professional interior photos, but also in ordinary apartments. Fiberboard and MDF boards are cheaper and wear out slower than natural wood , so we recommend this material to be tried by beginning creators of arched openings. In addition, fiberboard can be purchased with antiseptic treatment, but the wood will have to be prepared on its own (stain, varnish in three layers).
The main stage is preparing the form. Wooden elements will be attached at the boundaries of the opening, so all measurements must be taken correctly - for accurate cutting and saving material . First of all, we decide on the type of arch: what geometric figure will underlie the arch: rectangle, circle, ellipse, broken line, asymmetry. Then draw a diagram of the future arch on the opening indicating the dimensions and transfer them using a level to the wall, put serifs.
Step-by-step instruction
If you decide to install an arch in the hallway, kitchen or balcony, follow the recommendations below:
- Remove the old door and trim.
- Widen the doorway to the desired size.
- Level the walls and repair any defects.
- If the structure will be backlit, carry out the wiring.
- Take all measurements in different places to minimize errors.
- For uneven walls, choose the depth of the arch at the thickest point.
- Don’t be too lazy to make a life-size sketch (this will allow you not only to install the arch as accurately as possible, but also to pre-assess what the arch will look like).
- You need to begin work on installing the supporting frame in the following sequence:
- Create a main contour from the profile around the perimeter of the doorway and fix it on the wall.
- Secure the frame system.
How to cut a profile correctly
- Install the vertical guides with an indentation from the plane of the interior surface to the thickness of the drywall and add 2 mm to the data (make a reserve for plaster).
- The surface must be rolled out with plaster until it is as even as possible.
- To create a semicircle from the profile, cuts are made on it in increments of 5-7 cm.
- When an ideal curve is formed from the profile, it is installed in the right place and fixed to the frame.
- For greater strength, the arc must be fixed with several hangers to the horizontal upper guide.
- Then the crossbars are installed in increments of 40-60cm.
- The result should be a structure made of metal profiles in the shape of an arch for further cladding.
The final stage of installation
Next, the end part of the arch is closed:
- The frame is mounted, the curved part will be fixed to it.
- To make such a cut, take scissors for metal surfaces and mark an arc.
- The profile has a “P” configuration. It turns over on its side as the clock mechanism moves. This part will be located inside the fixed face element on the right side of the arch. The second part is fixed on the other side of the first element.
- Cuts are made at the top and in the middle of the profile, making equal indents of 40-50 cm. This serpentine structure is attached along the edge of the hemisphere.
Related article: How to hang a picture without drilling into the wall
A severe break requires the installation of a notch on the profile.
- Strengthening the device. A transverse part is made and fixed into a curved frame. Self-tapping screws with a press washer are used as fasteners.
- A small part of the gypsum board sheet is cut, its width is equal to the thickness of the wall opening.
The length of such strips should be made a little larger than the required dimensions; during the work, the unnecessary part should be cut off.
A strip of plasterboard is bent:
- The strip is wetted with water.
- The surface is treated with a needle roller.
- This part leans against the support at an angle.
- The bending sheet is tightly screwed to the frame.
At the end of all the work, the arch is brought to its logical conclusion: it is given the correct shape, all imperfections are masked, and a corner with notches is placed along the winding part. Then the base is primed with a deep-acting composition. After half an hour it can be puttied, then painted or wallpapered. Arched corners installed on either side will give the device a complete look. To make a wooden vault in a house, you should go through the same steps, only instead of gypsum board sheets, plywood and chipboard are taken. A small fiberboard sheet is used as a bending element.
Finishing
When the arched frame is ready and sheathed, you can begin finishing work. To do this, you need to cover the edges and joints of the materials with specialized paper tape or fiberglass mesh. You will also need to apply putty in at least 3 layers and sand the structure. Once you are convinced of the reliability of the formed structure, you can proceed by following some of the recommendations given below.
To do all the finishing work, you need to purchase acrylic putty, which is intended for interior work. But, please note, it is better to use a special mass for drywall. Before use, the putty mass is thoroughly stirred until smooth.
How to apply putty correctly
When starting work, put on gloves and other personal protective equipment! The putty is applied in linear movements with a rectangular spatula. In addition to filling all the unevenness and joints of materials with putty, it must also be applied to the heads of the screws so that their edging does not show through. Similar actions are carried out until the surface becomes ideal.
After puttying, you can begin gluing the joint and edges to remove all sorts of irregularities and give the material strength. To do this, you can take a fiberglass mesh or paper tape, it all depends on your preferences (both options are good). Cut a piece of mesh and place it at the joint (in the very center), pressing it with your fingers into the putty that has not yet dried. Check that the tape is securely fastened and that there are no wrinkles.
Fixing the mesh
After all the joints have been treated with mesh, you can cover the curved parts of the arch with it. The work needs to be done according to a similar scheme. When the mesh forms folds during the processing of arcuate sections, they can be smoothed out by cutting the fabric with a sharp knife.
After drying, the putty will become snow-white. This will be a signal that you need to take sandpaper and go smooth the surfaces. But, work carefully, do not remove too much putty, so as not to expose the mesh. For this work, use a respirator, because during surface grinding there will be a lot of dust, which is very harmful to human lungs.
When all 3 layers of putty have been applied and the surface has been cleaned, you need to wait about 12 hours for the structure to dry completely. Sand again with fine-grit sandpaper to achieve a perfect surface. That's all, you can decorate the surface.
Types of decorative arches
Round seating niche
Most often, arches are made of plasterboard.
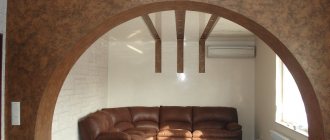
Flexible and plastic plasterboard allows you to quickly create a structure of almost any shape with your own hands. The finished element has high aesthetic characteristics. A plasterboard arch can subsequently be lined with almost any material, including wood, stone (the most successful examples can be seen in the photo).
Classic plasterboard finish without adding other materials
Let's add some decorative stone to the drywall
Framing the arch with wood with moldings
Arched openings can be divided into two types:
- Active - have a complex shape, providing maximum visibility into neighboring rooms, and can themselves decorate the interior. Passive - simple in shape, often serve as a border.
Good view from the living room thanks to the wide arch
The boundary between rooms in an apartment from a partition with arches
Advice! It is advisable to determine the shape of the arch before the repair, as well as its subsequent design.
Simple passive arches include:
- Classic - with the correct arc radius. Optimal for any interior. Ellipsoidal - the arc can have the shape of a regular or irregular oval. Modern - an arc with a pronounced rise. Romantic - the arc is cut off in the upper part, but rounded on the sides. Portal - a rectangular shape of the opening.
Classic round arch
Beautiful hallway with a rectangular arch glazed at the top
Complex active ones include:
- Oriental. Lancet. Horseshoe-shaped. Trapezoidal, etc.
Arch in the form of a dome in oriental style
Tall window in the form of an arrow arch
Shelves located in a horseshoe-shaped partition between rooms
Such arches can have uneven or figured edges, be located on several levels, and twist from one room to another.
Decorating the arch
It doesn’t matter at all what material you used to install the arch, because even a do-it-yourself brick arch needs final decoration. To decorate a door arch, you can use the following techniques:
- Painting to match the walls.
- Sheathing with wood blocks (as an option, laminate, siding, etc. are often used for this).
- Wallpapering.
- Use artificial stone based on gypsum.
- Decorate the structure with mirrors or mosaics (for mosaics you can use small pebbles, corks, glass, etc.).
- Use foam molding or surface painting.
Important! Try not to overdo it, so as not to clutter the aisle and mix incompatible items. It is worth noting that sometimes a simple paint job is enough to add elegance.
As you can see, there are a lot of options for finishing decoration, for which you can use not only natural materials. It all depends on the designer’s idea and the wishes of the owners, as well as the general style of the room. The classic additional interior can be complemented with stucco molding and fabrics so that everything fits harmoniously together. The finishing of the columns looks no less laconic if clinker is glued to them.
What types of arches are there?
Before you make an arch in your apartment, you should figure out what such a solution actually is.
As a rule, an arch is called any opening that does not have a door. This, of course, goes against the opinion of many users, for whom such a solution contains only a semicircular completion. In fact, there are quite a few types of arches:
Round. This is the classic arch that everyone is used to.
With this approach, the radius of the rounding is equal to half the distance between the walls. It is used almost everywhere and is very popular. Round arch made of plasterboard Segmental arch. In this case, the radius of the rounding is very large and there is simply a curved section on top of the opening.
As a rule, this solution is used where it is necessary to create a very wide opening - for example, a spacious exit to a balcony, a place to secure a window frame, etc. Arch in the Romantic style. Another fairly common use case is simply a rounded transition between the vertical and horizontal components of the opening.
Can look very beautiful if created carefully and professionally. It is created very simply, so it is used almost everywhere, however, it is not always noticeable. Half-arch. A creative way to solve such a problem.
With this approach, the arch makes a rounding only from one of the walls, and on the other the connection is made at a right angle. Portal. This is the case when only a professional can call such a solution an arch. An ordinary rectangular opening that does not have any roundings also has the right to be called an arch.
If you decide to create a really cozy and high-quality design in your apartment, then you will most likely have to make an arch.
The price for such work ranges from 2000 to 4000 rubles. It cannot be called too high, since a variety of modern materials make it possible to carry out such processes very quickly and without much difficulty. However, you can save money by doing everything yourself, of course, if you have the knowledge and ability to do such work.
A designer arch will cost you a lot
Ready-made arch kits
Wooden interior arch
If you are not confident in your own abilities, and the video tutorials from the Internet are not entirely clear to you, you can make your life much easier by purchasing a ready-made kit for forming an arch. Such sets can be made from different materials, have different designs, colors, designs and textures, which will allow each person to find the most suitable option. The most suitable option is a set made of fiberboard or MDF. Such materials are very similar to wood, but are less complex to process and install. The ready-made standard interior arch kit includes:
- 2 vault panels.
- Platbands.
- Inner plates.
- Elements for connection.
To choose the right set, you only need to measure the height, depth and width of the doorway. We hope that our article will be useful to you and give you confidence in your own abilities!
Possibilities of decorative arches
With the help of arches you can make a small room more spacious, and create effective zoning in a large one. This architectural element in the apartment performs several functions at once:
- Saving space and visually increasing it. Simultaneous functional separation of adjacent rooms and their visual unification. Creating a certain atmosphere in the house, emphasizing its style.
The dining room appears larger if there is an arch instead of a door
Division into zones in the bedroom
The dining room and kitchen seem to be one whole, at the same time they are separated by a wide arch
The spacious living room has a large arched window
Photo gallery of arch options
Arch decor
Arches of different shapes, but in the same style they also look great
An arch is, first of all, a part of the wall; therefore, when designing it, you should start from the finishing of the latter. An architectural element must fit harmoniously into the interior and be part of it. If there are several arches in the apartment, then they must correspond to the design of the room, be of the same shape or made of the same materials.
Advice! The wider the arched opening, the more attention should be paid to its design, color and stylistic matching of adjacent rooms.
An unusual solution for an arch in the form of a keyhole
Finishing materials
Carved wood with imitation columns
Depending on the style of the room and the arch itself, you should select the material for its design.
Paint, wallpaper, decorative plaster - the simplest option for designing an arched opening with your own hands. An element decorated with such materials practically does not stand out in the interior. The color of the coating on the walls and the inside of the arch may differ if this does not contradict the style of the room.
A convenient and simple solution to leave the walls and arch in the same color
Wood is a noble, durable material. Most appropriate for decorating interiors in a classic style. Looks ideal on designs of simple shapes.
Wooden trim looks noble and tasteful
Polyurethane stucco molding - with its help you can decorate an arch of any shape and style with your own hands: from minimalism to baroque. The opening can be decorated with polyurethane columns, figured or flat moldings, all kinds of rosettes, bas-reliefs - the material has practically no restrictions on shape. Initially white elements can be painted in any color with acrylic paint.
This arch decoration incredibly decorates the room
Stone – natural or artificial. Thanks to the variety of textures and colors, it can be used to decorate arches of different styles and shapes.
Ceramics - tiles or mosaics can cover both the entire arch and its individual parts.
Arch decorated with mosaics
Glass can be blocks installed at the full height of the opening, at different widths, or in a ladder. This design of arches in high-tech style looks impressive. Often there is a design of arched openings using stained glass and colored glass; such elements are ideal for the Art Nouveau style.
Tips and tricks
Before starting construction work, you need to select the material and prepare the tools. In addition to this, it would not be superfluous to listen to the opinions of experienced finishers:
- In order for the design to be original, it must be designed differently on both sides.
- You can highlight the arch against the general background using an arched arc, which will smoothly flow into the platbands.
- In order not to do additional work after making the arched passage, you need to think in advance about how communications (wires, pipes) will be laid.
- The voids formed between the sheathing and the wall can be filled with insulation (mineral wool, polystyrene foam).
- Patterned decoration allows you to make the arch unusual and universal.
- When working with drywall, special attention must be paid to fasteners. Self-tapping screws should not be screwed in at right angles, but obliquely. Thus, the service life of the structure will increase. When tightening screws, do not press too hard on the screwdriver.
- To align the shape and better fasten the individual parts, the joints of the drywall are covered with serpyanka.
- Construction stores sell ready-made kits with arched structures. The package contains arch vaults, plates fixed to the inside of the frame, trim on both sides of the passage, and connecting elements. The extensions can be purchased separately.
- Before applying the decorative layer, you need to coat the working surface with a primer and wait until it dries completely.
- Finishers recommend installing PVC corners on both sides according to the shape of the opening when wallpapering. They will help the decorative covering maintain its integrity and not open from the arch.
The arched opening can be decorated using stencils. They are sold in construction and art stores. There are examples of work where people decorated an arch in the form of two intertwined trees. Using gypsum elements, you can make columns and a vault from platbands and the upper arch. For variety, individual elements are coated with different paints.
An arched opening is considered popular when decorating apartments and cottages. Designs with rounded elements are suitable for classic interiors. You can carry out the work yourself if you carefully study the assembly process and watch a training video on the Internet.
Is it worth making an arch yourself?
Questions that concern many owners of private buildings - how to make a door arch, is the work worth the time and labor spent. This design is suitable for various types of interior. Before choosing an arch for an apartment or private house, you need to understand its advantages and disadvantages.
Pros:
- The arched design allows you to visually expand the space. The room seems larger due to the lack of standard openings that limit it.
- Through the open opening, more air penetrates into the rest of the home.
- It will help to divide a large room into separate zones. For example, you can turn the living room into a place for lighting a fireplace, reading books and holding banquets, and also divide the kitchen into a cooking area and a dining area.
- The viewing angle increases. The open opening allows you to monitor the situation in the combined rooms.
- It looks unusual and unique.
- The asymmetrical design is suitable for non-standard room decoration.
Minuses:
- A standard rectangular doorway creates a high level of sound insulation. The arch does not allow achieving such results.
- If an arch separates the kitchen and living room, cooking odors will penetrate into other rooms. Due to the open space, privacy is impossible.
The interior style needs to be thought out in advance so that the arched opening fits into the overall picture.