Is it necessary to build a warm chicken coop?
The health and egg production of poultry directly depend on their comfort, adequate nutrition and general physical activity. Temperature and daylight hours play an important role.
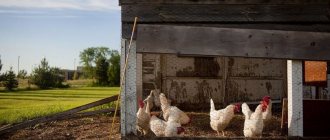
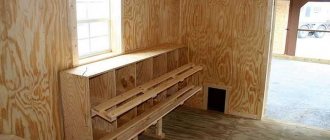
Old barn converted into a chicken coop with a run for walking
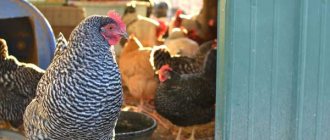
The period from November to March is the most difficult for both poultry and poultry farmers who keep laying hens all year round. If in spring and summer the bird leads an active lifestyle, walks freely around the enclosure or alley, bathes in sand and specially designed containers with water, then in winter, for obvious reasons, its activity is greatly limited.
If the temperature is too low and there is no light, the egg production of laying hens is greatly reduced, and in some cases stops completely. Based on this, during the cold season a chicken coop should be built for chickens, providing the following conditions:
- temperature above 10–12 °C and low air humidity;
- artificial lighting that increases daylight hours;
- natural or artificial ventilation for constant air exchange;
- a place for nests and a free perch at a low altitude;
- free space at the rate of 1 m2 per chicken.
Compliance with the conditions described above ensures that laying hens not only remain completely healthy and survive the winter well, but also maintain egg production and overall body weight.
Chicken coop requirements
You can't do without soundproofing a chicken coop. If noise from the street constantly penetrates into the room, the chickens will not be able to get enough sleep and feel comfortable.
Soundproofing
For good sound insulation, conventional insulation is not enough. It is advisable to use a special cake made of plasterboard and mineral wool, which is attached to the inside of the wall using self-tapping screws. All joints between plasterboard slabs should be sanded well and sealed with vibroacoustic insulation sealant. Additional sound insulation will be provided by covering the external walls of the chicken coop with sheets of foam plastic.
Be sure to fill the space between the rafters on the roof with basalt wool, otherwise in rainy weather a persistent “drum effect” will be observed in the chicken coop.
Ventilation in the chicken coop
To maintain a normal microclimate in the chicken coop, ventilation must be provided. The simplest option is an ordinary plastic pipe, which runs under the ceiling through the entire room and rises above the roof at a height of about 1 meter. Such natural ventilation will only work if there are drafts in the room.
Chicken coop setup.
If the construction was carried out conscientiously and the room turned out to be completely sealed, a small piece of plastic pipe can be installed just above the floor level. On the street side, the pipe is covered with a mesh; dampers are installed inside, which help regulate the intensity of the movement of air masses.
It is possible to organize forced ventilation without an exhaust pipe. To do this, a regular fan crashes directly into the wall. The downside to such a system is energy dependence. The device will only work if electricity is supplied to the chicken coop.
Lighting
In order for chickens to lay eggs normally, there must be light in the chicken coop. To do this, the room must be equipped with small windows. To prevent all the heat from leaving the room through them, it is advisable to give preference to models with 2-3 glasses. The outside of the windows must be covered with mesh. This helps protect the chickens from predators.
In the winter season, it is necessary to artificially extend the daylight hours by 11-12 hours, otherwise the chickens will stop laying eggs. To do this, additional lighting is installed in the chicken coop.
Types of insulated chicken coops
An ordinary chicken coop is a barn, near which there is an area for walking the birds in the fresh air. The walking area is fenced with a fine mesh net, which will reliably protect the bird’s habitat from unwanted penetration of predators.
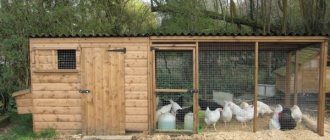
Winter chicken coop made of timber and boards for 30–35 chickens
In fact, this option can be taken as a basis when building a warm chicken coop. Especially if you need a room to keep no more than 10–15 chickens. If desired, you can consider a more comfortable chicken coop with both external and internal walking areas. But in this case, its size will be noticeably larger, which is not suitable for small suburban areas.
Depending on the number of birds, the following types of chicken coops can be used:
- 10-15 chickens - a mini-chicken coop in the form of a barn with an area of 10-15 m2. This will be enough for the free movement of birds and chicks if they are planned to be bred. Walking area - 2x2 m. The chicken coop must have at least one window and a ventilation grille;
- 20–30 chickens – a full-fledged barn with an area of 18–20 m2. The optimal height of the chicken coop is 1.8–2 m. Walking space is 2x3 m. This is enough to build a tiered perch and install 5–7 nests. If there is enough free space on the site, then you can build a barn with a vestibule, which will allow you to provide a small space for walking, and also make the chicken coop warmer;
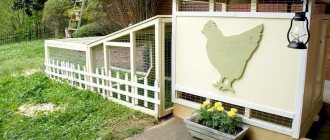
An aviary for walking chickens can be made from lumber and fine mesh
- 50 chickens or more - a building with an area of up to 50 m2, which will require not only more thorough insulation, but also the installation of an additional heating system. The height of the chicken coop, as in the previous version, is no more than 2 m. The space for walking is 3x4 m. It is optimal if the perches are located opposite the window, and 7–10 nests near the far wall in the chicken coop.
In many ways, all three types of chicken coops are similar and differ only in size, but with enough materials and free space on the site, an insulated chicken coop can have a completely different look.
For example, you can build a completely enclosed structure, which will already have a place for walking. This will prevent the chickens from getting hypothermic during walks, and will also allow the birds to walk freely, even when it is -15–20 °C outside.
Drinkers and feeders
Setting up a chicken coop is unthinkable without drinking bowls and feeders. Moreover, they should also be available for summer walking. There are periodic and bunker feeders. Periodic - this is when you came, poured out the amount of food and that’s it. Until the next feeding they stand empty.
Climbing in and digging around is a favorite thing
Bunker feeding is when there is a decent supply of feed, which is constantly poured into some container. Both have their drawbacks: periodic ones require you to go to the chicken coop every time and add grain, and the birds crowd around and fight for the best place, which sometimes leads to the feeder being overturned.
If you have a bunker feeder, you need to go much less often, but it is possible to overfeed the bird, which is a disaster for laying hens. Therefore, either the laying hens are given a large walk or only broilers are fed in this way.
There are many designs of periodic feeders, but not all of them allow you to use feed economically. The easiest way is to pour the food into a bowl or container. But, if there is at least some opportunity, the chickens begin to rake up the food, spilling it out and then trampling it down. I have to throw it away. And such feeders allow you not only to dig into the food, but also to climb into the feeder with your feet. Therefore they need to be improved. To do this, install wire dividers on the container. Feed consumption decreases sharply: it is more difficult to rake it out.
Feeder with dividers
You can make, for example, another similar feeder (or drinking bowl), which is conveniently attached or placed against the wall. It is probably easier to weld it from metal, although there are craftsmen who can make something similar from wood.
Convenient feeder for chickens: there is not much space, it stands firmly, and you can hang it
There are some interesting ideas. For example, an economical auto feeder is assembled from an old car disk, a basin of suitable diameter and a plastic water bottle with a capacity of 5-10 liters.
Components for a homemade feeder with economical feed consumption
Look for a disk of the type shown in the photo: with a large number of small holes along the outer edge. In the middle, cut a hole the size of the neck of the bottle. Cut out the bottom of the bottle cap, leaving only the threaded ring. The feed mixture is poured into the bottle, a disk is put on it, and the cut-off lid is pressed against it. Feed is poured into a basin and a structure is installed on top.
Enjoying success))
In order not to disassemble the feeder every time when you need to add food to the bottle, you can cut the bottom, making it like a lid. Then the bottle itself can be secured more seriously: fixation with the thread from the cap is not very reliable. But such an improvement does not allow anyone to rummage through the food, and no one can get into the basin.
You can make a feeder from a piece of plastic sewer pipe. Holes with a diameter of about 7 cm are cut out on both sides. They do not have to be round at all - square or rectangular will also work. A corner is installed at the ends at 90° with the socket up and along a small piece of pipe: feed can be poured here.
Chicken coop feeder made of plastic pipe. Also suitable as a drinking bowl
The second version of a chicken drinker-feeder made of PVC pipe
A simple but spacious bunker feeder is a decent chest with a folding bar attached at the bottom. In the open position, food is poured onto it.
Another option for an economical feeder is made from plastic sewer pipes. But this is already a bunker structure: there is a decent supply. The design is simple, and consumption is reduced.
An even more interesting design of the chicken feeder in the video: with a lid. To open it, you need to jump on it.
Another option is a bunker feeder made of PVC pipes and a plastic water bottle.
Read how to make beautiful beds here.
Choosing materials for construction with your own hands
A variety of building materials can be used to build a chicken coop - from edged boards to masonry bricks. Any material has both positive and negative qualities, which should also be taken into account when choosing.
Base material
The construction of a chicken coop, like any structure, begins with laying a load-bearing foundation. The foundation is necessary for reliable protection of load-bearing walls and roofs. In the absence of a foundation, the walls of the chicken coop will be under constant influence of moisture, which will come from the damp earth. As a result, this will lead to rotting and damage to structurally important components of the structure.
Concrete, brick or foam blocks are used to make foundation supports
To build an insulated chicken coop, you can use the following types of foundations:
- columnar - suitable for building chicken coops using frame technology, when the walls are made of thick boards and OSB. Foam blocks or concrete mixture are used to make the foundation. The supports are erected along the perimeter of the future structure;
- pile - used for the construction of buildings on heaving and moving types of soil. A base in the form of metal piles sunk into the ground around the perimeter of the building is suitable for constructing wooden chicken coops. If the foundation is a pile-grillage foundation, then its load-bearing capacity is sufficient to build a chicken coop from foam blocks;
- strip - the most reliable type of foundation. It can be used to build a chicken coop of any size and design. To make a strip foundation, a concrete mixture of grade M500, steel reinforcement Ø18 mm and edged boards are used.
To make a grillage, you can use either a 20x20 cm wooden beam or an M500 concrete mixture. The first option is cheaper and easier to implement. Using a concrete mixture requires the ability to set formwork and knit a reinforcement cage, but in general, the use of these materials allows you to build a more reliable and durable foundation.
The choice of materials for making the floor in the chicken coop depends on what type of foundation is used. For pile and columnar foundations, it is more rational to use wooden beams, edged boards and CBPB sheets. In the case of a strip foundation - concrete and reinforcing materials.
Wall materials
The choice of material for constructing the walls of a chicken coop depends on the size of the structure and the technology by which it will be built. The simplest and fastest option is a chicken coop made of wooden beams and OSB. A beam or thick board (from 22 mm) is used to construct the frame, which is later sheathed with OSB sheets inside and out.
Foam block is perfect for constructing permanent walls of a winter chicken coop
To build the main walls of a chicken coop, you can use the following materials:
- shell rock is a natural material with low thermal conductivity. Perfect for building chicken coops for 25–30 chickens. The shell rock is a rectangular block 180x180x380 mm. The technology of work is in many ways reminiscent of the process of laying foam or cinder blocks;
- foam concrete is a popular environmentally friendly building material. Suitable for building chicken coops of any size. For the construction of walls, it is better to use D400 foam blocks measuring 200x300x600 mm. The thickness of the walls being erected depends on the temperature regime in the region;
- brick is a traditional material for the construction of load-bearing walls. Has low thermal conductivity and long service life. It is best used for the construction of permanent chicken coops for 50 or more chickens. Both solid and hollow bricks are suitable for the construction of chicken coops.
When choosing material for walls, you should also take into account how long the structure will be built. If you are just trying yourself as a poultry farmer, then the optimal choice of material for walls will be wooden beams and OSB. In the future, such a chicken coop can be disassembled or expanded with a small extension.
If you already raise chickens in large numbers and are planning to build a permanent chicken coop, then it is better to build a permanent structure from foam blocks or bricks. Such a chicken coop will cost more, but its service life is noticeably longer.
Insulation material
To insulate the floor, walls and ceilings of the chicken coop, you can use various thermal insulation materials. The cheapest option is to use sawdust, expanded clay and dry hay. Expanded clay is used to insulate floors or ceilings, and sawdust and hay are used to insulate walls.
Polystyrene foam has a low thermal conductivity coefficient, which makes it one of the best materials for wall insulation
The only disadvantage of this method compared to modern heat insulators is that the materials have a high thermal conductivity coefficient. In turn, this requires the installation of a large layer of insulation, which is not always possible when building a chicken coop.
Modern insulation materials that can be used to insulate walls and floors in a chicken coop include:
- polystyrene foam is a cellular insulation material with high thermal insulation qualities. The thermal conductivity coefficient is lower than that of foam concrete, brick or mineral wool (0.047 W/m*K). Available in slabs of various sizes. The material is convenient to install on walls and ceilings. One of the disadvantages is that foam plastic is very fond of rodents, but this problem can be solved by covering the walls with OSB or plywood;
- mineral wool is a heat and sound insulating material with a different fibrous structure. In terms of thermal insulation qualities, it is slightly worse than polystyrene foam (0.056 W/m*K), but unlike foamed heat insulators, it is not food for rodents. To improve practical properties, it is recommended to use it in conjunction with reflective membranes;
Stizol has a metalized surface, which helps retain heat indoors
- extruded polystyrene foam is a modern cellular insulation with a closed structure made of polystyrene foam. It features high performance and long service life. It is an environmentally friendly material. With equal thickness of insulation, it is superior to polystyrene foam, mineral wool, expanded clay and other heat insulators;
- stizol - insulation and soundproofing material made of polyethylene foam. It is characterized by moisture resistance, durability and high thermal properties. It can have different types of front surface: metallized film, aluminum foil, non-woven fabric, etc. It is recommended to use material 10 mm thick as insulation.
When choosing a thermal insulation material, you should take into account its cost and the surface area that you plan to insulate. For small chicken coops, you can use stizol and other materials made from polyethylene foam. Stizol has a low thermal conductivity coefficient (0.3 W/m*K) - this ensures that the material reliably retains heat indoors.
For chicken coops with 50 chickens or more, it is recommended to use a combined approach. For example, insulate the floor with expanded clay and the walls with extruded polystyrene foam. If you want to save money, it is better to use polystyrene foam or mineral wool together with stizol.
Interior arrangement of the chicken coop
Arrangement of the chicken coop from the inside begins with drawing up a drawing plan that shows the placement:
- perches;
- nests;
- feeders;
- drinking bowl;
- containers for receiving ash baths.
Perches
The constant presence of birds on the floor leads to the spread of infection, so perches are built for them to sleep. The warmest, shaded place in the chicken coop is selected for the poles.
This allows you to maximally replicate the roosting conditions in the wild, when birds sleep on tree branches.
The optimal length of the pole is equal to the width of the room. The thickness of the wooden beam is 4x4 cm. The density of chicken placement is 20–30 cm per bird.
Based on this, you need to calculate how many poles will be installed in the room. The distance between them should be at least 25 cm.
To save space, you can arrange the poles in steps, but not on top of each other, so that the chickens sitting above do not stain the ones below with droppings. When installing the poles, keep in mind that the optimal height to which a chicken can easily rise is 80 cm.
The highest pole should be located at this height. The lowest one can be placed at a distance of 20 cm from the floor.
Having decided on the height and number of perches, fixing elements are attached to the walls that will hold the beams.
Iron corners will do. Before fixing the pole itself, it must be processed with a plane and sanded with sandpaper.
Paints and varnishes are not suitable for making them smooth, since their composition is unsafe for chickens. After processing, the structure is strengthened at the corners using a screwdriver or drill.
It is advisable to attach ladders to perches located at a height of more than 30 cm, along which chickens can climb up.
Important! Only wood is suitable for constructing poles. The use of metal strips will lead to hypothermia of the bird's extremities in winter.
Nests
The number of nests in the chicken coop will depend on the productive direction of the chickens:
- For meat breeds, one nest per 5 females is enough;
- Meat and egg breeds will require one nest for 2-3 hens.
Wooden containers for storing vegetables or baskets are perfect as nests. The main requirement for nest sizes is 40x40x35 cm.
In order for the females to quickly get used to the nests, a thick layer of soft hay (about 20 cm) should be laid in them. The nests should be placed in the farthest corner of the chicken coop, protected from drafts.
It is important for laying hens to feel safe while laying eggs, so they try to lay eggs where no one will notice them. This factor must be taken into account when installing nests.
The best placement option would be places where hens have already laid eggs on the floor. This approach will shorten the period of habituation to nests.
Feeders
The volume of the feeding bowl will depend entirely on the number of chickens. Each head should have 10–15 cm; for chickens, the area is halved.
If the feeder is of a circular type, then 2–2.5 cm is enough for each bird.
It is important that all birds have simultaneous access to food, otherwise weak birds will remain hungry.
When choosing a feeder or planning to make one yourself, pay attention to the material. It should be safe for the bird and easy to clean.
You will need several containers designed for different types of feed. For wet mash, you can build a hopper feeder from a plastic bucket.
To make it you will also need an animal plate with dividers, a sharp knife and wire. The plate should be 5 cm larger in diameter than the bucket.
Departing 0.5 cm from the bottom, holes are made in the walls of the bucket through which food will be served on the plate. There is no need to make them too large so that the chickens cannot stick their heads into them.
The optimal diameter is 5 cm. Then the bucket is attached to the plate using a wire, wrapping it around both containers and connecting the ends to the handle of the bucket.
It is better to install the finished feeder on a small elevation, remove it immediately after the meal and wash it.
For dry food, a wooden bunker feeder is a good option.
Hopper feeder option
You can design a box with an arbitrary length (for example, 120 cm): the size of the sides will be 120x9 cm, and the two small blanks will be 20x12 cm.
All these parts should be connected to each other using stainless steel corners.
Along the entire length of the box, you need to install wooden poles at a distance of 10 cm from each other so that the bird cannot climb into the feeder.
Drinking bowls
The best option for chickens is nipple drinkers.
For this you will need:
- nipples;
- transparent flexible hoses;
- drop eliminators;
- square PVC pipe;
- 20 liter bottle.
The bottle will act as a distributor. Holes are made in the pipe into which hoses are inserted. Nipples are attached to the hoses, which, in turn, are attached to the walls.
Drop eliminators must be placed under the nipples. You can do without them, but then all the liquid will be on the floor, resulting in increased humidity, which will lead to the spread of infection.
How to make a drinking bowl for chickens with your own hands?
Another simple option for a small number of birds - up to 15 pieces - is siphon drinkers. They have legs and allow you to save water. If the legs are designed well, even a chicken flying onto the top will not knock them over.
Siphon drinkers - factory-made and homemade from a plastic bottle
Factory drinking bowls, of course, look more attractive, but a homemade version is almost free, and they work no worse.
In the photo you see a simple homemade siphon waterer for chickens: a support was nailed in the corner - a piece of board with a hole cut out for the neck.
On top there is a fastening system and a load so that it does not get knocked down. A hole is cut into the former bottom of the bottle into which water is poured. The trick here is to choose the distance at which to install the water container: so that there is not too little or too much of it.
Cup drinkers are convenient when grown in cages, as they are conveniently attached to the mesh. But no one bothers you to hang a piece of mesh, say, on a wall or come up with another mount.
Cup drinkers for poultry (including chickens)
They allow you to water the birds without splashing. Water is supplied to the cup, it tilts under the influence of gravity, cutting off the supply. They drank the water, the cup rose, the water flows again.
A hose is connected to the side fitting, the second end of which is located in a container of water, which should be above the level of the drinkers. Convenient and economical.
Options for installing cup drinkers
Nipple drinkers for chickens. These are small devices, a few centimeters in size. A cone-shaped stainless steel rod is inserted into the plastic case.
Nipple drinkers
These nipples are screwed into plastic pipes into which water is supplied. A hole of the required diameter is drilled, a thread is cut and the nipple is screwed in.
When you press the rod, a few drops of water appear. The chickens peck at the rod, drinking the drops that appear.
The main disadvantage of this method is the drops that fall on the floor. To prevent this from happening, a special drip catcher is placed under each drinker. It simply snaps onto the pipe.
Despite their miniature size, these small drinking bowls cost a lot, especially if they are high-quality - read - imported. Ours are, of course, cheaper, but they break faster.
Small drinking bowl for chicks or quails
And the rest are different cups and basins into which water is simply poured. Their disadvantage is that birds often turn them over, and the water in them quickly gets dirty.
There are also interesting ideas from homemade ones. For example, such a pipe drinking bowl is shown in the photo. In a piece of plastic pipe, the water level is controlled by a float mechanism from the toilet cistern. Three drinking bowls are attached to the pipes.
Three drinking cups are attached to the pipe
Containers for ash baths
Wooden boxes 20 cm high can be used as containers for ash baths. They contain a mixture of shell rock, wood ash and sand.
The number of containers depends on the number of chickens. One box is enough for 5 heads. They can be placed around the entire perimeter of the chicken coop, excluding the nesting area.
Ash baths are necessary to maintain the immunity of chickens. With the help of sand and ash, the bird cleans its feathers, which reduces the risk of the spread of feather bugs and fleas.
Chickens eat part of the shellfish, which effectively cleanses the gastric tract and improves digestion.
Cells
Sometimes the birds are kept in cages. But this is for industrial or semi-industrial maintenance. With this method of cultivation, a large number of birds live in a small area. A drawing of a cage for chickens with dimensions is posted below.
All sizes are according to the standards, and there is no need to invent anything. This is the minimum that laying hens need. And what can come out of such cells is in the photo below.
Watch the video to see how to make broiler cages from wood. Everything is described in great detail: what, for what, what sizes, how to assemble and what is needed for this. Really useful.
Preparatory work
In order to quickly and easily build a chicken coop, you should carefully prepare for construction work. To do this, you need to decide on the location of the chicken coop, draw up a drawing of the future structure, calculate the material and prepare construction tools.
The diagram should show the location of nests, roosts and feeding areas.
When choosing a location on the site, it is advisable to adhere to the following:
- It is not recommended to build a chicken coop in a lowland or on a slope. It is optimal if it is a free site located on a hill;
- chickens and other poultry are afraid of noise. Therefore, it is better to build a chicken coop away from the road and other sources of noise;
- The health of chickens directly depends on the amount of sunlight. To ensure free flow of light, the structure should be located on the south side.
If the soil on the site is clayey, loamy, swampy or other soil that does not absorb moisture well, then it is recommended to drain the site before building the chicken coop. If this is not done, the supporting base of the structure will quickly become unusable, and this will reduce the service life of the chicken coop as a whole.
Once you have found a suitable place to build a chicken coop, you can proceed to drawing up a drawing. This can be done either using regular paper and pencil, or using special computer programs for design.
Opposite each structural element you need to indicate the size - this will help to avoid mistakes during construction
The drawing should show the structure on a reduced scale. It is taken into account that the size of the structure depends on the number of chickens that are planned to be kept.
Opposite each structural element, its size should be indicated. This will help you quickly navigate the project without wasting time on calculating this or that part of the structure. Additionally, you should depict the chicken coop in a projection from above. On this part of the diagram you need to locate the entrance to the room, perches, nests, feeding area, etc.
As an example, consider the two diagrams located above. Both options are designed for keeping 10-12 chickens. The first diagram shows a chicken coop on a columnar foundation 200x400 cm with a pitched roof. To make a chicken coop, edged boards with a thickness of 10 to 20 mm are used. If desired, this diagram can be taken as a model on the basis of which the chicken coop you need will be built.
The second diagram shows a chicken coop with an aviary for walking. The dimensions of the structure, including the vestibule, are 425x525 cm. To build the chicken coop, as in the previous version, a wooden board and timber are used.
Materials for building a chicken coop
Materials for building an insulated chicken coop are selected based on personal preferences and the funds you are willing to spend on building the structure. For example, to build a chicken coop from the first example described above, the following material is needed:
- cement M500;
- fine sand;
- gravel fraction 20–40;
- expanded clay fractions 20–40;
- fittings Ø16–18 mm;
- edged board 20x200x6000 mm;
- wooden beam 20×20 mm;
OSB sheets are ideal for covering the walls of a chicken coop built using frame technology
- OSB sheets 2440x1220x8 mm;
- slate;
- mineral wool;
- vapor barrier membrane;
- stizol;
- roofing felt;
- metallized tape;
- wood antiseptic.
It is advisable to use galvanized wood screws or galvanized nails as fasteners. To ensure reinforcement of the frame, you can use a steel angle of a suitable size.
Tool for work
To build a chicken coop you need the following tools:
- bayonet shovel;
- hand drill;
- wood hacksaw;
- construction stapler;
- screwdriver;
- concrete mixer;
When insulating walls with mineral wool, the use of a vapor barrier membrane is mandatory
- building level;
- roulette;
- pencil;
- wooden pegs;
- rope.
Do-it-yourself chicken coop for 10 chickens: drawings for calculating sizes
Any construction begins with the creation of a drawing. Do not neglect this stage - regardless of the scale of the undertaking, your drawing should be as detailed and clear as possible. This way you will have a clear picture of what you want to achieve as a result and a developed action plan.
When creating a drawing, it is not necessary to exactly copy ready-made diagrams. This is the beauty of the decision to build a chicken coop with your own hands: you can design a home for the birds at your own discretion, in accordance with the characteristics of your site and your own ideas about convenience.
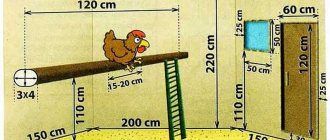
Chicken coop for 10 chickens: A - facade; B - view from the vestibule; B - general plan of the chicken coop.
However, with little experience in building chicken coops for chickens, it is worth turning to ready-made drawings and calculations in order to get your bearings and not miss important details. Particular attention should be paid to calculating the size of a chicken coop with your own hands for 10 chickens, because if the birds live in cramped conditions, there can be no question of any comfort for them.
For example, 3 laying hens need 1 m² of space. This means that for 10 chickens and a rooster, a chicken coop with parameters of 2x2 m will be a sufficient size of home. Accordingly, if you have 20 birds on your farm, the chicken coop should be 3x3 m. And so on - the size of the chicken coop is directly proportional to the number of birds.
If you are building a poultry house designed for year-round poultry, keep in mind that in winter the chickens crowd together and require less living space. At this time, 1 m² of space is enough for 4 chickens. Thus, for 10 birds in winter you will need 2.5 m².
On a note! On the chicken coop drawings, do not forget to take into account the free-running aviary. Its proportions are directly related to the size of the poultry house itself: with a coop width of 2 m, the minimum parameters of the aviary are 2x6 m.
Drawing of a chicken coop for a summer residence, designed to keep 10 chickens.
Features of chicken coops in the cellar
Keeping chickens in a house cellar or utility room basement is a compromise option when building an insulated chicken coop is not possible. In fact, this method of keeping chickens is not much different from the usual one. The only downside is that the chickens will not roam in the fresh air.
When converting a basement into a chicken coop, you should insulate the foundation walls with mineral wool or polystyrene foam
Recommendations for equipping a chicken coop in the cellar are as follows:
- litter - a layer of dry sawdust 4–5 cm thick. The litter is changed as it gets dirty, but at least once a week. Sometimes you can use hay, but you will have to change it more often;
- lighting - LED lamp power from 5 watts. Using artificial lighting, you should regulate the length of daylight hours. This will help increase the egg production of laying hens;
- insulation - mineral wool, stizol or other rolled heat insulator. To protect the insulation, it is better to use a vapor barrier membrane or dense polyethylene. The thickness of the insulation layer is from 5 cm;
- ventilation - vents in which you can install a supply and exhaust valve. The cellar or basement should be well ventilated periodically. For example, at the time of cleaning the litter.
Nests, as in the case of a full-fledged chicken coop, can be made from edged boards on the basis that one chicken requires 30–40 cm of space. The perch is installed 50–70 cm from the floor level. If desired, the perch can be connected to the nests using boards.
Optimal sizes
If you approach the issue of determining the size of a chicken coop scrupulously, then for each breed of bird there is a certain standard of “living space”. But in a country house or in a private house they rarely keep a purebred bird. Therefore, they start from the average.
There are some general guidelines to follow when creating a chicken coop project.
Estimating the area and dimensions of the building
When building a chicken coop, they usually proceed from the planned number of birds. It is believed that 2-4 chickens can live on 1 square meter of area. If we are talking about broilers, you can take 3-4 pieces per square meter. They are inactive and this area is enough for them. If we talk about laying hens or meat and egg breeds, it is believed that the optimal number is 2-3 birds per square area. So, a chicken coop for 10 broiler chickens can have an area of -2-3 square meters, a poultry house for 10 chickens - when keeping laying hens or meat and egg breeds - requires 4-5 square meters. If you decide to build a chicken coop for 20 chickens, the area for broilers will be 5-7 squares, for eggs and meat - 8-10 squares.
A beautiful chicken coop for 10-20 chickens does not need to be hidden in the backyard
But knowing the area of a chicken coop for 20 chickens or 10 is not everything. We still need to decide on the sizes. Most often they try to make a rectangular building: 3 * 1.5 m; 4*, etc. In this case, you can clean the poultry house without going inside - a rake, scraper, broom will reach even the far corners. Square ones are not so convenient in this regard, although a small chicken coop for 10-20 chickens will still not be large. So a square is fine.
How tall should the chicken coop be?
When building a chicken coop, you still need to decide on the height of the building. For birds, a height of about 140-150 cm is sufficient. But you must remember that you will have to clean the house, collect eggs, and change bedding. So when choosing the height of the poultry house, they proceed from their own convenience. For this reason, the roof is made higher than head level - so that you can walk upright.
The height depends on whether you will go inside for service or not.
No overlap
There are two options when installing a roof. First: if the poultry house is without a ceiling (ceiling), you can remove the walls by about 140-150 cm, make the roof gable and raise the ridge by 180-200 cm (or a little higher, as is convenient for you). In this case, you can move around the center of the room without problems, but we still rarely go to the edges. There is usually a perch and nests there, and there may be bedding. You will have to work carefully in this area, protecting your head.
There may also be no overlap inside
The benefit of this option is that with this arrangement we save on wall material. The downside is that more is spent on insulating the roof: it must be insulated over the entire area, which is significantly more than what is required when insulating the ceiling. But, in general, this option turns out to be less expensive, but also less convenient (you have to take care of your head).
With attic
The second option for how to build a chicken coop for 10-20 chickens is to make a mini-copy of a regular house. In this case, the walls are driven to the height required for free movement inside. This is a person’s height, plus 10-20 cm. But keep in mind that part of the height will go to the ceiling, there will also be a floor and bedding on it. Each requires about 15 cm of height. So, if the owner of the chicken coop is 180 cm tall, you will have to make walls with a minimum height of 220-230 cm.
With overlapping you will have to insulate less
As you can see, this option will require more materials for the walls, but only the ceiling (ceiling) can be insulated, and the attic can be left cold. The attic can also be used to store straw, bedding, etc. But don’t forget about rodents, who love such storage facilities and can become a problem.
On poles
Another option: make a chicken coop for 10 chickens on poles. In this case, 4 beams are dug into the ground at the corners of the building, the floor covering is made at a height of 50-80 cm from the ground level. The roof is made at a height of 180-200 cm. In general, this is a convenient option for a mini-chicken coop for a summer residence. This is more of a summer option, but can be insulated. In order for the bird to be able to get in and out, an inclined ladder is made from boards with thin perches nailed about 10 cm apart to make it easier for the bird to move.
Why not a mini-chicken coop for 5-6 chickens?
In general, you choose the height and general construction plan at your own discretion.
Chicken coop care after winter
Disinfection of the chicken coop is carried out for preventive purposes at least once a year. This allows you to avoid an outbreak of infection and the spread of harmful microorganisms. It is best to carry out disinfection in the spring or summer, when the chickens can safely walk in the fresh air and you can clean the chicken coop.
A set of products for disinfecting chicken coops and other objects where animals and birds can be kept
To disinfect the chicken coop you will need to do the following:
- cleaning - the floor, walls, ceiling, perches and nests must be completely cleaned of dirt and dust. To do this, use a convenient broom and brushes with hard bristles. After this, the surfaces are washed with hot water with the addition of soda ash;
- treatment - special means are used to disinfect the internal space in the chicken coop. For example, caustic soda in the form of a 2% solution or a 4% xylonaftha emulsion. The solution is prepared strictly according to the recipe without exceeding the norm. When processing, personal protective equipment is used: goggles, gown, respirator.
After treatment, you should wait until the product evaporates completely. The minimum holding time is 2 hours, but it is advisable to wait at least 5–6 hours and only then release the birds. And they also disinfect feeders, drinkers and other accessories that were in the poultry house.
Choosing a place to build a chicken coop for laying hens at the dacha
Having decided on the size of the future poultry house and the materials and tools necessary for construction, you can begin to choose a place for construction. Regardless of whether you decide to buy a ready-made chicken coop or build a mini chicken coop with your own hands, it is important to choose a suitable location. After all, the birds will spend all their time in this place: sleeping, laying eggs and walking, so it is important that it does not become a source of discomfort for the chickens.
Follow the following rules for building a chicken coop at your dacha with your own hands:
- the place should be dry - excessive humidity can have a detrimental effect on the health of the birds;
- choose a surface with a slight slope so that in case of heavy rainfall, the water drains quickly without spoiling the soil near the chicken coop;
- make sure that the chosen place is well lit;
- Ideally, the enclosure where the chickens will roam should be on the south side, so that it is warmed by the sun’s rays at any time of the year.
The location for the chicken coop must be chosen with special care, which will ensure comfort for the chickens and increase their egg production.
The main advice on how to properly build a chicken coop prohibits placing it on the ground. The building requires a good foundation - a foundation.
Video: review of a winter chicken coop with walking
The construction of a chicken coop is not particularly difficult - the work can be done independently, without the help of auxiliary workers and specialists. To do this, carefully study our instructions and read the advice of other chicken breeders, which can always be found on the Internet.
- Author: Vitaly Varlamov
Hello. My name is Vitaliy. Area of professional activity: technical means of automation and design technologies. Rate this article:
- 5
- 4
- 3
- 2
- 1
(86 votes, average: 3.8 out of 5)
Share with your friends!
Winter chicken coop at the dacha: insulation of poultry houses
In addition, at the stage of wall construction, you should think about ensuring a comfortable temperature for the birds. First of all, it matters whether you are going to keep chickens in the house all year round or whether it is a seasonal building.
How to build a winter chicken coop: (read more)
If the chicken coop is intended to be used during the cold season, after you have lined the walls with boards on the outside, you need to take care of the thermal insulation of the structure. This is an important point, since when the microclimate is disrupted, chickens begin to experience discomfort, get sick and, as a result, become inactive and lay less eggs.
If you are planning to build a chicken coop at your dacha with your own hands, photos and diagrams will become indispensable assistants in this matter. Well-drawn drawings show that the winter poultry house is provided with thermal insulation. One of the following options is suitable as a material for these purposes:
- Styrofoam;
- mineral wool;
- ecowool.
After the insulation has been installed, the entire structure must be covered with boards from the inside.
Insulated poultry house for year-round keeping of chickens in the country.
Note! It is not necessary to use boards to cover the walls. Plastic, fiberboard, chipboard, etc. can easily be used as a suitable material.
But, of course, laying insulation is not enough to provide the bird with comfortable conditions in winter frosts. Therefore, if you intend to keep chickens in a poultry house all year round, it makes sense to buy a ready-made winter chicken coop for 10 chickens or study in more detail the information on how to build a special poultry house for the winter with your own hands.
What is a smart chicken coop
A smart chicken coop is equipped with systems that control the microclimate, supply of feed and water for birds
Even the simplest mechanization of some functions makes the life of the chicken coop owner easier. Automatic drinkers allow you to change water once a day by simply filling the main container. Turning the lights off and on eliminates the need to walk around the yard late at night and early in the morning in winter.
An autonomous chicken coop combines automation, remote control and independence from external conditions. This option can exist unattended for 2 weeks and provide birds with warmth, drink, food and light.
The advantages of an autonomous system over a mechanical model are significant.
- Automatic heating – heating is adjusted to maintain a temperature comfortable for the bird. Heaters operate in economical mode. The required difference in daily temperature is taken into account. In addition, the control panel allows you to set different heating levels in different areas. The chick compartment needs to be heated more intensely. An area with nests for laying hens does not need good heating.
- Short daylight hours affect egg production, so electric lighting is used in autumn and winter. Automation allows you to set the lighting to turn on and off at the appointed time.
- The drinking bowl system can be connected to the water supply and the smart home. At the same time, the supply of clean water becomes automated.
- It is possible to automate the preparation of feed and its supply to birds, as well as the removal of excess.
- You can also take control of ventilation, which is important in the hot season.
- An automatic egg collector prevents chickens from pecking eggs. And you can’t pick them up every day.
- A smart automatic chicken coop for a private home ensures the protection of birds. The poultry house can be equipped with an alarm system.
- Work data can be transferred to the owner’s phone or laptop. At the same time, the owner of the dacha can control the system from a distance and change the settings.
The only drawback is the need for electricity.
The water supply, ventilation, and heating systems can be synchronized with the smart home system. To do this, you will need to equip your chicken farm with special sensors. The most commonly used hardware and equipment is the Arduino complex. The poultry house is equipped with Wi-Fi and controlled using gadgets connected to the Smart Home system.
Chicken coop foundation
There are options. They most often build on posts - they make a columnar foundation. It happens - they make a shallow pile or strip. But this is the case if the material chosen for the walls is heavy, or which requires a rigid base: brick (ceramic, silicate, adobe), foam and cinder blocks, shell rock, etc. For light buildings made of wood - frames, timber, logs - it is enough to fold the columns or install ready-made foundation blocks (you can make them yourself).
These are posts for a frame barn for chickens
In the case of columnar and pile foundations, supports are placed in the corners and 2-3 meters in between them. The load on the base will be small, so they rarely work too hard.
What should a good chicken coop look like?
The bird should feel good in the chicken coop, so the optimal temperature inside the room is maintained all year round. Perches, canopies, feeders and nests are needed for a comfortable stay in the chicken coop.
A ventilation system is equipped because poultry waste products spoil the air. This is bad for the health of chickens.
The egg production of a bird depends on the mode and quality of lighting. Light bulbs are placed in the chicken coop, they dissipate heat and provide the necessary light. The wiring is hidden under the floor or in the walls so that chickens do not have access to them.
The structure is installed away from the residential building so that the bird feels calmer. The necessary protection is provided. Metal bars are placed on narrow passages to prevent predators from entering the premises.
Heating
It is difficult to overestimate the importance of properly installed heating for a winter chicken coop. All poultry house owners know this: at above-zero temperatures, laying hens feel great and lay eggs well in winter.
Electricity
If electricity is supplied to the chicken coop, you can heat it with fan heaters or infrared lamps. fan heaters . Not in the sense that they are cheaper, but in the sense that they will use less electricity over the winter. There are two types of automation: temperature and time. Naturally, to heat a chicken coop it is better to take one that reacts to temperature. As soon as it gets cold, say, to 0°C, it will turn on; when it rises to +3°C, it will turn off. In general, you choose the settings yourself. The method is effective and quite popular.
Chickens are also often heated with infrared emitters . But they do not heat the air, but objects that fall within the range of the rays. They are hung above perches and several above the floor. If the birds are cold, they gather under them. It can be cold in the chicken coop, the main thing is that its inhabitants are warm. This is exactly what happens with infrared heating. One caveat: IR lamps burn out from frequent switching on/off, so it is advisable to turn them off very rarely. For people, they burn for months, fortunately they “draw” little electricity.
It is also important to know about the operating features of IR heating lamps (they are for lighting, do not confuse them). The surface of the lamps heats up; the design of the lamp itself is not adapted to such loads. Plastic sockets do not hold the lamp well, but finding ceramic ones is a problem. To ensure fire safety, it is better to make a wire cage for the lamp. This way, the chickens won’t get burned, and if the lamp falls out, it won’t break and the litter won’t catch fire.
Oil radiators are ineffective: high consumption, little heat. Homemade devices with an open spiral are effective, but very fire hazardous, and you will have to leave them on. This is too much of a risk.
IR lamp heater in a mesh casing
Boiler and stove
There is also a heating option - a boiler and radiators. But these are dreams for most. They also heat it with a potbelly stove, a wood-burning boiler, or build a small brick stove. Moreover, they try to route the pipe through the chicken coop so that it provides maximum heat. If the stove is iron, it can be lined with brick, like an iron pipe. Once heated, the brick retains heat for a long time. With normal insulation, one heating is enough for a couple of days.
Heating a chicken coop by decomposing sawdust
There is a way to maintain positive temperatures without heating - using the heat released during the decomposition of sawdust. But it only works if there is normal (at least) insulation. Sawdust is poured onto the floor. The first layer is poured in the fall, before the first cold weather. The layer is about 10-15 cm. It lies for a month and a half.
This bedding is much better than hay: chickens do not get sick, since sawdust regulates humidity well. They also love to rummage in the litter, and are constantly busy with this, so the laying hens do not get fat even with plenty of food and limited walking.
Chickens with sawdust feel great even in the cold
After 30-50 days, add a fresh portion of sawdust (you can tell by the smell and appearance). And this time, too, about 10 cm. Then - again. By the end of winter, a layer of about 50 cm has accumulated. Moreover, even in decent cold weather, the temperature inside the chicken coop remains at least 0°C, which is enough for laying hens. If you bury yourself in such litter, it will be about +20°C. What chickens do in the cold: they dig holes and sit in them. This is sawdust: a decomposition reaction occurs, releasing a large amount of heat.
In the spring, the entire mixture is taken to the compost heap, after some time it will become an excellent fertilizer. But one more thing: in the fall, you have to put a high board in front of the door so that the bedding doesn’t spill out. Walking is uncomfortable, but the draft from under the door is eliminated.
NO AMMONIA SMELL
There is no damp, rotting litter in the room. And the built-in exhaust fan completely cleans the air in 15 minutes.
However, the design also has its disadvantages.
First of all, electricity costs. You have to pay for beauty. Heating for the winter period is only electric. We use an electric heater with temperature control. We do not turn on the heating until the frost sets below 10°. During this time, chickens grow thick and warm down, which will warm them in winter. Even at minus 15°, my chickens walk outside all day. Young laying hens lay eggs all winter, except when they rest on days when the thermometer drops below minus 25°. In this case, an infrared lamp was hung on the wall so that the light fell obliquely along the entire length of the perches. The result was different temperature zones: the closer to the lamp, the warmer.
This coop is also not suitable for laying chickens.
. Children can fall from heights and be killed. That’s why I don’t leave eggs under the hen - I change the stock by buying 4-month-old chickens, or I raise store-bought chickens only in the summer, fencing the support posts of the chicken coop with mesh and putting a box of hay for the kids to sleep there for the night.
Having chosen a high, dry place on the site, we made a cement border around the entire perimeter of the site, on which the chicken coop itself and the walls of the chicken enclosure were later installed. We installed a PVC pipe to drain water in case of flood. And for our convenience, they also cemented the path leading from the house to the chicken coop.
8 support pillars 80 cm high are made of timber with a cross-section of 100x100 mm and connected to each other by timber 100x50 mm. 4 stand on the curb, and cement blocks are dug under the rest.
Along the long side of the chicken coop, every 50 cm, 100x25 mm boards were inserted and secured with an edge - the logs of the future floor.
A whole 125x250 mm OSB sheet was laid and secured on top of the structure, the missing fragment was cut out and joined flush. The floor is ready, all that remains is to insulate it and sheathe it underneath.
All walls are assembled according to the sandwich principle: the timber frame is insulated and sheathed on the outside with OSB sheets. The timber was sawed into sections according to the drawing, and holes were drilled for screws to prevent cracking. Lay it out on a flat surface and secure it with clamps. The timber was screwed together using a Kreg Jig for drilling oblique holes. If it is not there, everything gathers in the corners.
The frame was laid on an OSB sheet, the window and door openings were outlined with a pencil, which were then cut out with a jigsaw and screwed in place. The second side of the wall was prepared in the same way.