Home » Articles » Ceilings » DIY plasterboard suspended ceiling
September 26, 2021 No comments
Suspended ceiling made of plasterboard sheets: all stages of installation on your own - from project preparation to coating with the finishing composition.
When a homeowner intends to install a suspended ceiling with his own hands, he is faced with a choice of what materials to choose and what design solution will suit him perfectly. After all, he can buy building materials of any color and install a ceiling structure in any design solution.
Plasterboard ceiling
Positive qualities of drywall
There are a lot of finishing materials, but experts prefer drywall. For our compatriots, this building material remains the most popular. Unlike previous developments, modern models have:
- resistance to high temperatures;
- moisture resistance.
Drywall offered:
- fire-resistant types;
- moisture-resistant models;
- standard varieties.
Types of drywall by edge type
Here are the main advantages that made drywall so popular.
- No complex preparatory procedures are required. The material is easy to process.
- Sheets of drywall are inexpensive.
- Installing such finishing material is simple.
- It is easy to care for the installed plates. It is enough to wipe the ceiling surface with a damp cloth several times a year.
- Drywall is used everywhere.
GKL sheets Knauf
It is worth highlighting some disadvantages.
Firstly, drywall does not look as aesthetically pleasing as PVC film.
Secondly, not all drywall is moisture resistant. Therefore, moisture can completely destroy the ceiling surface. Then it will need to be replaced.
Thirdly, only fire-resistant material is not considered flammable. So such a ceiling cannot be installed in all rooms.
Ceiling design
When creating a project, they often use one of the architectural programs. A ready-made scheme is offered. Indicates what consumables will need to be purchased. Of course, you can do the work the old fashioned way, but then more effort, money, and time will be spent.
Plasterboard ceiling project
First stage. The perimeter is calculated using a simple formula. For example, the dimensions of the room are 4 x 5 m. Then 5 x 2 + 4 x 2 = 10 + 8 = 18 m.
This is the length of the guide profiles. All data is printed on graph paper.
For your information. The length of opposite walls may not be the same. Then the larger indicator is used for calculation.
Ceiling markings
Second phase. The frame profile is calculated. To complete the work, you will need profiles 6 x 2.7 cm. They are fixed in increments of 60 cm. It is necessary that each profile has the same length as the width of the room.
The number of slats is determined as follows: the width of the room (in centimeters - 400) is divided by the pitch (in centimeters - 60). The result is a figure of 6.66. This result is rounded to 7.
Two slats (the first and the last) are fixed, retreating from the wall surface by 10 cm. The remaining sections are fastened according to the indicated step. The places where the slats are fixed are indicated in the project.
You need to understand. Calculating a pitch of 60 cm is not a random number. It should be taken into account that standard plasterboard sheets have a width of 120 cm or 60 cm.
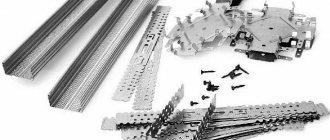
Accessories and fasteners for drywall
Third stage. You need to decide how many hangers are needed. The step for their fastening is also 60 cm.
The number of hangers is calculated in this way: 400 divided by 60, the result is 6.66. The result is multiplied by 7. This means that (after rounding up) 47 pcs.
It is customary to attach the first and last suspension 30 cm from the wall surface. In the diagram, such places are indicated by crosses.
Preference is given to spring suspensions. Direct hangers are usually used:
- if the ceiling surface is absolutely flat;
- if the height of the structure exceeds 12 cm.
Fourth stage. Determine the required number of jumpers. They give the structure the required rigidity. ((400/60) – 1) x 7 = 40 pcs.
Profile hangers for plasterboard
Fifth stage. All that remains is to calculate how much is needed:
- plasterboard sheets;
- self-tapping screws
The area of the room is 20 sq. m, and the sheet area is 3 square meters. m. This means that you will need almost 7 sheets of drywall.
And the number of screws is also calculated very simply, but you need to take into account the following rules.
- Drywall is fixed with “thirty” self-tapping screws, with a step length of 25 cm.
- For walls, the 60 x 6 option is used (taking into account the step length of 30 cm). For the ceiling - 60 cm.
- The fittings will be fastened with LN11 screws:
- for profiles and hangers - 2 pcs.;
- for profiles and “crabs” - 4 pcs.
In addition, it is necessary to decide on the number of lighting fixtures and note their location. It is necessary to calculate the length of the electrical wiring with a small margin for connections.
DIY drawings
Well, let's stop with the lyrics and move on to more specific information.
Drawing up drawings
Let's look at three options for the path you can take.
Paper drawings
- The first is to draw up a drawing manually, using classic compasses, drawing boards and other devices. The requirements for this approach are quite simple - your task is to complete the drawing to an exact scale in two planes, indicating the actually calculated dimensions of all its parts. The disadvantage of this method is that you will need to remember the basic drawing techniques that you once studied at school, and if you do not have enough experience, there is a high probability of making a miscalculation, which will subsequently cause many problems.
Making a drawing in a computer program
- The second method is to use various computer programs to create 3D drawings. One of the most popular such programs is AutoCAD. This product is notable for the fact that for a one-time job you can download the student version completely free of charge and legally from the official website of the developer. Although its functionality will be limited, it will be sufficient for the task we are considering. The downside of this solution is that you will need knowledge of such programs and the ability to work with them.
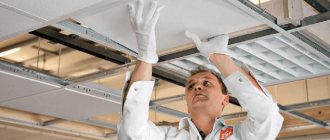
Professional at work
- The third and most correct option is to order a professional drawing from an architectural bureau. Of course, this will require an investment of a certain amount, and for some it may seem like a lot, but the benefits you will receive will be quite significant. Firstly, you guarantee yourself the accuracy and correctness of the calculations. Secondly, experts will take into account not only the appearance of the ceiling, but also its optimal design in terms of strength. Otherwise, you warn yourself against possible inconsistencies at the installation stage, since the person responsible for the design appears
The rest is, of course, up to you to decide. You can limit yourself to a simple sketch of the outlines on a pack of cigarettes and not go wrong. In general, weigh the pros and cons and make a decision that suits you.
Not only to draw, but also to see
Here is a virtual design project of the premises
Let's talk a little more about creating drawings using a computer, since this is the most modern and accurate method. This is what professionals will use.
What this method can offer that cannot be achieved in other ways:
- By downloading a library of ready-made materials, profiles, fasteners, hangers and other things, you can check whether your idea can be brought to life and what will be required for this.
Visualization of the scene in a 3D program
- Working in 3D with textures, the view will allow you to see the final result of your work without buying materials or spending effort on installation. The images are sometimes so realistic that they are difficult to distinguish from real photographs.
- Having seen the finished result, you will immediately understand whether you like this design, which, as you understand, will be much cheaper and easier than assembling everything after the fact, and only then being disappointed.
Collection of equipment, purchase of consumables
Tools for installing drywall
Each master independently determines what tools he will need. Much depends on the skills acquired by each specialist individually. Therefore, only those tools and materials are listed here without which it is impossible to perform the work efficiently:
- guides;
- metal scissors;
- hammer drill (respectively, drill bit);
- “serpyanka” (a suitable width of tape for seams);
- screwdriver;
- dowels;
- laser level (to take measurements of the entire room);
- water level (minimum length - 2 m);
- drywall;
- hammer;
- self-tapping screws;
- roulette;
- anchors fixing suspensions;
- “crabs” (fasteners);
- ceiling suspensions;
- mounting knife;
- ceiling profiles;
- Master's protective equipment - plastic goggles, respirator, gloves.
Important! Each ceiling has its own characteristics. Therefore, additional elements may be required to work with it. For example, if the butt profiles are located at different heights, clamps will be needed. This means that large stones were mixed in the concrete, now preventing normal drilling.
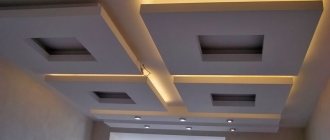
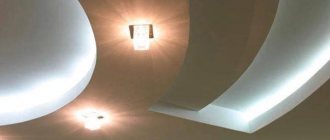
Combined ceilings
When you have a choice between a suspended ceiling and a plasterboard one, you don’t have to give up one of the options. They can be combined. For example, all three-dimensional figures should be made of plasterboard, and the rest of the space should be leveled with a suspended ceiling. Thus, you can combine matte and glossy textures. And this is very beautiful.
Mounting the guide frame
Act one. Using a tape measure, determine the lowest angle of the room. The label is set:
- if built-in lighting fixtures are not installed, then 5 cm from the ceiling;
- if you plan to install lighting devices, then 9 cm from the ceiling.
Act two. Mark the same height in all other corners using a level. Along all walls, additional marks are installed at the height of the first point (several marks are made). They should be connected. For this use:
- long ruler;
- construction cord (you need to stretch it well);
- multi-point notation.
Act three. The guide profile is attached to the walls. Corners are usually equipped with butt seams. In rooms with large square footage, this is done without fail. But then the structure will need to be strengthened so that the elements do not move apart under its weight. For this purpose, use any material with good density:
- plastic;
- tin;
- plywood
Fastening the guide profile
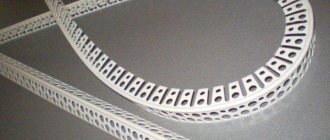
This material is applied over all seams. It must be firmly attached to the wall with dowels. Next, the corner joints of the profile are strengthened.
On a note. You can use serpyanka sealing tape. Although it is not sold in all specialized stores.
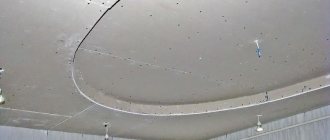
Installation of the main ceiling profile
Connection of 2 profile levels
Installation should be carried out in strict order.
- The usual dimensions of plasterboard sheets are 120 x 250 cm. So the ceiling profiles will need to be fastened in increments of 40 cm. Then each sheet can be secured at the edges, as well as in the middle in two places. It will be necessary to make parallel markings in compliance with a 40-centimeter step.
- Jumpers are formed from the same profile and attached to the transverse walls (every 250 cm). But the dimensions of the sheets may turn out to be non-standard, then the distance is determined by other calculations. “crabs” are installed at the joints.
Connecting ceiling profiles with a crab
- You need to decide where the hangers will be installed. The first suspension should be installed 25 cm from the plane of the wall. And subsequent suspensions - taking into account a step of 50 cm. The suspensions are secured with anchors. Here ordinary dowels are not used, because they do not have threads. And then, under the influence of gravity, the structural elements will spontaneously “pull out” from the ceiling.
- Attach ceiling profiles to suspensions. They begin to do this work from the corners of the room. We can assume that the frame for the suspended ceiling is completely prepared.
Attaching the main profile to hangers
Attaching a metal profile to the ceiling
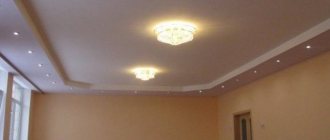
Plasterboard ceilings in various rooms
In the hall and in the living room
In the bedroom
In the children's room
In the kitchen
In the hallway and in the corridor
In a private house
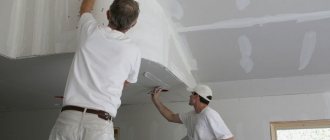
Method of installing plasterboard sheets
Attaching drywall to the profile
First step. The material is cut for installation in places where there is no need (possibility) to place whole sheets.
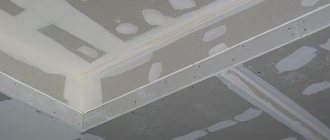
Second step. Using a mounting knife, chamfer the edge. Then it is possible to ensure deep penetration of the prepared putty composition into the cracks.
Fastening plasterboard sheets, joints
Third step. Begin to attach sheets of drywall from any angle. You will need to place the first screw at a distance of 10 cm from the edge. You need to maintain a distance of 20 cm between screws.
Installation of gypsum board sheets on the ceiling
Should be considered. The screw heads should not protrude. It is also highly desirable that the screws on adjacent sheets be placed at random, and not opposite each other.
Fourth step. It's time to install all the other sheets. There will only be a gap around the perimeter. It is insignificant - approximately 2 mm. When these sheets are joined, a minimum shift of one cell is allowed. Make sure that all sheets are attached both at the edges and in the central part.
Layout of sheets
Drawing up a diagram
Depending on what type of frame is chosen, the necessary measurements are taken. Then a diagram is drawn on a sheet of paper, taking into account the features of the selected design.
For a cellular frame:
- The length of each wall is measured. Each one, since often opposite walls in apartments do not match in size.
- The distance from floor to ceiling is measured at the corners of the room and in its center.
- The thickness of the suspended structure is calculated from the lowest point of the ceiling. It depends on what will fit in the space between the base surface and the drywall. This could be insulation, sound insulation, lighting elements, wiring or other communications. The minimum distance between the ceiling and plasterboard is 50 mm.
USEFUL INFORMATION: How to apply liquid wallpaper to drywall and is it possible to do it?
- A diagram of the location of the supporting profiles and cross members is drawn. In this case, it is necessary to choose the optimal step so that the sheets are necessarily joined on the profile. Typically the step is 60 cm.
- The result is a grid with cells of the same size. On it you need to mark the places where the hangers are attached in increments of 30–40 cm.
- It would be useful to mark all communications and the location of lamps on the diagram.
For the transverse frame:
- The height of the structure is selected according to the same principle.
- The pitch of the supporting profiles is 0.5 meters.
- The locations of the hangers are determined in the same way as for a cellular frame.
There is no clear algorithm for multi-level structures. The order of work depends on the number of levels, the location of the boxes and other features of the designer ceiling. But the general principles for placing fastening elements remain the same.
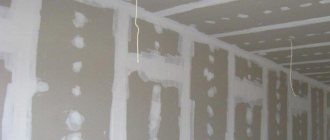
The final stage is finishing the ceiling
A primer is used for initial sealing of joints. The porous structure changes, the material becomes denser. As a result, it absorbs putty better. You need to wait until the putty composition is absorbed and dry.
Puttying a plasterboard ceiling
Putty must be applied to the seams between the plasterboard sheets and to the screw heads. This work is done with a high-quality spatula. Its edges should be smooth and sharp. You should use a putty compound designed specifically for sealing joints. This purpose must be indicated on the label.
After the seams have completely dried, seam tape is used for subsequent gluing. The joints, which is important to consider, must be sealed with an overlap. Then the tape is treated with putty. At the same time, all cracks that can be identified are sealed.
You need to wait until the putty layer dries. After this, the finishing coat can be applied. This can be plaster, paint, etc. To complete the arrangement of the ceiling, lighting fixtures are installed. Naturally, if they were initially provided for in the project.
Decorating walls with plastic panels in the bathroom, read here.
Prices for gypsum boards
Video: DIY plasterboard suspended ceiling:
(No Ratings Yet)
Types of ceiling frames
There are two types of lathing:
- Cellular, when load-bearing profiles or beams create a kind of lattice (see next photo). As a rule, it is used in most cases of leveling the ceiling with plasterboard.
- Transverse. Profiles or slats are located in only one direction, and the gypsum board is attached to them across. This method is usually used by experienced craftsmen.
USEFUL INFORMATION: Drywall slopes: do-it-yourself installation
There are also single-level and multi-level designs. A ceiling with two or more tiers is quite difficult to calculate and install, but all costs are more than offset by the original appearance. To develop projects of such structures, it is better to seek the help of a professional designer.