The warmest and most environmentally friendly houses are buildings made of wood, namely log houses. As you know, wood saves and accumulates heat well, so the walls of the house are also endowed with these important properties. There are many statements that the thermal conductivity of a wooden wall, which is only 24 cm thick, is equal to the thermal conductivity of a brick wall with a thickness of about 1 m. And this is really impressive. However, it happens that during operation you notice that in winter your house is not as warm as you would like, and sometimes there are even drafts. In this case, you need to think about insulating your home and removing all cold bridges so that the heat is retained inside and the house is well insulated. We can say that in harsh regions, every room needs insulation. Therefore, next we will look at how to insulate a log house, what exactly needs to be insulated, what materials are best suited for this purpose, and also consider in detail the stages of insulation work.
Why is it cold in a log house?
It might be cold inside
Before you start fighting the cold, you need to determine its source. Although wood is a fairly warm and accumulating material, it can be cold in such a house in winter. Why? Owners of log buildings often face the following problems:
- Frequent drafts in the rooms.
- Cold feet due to the wind blowing through the legs.
- After turning off the heating system, the house begins to cool down quickly.
- Cold walls.
There are a few more different nuances that we will not mention. Still, this is enough to think about urgent insulation of the house. Let's look at what happens in the house when it is heated. For example, you have a house made of logs, which you heat using any heat source, be it gas heating or electric. The heat exchange at home involves:
- heat source;
- indoor air;
- ceilings;
- walls;
- floor.
How does everything work? We know from a school physics course that air heated by a heat source begins to rise up to the ceiling. When it rests on its surface, heat transfer occurs, which cools the air. What is the result? The most heated and warmest part of the house is the ceiling. Now the air is directed towards the walls, going down along their surface. Please note that the walls are much colder than the ceiling due to the external influence of frost, so the air begins to cool faster, increasing its movement speed. Then the air flow is directed to the floor, having gained sufficient acceleration, moving along its surface at such a speed that it seems to you as if such a draft is blowing through your legs that there are no walls at all. Moreover, if a heat source, such as a portable radiator or fireplace, is installed directly next to interior walls, as is often done, the flow rate will increase even more. So it turns out that there is a constant draft in the rooms, which is caused by the owners themselves.
Movement of warm air inside the house
To avoid this, special building codes were created, according to which heating radiators should be placed under windows. It is clear that the coldest are the outer walls, while the walls inside are quite satisfactory. It turns out that when the heat source is located under the radiator, warm air prevents the penetration of cold, and also, when rising and falling along the walls, it will not cool and move so quickly. Why? The air flow will flow down the inner walls, which are much warmer, and when it goes down the outer wall, it will collide back with the heat source, which will heat it up, repeating the entire cycle. In this situation, the following results: the house warms up much faster, and the entire structure retains heat better, because it is not wasted, but accumulated.
But this is not the only reason why the house may be cold. Heat loss often occurs due to poor-quality thermal insulation and cold bridges. To eliminate heat loss, you need to check:
- Ceiling. The first thing you need to check is this, because it is through the ceiling that up to 70% of all heat escapes. It is important for you to retain heat in the house and insulate the attic or attic.
- Walls. All external walls and the elements within them, such as windows and doors, account for the lion's share of heat loss. Improperly installed doors or windows are the first reason why the house may be cold. Warm air will simply leave the room, and cold air will fill it. It will be very difficult to heat the room. Moreover, cracks in the walls also lead to this effect.
- Floor. This is the last source of cold in your home. It must be in good working order and insulated. In winter, subfloor ventilation should be reduced.
Heat loss at home
Next we will look at how to get rid of these problems and minimize heat loss through the ceiling, walls and floor. Let's find out what and how to properly insulate a log house.
Possible heat loss of a wooden house
Sometimes the cause of cold inside a wooden house can be the logs themselves if their diameter is too small. Such a mistake is often made at the initial stage of designing a structure, when the designer does not take into account the level of humidity and sub-zero temperatures in the area.
As a rule, in regions where the humidity level is high and frosts are minus 20 degrees, for construction you need to choose logs with a diameter of at least 480 mm.
Places where heat loss occurs are sometimes visible to the naked eye. For example, if the wallpaper is coming away from the wall or it is very cold in some place, then this is a sign that heat loss is happening here.
To identify the leakage of warm air from a wooden room, you can take a burning candle and walk throughout the house, starting from the attic, attic and ending with the floor.
In the place where the candle flame flutters under the influence of air movement, heat leaks. Also, when examining the walls, you can see frost in some places - this also indicates that it is there that warm air is leaking out.
Requirements for insulation materials
By insulating your home, you can reduce heat loss, while the cost of heating the room will be significantly reduced. This will make your stay in the house much more comfortable. We invite you to remember what and how our grandfathers and great-grandfathers used to insulate a log frame. They had various materials in their arsenal to insulate the walls of the building. This was also the so-called “mazanka”, which consisted of straw mixed with clay, as well as shingles of wood, which were used to plaster the walls. This simple method helped residents solve the problem of drafts; moreover, the walls could still “breathe.” It is worth noting that this did not spoil the appearance of the building; it seemed more well-groomed and neat.
Lathing for insulation
But, as time goes on, the construction industry is developing, and the use of such old-fashioned methods is no longer relevant. Today we have a lot of insulation materials that are much more effective and much easier to work with. Therefore, before you engage in insulation, you need to familiarize yourself with the properties that such materials should have. This will help insulate your home correctly and 100% effectively. What qualities should an insulating material have? These are the main properties:
- good vapor permeability. It is important that it is the same as that of wood;
- high resistance to moisture. As you know, wood and moisture are incompatible concepts, so the insulation should not accumulate condensation so that the wood does not rot;
- the material must breathe, easily allowing air to pass through;
- high fire resistance to protect the house from fire;
- it should fit closely to the rounded structure of the wall and fill the gaps.
Taking into account all these recommendations, you can choose the insulation that will perform its functions efficiently. But the question arises, how to insulate a log house? Now we will look at the ideal options for insulating a wooden house.
Insulation options and features
Thermal insulation is carried out in the presence of heat loss. The areas where parts of the structure meet are most in need of protection. Regardless of the type of insulating material, proper caulking of the gaps between the logs can improve the effect.
Before starting to insulate the house, it is necessary to caulk the log walls.
Internal and external insulation is suitable for a wooden house. Internal is rarely used due to its inexpediency.
What to use
As mentioned earlier, the entire insulation process comes down to insulating the attic or ceiling, caulking the walls, insulating door and window frames and the floor. If all these procedures are performed correctly, no additional work will be required.
Insulation scheme for a log house
It is worth noting that most often the reason for building a house from wood is that it is a natural and environmentally friendly material, so it is stupid to talk about using polystyrene foam to insulate it, because then the whole point will be lost. Moreover, its properties do not match those that are recommended. What then should you use?
To insulate the attic, experts recommend using the following materials:
- sawdust;
- cellulose wool (ecowool);
- straw;
- seaweed;
- mineral wool.
Ecowool
If we talk about caulking walls, then it should be made only from natural materials:
- moss;
- tow;
- hemp;
- jute;
- insulation based on jute and flax.
Materials for caulking
The main requirement for materials is that their properties are similar to those of wood.
To insulate a wooden floor on joists, roll mineral wool or natural backfill materials are used. As for concrete floors, a more dense material is required. It could be:
- cork;
- basalt wool in slabs, the density of which must exceed 160 kg/m3;
- expanded polystyrene;
- extruded polystyrene foam.
Scheme of floor insulation in a wooden house
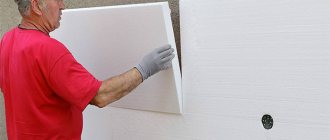
It happens that even after performing all these basic procedures, the room may be cold. Why and what to do about it? The reason may be that the thickness of the logs was incorrectly selected during construction. It should also not be ruled out that the house is already old or the heating was calculated incorrectly. In any case, you will have to insulate the walls. Taking into account all the requirements for insulating a house, to insulate the walls outside you can use:
- Ecowool.
- Sawdust or sawdust granules (fill material).
- Mineral wool.
- Expanded clay (fill).
Wood is a difficult building material, because it is not only capable of “breathing,” but is also considered a kind of air recuperator. When air enters the thickness of the wood across the fibers, it is then distributed along these fibers, exiting through the end. It turns out that the tree “breathes” through the ends. That is why for such “living” walls you cannot use:
- Styrofoam.
- Polyurethane foam.
- Extruded polystyrene foam.
- Polyurethane foam to eliminate cracks.
- Various sealants.
Insulation of log walls from the outside diagram
If you neglect this advice, such vapor-proof materials will cause the wood to simply rot during use. And if you protect the wood from the inside with a vapor-proof film, then the entire log house will turn into a thermos.
Insulation of walls outside with ecowool
How to insulate a wooden house from the outside
If there are cracks in the walls, it is better to seal them in warm and calm weather. In order for the material to fit tightly, it must be compacted using caulk.
To eliminate cracks use:
- Moss;
- Tow;
- Jute;
- Hemp.
If a wooden house has just been built, then it is better to do external thermal insulation after 1-1.5 years. This period is necessary to give the log house the opportunity to sit down. If you neglect this rule, it may turn out that, under the influence of subsidence, the thermal insulation will be deformed and cracks will form, which will lead to heat loss from the inside.
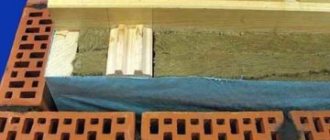
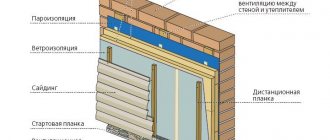
To insulate a wooden house, you can install a ventilated facade. In this case, the walls will be able to breathe, and the moisture will be released back.
To make a ventilated facade, you need:
- Clean the walls from debris and plaque.
- Treat the wood with an antiseptic to protect the walls from fungus. You can use a primer. After treating the walls, it is better to wait some time for the antiseptic to dry. It is better to choose a time for such work when rain is not expected.
- Install the sheathing. It is needed to lay thermal insulation. To correctly calculate the distance between the bars in the sheathing, you should know the dimensions of the material for thermal insulation. If these are slabs, then it is better to first take the dimensions from them, and only then do the sheathing. The bars must be installed level.
- Installation of thermal insulation material in the sheathing. It must be laid very tightly; there should be no gaps between the plates. If the slabs protrude too much, you can remove the excess with a sharp knife.
- Waterproofing layer. It is made to protect thermal insulation from penetration of wood. The most commonly used is a waterproofing membrane. A layer of waterproofing material is attached to the sheathing with a construction stapler. It is better to glue the material at the junction using construction tape or tape.
The last stage of insulating a log house from the outside is finishing the walls.
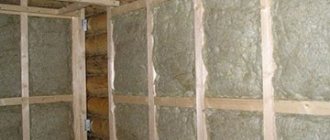
Ceiling
To begin with, it is important to do everything to insulate your home from the inside. We found out that the lion's share of all heat escapes through the ceiling, so the first place to start insulating the house is from there. Many people do not take this event very responsibly and do not always want to insulate the ceiling. Still, the undeniable fact is that warm air always rises, and if the top is not insulated, then it (the air) will simply go out into the street. Believe me, all the money spent on insulation will be fully recouped, since you will save significantly on heating.
So, what do you need to insulate the ceiling? These are the following tools:
- knife;
- hammer;
- hacksaw;
- electric jigsaw;
- screwdriver;
- tile adhesive.
In order to build the sheathing and frame, prepare:
- nails or screws;
- glue;
- edged board;
- polyurethane foam;
- drywall.
Insulating the attic ceiling
As for the insulation material, it is better to use ecowool or mineral wool. If we talk about mineral wool, it is a relatively inexpensive material that is distinguished by its positive qualities. Mineral wool does not burn, is tensile strength, has soundproofing properties and is easy to work with, so even a beginner will be able to complete the installation independently, without outside help. To ensure good waterproofing, we recommend using glassine.
Having prepared all the necessary tools and materials, you can get to work. The whole process can be divided into the following stages:
- The first step is to make a frame from edged boards. Please note that this will affect the height of the ceilings. For those who have high hair, this will even benefit. The boards must be secured in increments of no more than 1 m from each other.
- To ensure good waterproofing, the space between the boards must be filled with glassine so as not to leave empty spaces. The material should stick well; to do this, lubricate it a little with tile adhesive.
- Now place mineral wool on top of the glassine. Make sure that the insulation adheres well to each other, leaving no gaps or holes. If the mineral wool does not want to stick, apply a small amount of tile adhesive to it.
- After the entire ceiling is insulated, it needs to be sheathed with plasterboard to give it a finished look. Using self-tapping screws and a screwdriver, sheets of drywall are screwed to the frame.
That's all, your ceiling is insulated. All that remains is to finish the ceiling and make the cladding. Now the precious heat will remain in your room, which will reduce your heating bills.
To ensure that insulation work does not go to waste and is carried out correctly, it is important to carry it out during the warm period. Moreover, it is impossible to insulate a log house immediately after its construction. The structure needs about a year to settle. Taking this into account, work should be carried out no earlier than 1 year after its construction.
Insulation of an unheated attic ceiling with expanded clay
You can’t do without insulating the roof, so if you have an attic, it should also be insulated.
Cost of finishing materials
All work on insulation and cladding of a wooden house requires large financial investments. The cost depends on:
- Scope of work performed.
- Conditions of external walls.
- Type of insulation.
- Quality of waterproofing membranes.
- Type of decorative material.
- Additional fasteners.
- The work can be done independently or by a professional team.
Therefore, before starting to insulate the facade, they calculate the approximate cost with a margin and compare it with the available budget. By making calculations in advance, you can be sure that the work will not stop halfway due to lack of funds.
Walls
When you decide to insulate the walls inside the house, you need to take into account that condensation will form on the walls. This will be especially a problem for those who live in northern places where winters are very cold. Condensation occurs due to a sharp temperature change: it is very cold outside the house, but warm inside. So it turns out that the dew point will move into the insulation layer. But this is not a problem, since everything can be corrected with a simple vapor barrier film, which is often used with insulation. Another option is to provide good ventilation.
To complete the work you will need:
- roulette;
- plumb line;
- screwdriver;
- level;
- chisel;
- hammer drill;
- electric jigsaw;
- mallet;
- hammer;
- dowels and screws;
- screwdriver;
- felt, tow or foam;
- wooden beams;
- insulation, drywall and putty.
We recommend using ecowool as insulation for walls (mineral wool can be used instead). The advantage of the material is that it fills all the cracks and voids in the walls, preventing them from blowing out. It is also worth noting that moisture does not penetrate inside, so you are not afraid of fungus. Among other things, it is a breathable material.
Now let's move on to the technology of wall insulation.
- If there are cracks or potholes in the wall, they should be sealed with polyurethane foam, tow or linen felt. Choose what you like and what is easier to work with.
- Make a sheathing from a wooden beam. Mark the place where the outermost elements of the sheathing will be installed. Pay special attention to this work, since the fastening of subsequent elements will depend on the correct installation of the first beams. This is why you need to use plumb lines and a level.
- If the location of the first beam has been determined, it must be secured with dowels and screws. To ensure that the beam fits securely to the wall, fasten it in increments of 25–30 cm.
- Place the next beams at a distance of 1 m from the previous one, parallel to it. This way you will make a frame around the entire perimeter of the wall. When there is a window opening on the way, it needs to be covered with beams in a circle.
- Now you need to install the intermediate bars. On top of the first vertical bars, screw the intermediate ones, which will be in a horizontal position. Your wall should be divided into squares. To prevent fungus and rot, treat the wood with an antiseptic.
- Your sheathing is ready, all that remains is to lay a layer of insulation between the beams. In this case, there is no need to use glue. Ecowool will stick well between the wall and the sheathing, the main thing is to place it tightly.
- At this stage, you should create a vapor barrier using plastic film. Lay it on top of the insulation with a slight overlap of 5–10 cm.
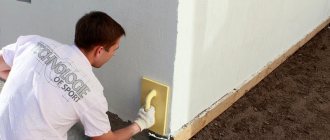
- And finally you need to do the finishing. Cover the walls with plasterboard, screwing it to the sheathing. The plates must fit snugly against each other. All cracks need to be filled with putty.
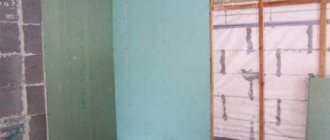
Insulation of walls from the inside
The first question that home owners prefer to ask is whether it is worth insulating the walls from the inside as well, just to be on the safe side? As a rule, there is no need for this if high-quality materials were used in the process of arranging external thermal insulation and installation technology was not violated. Therefore, additional installation of thermal insulation from the inside is far from the most justified solution.
However, no one cancels the need to caulk the cracks and seal them with a special sealant. This is a relatively inexpensive way to protect yourself from possible shortcomings that are hidden by external thermal insulation.
The caulk is sealed inside and out using a special sealant, which is applied with a mounting gun directly to the problem area. Next, the sealant layer is leveled to achieve uniform insulation. This is done using a regular spatula.
In a number of other cases, insulation with mineral wool is used, followed by plasterboard sheathing. Again, this solution must be economically justified, otherwise, with normal thermal conductivity of a house without strong insulation, it is not profitable to use this method.
Floor
Installation of insulation on the floor
The last thing to insulate in your log home is the floor. To work you need the following tools and materials:
- drill;
- hammer;
- electric jigsaw;
- saw or hacksaw;
- knife, pencil and nails;
- tape measure and level;
- plane;
- insulation material (mineral wool).
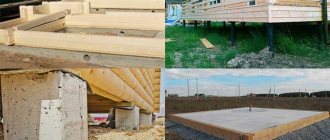
When you have a concrete floor in your home, insulating it is a must. The work, naturally, is not easy, but following the instructions, spending a little time and effort, you can do it.
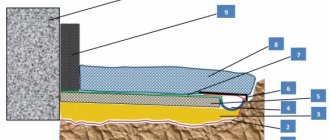
Insulation of concrete floor scheme
One method of floor insulation is called “raised flooring”. The work boils down to raising the floor by 6 cm and insulating it. The stages of work are as follows:
- The concrete surface should be leveled and various defects eliminated.
- Lay a waterproofing membrane on the surface of the concrete, which will not allow moisture to pass through to the insulation.
- Now you need to lay the logs from the beams. The distance between them should not exceed 50 cm. The recommended size of the logs is 50×100 mm, with a thickness of at least 50 mm. You should not attach logs more than 30 cm to the wall. It turns out that your floor should be divided into even lines of beams that serve as joists.
- Place mineral wool in the gaps between the joists. Again, fill the empty space tightly so as not to leave gaps.
- Place a PVC membrane on the insulation.
- All that remains is to lay the flooring, and your insulated floor is ready. It is good to use chipboard or waterproof plywood as a material.
That's all, your house is well insulated from the inside, and you can enjoy comfortable living in a warm room. As you can see, there is nothing complicated, but what a result. But, besides all this, you can insulate your home from the outside. How to do it? Let's find out.
How to insulate the floor of a log house with your own hands?
In order to have a warm floor in a wooden house, you will need to equip the floor base, following the technology of laying the floor on the ground. You will need to perform bedding, waterproofing and lay an insulating layer. If the floor is made of wood, then between the joists you will need to lay a 10-15 cm layer of insulation. A rough and finishing floor is placed on top of it.
Insulating a log house is a complex of actions. If the ceiling, roof and walls are insulated correctly, then you will not have to insulate the house from the outside. You should know that you can insulate a house of this type in another way: it is possible to build a glass veranda in the cold part of the house to expand the total area and form an air barrier.
Caulking walls
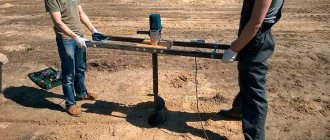
Caulking is one of the most important activities that every log home owner must perform. Thanks to this, you can seal all the cracks and cold air will not penetrate into the house. This is a process by which a log frame is compacted with fibrous materials. All work must be done in warm and dry weather. What needs to be done?
Caulking tools
To work you need to prepare:
- hammer;
- scissors;
- chisel;
- caulking shovel;
- mallet.
Caulking work must be done first, even before any stages of insulation. In addition, caulking can only be done after the building has settled. All work starts from the lower crowns and as you need to move up. It is important to caulk the seams both outside and inside, and you cannot completely process one wall and then the second. Everything must be uniform and go along the perimeter, otherwise the building may warp.
Log caulking
For example, let's consider caulking with tape insulation or jute. It can be called the simplest. There is no need to cut the tape, which makes the whole job easier. So, the work process is as follows:
- You should start with the first lower crown. Place the end of the tape on the ground and unwind it, gradually moving towards the other end. There is no need to cut the tape, the main thing is to make sure that it runs in a strip and does not turn over. Please note that the material should not be stretched too much.
- Go to the beginning of the ribbon, lift it and from the end begin to push it between the crowns. As soon as you have caulked the first crown to the opposite end, cut the tape with a margin of 10–20 cm. Use well-sharpened scissors.
- Now everything can be reliably caulked using a hammer and caulk. Do this gradually so that creases do not form. You won't be able to do everything in one step, so push it in until it disappears into the log. You need to push the tape at a slight angle, as if diagonally.
- Oddly enough, everything needs to be repeated again, between the same logs. 1 or 2 more tapes can fit there, depending on the slots and density of the tape. It turns out that more material is spent on caulking than on the initial insulation of the crowns, and keep in mind that this is only on the outside. You need to repeat the entire procedure inside and move up the entire perimeter.
This is a rather scrupulous and time-consuming job, but by doing it, you will compact your structure and the air will not flow inside the room.
You can see how to caulk a log house in the video:
Insulation of windows and doors
Window insulation
This is another important stage when insulating a house from the outside, which you simply cannot do without. You will be pleased that it will be very easy to seal all the cracks and holes in window and door frames. To work, you only need an aluminum ruler and foam, which you need to use to blow out all the cracks.
First of all, you need to determine the tightness of windows and doors. You can use an aluminum ruler to determine the cracks by pushing it into different parts near the window frame. In those places where she walks freely, cold air enters the house. All such cracks should be filled with foam. Using the same scheme, check the door frames and take all necessary measures.
When you find cracks under the window sill, you need to eliminate them both from the outside and from the inside. In windy weather, just take a candle or matches and hold it near the windowsill. You can notice the blowing by the flame. Fill all cracks with foam.
Use soft foam
Take a look at your windows. If they are old and have lost their original properties, it is worth thinking about installing new ones that will store heat in the house much better.
By completing all of these measures, or at least some of them, you can solve the problem associated with heat loss. Your wooden house will retain heat perfectly, making your stay more comfortable. It is also important that your heating costs will be reduced. The work is not that difficult to complete, so even without outside help you can complete the task.
Insulation of a wooden log house inside
If insulating a wooden house from the outside is not enough, then thermal insulation work should be carried out inside. To do this, we choose the material that suits us best. Of course, you should choose natural insulation materials, which we reviewed earlier.
Selection of internal insulation
To insulate a wooden floor, mineral wool or bulk materials are used. To make it easier to lay wool between floor joists, it is better to choose mineral wool slabs - this is the best option for thermal insulation of the floor.
Expanded clay is often used from bulk materials. This insulation is not exposed to liquids and is not a favorable environment for rodents, insects and fungi.
It is very convenient to pour it into areas where it is impossible to lay roll or tile insulation. Expanded clay can be used to fill almost any hard-to-reach cavity.
So, in order to insulate a wooden house from the outside and inside, you need to select a material that will:
- Good air flow;
- Vapor permeable;
- The material should be convenient for installing thermal insulation with your own hands. It doesn’t matter where the work will take place - outside or inside;
- Do not allow water to accumulate. Because those materials that accumulate water lead to the formation of condensation on the walls of a wooden structure, and the wood gradually rots and collapses under such a layer of thermal insulation;
- Have a structure that will allow the material to be laid so that there are no gaps left and no cracks will form in the future.
You should not make thermal insulation using polystyrene foam, polystyrene foam or polyurethane foam, because these materials will create a “thermos” effect for the room. And this will lead to the slow destruction of the wooden structure.