Features, advantages and disadvantages
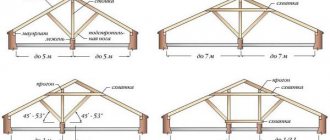
A hip roof differs from a gable roof in the absence of gables and the presence of four slopes. This is a type of compound roof in which the two end slopes are triangular in shape and are called hips. Because of them, the design got its name.
A number of advantages of a 4-pitch roof with hips include:
- rigidity of the structure, not subject to deformation;
- no danger of accumulation of snow and other precipitation;
- low wind load even in areas with frequent storms;
- additional protection of the building from precipitation, thanks to eaves overhangs on its four sides;
- increasing the attractiveness of the building's appearance;
- reducing the tendency to destroy eaves overhangs.
But the 4-slope complex hip roof is not without its disadvantages, of which the following are distinguished:
- increased cost of construction;
- high complexity, requiring the participation of specialists in construction;
- the low height of the hipped roof, which makes it difficult to organize residential attic spaces in the house;
- lack of natural light sources, which is why it is always necessary to install dormer windows on a hipped roof, if necessary.
It is important to weigh both the pros and cons before construction.
Calculation of material quantity
Let's start by determining the number of sheets of metal tiles. There are full and useful sheet sizes. Useful - determine what actual area the sheet will cover. It is these dimensions that should be taken into account when calculating the number of sheets of metal tiles per slope. Full is a useful plus overlap. It is different for different manufacturers. Vertical - 0.1 m, 0.12 m, 0.13 m, 0.15 m, etc., horizontal - 0.06 m, 0.08 m, 0.09 m, etc. For calculations The amount of overlap has no effect. The length of a metal tile sheet is strictly tied to a step equal to the wavelength, that is, 0.35 m. Accordingly, the useful length of the sheets is 0.35, 1.05, 2.1 and 3.5 m, i.e., according to the 1st, 3, 6 and 10 waves are the necessary dimensions for calculating the number of horizontal rows. The useful width of sheets varies from manufacturer to manufacturer - 1.05, 1.1, 1.14 m, etc. - this is the required size for calculating the number of vertical rows.
For a rectangular slope, the amount of metal tiles is calculated as follows: by width - divide the width of the slope by the useful width of the sheet. Round up. We get the number of sheets in a horizontal row. By height - divide the height of the slope by 0.35 m. Round up. We get the number of waves. It must be remembered that if the angle of inclination of the slope is less than 14°, then the overlap must be done in two waves, that is, to the total number of waves you will need to add a number equal to the number of rows minus 1. We determine with what sheets this number can be paved. We get how many and what sheets of tiles in a vertical row. After this, multiply by the number of rows in width. The result is how many and what sheets of metal tiles are needed for this slope.
Example. We have a slope measuring 9x5 m.
Determine the number of rows in width. We take tiles 1.05 m wide. We get 9/1.05 m = 9 rows. The rest will have to be cut - it's waste. To have fewer of them, you can play with the size of the gable overhang. Define vertical sheets. 5/0.35 m = 15 waves. If the angle of the slope is greater than 14°, then 2 rows of 6 waves and one row of 3 waves will be optimal. If less, then remembering the overlap, make a row of 10 and a row of 6 waves, respectively.
Answer: For this slope with a slope of more than 14°, you need 18 sheets of 6 waves and 9 sheets of 3 waves. For a slope with a slope of less than 14°, you need 9 sheets of 6 waves and 9 sheets of 10 waves.
To calculate triangular areas of the roof that do not have a pair, and trapezoids, we complete each figure to a complete rectangle and calculate it according to the above diagram. If paired triangles are formed, then we take this into account. Parallelograms are calculated as rectangles with one side equal to the base and the other to the height of the parallelogram.
The number of other roof elements is determined separately:
- ridge elements - cover the ridge (the place where the horizontal edges of the slopes meet) and the ribs (the place where the outer side edges of the slopes meet). It is necessary to measure the total length of the specified roof elements and add 10% for overlaps;
- inner valley (lower). It is placed in the place where the inner side edges of the slopes meet. External valley (top). Decorative element. Placed on top of the inner one if desired. The total length is equal to the total length of the valleys, plus 10% for overlaps;
- cornice strip. Covers the ends of the rafters. The element is desirable, but not required. Installed along the entire length of the cornices. The total length is equal to the entire perimeter of the cornices;
- end strip. Installed along the entire length of the ends of the slopes. Covers the ends of the sheathing and protects the tiles from being torn off by the wind. The total length is equal to the length of the corresponding roof elements;
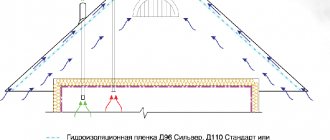
- waterproofing film. The quantity is equal to the area of the entire roof, plus 150 mm for each overlap between the rows;
- special porous self-expanding sealing strip. Closes all gaps between the ridge, valley and the plane of the metal tile sheets. The quantity should be enough for all elements with double-sided installation of the seal;
- falling beams - their length is equal to the length of the rafters - and the sheathing boards should be enough to cover the entire roof in 350 mm increments.
Here we are not considering insulation and vapor barrier film - although these are necessary elements, they are indirectly related to the roof.
Types of hip roofs
It has several types, differing in design details.
Half hip roof
A half-hip roof is a roof where there is no full-fledged 4-pitch hip and the result is a gable hip roof, where both creases and gables are present at the same time. All rafter legs, as in a regular “double-pitch”, are placed parallel along the long side.
Tent
The hipped hip roof differs from other hipped structures in that all its ribs and 4 slopes converge at the central point of the roof. As a result, a house can be covered with such a structure only if it is square.
Classical
The classic hip design contains elements typical of similar hipped roofs and is most often used in residential buildings in the shape of a rectangle.
How to correctly calculate the angles of inclination of a hip roof - based on the snow load, from the wind load.
Counter-lattice for metal tiles
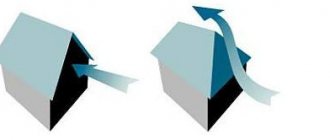
The purpose of the counter-lattice under metal tiles is to create a gap for the passage of air in the under-roof space. The structure is mounted on top of the waterproofing, resulting in an open space for air.
Is a counter-lattice needed for metal tiles?
The advantages of the counter-lattice are as follows:
- roof ventilation is provided;
- the formation of mold and mildew on the elements of the rafter structure is excluded;
- Rotting of wooden roof elements is prevented;
- Condensation does not accumulate on the back side of the roofing material.
It follows from this that installation of counter-lattice under metal tiles is mandatory. The design, in addition to the listed positive aspects, allows you to correct irregularities that were made during the construction of the rafter system.
The counter-lattice creates a gap for ventilation in the roofing pie and allows you to correct uneven installation of roof trusses
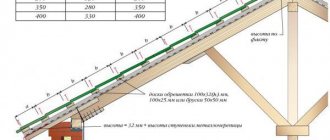
Counterbeam thickness
Basically, timber with a cross-section of 30x50 mm and a length of 135–137 cm is used to install counter-lattice. Such lumber is used for the construction of a simple roof. If a sloping roof is being erected, the cross-section must be increased to 50x50 mm. The distance between the counter-lattice elements along one rafter leg should not exceed 30 cm.
Installation instructions
Having prepared the bars of the required size, you can begin installation, which is performed in the following order:
- Wooden elements are treated with special means that prevent the wood from rotting and being damaged by insects.
To protect wooden elements from rotting and damage by insects, they are treated with antiseptics - After laying the waterproofing, the counter-lattice is secured with galvanized nails.
It is advisable to use galvanized nails to secure the counter-lattice. - During the filling process, make sure that the bars are parallel to each other and perpendicular to the cornice strip.
Counter-lattice bars are stuffed on top of the waterproofing, placing them parallel to each other - On the counter-batten frame, the pitch of the sheathing is marked.
To ensure that the sheathing boards are laid with the same spacing, marks are made on the counter batten slats - The tags are connected to each other using a dye cord.
- Install the sheathing, placing, if necessary, slats of the required thickness to level the plane of the roof slope.
Hip roof installation procedure
Installation of hip structures occurs in several stages. Four-pitched roofs of residential buildings require a particularly careful approach in the construction of rafter support structures.
Laying and fastening the Mauerlat
The roof slopes on 4 sides of the roof rest on the Mauerlat. In the case of hips, wooden beams with a section of 10 by 10 or 10 by 15 cm are used. The latter are installed along the perimeter of the walls. The connections are not made end-to-end, but overlapped and the beams are attached to the base of the wall with metal brackets.
Purlin installation
A purlin is placed parallel to the sides of the mauerlat, which is used as the basis for additional supports for the legs of the rafter structure. The need for it arises only if the roof has a large area or an extremely complex configuration.
Place it in the middle. Also, a hipped hip roof does not require purlins; it is held in place by a complex assembly at the junction of the diagonal rafters.
Racks and struts
Diagonal rafters always require additional reinforcement, no matter if we are talking about a hip roof of a small or large area. With a slope size of 9 meters or more, stability should be ensured by not one, but at least two additional supports. For smaller spans, one reinforcing structure is used. The latter are played by racks and struts.
A stand is an element that is vertically installed on the ceiling. It is separated from the latter by waterproofing material if the ceiling is made of reinforced concrete slabs.
The brace differs in that it is placed at an angle ranging from 45 to 53 degrees. The angle is chosen in such a way that it provides support for the rafters that are subject to the maximum load. The strut rests against the bottom of the bed.
Ridge installation
Before installing the ridge beam, measurements are taken and its exact location is marked. For the latter, use a stretched rope and a level.
Diagonal rafters
Diagonal rafters are placed so that their upper heel rests against the ridge beam. Support methods can be different, depending on the complexity and type of structure:
- if there is only one ridge girder and runs along the central axis , then the legs of the rafters rest on the beam itself;
- if there are two purlins or rafter legs are made from boards , the latter rest on the truss, which already rests on both ridges;
- if in a design with two ridge girders the legs are made from beams , then it is necessary to use an additional dent from a short board, 5 cm thick, to sew the legs in the ridge area.
To place it on the support, the heel of the rafter leg is cut down and secured with nails. If reinforcement of fastening is required, then metal clamps or wire are used for this.
As for the lower part, it is rested against the Mauerlat or rested on it. The heels are secured with metal corners with nails or special metal staples. In simple cases, punching nails into a wooden plank is suitable.
Row or central rafters
Ordinary and central rafters are mounted after the diagonal ones according to the same principle as the latter.
Narozhniki
Sprinklers are required if the envelope roof has a large area. With their help, the plane of the hips and parts of the slopes adjacent to the rafters of the slope are formed. They are mounted using a notch.
To do this, nests are made in the slopes, preventing the parallel position of the half-legs of adjacent slopes, which is why they often move when walking. The recommended distance between them is 20 cm.
Preparing for roof installation
In this case, all rafters must be in a single plane. All elements of the roof structure must be thoroughly treated with an antiseptic before installation.
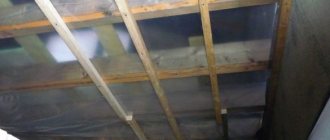
There are two types of roofing for metal tiles - warm and cold. The fundamental difference is that in a warm roof the thermal insulation is laid between the rafters, in a cold roof - in the plane of the floor of the house. The installation option for a warm roofing system is more complex.
Installation of waterproofing
waterproofing device
Waterproofing is used to protect thermal insulation from condensation. Condensation forms on the inside of the roofing when the outside temperature drops sharply. Installation of waterproofing begins with the valleys. To do this, roll out a roll of waterproofing material (membrane) from top to bottom to the length of the valley. Then along the rafters, from the cornice with an overlap. The joints of membranes, especially valley ones, must be glued with SP 1 tape. The membrane is fixed with wooden counter batten blocks 50 X 50 mm. This is provided by the technology of metal roofing.
Sheathing and valleys
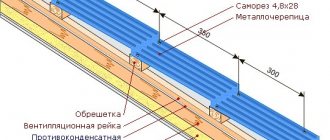
- Along the eaves overhang, first we nail two boards, one on top of the other, 50 X 100 mm.
- We put the waterproofing on boards.
- On top of the falling bars, with a step equal to the wave of the metal tile, we fix the sheathing horizontally (boards 32 X 100 mm).
- The pitch of the sheathing is controlled using a special template.
- On the ridge, we stuff an additional board of sheathing under the metal tiles on both slopes.
lathing for metal tiles
A valley is constructed along the internal fracture of the roof. A continuous sheathing is installed in the valley. Water flows through the lower bars of the valley. They are secured with self-tapping screws in the designated places. The joining of the planks is done with overlaps of 100 mm. The joints of the planks are sealed.
Having previously measured and trimmed, we lay the metal tiles. From above, at the junction of the sheets (metal roofing technology), the upper valley strip is mounted using roofing screws. This is a decorative element that covers the inclined cut of metal tile sheets.
Junction strips and cornice strips
Installation of the internal apron, which consists of lower junction strips, begins from the bottom wall of the pipe. During installation, we apply the lower junction strip to the pipe wall and mark the upper edge. We break through the groove along the intended line. We remove the dust after gating. We wash the groove with water.
installation of abutment strips
The edges of the strip inserted into the groove are sealed and attached to the sheathing with self-tapping screws. Under the lower element of the apron is a flat sheet with edges designed to drain water. We direct the tie into the valley or down to the eaves of the roof. Then we make the side walls of the pipe, and finish with the top. The junctions are most susceptible to leaks. Therefore, we make connections in metal tile roofing installations with special care.
We advise you to study - 11 color schemes to transform the interior of your home without spending money on renovations
Next, the metal tile sheets are installed. The outer apron, consisting of the upper abutment strips, is installed after installing the metal tiles in the same sequence as the inner apron. The planks are fastened to the metal tiles and to each other with self-tapping screws or rivets.
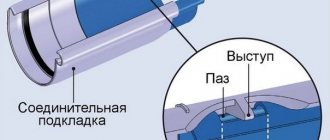
They are installed in marked places and secured with self-tapping screws. A V-shaped hole of 10 cm is made on the gutter for the outlet funnel. If necessary, the gutter is cut to the required length. The gutter is inserted and secured in the holders.
The edge of the gutter should overlap the bottom edge of the eaves strip for metal tiles. Attach the cornice strip to the sheathing with self-tapping screws. A waterproofing membrane is placed on top of the eaves strip and the last board of the sheathing and secured with connecting tape. In places where there is increased water flow, for example under the valley, we install an overflow limiter on the gutter.
Selection of insulating films and insulation
The complexity of the design of a 4-slope hip roof requires a particularly careful approach to the selection of steam, hydro and thermal insulation.
Vapor barrier
Modern vapor barrier materials are represented by special films from manufacturers such as JUTA, Tyvek, Rufizol. Such films are very light and easy to install.
Waterproofing
For waterproofing, it is recommended to use high quality membranes. The more precipitation there is in a region, the better it should be. The already mentioned manufacturers Izospan, Rufizol and JUTA are popular on the Russian market.
Insulation
It is not recommended to use glass wool to insulate a roof with a hip. Like obsolete material. Mineral wool and special mats based on it are well suited.