- The first step is to develop a diagram.
- Load-bearing beams are installed and sheathing is laid on them.
- The roofing material is attached to the latter.
- Next comes the installation of wooden sheathing and rafters (metal ones are also used, this will extend their service life).
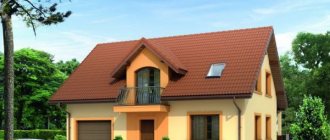
From the outside the building looks traditional, but inside it feels cozy, warm and reliable. Look at the photo below. Isn’t it a beautiful view of such a two-story house with a picturesque balcony?
Hip roof
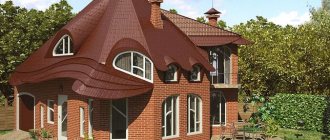
The unusual name of a hip roof should not confuse you. This variety is a hybrid that combines trapezoidal and triangular shapes. This creates a hipped roof. The transition from one shape to another gives originality, not to mention the practicality of using additional space. A skillfully created individual project will allow you to combine unusual design with functionality. For example, on the second floor there is an attic floor, a playroom for children or an additional guest bedroom with a small open balcony or loggia. By the way, the use of an attic will make it possible to reveal the potential of a hip roof.
If there is no gazebo on the land, this is compensated by a veranda. On a hot day, the cornice will protect guests from the sun, on an autumn day - from the wind and possible precipitation. A design solution would be to place the chimney as one of the walls on the balcony. This will insulate the room on a cool evening.
Construction of the rafter system
Important. Mistakes made during the construction of the rafter system are very difficult to correct. Most of them will become noticeable already during the operation of the building, this is extremely unpleasant. There are situations when it will take more money to correct the shortcomings of the rafter system than to build a new roof. And this is also the case when, due to leaks, there is no need to repair the interior.
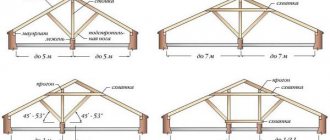
As an example, we will look at step-by-step instructions for one of the most complex roofs - a hipped roof. Understanding the construction technology of this rafter system, it will not be difficult to understand the technology and assemble simpler single-pitch or gable roofs yourself.
Step 1. Take two long boards, with their help it is easier to determine the length of the rafter legs, the angle of the slopes and the height of the roof. Temporarily fix the boards to a vertical support on the wall of the house. Raise or lower them until you find an acceptable position. If the size of the house allows, then it is better to design the rafter system so that the length of the legs does not exceed 6 m. Such lumber can be purchased, there will be no need to increase it. Building up not only takes a lot of time, but also weakens the structure and requires the installation of additional supports.
Step 2. Fill the reinforcing belt. It not only increases the height of the attic space, but also makes it possible to extend the overhang of the rafters and additionally protect the facade walls from precipitation. The width of the belt should be at least 30 cm, the height depending on the size of the house.
How to fill a reinforcing belt?
- Drill holes 15–20 cm long in the walls, insert metal rods with a diameter of 12–15 mm into them. There must be a thread at the top. If it is difficult to find such elements in the market, then you can weld threaded studs to ordinary building reinforcement. The distance between anchors is approximately 1 m.
- Install formwork around the perimeter of the house. To do this, use 20x150 mm edged boards so that they are not pushed apart by the concrete and secure them with pegs after 1.5–2.0 m. There is no need to be afraid that the reinforcing belt will not have a perfectly even width along its entire length; this element will be closed during further construction of the roof.
Installed formwork
- Prepare the concrete. The solution must be made strong; one part of cement should be given one part of sand and two parts of crushed stone. You can prepare it manually directly on the floor slabs of the house or on the ground with a concrete mixer, and then feed the mass upstairs manually.
- Place reinforcement in the formwork; one rod is enough around the entire perimeter. Be sure to raise the rod at least 5 cm above the ceiling surface. It should not lie in the middle of the belt; in this position the reinforcement does not work. You can use any pieces of wood or pieces of concrete blocks as pads.
- Fill the belt with concrete; you must work carefully and strictly maintain the horizontal position of the upper plane. To check, use an ordinary level.
The process of filling the armored belt
The armored belt is flooded
Important. The difference in height at the corners of the reinforcing belt should not exceed ± 2 cm. To check, you need to pull the rope, with its help it is much easier to level the concrete surface.
Allow at least three days for the concrete to harden. Remember that it will gain 50% strength only after two weeks, only then can the structure be fully loaded. If the weather is very warm and windy, then the concrete belt should be watered generously with water at least twice a day. Concrete gains strength not during drying, but during favorable chemical reactions; this constantly requires moisture.
When the concrete hardens, the formwork is removed
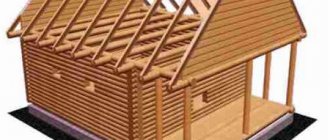
The construction of a rafter system conventionally consists of four stages: installation of the mauerlat, installation of the ridge beam, installation of rafters (hip and diagonal) and arrangement of the sheathing.
Half hip roof
The half-hipped roof option is becoming popular (it gives the building the appearance of a large mansion). The peculiarity is the combination of hip and gable. As a result, we see an original and practical form. Buildings of this type are common in regions with strong winds and harsh climates. The streamlined shape perfectly resists bad weather, the space on the upper floor is used both for utility purposes and as an additional living space. Thanks to the unique angle of the roof, the room will look unique, and with skillful selection of design, even better. Brickwork and a massive wooden porch will give the house the appearance of a country cottage.
When choosing a half-hip roof, be prepared for difficulties, because building this structure correctly is quite difficult and only an experienced team can do it. In addition, due to the large number of beams and partitions, the building acquires significant weight. Therefore, it will be necessary to calculate the additional load on the foundation. All this entails considerable material costs.
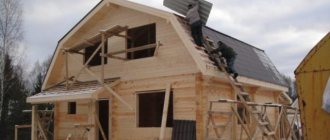
Roof support skeleton: creating a frame
The builder is working on creating a roof frame.
The basis of the roof, which takes on all the loads, is the frame of the roofing system. It consists of a mauerlat and a rafter system.
Mauerlat is a load-bearing beam that takes on all the loads to which the roof is exposed. It also connects the roof to the walls. The step-by-step construction of a house roof begins with the installation of this part.
Mauerlat is a wooden structure, a thick beam that is placed around the perimeter of the wall. All rafters will rest on it. Therefore, it is attached as rigidly as possible.
Sometimes a support is created under it in the form of a concrete monolithic beam equipped with metal protrusions, or it is fixed with forged wire. To prevent this most important part of the structure from being exposed to excessive moisture, it is treated with moisture-protective agents and fungicides.
And most importantly, they separate the building from the brick or concrete wall with waterproofing pads, for example, roofing felt. After all, the thermal conductivity of stone and wood differs, due to which moisture condenses on the stone, and from it the wood can get wet. This would lead to rapid destruction of the wooden beam of the Mauerlat.
The Mauerlat for a gable roof is located on two sides of the house structure, for a hip roof - on four walls. In this case, the thickness of the beam is selected in accordance with the load that will be created by the entire roof structure. The greater the load, especially snow and wind, the thicker the Mauerlat becomes. The rafter system rests on it.
After installing and securing the Mauerlat, the rafter system is assembled. In the simplest case of a gable roof, this means installing rafter structures on the gables, and then installing a ridge girder.
If there are load-bearing walls in the middle of the house, they can also be used to install ridge girder supports. The rafters themselves are installed from the ridge to the mauerlat, with the upper part resting against the ridge girder, and the lower part against the mauerlat. In order for the abutment to be reliable, a profile recess is made, which allows the rafters to rest tightly against the mauerlat.
It is important! If the structure is small in size, you can do without a ridge girder by installing only rigid rafter structures with a crossbar. It guarantees rigid fixation of the rafters in the desired position and uniform transfer of load to the Mauerlat and walls from the roof. In this case, you can do without the Mauerlat, using instead the transverse beams on which the rafters rest.
Hip roofs
The hip roofing system involves a hip roof. It is usually used in square houses or similar configurations. 4 triangular slopes are used, which are connected in the center. The triangles must be isosceles (if you look from above, you should see 4 identical triangles inscribed in a square). The origins of such forms go back to ancient civilizations that used the hut. In the Middle Ages, the tent system was common in the construction of palace complexes and castles, where the structures were like a steep slope. Nowadays, it has become popular to erect a square roof not only on private low-rise buildings, but also in cottages and gazebos.
This coating perfectly resists strong winds and the penetration of precipitation into the room thanks to its drainage system. Tall narrow windows with a low-slung house will create the impression of privacy.
Despite the apparent simplicity, the work should only be carried out by a professional team that can properly insulate the connections of beams and rafters. Therefore, the money saved on a small amount of materials will have to be spent on another expense item. In addition, you need to plan for a lot of waste when using most roofing materials, especially metal tiles.
How to build a roof with your own hands
General instructions for building a roof with your own hands look like this:
- Before building a roof, you need to take measurements of the building;
- Next comes the preparation of all materials (including impregnation of wooden elements with antiseptics and fire retardants) and tools;
- Work begins with the installation of the Mauerlat;
- Next, install the ridge transom (if necessary);
- Then the frame is attached;
- The structure is fixed and reinforced with racks, struts and tie-downs;
- A waterproofing layer and lathing are attached to the assembled frame;
- Next, the necessary work is carried out to ensure good ventilation of the under-roof space;
- Then drips are installed;
- The last step is the installation of the material chosen for the roofing.
Mansard roof
The roof under which the living space is located is called an attic. The second name is French. Its shape can be different, but most often it is a variation of a gable roof. For ease of living, the slope line is most often made as a broken line. The design becomes more complicated, but using the space as a living room is more comfortable and practical. A new fashion trend is an additional complication of the coating using concave and convex lines.
If you are interested in such a design due to the reduced cost of construction, then you can’t really count on it. Making a regular pitched roof is much easier. The attic needs to be additionally sheathed with waterproofing, insulation, ventilation outlets, and windows on the façade of the building. Combining a beautiful and convenient option will not be cheap. If you nevertheless decide to build such a roof, then try to make the slope as soft as possible - this will make the building visually more beautiful. The color of the tiles is traditionally burgundy (looks elegant). To complicate the design, you can build in a bay window.
Multi-pincer
A special feature of this type of roof is its complicated design, which combines several intersecting slopes to form valleys and internal corners. This form is one of the most difficult, and not every professional team of builders can cope with it. The endova requires particularly careful design, since it is it that will bear the main load during precipitation. The finishing in this area must have reliable waterproofing also because fallen snow will accumulate in these areas.
This design is in demand in cases where the building has an atypical layout and shape, as well as with a multi-level roofing system. This form looks aesthetically pleasing and attractive. But don't try to build it yourself. Firstly, it is necessary to perform all calculations correctly and accurately. Secondly, scrupulousness, patience and professionalism will be required when implementing the plan. Thirdly, when implementing the project you will face considerable financial costs: a large amount of material will be required. If the work is done efficiently, no problems should arise during operation.
Dome and conical
Lovers of everything unusual will certainly pay attention to the domed roof. On the one hand, it is original. It is unlikely that you will see many round roofs on your street, and their shape can be varied. On the other hand, it is functional and practical. The attic space is used rationally, and there are unlimited opportunities to fill the room with light as much as possible by installing a large number of polycarbonate windows. Standing under the dome and looking through the window at the sky is amazing.
One of the types of dome roof is conical. At its base there must be a circle that tends upward to one point. This building looks extravagant, somewhat reminiscent of ancient ethnic buildings. This solution is quite rational: precipitation does not accumulate on the roof, but immediately flows down, and the wind resistance is excellent. The use of the attic space is possible for different purposes: household needs or a living room. In any case, the usable area of the house will expand.
One-story houses and their charming roof designs
The charming location became the starting point for creating a peaceful enclave for a modern and active family, meeting all their needs and goals. The house is one-story. The functional system is based on the principle of clear communication, which is the basis of the building, connecting the day and night zones. One of the roof slopes of the one-story house was adapted as an attic for a children's room. At the front, the first space was a two-car garage, but the investors eventually decided during construction that this area would be dedicated to functional office space.
The body of the building was based on a simple form that varied along the sloping roofs that are a characteristic element of the building. The result is an impression of lightness, and the arrangement of the sloping parts of the roof emphasizes the differentiation of the functions of the objects.
Large glazing on the south side blurs the boundaries between interior and exterior, allowing ideological insight into the forest inside the house. The large glazed area at the front, which would have originally been a garage door, was concealed by shutters. This made it possible to obtain a façade of the house that was minimalistic and natural in its expression.
The development area is located on the edge of a pine forest among holiday homes, which naturally inspired the choice of cladding for the façade of the designed house. Combined with a simple but original form, in addition to meeting the investor's expectations, it fits perfectly into a unique location.
We hope that after viewing our selection you are convinced that the roof of a one-story house can be both a work of art and a fully functional part of the house.
- The roof of a private one-story house as a piece of art
- One-story house with a flat roof
- One-story house with a gable roof
- Reconstruction of an old barn into a private one-story house with a gable roof
- Green roof of a one-story house with a huge terrace
- One-story house with a pitched, radius roof
- Photo of a one-story house under one roof with infinity
- One-story houses with a high gable roof, glass facade and through glazing
- Thatched roofs of one-story houses
- Complex roof of a one-story house with a garage
- One-story houses and their charming roof designs
Pagoda
This is a special Buddhist religious building. It is believed that everything in life happens cyclically, as if in a spiral. This principle was reflected in the design of the first pagodas. The building has the shape of a tower, in which several tiers rise above each other. Each of them has its own roof. At the top, the tiers become smaller, so when there is precipitation, water flows down freely. The material used can be wood, metal or brick.
Bubnovaya
The Sudeikin roof (or tambourine) is a historical version of the roofing system. In the structure, beams are located in a certain sequence and places, which form an octagonal dome. A pillar is installed in the middle of the attic, which is the only support. The sediment drainage system is effective due to the steep descent; the presence of the attic provides an effective air layer that retains heat.
Combined roof
A combination of different types of roofs is used in two- and three-story (or more) houses that have an extension to the house in the form of a garage, outbuilding or other non-residential premises. The levels of such a roof vary, so there is a need to arrange transitions. Only an experienced architect can complete such drawings, who will describe all the points in detail. The construction technology is also “star-studded”, so attracting an experienced team of professional builders is a necessity, not a luxury.
Complex roof of a one-story house with a garage
The surroundings were a huge inspiration. The roof of the one-story house has an organic shape and the lower part is designed to take advantage of the breathtaking views of the forest.
A complex curved roof spans two houses. The first, tiny house includes a guest area and a garage. The second is a full-fledged home for a family. Downstairs there is a spacious living area with living room, kitchen, study room and master bedroom. Upstairs follows the arrangement of the children's rooms, which are the only volumes located above the roof.
The structure of such a large and complex roof covers a large area between both houses. During the construction of the roof, reinforced concrete structures were used in areas without load-bearing walls, supported by steel columns.
Finishing and insulation of different types of roofs
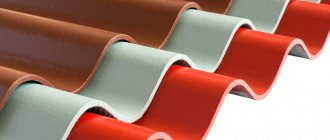
Pitched roofs can be decorated with almost any cladding material. Slate, metal tiles, ondulin, corrugated sheets, seam roofing - the choice depends on the budget and design features. The most expensive in this group are ceramic and slate tiles. These materials justify their price due to their high quality and are used in luxury buildings. The most affordable are corrugated sheets and ondulin. They are not attractive or particularly durable, but there are situations when this is not so important. The optimal solution for finishing the roof of houses with an attic is metal tiles. It has an excellent balance between price and quality.
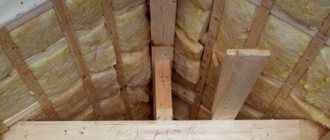
The insulation of residential and non-residential attics differs significantly: in materials, in the technique of performing work. To summarize, we can say that the main insulation materials in our time are polystyrene foam or mineral wool. The first option has superiority in price. But using it can lead to the formation of a greenhouse effect - the material allows steam to pass through. As a result, the moisture does not leave, and the temperature rises. This promotes the growth of mold and other harmful microorganisms. This will not happen with mineral wool. It retains heat perfectly, allows steam to pass through, and the walls “breathe.” Pay attention to proper waterproofing: if it leaks, the wet insulation will become unusable, so you will have to do the repairs again.
Any house, be it frame-panel or aerated concrete, requires competent and reliable roofing. When choosing it, you should not be guided only by appearance. The roof must be functional. Even in a rustic chalet, you can equip a small staircase along which you can climb to the attic or attic, look at the stars or dream about the future. Think carefully about what exactly you want to see in the end.
Instructions for preparation for construction
Step 1. Select a project
The main differences between roof projects are not design, although they are primarily striking, but structural. When choosing a specific project, you should take into account the maximum number of technical characteristics of the building and the climatic zone of its location.
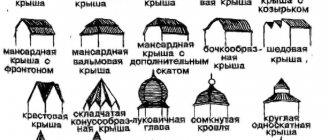
What roofing options are offered to developers today?
| Roof type | Short description |
Flat inclined | The simplest one, used in small houses. The advantage is a simple rafter system. The disadvantage is the lack of residential attic space. It is rarely used in our country; such houses can be seen more often in Scandinavian countries. |
Gable | A universal roof for houses, allows you to build attic spaces, can be simple or broken. In terms of complexity, cost and manufacturability, most developers are satisfied. By changing the angle of inclination, the load indicators on the elements of the rafter system are adjusted. |
Four-slope (hip) | A more complex design, it is recommended to install it on larger houses. The rafter system must be installed taking into account all building codes and regulations, and preliminary calculations must be made. |
Half-hip | It differs from the hip one in that the sizes of the slopes are not the same. Two slopes are large, and two trimmed ones are small. The technical structure is somewhat more complicated than the hip roof, but such roofs increase the volume of the attic space. |
Tent | All slopes have the shape of equilateral triangles, and their vertices converge at one point. The roof can be installed on square-shaped houses. |
Multi-forceps | The most complex of all the roofs listed, it is rarely used and only on multi-story buildings. |
Step 2. Selecting materials
Once a specific roof option has been selected, you need to decide on the materials for the construction of the rafter system and the type of roofing coverings.
Important. At the same stage, you need to decide whether the roof will be warm for living quarters or cold.
Rafter system
The rafter system requires only high-quality materials of at least second grade.
Edged board 2nd grade
Grade 1 edged lumber
Practical advice. To save money for the rafter system, you can buy wet boards rather than dry ones; they are much cheaper. But it should be remembered that raw lumber must be used no later than 7–10 days, during which time the rafter system must be installed and the roof covered. The boards will dry optimally under load, and strong mechanical connections will prevent them from warping.
Raw edged board
Prices for various types of construction boards
Construction boards
The Mauerlat is made from 100×100 mm timber or 50×200 mm boards. Rafter legs are made from boards 50×150 mm or 50×100 mm. The linear dimensions of the rafter legs must take into account the maximum possible static and dynamic forces. The width of the boards can be changed by using various vertical and angular stops. Each rafter system has its own characteristics; the master must have extensive practical experience in order to correctly solve problems that arise during construction. And, of course, a project must be ordered for a residential building; a self-built building is considered illegal and will not be accepted for use. This means that light and heating cannot be connected to it, such a room is not registered, it cannot be given or bequeathed. The project, among others, has working drawings of the rafter system; it is necessary to strictly follow the engineers’ recommendations.
Rafter system design
The type of lathing depends on the type of roofing; for soft roofing materials it is necessary to make a continuous one, for hard ones any kind is suitable. For a solid one, you need to prepare sheets of plywood or OSB, the thickness is at least one centimeter, but it can be changed depending on the pitch of the rafter legs.
OSB-3
Prices for OSB (oriented strand boards)
OSB (oriented strand board)
You can make a continuous sheathing from edged slats, although this option is difficult to consider optimal - it is very expensive and time-consuming. For solid roofing materials, the sheathing is made of slats or unedged boards. Unedged lumber must be sanded.
Unedged board
Roofing materials
For residential buildings, the most budget-friendly options are bitumen or metal shingles.
Metal tiles
Less commonly used are profiled sheets or roll coverings.
Corrugated sheet
Very rarely natural or artificial piece tiles.
Roof tiles
The rafter system largely depends on the type of materials. At the design stage, it is necessary to take into account the weight and fastening features of roofing coverings.
Prices for various types of roofing materials
Roofing materials
Insulation materials
Warm roofs are installed only in cases where attic spaces are planned to be converted into residential attics. Currently, two types of insulation are used: mineral wool or polystyrene foam.
Insulation with mineral wool
Roof insulation with polystyrene foam
The distance between the rafter legs should take into account the factory width of the insulation, thereby reducing the amount of unproductive waste and speeding up work.
Rafter foot step
The weight of insulation is minimal and can be neglected during the design of the rafter system. But you should keep in mind the climatic zone where the house is located; the thickness of the insulation and, accordingly, the width of the rafter boards depend on this.
Practical advice. For all climatic regions, the thickness of the insulation should be at least 10 cm; for the middle zone, this parameter increases to 15 cm. If the insulation layer is less than the recommended values, then the efficiency of heat saving sharply decreases.
Additional roof materials
If the roof is warm, then it is necessary to provide for the installation of steam and water protection, and the installation of counter-lattice to ensure natural ventilation of the under-roof space. The range of materials is huge, but by and large they are not much different from each other. The performance characteristics are influenced to a greater extent by compliance with installation technology than by the physical characteristics of roofing membranes. Even very cheap material can be used in such a way that it satisfies all building codes and requirements. Conversely, the most modern innovative material can be mounted in such a way that, apart from harm, there will be no positive effect.
Water vapor barrier for roofing
Diffusion membranes
And the last thing you should think about when planning the construction of the roof is the drainage system and special elements for bypassing chimney and ventilation pipes. For some linings and snow retainers, it is necessary to provide additional fixation points on the rafter system. It is much more expedient to do this at the stage of its construction than after fixing the roofing materials. Although modern technologies make it possible to use both options for installing additional and special roof elements.
Brick pipe passage through the roof
Pipe passage through the roof
Connecting a pipe to a slate roof
This completes the preparatory stage. If all building materials are prepared, the type of roof and roofing coverings are selected, and the rafter system is designed, then you can begin the actual construction of the roof.