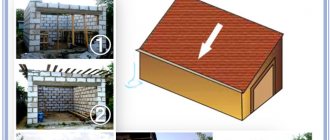
Mansard roofs of private houses: types, options, design
When thinking about building your own home or even a summer cottage, you want the house to be beautiful, unlike its neighbors, comfortable and functional. It would also be nice if it were inexpensive. A mansard-type roof allows you to solve almost all these problems. The appearance of the house turns out to be interesting, and the building can be decorated in different styles - all the options for combinations of roofing, type and shape of the roof, windows and balconies are probably impossible to count. It’s worth talking about the cost separately.
The combination of slopes directed in different directions gives a very unusual effect. You wouldn't call a house like this ordinary
How much does it cost to build an attic
The construction of an attic floor is considered profitable due to the fact that there is no need to spend money on erecting walls. This is only partly true.
Firstly, a lot of money will be spent on creating a rafter system. Its cost depends on the type of mansard roof chosen (see below) and on the price of lumber in your region.
Secondly, you will have to spend a considerable amount on insulation and vapor barrier of the attic roof. It is clear that roofing material alone is far from sufficient to ensure the required air conditions for residential premises (if the attic is planned for residential use). It will be necessary to insulate, and the layer of insulation should be significant. For example, for central Russia, the layer of high-density mineral wool should be from 200 mm, plus a layer of waterproofing and vapor barrier.
Thirdly, windows are much more expensive. If you make them auditory, you build a special structure from rafters, which complicates the roof topography, and therefore increases the cost of materials and installation. Even on an ordinary gable roof you have to think about constructing valleys and retaining snow above the windows.
Installation of skylights in the roof
The second option - windows in the roof plane - require particularly careful sealing so that precipitation cannot get inside. This makes installation 1.5-2 times more expensive. The windows themselves cost about the same amount: they must have a reinforced frame and reinforced glass that can withstand snow loads. In addition, for maintenance the frame must be rotary, and this further increases the cost.
What is needed to install a roof window and the procedure for installing the components
There are two types of windows in the attic - vertical and in the plane of the roof. Both types can be used in the same project. The photo below is a good example of such a combination. You can’t really say that the house is unmemorable. How many more options could there be?
Attic roofing in several levels is also a common technique
In addition, such popular and inexpensive roofing coverings - metal-based materials such as corrugated sheets, metal tiles, roofing iron - are not recommended to be used when installing the attic roof of a private house. There are two reasons:
- High thermal conductivity. Due to the fact that metal conducts heat very well, it is necessary to lay a large thickness of thermal insulation materials. Otherwise, the attic will be too hot in the summer and cold in the winter.
- Increased noise level created by the coating during rain. Even an ordinary roof covered with metal sounds like a drum when it rains. The attic room is much larger in area and the “tool” is more powerful. If you can combat the noise level indoors with additional sound insulation, then you can’t do anything to reduce the sound outside. If the neighbors' houses are located at a considerable distance, this may not be a problem, but if the buildings are dense, conflicts may arise.
If you do the math, additional thermal insulation and sound insulation will minimize the cost savings when purchasing roofing material. Perhaps another, initially more expensive roofing covering will turn out to be more profitable as a result. So here you need to calculate your options.
All this was described so that you have a more complete idea of whether building an attic floor is really that cheap. It turns out - not very good. Nevertheless, this solution has its advantages:
- The attic floor turns out to be light. Therefore, the foundation for private houses will require only a little more powerful than when constructing one floor. Since the cost of the foundation is a significant part of the cost, the gain here is tangible.
- If there is a shortage of funds, insulating the attic and putting it into operation can be delayed for the required period. Moreover, this delay will be useful. That's why. During construction, wood with high humidity is almost always used. If you start insulation right away, moisture will be absorbed into the insulation. If the “pie” is done correctly, it will go away naturally. But if there are violations, problems may arise. If the roof under the roofing material stands for some time without insulation (but with waterproofing installed under the roofing), then the wood will dry well and there will be fewer problems.
- The attic allows you to make your house original and non-standard. In any case, the building turns out to be more expressive and individual - there are a lot of design options.
We tried to describe as fully as possible the disadvantages of a mansard roof and its advantages. If the difficulties do not frighten you, choose which design you prefer.
Advantages and disadvantages
The arrangement of living space in the attic is most often associated with the main advantage of the attic - an increase in living space: the presence of additional rooms for living.
Other advantages of the attic are:
- The decorative appeal of a building in connection with a specific roof design;
- The arrangement of the attic can be done not in a new house, but in an already inhabited one, without leaving the house;
- The ability to insulate a room on your own (without special equipment).
In addition, the costs of constructing an extension, if it is necessary to increase living space, will be more significant than the costs of arranging an attic space.
Disadvantages include equipment for additional attic heating, waterproofing and forced ventilation . In addition, it is necessary to install special windows.
The slope of the walls can also be attributed to the disadvantages of the attic space, since it reduces the additional area of the room , but it is possible to build an attic in several levels.
Projects for mansard roofs of private houses:
Sloping roof with balcony
Hip sloping mansard roof
Gable mansard roof
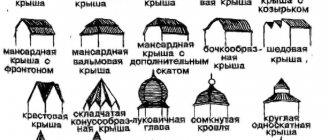
Types of mansard roofs
The attic type roof used in the construction of private houses has various design options. You can make all existing types of roofs, except, perhaps, flat. All others can be implemented both in “pure” form and in combination.
Single-pitch
Houses with pitched mansard roofs look unusual. Its device is the simplest due to the lack of a ridge and the problems associated with its arrangement. The beams rest on a mauerlat mounted on multi-level walls. The bevel is formed due to the difference in height of two opposite walls. In this case, the slope angle should be in the region of 35°-45°. A smaller slope will lead to the accumulation of a large amount of snow, which requires strengthening the load-bearing beams and installing additional supports, and this reduces the already not very large living area in such an attic floor.
Single pitch mansard roof
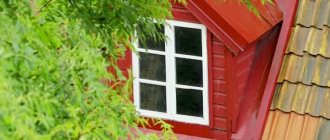
If we talk about the external design of the house, the buildings look non-standard. Most often, a large window is made in the high wall of the attic floor: the structure itself is conducive to this. See the photo below for examples.
This house with a pitched mansard roof is the most conservative
The construction of a pitched roof is the cheapest if the distance between two opposite walls does not exceed 4.5 meters: you can lay standard-length beams on the walls and not make supporting structures. Apparently this is the reason for the decision in the photographs below, but it turned out very interesting.
If the distance between the walls is smaller, the design is quite simple
Non-standard solution: two pitched roofs form a terrace between them
Gable
The gable mansard roof is the most widespread: given the general structure, there can be many solutions. The design itself is the most optimal: at relatively low costs it allows you to satisfy various requirements for the required room area.
The easiest way to implement an attic is under a regular gable roof, but its height must be sufficient so that a living space can be allocated under it (if the floor is intended to be residential). May be:
- symmetrical - the ridge is located above the middle of the building;
- asymmetrical - the skate is offset from the center.
The gables are straight. The room turns out to be trapezoidal; in fairly wide buildings it can be square. The disadvantage of a gable roof of the mansard type is that a large space is cut off on the sides, which is not always acceptable in private houses. To prevent large areas from being wasted, they are used for storage rooms or closets.
The design of the attic floor under a gable roof
With this arrangement, windows are made in the roof; their location depends on the angle of inclination. They can be auditory, as in the photo above, or in the plane of the roof, as in the photo below.
Windows can be located in the plane of the roof
There is another option for installing an attic roof for a private house with two slopes - a one and a half floor. It is installed on walls that have been raised to a certain level. The house is then called “one and a half stories high” (one of these houses is pictured above).
The difference in usable area is obvious, but the costs are also higher (for wall material)
These are two types of gable mansard roofs. There is also a third one - broken ones. They can be separated into a separate category - the device has significant differences.
The construction of a sloping mansard roof is both more complex and simpler. Essentially these are the same two slopes, but consisting of two parts with different slopes. This structure allows, without spending money on building walls, to get a living space that is only slightly smaller than on the ground floor (by about 15%). In this sense, its structure is simpler. But the rafter system has a more complex structure, and in this sense its structure is more complex.
The design of a sloping mansard roof is the most commonly used version of the rafter system - with part of the rafters being moved beyond the surface of the wall. This creates an overhang that protects the junction with the walls from precipitation.
This type is the most common for self-construction. It easily allows you to increase the usable area, build on small buildings such as a garage or summer kitchen, and get additional, almost separate, housing. Since the materials used in construction are usually light, the bearing capacity of the foundation is usually sufficient, but the calculation does not fit. (Read about calculating strip foundations here).
There is a small room made of logs below, and above there is a vast attic supported by racks
Four slopes
These are already complex systems that must be calculated. The surface becomes large, the cost of insulation increases significantly, and at the same time the size of the attic space decreases: parts of the rooms are cut off on all four sides.
Their advantage is their high resistance to strong winds: all surfaces are inclined and the wind load does not put so much pressure on the slopes. The structure is such that the overhangs can be made low, protecting the walls from the effects of precipitation and winds. In addition, many consider houses with such roofs to be the most attractive. The classic version of a hip roof is hip.
One of the types of hipped roofs is a hip roof with an attic space underneath. You can only stand at full height in the central part
When installing them, inclined rafters are reinforced - they account for most of the load. In general, its rafter system is one of the most complex, material-intensive and, therefore, expensive. So that you can evaluate the entire scope of work and costs, consider its design in the photo below.
Hip mansard roof rafter system
The top picture shows all the stops and slopes that need to be installed; the second picture shows the structure and location of the rafters more clearly.
There is also a transitional option - half-hip. It is something between a gable and hip roof. In this case, the hip is made only for part of the floor height.
Mansard half-hip roof. Organization of its rafter system
Only the main types of mansard roofs are described. There are also combinations of them. For example, a hip roof can also be a broken one, just like a single-pitched one. There really are a lot of options. The main thing is to avoid gross mistakes when developing a rafter system, and then implement everything correctly.
One-story houses
Photo: houzz
A one-story private house with a flat roof is a completely different, slightly unusual and ultra-modern aesthetic. And it has a lot of advantages. Low and rectangular cottages are convenient for living, since all rooms are on the same level, and you do not have to constantly move up the stairs. These homes are also the most energy efficient because they can be heated at the lowest cost.
A house with a pitched roof is easy to build and requires fewer materials than a house with a gable roof.
Photo: mfarchitect.com
Flat pitched roofs are the most suitable option for construction in regions with strong winds.
Photo: mfarchitect.com
Compact one-story houses with a flat roof are the standard option for prefabricated wooden cottages.
From time to time we feel the need to relax and take some rest without thinking about any problems. For such moments, a cozy one-story house in the middle of nature, somewhere on the edge of the forest, is best suited.
Photo: backstage.worldarchitecturenews.com
Despite the simplicity of the architecture, one-story forest houses made of wood look ideal throughout the year and allow you to wonderfully relax in the lap of nature.
A facade with a glazed pediment paired with a pitched roof is a current trend in low-rise suburban construction.
Photo: contemporist.com
The beautiful house in the photo is an example of a hybrid design that, on the one hand, follows the traditions of local architecture, and on the other, has a strong modern character. This combination allows the alpine cottage to merge with the surrounding nature and at the same time stand out from its background.
Photo: backstage.worldarchitecturenews.com
Single-storey prefabricated cottages with a sloping roof and continuous glazing along the front are an ideal option for those who prefer something ultra-modern. Located on a slope near a lake or river, such a house will give you unprecedented pleasure from privacy and picturesque views.
See also: Beautiful roofs of private houses: photos, design options, views
Mansard roof with balcony
How roof windows are made has already been described above. Balconies are built using almost the same principle. There are even special window systems that allow this to be done in the surface of the slope. Although the implementation is simpler, such a window costs a lot.
One view of a small balcony
If the load-bearing capacity of the walls allows, by increasing the size of the dormer window, you can make a hanging balcony.
The dormer window can also be turned into a small balcony
The balcony area can be supported by columns. Only in this case the removal is made above the entrance. Then the columns fit organically and also serve as decoration.
The columns that form the entrance door support the platform
A balcony on the pediment of a house with an attic is built according to a different principle. It is protected by an overhang extended forward; if the wall allows, the platform is made hanging.
Balcony on the gable of the attic roof
In small houses, a balcony is often made by moving the pediment of the attic floor away from the load-bearing wall. Due to this indentation, a platform is obtained. Canopies in such roofs are made by extending the roof to at least the same level as the outer wall, and even better - further. This overhang will also protect the gable wall and reduce the amount of rain that will fall on the open area.
The gable of the attic is moved inward. The resulting area is used as an open balcony
The design of this type of roof is such that by extending it you can even create a covered terrace. Its edge can rest on a decorative wall or on pillars.
The difficulty of this project is the long rafters
A similar idea is implemented in this project, but the roof here is multi-gable. It’s difficult to calculate it yourself, and it’s even more difficult to make valleys correctly, which is why they are rare
If we talk about non-standard solutions, then an “L”-shaped mansard roof from two lean-to roofs will turn out to be functional. In addition, this is an inexpensive way to decorate such a non-standard building.
"L" shaped single-pitched mansard roof
If you need an inexpensive way to build a house, read about frame house construction.
Types of mansard roofs
The group of attic roofs includes all types of roofing, under the slopes of which you can arrange a living space. According to building codes, an attic is distinguished from an attic by a ceiling height suitable for human habitation and the presence of natural light. The following types of roofs are suitable for installing an attic:
- Gable. A classic house roof consisting of two slopes. To effectively use the attic area, the elements of the rafter system are moved closer to the walls. Due to the steepness of the slopes, the height of the sides makes them unsuitable for living, but in that place it is convenient to place shelves and cabinets for storage. The angle of inclination of the pitched planes of the roof of a house for arranging an attic must be quite steep; this measure leads to an increase in the mass of the structure and an increase in the cost of construction.
Houses with any type of roof can be equipped with an attic, however, working with a hipped, pitched and asymmetrical roof is more difficult and expensive; it is better to abandon these options in favor of more rational ones - a gable or broken roof.
Mansard roofs: features of installation and selection of materials
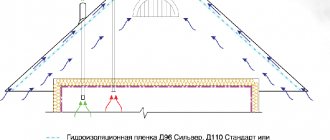
A residential and functional attic must be carefully protected from moisture, cold and wind. Therefore, during construction, a roofing pie is constructed, which includes several layers that provide an optimal atmosphere in the attic.
A roofing pie is required for both the attic and a warm attic.
When building a roof for a residential attic space, it is worth considering the following features:
- the choice of high quality materials is the key to the durability and comfort of the attic;
- windows should be protected as much as possible from rain, wind and snow, since these openings are a vulnerable area of the roof;
- all wooden elements of the roof must be treated with an antiseptic or a means to protect the wood from moisture;
- roof ventilation is ensured using a ventilated ridge, a ventilation gap between the waterproofing and the roofing;
- the use of lightweight roofing materials, for example, corrugated sheets and metal tiles, will reduce the load on the foundation and walls of the building.
Main stages of work
There are no universal instructions for building an attic roof, but there is a certain sequence of work. This allows for the phased construction of a roof with an attic and takes into account some important points.
The roofing pie is created in stages using high-quality materials
The main actions are as follows:
- During the design process, the parameters of the roof and each of its elements are calculated, for example, the cross-section of the rafters is calculated, depending on their length and angle of inclination. A drawing is created that shows the location of each element.
- After design, they begin preparing and cutting the rafters, installing rafter legs and additional elements.
- To attach the rafters, you need a Mauerlat, which is made from timber. The rafter legs are fixed to it.
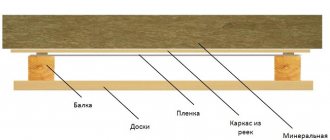
- After creating the frame, a waterproofing film is laid on it, reinforced with staples and secured with lathing slats.
- The roof covering is installed on top of the sheathing. In valleys or under soft roofs, continuous sheathing is required.
- From the inside, insulation, for example, mineral wool slabs, is laid between the rafters. Then a vapor barrier film is attached to the rafters, taking into account that there must be a gap of 5 cm between the insulation and the vapor barrier for ventilation. If such a gap is not provided, you need to build up the rafters with additional boards.
- After installing the vapor barrier, the attic can be finished.
Types of attic spaces
A heated attic space is a real alternative to the second residential floor of a wooden or brick house. The fact is that increasing the number of floors of a building is associated with significant costs for the capital foundation and the construction of stairs. Different attic configurations are used depending on the available space and the needs of the homeowner:
- Single-level. Under the broken or straight slopes of the gable roof there is only one living space. The construction of an attic of this type does not involve an increase in the weight of the roof, so it is suitable for buildings under construction and reconstruction. Even a master without experience can perform calculations and build a drawing of a one-level attic. According to building codes, the ceiling height in a residential area must be 2.5 m or more.
- Single-level with remote console. A cantilever-type mansard roof device is placed under an asymmetrical roof. To increase the area of the living space, part of it is moved outside the perimeter of the building. The protruding part of the attic, supported by pillars, is adapted for a shed or garage. The roof of the house with consoles is asymmetrical; the main part of the house is covered by a gable roof, and the console is covered by a single-pitched “patch”. A cantilevered attic is built to install vertical windows for natural light. However, professional architects can create a project and drawings of such complexity, and the complex diagram of the rafter system is not suitable for self-installation.
- Two-level. If the roof height exceeds 5 m, then in the attic room you can arrange two rooms located at different levels and connected by a staircase. This type of attic cannot be added to existing houses. Two-level premises are planned at the design stage and taken into account when creating foundation drawings. The relative arrangement of the rafter system is specially developed for the complex, asymmetrical geometry of the roof slopes. The second level of the attic rests on columns, so the reliability of the structure directly depends on the correctness of the calculations and the professionalism of the architect.
Designers can create real masterpieces from cantilever and two-level attics, using the advantages of panoramic lighting, equip a greenhouse, a nursery or a bedroom filled with fresh air and light, however, a simple single-level design is more suitable for self-installation.
Attic under a pitched roof
The installation of a single-pitched roof structure allows for a fairly spacious and easy-to-use attic floor. The supporting frame consists of the following elements
:
- Mauerlat (when building a wooden house, the upper crowns of the walls serve as support);
- racks;
- rafters;
- spacers;
- struts and other elements.
When designing a pitched roof, it is important to correctly calculate the angle of inclination. The construction of a pitched roof with an insufficient angle of inclination contributes to high snow loads, resulting in an increased risk of deformation of the roof under the weight of snow and moisture getting into the joints. In addition, the roof's resistance to wind load is reduced.
Be sure to read: Insulating an attic roof: how to insulate it correctly
If a pitched roof has a slope of 45 degrees, the snow will completely roll off it under its own weight. In general, a single-slope structure with an inclination angle of 35-40 degrees is considered optimal. The final coating can be made from almost any roofing material. The roof frame can have a slope along the length or width of the building, depending on the architectural design and the height of the load-bearing walls. Its cost directly depends on the degree of slope of a pitched roof, since lighter structural elements and materials are used to install a roof with a large angle of inclination.
Advantages of the attic
Homeowners try to use every opportunity to rationalize construction costs, so they do not miss the opportunity to use the space under the roof of the house. This option for increasing the usable area of the house has the following advantages:
- Minimum price 1 sq. m of living space. Due to the fact that the equipment of the attic is not associated with an increase in the cost of constructing the foundation, the cost of each meter in the house is cheaper than when constructing two-story structures.
- Rationalization of heating costs. An air pocket between the floor and ceiling of the attic prevents heat generated by heating devices from escaping through the roof. Air does not transfer heat well, so the ground floor of the building will be warmer, which leads to energy savings.
- The finished look. The equipment of the attic makes the appearance of the house complete and harmonious, allowing you to equip a balcony, canopy or garage.
- Speed of construction. During the construction of an attic in a residential building, it is imperative to stop using the first floor. The speed of installation allows us to complete the work on equipping the attic within a week.
- Minimum costs. Experienced builders say that there is no way to get a few square meters cheaper.
To equip an attic room, the length of the end wall of the building must exceed 4.5 m, and the area of the house must be more than 7 square meters. m, the recommended proportion of height to area is ½.
Natural lighting in the attic
The presence of natural light is a prerequisite that must be met in order for an attic space to be considered residential according to building codes. There are two ways to organize it.
- Installation of vertical windows. This is the simplest and most accessible way out of the situation. Vertical windows are installed on gables, so this method is not suitable for hipped and pitched roofs. The optimal window placement scheme is at a height of 1.2 m from the floor, this allows for maximum use of natural light during daylight hours.
- Installation of panoramic windows. Panoramic windows are also of the vertical type; they are distinguished by a large area of translucent structure. Their installation is used to open an overview of the picturesque surroundings. Since the panoramic window replaces a significant part of the pediment, its frame must be specially reinforced to support the weight of the roof. The cost of panoramic windows of panoramic windows is several times higher than the price of ordinary vertical ones.
When choosing windows for the attic, keep in mind that it should be in harmony with the roofing material, the total area of the windows cannot exceed a third of the surface of the slopes, and the size of the translucent structure directly depends on the angle of inclination.
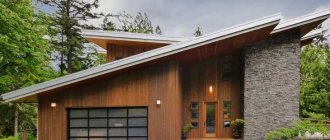
Shed roofs made of corrugated sheets
Private cottages of modern architecture have a laconic facade and a pitched roof. Another common feature of such houses is large, most often panoramic windows.
Photo: homedit.com
Be it summer, spring or winter, such a small cottage with a pitched roof and an attic always looks attractive. And if you live in the northern region, black color of facades and roofing will be optimal for heat conservation.
Photo: irondesignroofing.com.au
A striking design element of the cottage in the photo was the dynamic pitched roof, which rests on the ground with a rafter system.
Photo: Englert Inc.
Radius pitched roof.
Photo: houzz
A pitched roof harmonizes well with wooden facades, as in the photo of this country estate with a garage.
Photo: mountainmodernlife.com
A private house in the high-tech style is a cubic volume under a pitched roof, square windows of different sizes and contrasting facade decoration.
Wooden wall cladding and green lawn in certain areas of the roof can neutralize some of the “coldness” of the stone finish.
Ventilation equipment
If you are going to insulate and heat the attic, it must be equipped with a forced ventilation system. The cold under-roof space is ventilated independently using dormer windows. In a well-insulated attic, natural air circulation is hampered, making it stuffy, damp and uncomfortable. To avoid such problems, installation is necessary:
- Ridge aerator. This is a device installed along the ridge connection. Through its system of holes, the heated air exits. The design of the ridge aerator prevents insects and moisture from penetrating under the roof.
A working forced ventilation system forces air to circulate using convection - the property of warm air rising to the top, making room for cool air taken from the street. This will increase the service life of the rafter system and roofing material, protect against mold and dampness, and also create a pleasant microclimate in the attic.
There are ready-made drawings of mansard roofs of standard sizes available for do-it-yourself installation; if you are an inexperienced builder, then it will be safest to focus on these options.
Preparatory activities
First of all, you must make sure that the foundation of the house can withstand the additional load from the attic floor. If necessary, the foundation must be strengthened or an attempt must be made to transfer new loads to a separate foundation. At this stage, you may need professional help.
How to build an attic
Solve the issue of attic design. The under-roof floor can have a variety of shapes. In this case, the internal space of the room is determined by the features of the roof structure.
The attic roof must be designed in a special way. You will have to get rid of the old rafters and related materials, replacing them with a new system designed taking into account the upcoming loads, angle of inclination and other important design features.
Thus, the rafter structure must be calculated and designed separately, specifically for your attic floor.
The most optimal roofing option for the attic floor is a broken gable roof. A gable roof will place a much greater load on the walls compared to a lean-to system. However, you will not find a more convenient roof option for the attic floor.
Gable mansard roof
At the same time, a broken roof will “eat up” the least amount of free space in the attic compared to all other types of roofs.
It is important that the gable roof has a sufficient number of load-bearing supports. Typically, layered rafters are used to construct such a roof. In this case, the elements of the rafter system must rest on load-bearing walls that can normally withstand incoming vertical and horizontal loads.
Rafter systems for single-pitch structures
A pitched roof, despite its simplicity, may have some differences due to the size of the structure and the slope of the roof.
- For structures with a small angle, less than 30 degrees and a span of up to 4.6 m, the rafter legs are supported on the Mauerlat. This rafter fastening system is most common for gazebos, garages and utility buildings.
- If the span is 4.5-16 m, intermediate supports will be required. In addition, on a higher wall, you should lay a beam - a wooden beam measuring approximately 10x15 cm. Fasten the rafter leg to the bed, and the other end to the rafter so that the angle is 45 degrees.
- For large structures with a span length of 6-15 m, it is necessary to install an additional beam in the center of the structure in parallel with the load-bearing walls. A vertical support beam is installed on the bed, fixed with struts on both sides.
Construction of a 15-meter pitched roof.
- Buildings longer than 15 meters must have two vertical supports. The racks under one rafter must be connected with a jumper, and with the rafters they are fixed with struts directed towards the load-bearing wall. This way the structure will have the necessary rigidity. The installation step of the beds cannot exceed 6 meters.
Options for single-pitch structures.
The most common material for making rafters is wooden beams and boards. Rafter legs that exceed the standard dimensions of the timber in length should be made of laminated veneer lumber. It is advisable to avoid joints. If this fails, then a support post must be installed under the joint. Small, lightweight rafter structures can be made from boards (pair or triple).
For rafters it is necessary to use coniferous wood, well dried to 15% humidity and without cracks. All elements must be treated with an antiseptic. In addition, fire safety requirements recommend covering the structure with a special fire-resistant compound. Joints and interfaces with concrete parts of the house are laid with roofing felt or similar materials.
Fastening the rafter system of a pitched roof
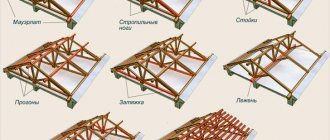
Layered rafter system
If your structure is built from rounded logs or beams, the roof rafters can be made with layered or hanging elements.
The layered rafter system is distinguished by the fact that it is installed on existing internal load-bearing supports. Common in brick and block structures, as well as in log houses with an internal load-bearing wall. This design consists of:
- racks;
- runs;
- contractions;
- more laid down;
- struts
Additional elements are needed if the weight and area of the roof are very large. The larger these parameters, the more numerous the additional reinforcing elements. Layered systems can be used for structures with a roof length of up to 12 meters or more, which requires internal supports.
Shed roof with a layered rafter system.
Sliding rafter system
It is distinguished by the use of sliding rafters. Most common in log buildings and timber houses. A characteristic feature is the “adjustment” of such a structure to the deformation of the foundations, since newly built wooden structures shrink during the first years by up to 15%. Rigid roof structures in such situations create distortions and defects. Sliding slide fastenings allow the roof structure to adapt to subsidence.
Sliding support for rafters of a pitched roof.
Hanging system
A characteristic feature of hanging rafter systems is the absence of supports on the partitions. For such a structure, a frame base and walls of equal height are required. The slope of the slope is formed by the construction of wooden posts and trusses. Rafter truss is a triangular structure with a right angle, consisting of:
- racks;
- puffs;
- rafters;
- struts
Such a farm is assembled, as a rule, on the ground, after which, having mounted a temporary flooring for the work of one or two workers, it is installed on the roof. Similar designs are used for structures no more than 4.5 meters in length.
Fastening hanging rafters.
Non-thrust rafter system
One of the varieties of layered construction. In it, the walls do not experience the pressure of the rafter beams, which spring, working in bending. There are several options for this design:
- The support beam is fixed on the rafter leg (or the emphasis is placed on the mauerlat by sawing or cutting). In the upper part of the beam, a cut is made horizontally with a slight angle in order to prevent expansion into the purlin.
- At the edge of the beam, the bending moment is small, so it allows trimming at this point. The depth has limitations: with a rafter beam height of more than 18 cm, no more than 0.3 of the height, with a height of 12-18 cm, no more than 0.4 h, and with a height of 12 cm, no more than 0.5 h.
- If it is impossible to trim the upper part of the beam, it should be extended by cutting a board and secured with mounting plates on both sides.
Important!
In all cases, the size of the trim cannot exceed the height of the beam section.
The roof gives any structure a certain architectural expressiveness and aesthetic style. In addition, the roof must have good strength characteristics. To do this, rafter structures and sheathing are installed, the task of which is to transfer various loads to the walls of the building.
Stages of attic construction
Stages of attic construction
Before starting construction, decide what area the under-roof floor should have, whether you will insulate it and whether you need to install heating in the attic.
In accordance with your own preferences, draw up (order, find in open sources) an attic project with sketches, drawings, calculations and explanations.
The design documentation should reflect the following important features of the attic:
- the presence of additional partitions and load-bearing walls;
- number of window openings;
- features of the internal structure of the roof;
- type of roofing material, etc.
After this, calculate the required amount of materials for arranging the attic. It is best to make an attic using the same materials from which the structure itself is built (brick, blocks, etc.).
Timber country house with attic
If you plan to use the attic exclusively for seasonal living, you can make it from more budget-friendly materials. Typically, wood is used in such situations. This material goes well with most existing building materials and is perfect for furnishing an attic.
Wooden attic
Proceed with the arrangement of the wooden frame - the basis of the roof. Select suitable locations for placing the blocks needed for arranging the partitions.
First you will need to lay out the exterior and gable walls. Proceed with the arrangement of the attic roof only after the construction of the house itself has been completed.
To assemble the frame, use a high-quality wooden beam measuring 15x5 cm. When performing each stage of the work, be guided by the sketches and drawings you have. It is impossible to explain everything solely in words.
Bar 150x150 mm
First step
Strengthen the existing structure with slings. To strengthen the purlins, use special support blocks in the shape of the letter U. The blocks are installed and filled with cement mortar. This strengthening will prevent further cracking of the walls.
Second step
Build solid gable walls and begin building the attic. After installing all the necessary walls, begin installing the elements of the rafter system.
Capital gable walls
Third step
Install the rafters in accordance with the design documentation and make sure that the installed system is reliable.
Mansard roof design
First you need to install the purlins, and only after that fix the rafters. First you need to lay out the stepped wall slopes, and then arrange the partitions of the attic floor. Be sure to make sure that the elements of the rafter system are evenly positioned.
Fourth step
Align the slopes of the gable walls using a band saw.
Strengthening the gable overhang
Nail batten boards to the rafters to install the insulating material. Secure the waterproofing, insulation and vapor barrier, and then lay another layer of boards on top of the waterproofing.
Lathing for attic roof
Sixth step
Apply your chosen finish to the sheathing. It is better that the finishing roofing material is as reliable and high quality as possible, so that the attic is cozy, warm and safe.
Laying sheets of metal tiles
After completing the work on arranging the walls and roof of the attic, proceed to insulation and interior arrangement of the under-roof room.
Technology for carrying out work on the construction of an attic roof:
How to build a mansard roof correctly? - This question worries many novice builders. Before you build an attic roof, you should decide on the purpose of the attic space. In a small narrow attic you can arrange a bedroom, an office, or a nursery. The large room is useful as a living room.
Planning
If the attic is part of the house being built, then the design of the attic roof is already included in the house plan from the very beginning. If the room was not planned earlier, then at the initial stage it is necessary to design the attic roof.
First, measurements are taken of the house frame and a design drawing is drawn up. If there is an old roof, take the size from the ridge to the ceiling.
Drawing up a drawing before making a mansard roof will allow you to visualize the future structure, its constituent elements, and calculate its area.
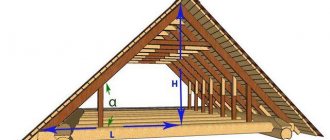
Calculation of the dimensions and height of the attic walls
The usable area of the room depends on the height of the attic floor. Based on this, this space can be divided into several types:
- a full attic floor, with a height of vertical walls of more than 1.5 m;
- one- or two-level room, the height of the walls varies from 0.8 m to 1.5 m;
- a semi-attic room in which vertical walls are either completely absent or have a small height - up to 0.8 m.
Developing an attic roof project with your own hands is a complex task that requires theoretical knowledge and practical skills in the design and construction of residential buildings. Making an error in the calculations can cause cracks to appear or even the collapse of the house.
The formula for calculating the area of the attic space makes it possible to determine the type and materials for installing the supporting system, as well as to calculate the area of the finished attic. If this space is planned to be used as a living space, then you cannot do without calculating the roof area.
How to calculate an attic roof, plan and calculate an attic space? In order to calculate the area of the attic roof yourself, you need to divide the space schematically into simple geometric shapes - rectangles, squares, trapezoids, and then calculate the areas of these shapes using special formulas.
Schemes and formulas for calculating the area of different figures
To determine the total area of the roof, you need to add up the sums of the areas of all the figures that make up it.
To calculate the area of the slopes, you must indicate their slope angle (from 11 to 70 degrees) and the height of the ridge.
To calculate the surface area of a pitched roof, it is necessary to multiply the width and length of the building by the dimensions of the expected overhangs: Sabcd= Lcd*Lbd.
When calculating the area of a gable roof, this figure should be multiplied by two. The area of complex pitched roofs is calculated in the same way.
Scheme for calculating the roof area
Calculation example for a gable roof
Let's demonstrate the calculation using an example: if we have a house measuring 9*7 m, the length of the rafters = 3.8 m, the overhang is 0.6 m long, the overhang on the pediment is 0.6 m.
Then we calculate the area of one roof slope using the formula: (9 + 0.6 + 0.6) * (3.8 + 0.6) = 44.8 m2.
We calculate the total roof area: S = 44.8 * 2 = 89.6 m2.
Roofing Factor
You can also choose the right roofing materials using a simple calculation, taking into account the base of the rafters, as well as their angle of inclination. The characteristics of roofing materials affect the reliability and durability of the pitched structure. It also depends on them how the lathing will be done: continuous, sparse and mixed.
When choosing roofing materials and insulation, you should take into account the climatic conditions of the region of residence, the presence of strong winds, and temperature conditions. When insulating an attic roof, special attention is paid to gables, slopes and attic floors.
Since the roofing materials are installed overlapping, the area of the roof and the roofing material will differ.
When roofing a roof with slate, the following formula is used: S= (2*A+B) * (2*A+C)/cos 30 where S is the total area, B and C are the length and width of the house, A is the width of the overhang,
30 is the angle of inclination of the rafters. If the length of the house is 9 m, the width is 7 m, the width of the overhang is 0.60 m, the cosine of an angle of 30 degrees is 0.87, then the total roof area will be 96.14 m2.
Using this formula, you can also calculate a soft roof.
The material consumption is also affected by the angle of inclination of the rafters and the amount of overlap. The greater the angle of inclination, the less overlap of the roofing material will be.
Table of roof slope and overlap coefficients (k)
Calculation of roof height
After the slope of the structure is determined, proceed to calculating the height of the ridge.
Let's consider the calculation formula for a gable roof: a=b*tg angle of inclination. where b is equal to half the width of the house tg - the tangent of the angle of inclination can be found in a special table.
Example:
Given: house 7x9 m, roof slope angle - 40 degrees.
The width of the house, equal to 7, is divided by 2, therefore, leg b = 3.5. Tangent 30 degrees = 0.57.
Solution to the problem: leg a=3.5*0.57=1.99 m.
Answer: optimal ridge height = 1.99 m.
Scheme of a mansard roof with two slopes
Installation work
When all the calculations have been made, before installing the attic roof, the old roofing system is removed and the strength of the foundation and walls of the house is checked. Also at this stage it is necessary to waterproof the building.
The construction of an attic roof begins with the installation of a Mauerlat. Installation of the Mauerlat on a gable roof is carried out on both sides of the house, in places where the rafters are inclined, and on a hip roof - along the entire perimeter of the building.
Fastening the timber to the wall is ensured by monolithic grouting and studs. To do this, holes of the appropriate size are made in the mauerlat bars. After installing the beams, install washers on the studs and screw in the nuts.
Installation of Mauerlat - attic, gable roof
The next stage is the installation of a new rafter system, according to the project.
You can use rafter trusses, which will facilitate the assembly of the entire system. In this case, you must first make a test sample.
Installation of roof trusses in a timber house
After installing the rafters, a vapor barrier is laid on the inside of the roof . To insulate the attic, mineral wool is laid, which is placed between the rafters.
Insulation and insulation of surfaces
Next, they begin to construct the sheathing, on top of which waterproofing is laid to protect the room from moisture.
Pie of insulation and insulation of the room under the roof
The final stage is installation of the roof covering. It can be slate, tiles, metal tiles, ondulin. If provided, windows are installed.
Roofing installation
How to expand an attic roof with your own hands - video: [su_youtube url=»https://www.youtube.com/watch?v=LdoiMXPXU0g»]
Attic insulation
A wide variety of materials can be used to insulate the attic. For example, mineral wool insulation, expanded polystyrene, all kinds of blocks, etc. are very suitable for performing such work. One of the most preferred thermal insulation materials is fiberboard. Using this material as an example, the procedure for insulating an attic room will be considered.
Stages of attic roof insulation
In the case of using slabs with a thickness of 1.2 cm, the thermal insulation characteristics of such insulation will be similar to the properties of a wall laid in brick, or finishing made of boards about 5 cm thick.
In addition, the slabs have good noise insulation properties. Factory treatment with antiseptic preparations makes the material resistant to adverse external factors, and the relatively low price allows almost everyone to buy such slabs.
The most suitable material for attic insulation is fiberboard
On one side the slabs have a slightly corrugated texture, and on the other they are smooth. To cut slabs, you can use an ordinary sharp knife. The material is not particularly afraid of temperature and humidity changes. At the same time, work on thermal insulation of surfaces using fiberboard will not take much effort and time.
Finally, you can glue wallpaper to the smooth side of the fiberboard (the smooth side is the front side) or perform another finishing touch at your discretion.
How to insulate an attic
Traditionally, thermal insulation work begins with insulating the walls. It is enough to fix the slabs with nails. First, duralumin plates should be placed under the fastener heads. Place the nails themselves staggered.
If the walls are not made of wood, you may need to use other fasteners. Focus on the situation.
To attach slabs to plastered surfaces, you can also use PVA glue or various types of adhesive mastics.
At the stage of covering the ceiling, try to enlist the support of at least one assistant - the slabs are quite large in size and it is not particularly convenient to attach them alone.
The cladding is carried out according to an extremely simple scheme: the slab is carefully applied to the fastening point and fixed using T-supports made of boards, nails and duralumin plates. Wear safety glasses at this point.
The floor can be insulated using two methods.
In accordance with the first method, the surface is first covered with a double layer of roofing material, after which fiberboard is fixed on top, and then the finished floor is installed.
In accordance with the second option, fiberboard slabs are nailed to the floor, and carpet is glued on top of them. This coating is very convenient. For additional convenience, it is recommended to impregnate it with a special composition that makes further maintenance of the carpet easier.
Before gluing the carpet, it must be unrolled and kept in the room for 7-10 days. Fiberboard boards are pre-coated with glue. After gluing the fiberboard, you need to additionally press it to the surface using boards and leave to dry for a day.
Interior arrangement of the attic
In conclusion, all you have to do is carry out a number of works on the internal improvement of the attic. Start from the ceiling.
Interior arrangement of the attic
The best option is to install a light suspended ceiling. Lining is well suited for the construction of such a structure. You can also use hardboard, plywood or other suitable materials.
It is more convenient to first make the ceiling to size, and then attach it to the crossbar of the truss.
Interior arrangement of the attic
Nail crossbars made of high-quality wooden beams to the rafter posts. Nail the selected finishing material to the frame. The best option is wooden lining.
In places where niches form (and they will definitely be present due to the peculiarities of the roofing structure), you can nail plasterboard or other suitable material, creating compact cabinets for storing various types of accessories.