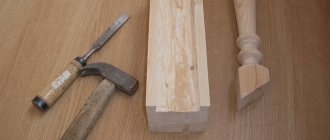
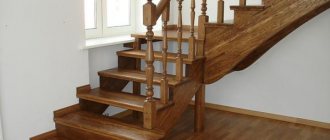
How to attach balusters to steps and railings
There are many staircase designs and methods for installing balusters, but when attaching railing posts and support posts, only two types of fasteners are used:
- Wooden dowels or dowels.
- Metal studs or pins and bushings.
Neither option is ideal. Some people choose wooden dowels or dowels. But over time, the wood dries out and cracks, which leads to the fact that the railings begin to wobble. The option with a metal fastener is no better: the wood is crushed, so the connection also becomes loose. With some fastening methods, it is possible to tighten the studs/screws little by little, restoring stability to the railing.
Installing railings and balusters with your own hands is possible. You need to know how to assemble knots
Self-tapping screws can only be used for fastening balusters as additional fasteners. The head of self-tapping screws often breaks off, so this is not an option for stairs. Such fasteners are used only for “baiting” or in addition to those listed above.
In any case, for greater stability, additional glue is used. Before attaching the balusters to the steps and railings, coat the joint with glue. Place the pin and lubricate it. Fix the baluster to the step or floor and coat it. Attach the posts to the railings - also use additional glue.
Attaching balusters to the floor can be done in different ways. You need to choose the one that is most suitable for you
Wood glue is suitable for installing balusters if you are gluing wood to wood. Traditional option, but there is a more modern one. Tiebond II glue. This is a universal composition that sets in 20 minutes. The wait is not too long, at the same time, you have time to get everything done. It holds up perfectly - the wood nearby may crack, but the joint remains intact. Before attaching balusters to steps and railings, lubricate the end of the part and the fastener itself with this composition.
Joiner's moisture-resistant adhesive Titebond II Premium is a one-component PVA adhesive for working with wood. Great for wooden stairs
Methods for installing balusters on the base of the floor, steps and railings with your own hands
There are many ways to install balusters. The choice of the most effective one in a particular situation depends on the type of staircase, the characteristics of the railings, and the material of the balusters. An important point is the decision on the frequency of installation of balusters and support posts. It is possible to install one baluster per step or two. Also, support pillars can stand at the edges of the span or be added to the middle.
How to determine the distance between balusters and make markings
Markings for their installation must be done in such a way that all balusters and support posts are in the same plane. The installation point is marked at a distance of 5 cm from the edge of the step plus half the width (or diameter) of the supporting plane of the baluster. The distance between the balusters depends on the depth of the step itself and the number of balusters on it. For accurate marking, you need to pull the lace on two nails driven in at both ends of the span. But if there are children in the house, then the distance between adjacent balusters should be such that a child’s head cannot fit between them.
How to install balusters depending on the type of fastener
Dowels
A hole with a diameter slightly less than the diameter of the dowel is drilled at the base of the baluster. The dowel itself is driven into this hole using glue using a mallet. The same hole is drilled according to the markings in the step. A baluster with a dowel installed in it is also driven in with glue.
Dowels
Hairpins
The hairpin is screwed into the base of the baluster, and then the baluster with its hairpin is screwed into the prepared place. The pin is screwed into the body of the baluster using a screw-type thread. If the floor is wooden, then the second end of the stud has the same thread. In the same way, balusters are installed on wooden steps. If the floor is concrete, then a nut is mounted in the right place, and the end of the stud has a bolt thread.
Baluster with mounting pin
Bolts
Installing balusters on bolts is done like this. A through hole with a diameter equal to the diameter of the bolt is drilled in the step board - from 10 to 14 mm. A socket with a larger diameter is drilled under the bolt head. A hole is also drilled at the base of the baluster, with a diameter 1–3 mm smaller than that of the bolt. The bolt is screwed into the baluster through the step.
Self-tapping screws
If you run a long board – a “string” – along the side of the stairs and attach it to the stairs with bolts, then balusters can be attached to it with self-tapping screws. The self-tapping screw is screwed horizontally through the string and baluster.
Anchors and dowels
If a staircase element needs to be attached to brick or concrete, then you should use dowels or anchors. A hole of the appropriate diameter is drilled in a solid base, the dowel is hammered into the resulting socket, screwed in with a self-tapping screw or the required part is screwed in with a bolt.
Anchors and dowels
Welding
Welding connects the elements of a metal staircase. This option is not suitable for every DIYer.
Final processing of railing elements
When the staircase is assembled, the railing is covered with a handrail. It should be made of a material that is pleasant to contact with the hand. It could be plastic, polished wood or something similar.
How to attach balusters to the floor and steps
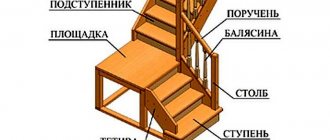
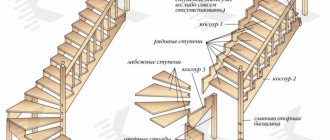
Balusters or railing posts can be intermediate or main. The latter are also called support pillars. They usually have a larger cross-section and may look different (square instead of rounded posts), although the style remains the same. Main balusters are located at the beginning and end of the stairs, on flights, and at turning points. On long spans they install even more ones - every three to five steps. It all depends on the design of the stairs.
The structure of the stairs and the method of fastening with overlays
Main balusters carry a greater load, so they are secured with more powerful fasteners. At the same time, more fixation points are made and additional clamps are used.
How to attach balusters to steps and railings: through fastening of a baluster through a step
One of the simplest ways is to attach the baluster to the step using a pin through it. You can use regular or plumbing studs. A plumbing stud may be called a screw. Sometimes they add “combined”. This is all because this fastener has two types of threads: at one end it is metric (for a nut), at the other end it is self-tapping with a sharp peak (similar to a self-tapping screw).
How the balusters are attached: through the step all the way through
A through hole is drilled into the steps and the selected type of fastener is inserted into it. If a plumbing stud is chosen, the self-tapping thread is turned upward. At the bottom of the step, a hole of a larger diameter is drilled under the washer so that the washer and nut can fit in. The holes can be covered with covers, but they must be easy to remove. After a while you will have to tighten the nuts, as the wood gets crushed. The baluster is screwed onto the installed screw. To prevent the wood from cracking, pre-drill holes in the center of the balusters.
To make the balusters wobble less, their connection with the step is coated with glue.
The diameter of the studs for fastening balusters is 6-8 mm, for posts - 10-12 mm. Length - the longer the better. In some options, a continuous embedded pin is made that goes right through the entire rack.
The sleeve is glued into the hole in the baluster or in the steps (two different types of fastening)
When using a regular pin, a hole is made in the baluster and a threaded sleeve is glued into it. In the photo above, the opposite is done - the bushing is glued into the baluster. This is also possible, but this is a different type of fastening, although the principle is the same. When installing, the baluster is screwed on; the thread of the pin must match the internal thread of the bushing. This connection is more reliable, since the lateral load falls not on the thread, but on the more massive and smooth walls of the sleeve. As a result, less wood is crushed. Don't know how to attach balusters to steps and railings so that they don't wobble too much? Try this connection. But don’t forget to glue the joint between the baluster and the handrails and the string/step with good glue.
On stiletto heels
How to attach balusters to steps and railings if the staircase is made on bowstrings? In this case, the racks are most often attached to the bowstring, although it is also possible to attach them to the steps. If the string is wide enough, you can try to fasten through, but often this is unrealistic - the thickness is too small and the width is too large. You can attach it to a pin, which you screw one side into the bowstring and the other into the lower part of the post.
How to attach balusters to steps and railings with studs
In the center of the lower part of the rack (we find it by drawing two straight lines connecting the corners) we drill a hole that is slightly smaller than the diameter of the stud. We wet the pin with glue, then screw it halfway into the hole. We also drill a hole in the bowstring or in the step and repeat the operation. It's simple. But the disadvantage of this method is that if the railings start to swing, this can only be eliminated by going through everything again.
On the dowels
A dowel is a round wooden pin. For better grip, vertical notches are made on it. The diameter of the dowel can be from a couple of millimeters to 1.5 cm. It differs from a regular pin in that it is held in place not by the thread, but by friction.
The entire installation procedure is similar to installing balusters on studs: a hole is made in the middle of the post and in the string/step. A dowel is glued into the hole in the string/step. It is coated with glue and hammered in with a hammer (the diameter of the hole is slightly smaller). It is important to knock not on the dowel, but on the piece of wood that is placed on it. The hole in the baluster is coated with glue, and it is placed on the dowel. This is how all the railing posts are assembled.
To the balustrade board
A simpler option is to attach the balusters not to the bowstring, but to the under-baluster board. This method is available only and exclusively for string ladders. Since the under-baluster board is attached to it. The assembly procedure is simple - first, all the racks are attached to the baluster. They are attached from below, through, into the rack. All the racks are installed, and then the entire assembly is attached to the bowstring. Screws and studs are used to fasten balusters.
This is what a staircase with a baluster looks like. This is the board to which the posts are attached. She, in turn, is attached to the bowstring
How to arrange and install pillars, balusters and handrails for stairs to the second floor in a house
Contents
Introduction
Making markings for posts and balusters.
How to properly secure balusters on stairs
How to install a stair handrail on the second floor of a house.
How to make a curve in a handrail at the bottom of a staircase.
Additional materials for the article.
Introduction
This article details how to calculate the location and install posts, balusters and handrails of a wooden staircase on a metal frame so that the structure is strong, symmetrical and functional.
You can print out the text of this instructional article and use it as step-by-step instructions when making a staircase yourself.
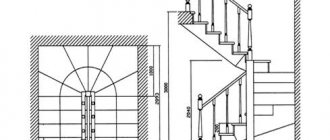
Making markings for posts and balusters
We make markings for installing balusters as follows.
To avoid any deviations, I set aside 60 mm from the side edge of the upper step.
I set aside the same 60 mm from the edge of the bottom step.
I make marks and place a guide rail along them.
Using a corner, I place marks at the beginning and end of each step.
This way the deviations will be minimal and all the balusters will stand straight. The next step will be marking the distances between the balusters.
We install a pillar at the top of the stairs on the second floor.
To do this, take a 10 x 100 mm bolt and weld it to a metal embedded plate.
While the post is not connected with railings and balusters, it wobbles, but when the entire structure is assembled, it will stand firmly.
Now we install the lower pillar, on the platform between the upper and lower flights of the stairs. Set aside 55 mm from the overhang point of the step and drill a hole for the bolt on which the post will be attached.
The width of the pillar is 100 mm, but we set aside a little more than half of this value - 55 mm, so that there is a gap of 5 mm between the pillar and the step. This way the pole will not rub against the step and creak.
Let's move on to how to arrange balusters. We take the corner again and make a mark on the second step.
We mark the end of the overhang of the upper step and set aside 1 cm from this point.
We use small scraps of the base of the baluster as a projection.
The distance from the step board to the baluster is 4.5 cm.
We set aside the same 4.5 cm from each riser board on each step.
We measure the distance from the outermost baluster on the top step to the post - it turns out to be 8 cm.
The width of the tread on our steps is 26 cm, so the distance between the balusters should be 13 cm (exactly half).
The second baluster on the step will stand at a distance of 7 cm from the edge of the step and at a distance of 8 cm from the next lower baluster, taking into account the 1 cm indentation.
Taking into account that the gap between the post on the landing and the step is 0.5 cm, the distance to the baluster there will be slightly less - 7.5 cm.
Main! The following sequence must be observed: first the pillars are placed, and then the balusters are placed in such a way that between the upper and lower pillars and the balusters closest to them there are approximately equal distances, with an error within 1-1.5 cm.
You can also learn how to best calculate the location of balusters and pillars on the stairs from the following video:
How to properly secure balusters on stairs
When installing balusters, we see that the base of two adjacent balusters is not the same. The one that stands at the riser has a higher base than the outer one.
The tops are all the same. Initially, all balusters were the same size.
How much does the base of the baluster need to be trimmed? The baluster leg has a height of 19 cm.
Since the outer baluster stands exactly in the middle, we reduce it by half - by 9.5 cm.
We attach the balusters to the steps using a self-tapping screw with a hex head.
Be sure to use a washer.
Using a ratchet, screw the baluster to the step.
Using a guide and clamps, we secure and tie together all the installed balusters. We check their position using a level and compare it with the position of the pillars.
Each baluster is marked with its own number, corresponding to the number of the step.
Also, on each baluster along the installed guide, a mark is made indicating the cutting line for the installed handrail.
On the reverse side, to make it easier to assemble the entire railing structure later, marks are also made on the guide itself indicating the position of the balusters.
The position of each baluster on the guide is also numbered.
After the balusters have been cut, they are installed again according to the numbering, and only after that the railing strip is attached to them.
You can see how this whole process looks in real life in the video:
How to install a stair handrail on the second floor of a house
We start by measuring the angle of the handrail in relation to the post.
In accordance with this, we also adjust the angle of inclination of the circular saw, which we will use to cut the handrail of the stairs.
After this, we saw off the edge of the handrail.
We weren’t able to cut through to the end; we only had to finish cutting just 0.5 cm.
We do this with a regular hacksaw.
We sand the edges with sandpaper.
We repeat the same operation on the other side of the handrail.
We install the handrail and check how it fits against the posts. Everything fits perfectly on the bottom, no gaps.
At the top we see a small gap and correction is required.
We trim the edge of the handrail a little and remove the interfering protrusion-bump. After eliminating this shortcoming, the handrail fits snugly to the upper post. When tightened with fasteners, the structural elements will fit together even more tightly.
One more point needs to be noted. The railing is initially a regular beam and we need to make a groove on the reverse side for the railing strip.
To do this I use the following device. Using a clamp, I attach a piece of wooden beam to the router at a distance of 15 mm from the router.
This will be the indentation from the sides of the handrail.
The groove itself will be 50 mm wide and 5 mm deep - exactly the thickness of the underrail strip.
You can also watch how to make handrails in this video:
How to bend a handrail at the bottom of a staircase
The end of the handrail at the bottom of the stairs should be rounded. In this part I will tell you how to do this.
As a blank for the handrail, we use ordinary timber 80 x 55 mm.
A 40 x 100 mm board is glued to this beam.
I glued three of these additional elements one by one.
I ended up with a build-up to the handrail, on which I previously drew how the end of the handrail would go.
I started cutting off the excess with a saw.
Then we begin to process the end of the railing with a hand cutter with a diameter of 8 mm, removing unsawed remains.
Movements must be performed vertically, since the railing will be twisted with a screw and smoothed out.
We cut the handrail almost along the line that was originally drawn.
Now take a belt sander and smooth out the sides of the handrail.
We outline with a small margin the cutting line from the bottom of the handrail.
We also cut off the excess part at the end of the handrail.
The thickness of the handrail at the attachment point with the bottom post should correspond to the thickness of the handrail at the baluster. We draw a vertical line and measure, we get 72 mm.
Thus, we made the blank of the curved handrail using only three tools: a hacksaw, a grinder and a turbo machine with a cutter.
After processing the handrail we get this option.
It remains to install two more missing balusters.
As a result, we get the following construction.
For a better understanding of the material presented, you can also watch the video:
Additional materials for the article
- How to install steps, risers, landing and cladding boards on a metal staircase frame.
- How to make and install an invitation step on a metal staircase frame.
- Do-it-yourself metal staircase to the second floor Step-by-step instructions and video tutorial
- Designing a metal staircase to a house on the second floor in the Compass program
- How to design a metal staircase to the second floor in a house using a pen and a piece of paper (if you do not work in a graphics editor)
- How to design a metal staircase. Design of staircase frames with comments.
- SketchUp lesson on designing a metal frame or broken stringer.
- You can also check your calculations and get advice on improving the comfort level of the stairs using our online calculator: Online staircase size calculator
How to attach balusters to railings
The simplest option for attaching handrails to balusters is with a handrail, also called a “handrail.” The name speaks for itself. This is a board to which the racks are fixed through and through from above. From above it is covered with a railing, in which a groove is usually cut to the size of this board. But this is optional. There are pads that are thicker, which gives a different look. They choose what they like.
How to attach balusters to railings: support board
The handrail/railing can be installed with glue, additionally secured from below with screws or nails. You can take finishing nails and screws (finishing screws with a small head are also available).
You can also use a secret method of installing the railing on dowels or studs. In this case, the procedure is as follows:
- Install dowels or metal pins in the center of the balusters.
- Place all racks strictly vertically and secure them.
- Place the railings on top the way they should be. Here you will need an assistant - you need to hold the railing and knock along it with a hammer.
- We take a hammer and an intermediate block. Place the block over the counter and hit it with a hammer. A mark appears on the bottom of the handrail. Here you need to drill a hole.
- We go around all the balusters, transferring the marks to the handrail.
- We drill holes.
- Let's check if everything fits together well.
- We remove the handrail, coat the joints with glue and install it again, hammering it through the board.
That's it, the handrail is installed. There is another simple way to attach balusters to the handrail - from below, diagonally, using nails or self-tapping screws. There are two mounting points on each side of the rack.
Attaching handrails to wooden staircase balusters
If a recess is made in the handrail as in the photo on the right, the fasteners will be unnoticeable because they are covered on the sides by protrusions. If the plank is flat, it is advisable to select the least visible fasteners. After installation, it can be covered with putty and the surface sanded.
A reliable way to fix balusters
Balusters are low figured pillars, most often made in the form of columns, sometimes carved with decoration. Their main function is to maintain the railings of balconies, stairs and other similar structures. They can be made of wood, rubble, metal, as well as concrete, however, from any available material. Doing the fastening of stair poles with your own hands in a high-quality manner is a guarantee of the safety and integrity of the product for many years.
Staircase posts, as a structural and at the same time decorative element of the railings, can be of various shapes and sections. These handrail supports fill the space between the flight of stairs and the railing.
Options for decorative carved balusters
Technology for fixing balusters on steps
Methods existing today
Every home craftsman who has at least once encountered the independent installation of a staircase, for example, made of wood, understands how troublesome and difficult it is to attach decorative balusters (entrance, corner, intermediate) to the floor and steps.
Of course, each master who installs a ladder solves the situation in his own way. Craftsmen offer several options for securing load-bearing railing posts:
- Arranging a through hole inside the post through which a fastening pin is passed;
- Installing racks on homemade fasteners;
- Screwing a self-tapping screw with a diameter of 5 mm into the step so that approximately half of the cut of the thread head sticks out; at the end of the post, drill a hole in the center with a smaller cross-section than the self-tapping screw, and screw it onto the self-tapping screw protruding from the step;
- Straight screw tie with a built-in removable gearbox, which allows you to fix various types of units;
- Using glue, but remember that if the fence is not glued, then it can be disassembled to replace a damaged step or other element of the building;
- Adaptation of plumbing screws-studs intended for fastening bathrooms.
Option using a hairpin screw
Screw - series 14.100 pin - fastener for pillars of wooden ladders, which has a gearbox that, using a conical type transmission, reproduces rotation along one plane to another. It is worth noting that thanks to a powerful rod made of hardened metal 280 X 14 mm and a reinforced baluster gearbox, the fence will be secured as reliably as possible with a high level of safety.
The pin allows you to quickly and efficiently fix and remove entrance and intermediate supports.
Screw-stud model 14.100
Minimum set of tools
To carry out installation work you will need the following minimum set of tools and materials:
- Drill;
- Set of drills;
- Carpentry screw-stud series 14,100;
- Wrench (open-end 10 mm), hex (6 mm) keys.
What are balusters for stairs?
Balusters are special supports installed vertically to which handrails are attached. They perform not only a protective function, but are also a decorative element. In order for the staircase to last as long as possible and be safe to use, you need to properly install and secure the balusters.
Depending on the design solution, balusters can be made from:
Preference is mainly given to wood products. They are strong, reliable, durable, have a relatively low price and go well with any interior style.
When choosing balusters, you need to pay attention to their shape, since when installing several elements in a row, the gap between them should have an attractive outline.
Tips on how to install balusters on the stairs with your own hands correctly
There are two structural types of stairs: on stringers and on a bowstring. The baluster is attached directly to the steps if the supporting structure is made on stringers. If it is made on a bowstring, then the balusters are attached directly to it.
I mainly install support posts at the beginning and end of the stairs, as well as in those places where the railings make a turn. They help make the stair railing stronger and safer. If the staircase is made on a slope, then the supporting pillars can be attached both to the floor and to the steps.
Important points to consider when installing balusters:
- According to safety rules, the height of the railing must be at least ninety centimeters;
- The recommended distance between vertical support elements is fifteen centimeters (if there are small children in the house, the distance should be reduced to ten centimeters);
- The baluster must be securely fixed both above and below;
- Handrails must be installed taking into account the needs of the residents of the house (they must be smooth, non-slip and comfortable).
It should be taken into account that the railing must support the weight of an adult leaning completely on it.
How to install balusters on a staircase: design parameters
Balusters are a vertical support that is located between the steps and railings. Its main purpose is to prevent a person from falling, ensuring comfortable and safe ascent and descent. In addition, balusters can also serve as decoration, adding some zest to the interior of the room.
Such supports can be attached to steps, stringers (sides of stairs) or strings.
In order for the future staircase to be not only beautiful, but also reliable, it is necessary to follow some recommendations and rules when constructing it:
- Balusters are attached in two places - on the handrails and some other structural element;
- The handrails themselves should be comfortable to use;
- It is recommended to make the height of the railing no lower than 80 cm, the optimal option is considered to be 90 cm;
- Installation of supports should be carried out evenly, in increments of 10-20 cm (if there are small children, the smaller the gap, the safer).
When fastening, special attention should be paid to mounting the lower and upper balusters, providing them with maximum strength. After all, it is these racks that bear the main load.
The thickness of the support posts in this case is not particularly important, since it does not affect the safety of the structure in any way. It all depends on the wishes of the owner of the premises.
Reliable fastening of balusters to the string of the stairs yourself
Balusters can be attached in three main ways: on studs, on self-tapping screws or on dowels. Each method has its own advantages, and the master himself chooses which one to use.
It is strictly not recommended to secure balusters with nails, because over time the structure may become unsafe.
The procedure for performing installation work:
- Fastening the upper and lower balusters;
- Marking the location of supports on the bowstring;
- Marking the center of the balusters (it is better to do this with a carpenter's pencil or waterproof marker);
- Adjusting the supports to the design features of the staircase (in some cases, an oblique cut is made both above and below the baluster).
- Installation of balusters.
The balusters can simply be screwed to the side of the bowstring or attached to its upper edge. The first method looks less aesthetically pleasing, but it is very simple and perfect for beginners. With the second method, most often you first have to install a baluster on the bowstring (a special wide bar with a groove with which it is put on the bowstring). It is screwed on with self-tapping screws or glued on. In some cases, you can do without a baluster.
Fastening with studs. First, in the center of the baluster on both sides, you should drill a hole for a pin eight centimeters deep (standard diameter is from 0.8 to 1.2 centimeters). After this, the baluster is trimmed from the ends. A galvanized or anti-corrosion-coated stud is inserted into the support and filled with PVA wood glue. The pin should protrude 5–7 centimeters from the top. A hole of the appropriate diameter is drilled in the bowstring, a baluster is screwed into it and fixed with glue. The upper part is attached to the support or railing.
Fastening balusters to dowels. At the ends of the support and in the bowstring, holes are drilled for dowels (thick wooden rods). The dowels are fixed in the stairs and balusters using PVA glue. It is necessary to ensure that the supports are in a strictly vertical position until the glue dries completely. The railings are attached in the same way, but after the glue has completely dried at the bottom of the baluster.
Fastening supports using self-tapping screws. Fastening balusters with self-tapping screws is the easiest way, so it is suitable even for non-professionals. You can screw in the self-tapping screw at an angle so that it pierces the baluster right through, screwing into the bolt. Or you can screw the screw into the wood plank at a right angle in advance, and then carefully screw the support onto it. It must be remembered that the screws must be treated with an anti-corrosion coating.
Fastening wooden balusters and posts
Many will agree that installing railings is more complicated than making the staircase itself: there are too many different components, there are no standard solutions suitable for everyone. This is where the difficulty lies. Wood railings are perhaps the most difficult to install. The material is plastic, but therein lies the problem: an element that is well secured at first can wobble with a decent amplitude after a year or two. Therefore, they approach the fastening of wooden posts and balusters very, very carefully, play it safe, use combined methods, adding glue if possible. This makes the connections tighter.
Not the most elegant installation of wooden balusters on stone or concrete steps, but reliable
In general, a baluster or post is attached either to the step board itself, or to the stringer - it depends on the design of the staircase. Internal stairs on stringers are rarely made today, so we will mainly talk about installing railings to the steps.
Using a bolt (capercaillie) to the step through
There is a simple option - through fastening of balusters and support pillars to the step. The only requirement: the thickness of the step must be decent - more than 40 mm.
In this case, to install a baluster or pillars at a selected point, a through hole is made in the step board through which a bolt with a diameter of at least 8-10 mm is passed (12 and 14 mm is possible, depending on the cross-section of the baluster). The minimum length of wood grouse is 80 mm (the rest can be sawed off). A hole of larger diameter is drilled under the bolt. After installation, it must be recessed so that at least 5 mm remains to the edge of the board. The resulting hole is closed with a decorative overlay (you can choose a plastic one of a suitable color or make it from wood).
Installation of wooden balusters: fasten through to the step
A bolt is inserted into the hole, and a hole 2-3 mm smaller in diameter than the diameter of the bolt used is drilled in the center of the baluster. The specific diameter depends on the type of wood: the harder the wood, the smaller the difference between the diameters of the drill and the bolt should be. The depth of the hole is equal to the length of the bolt.
The bolt is screwed in from below, passes through the step, and enters the body of the baluster. It is screwed onto the thread and exposed. Finally tighten from below using a socket wrench of the required diameter. The good thing about this option is that, in theory, the connection can be tightened if you remove the plug and use a wrench to reduce the backlash. But the “tightening” works until the hole in the wood becomes too large from the play. And it (play) will appear sooner or later - from loads that are directed in different directions, from natural processes occurring in the wood. So the connection is not permanent.
On a dowel or threaded rod
If it is impossible to get to the steps from below, there is an option for attaching balusters to dowels (50*10, 60*12, 70*14, 70*16 mm). The dowel is chosen to be large, with a large diameter. The installation of balusters in this case is as follows: a hole is drilled in the step with a depth equal to half the length of the dowel. We drill a second similar hole in the lower part of the baluster. The diameter of the drill is 1-2 mm less than the diameter of the dowel.
Installation of wooden railings on dowels
Epoxy glue is poured into both holes, the dowel is inserted into the hole in the step until it stops, then a baluster is put on it. For greater reliability of such fastening, you can coat the entire lower part of the baluster with glue.
One point: look for dowels from the same wood from which the steps and railings are made. They have the same coefficient of thermal expansion and react equally to shrinkage and increased humidity. This will make the connection more durable. Installing balusters on dowels is a traditional, but not the most reliable method today. Firstly, the dowels can break, and secondly, the connection itself still becomes loose. So in a few years you will have to look for a way to fix the dangling railings.
Instead of a dowel, you can use a threaded rod. The process of installing a baluster is no different. Everything is the same, only you don’t have to fill the hole with glue, although...
For self-tapping screws
The most “collective farm” method, which professionals really dislike, but which is easier to understand and implement, is installing balusters on self-tapping screws. For fastening to the steps, use wood screws with a diameter of at least 6 mm and a length of 60 mm. Place two on each side (total, 8 screws on each side).
The simplest and most “wrong” way. And one more thing: a lot of hassle in order to cover unsightly marks
They need to be screwed at an angle of 30-40°, and holes must be pre-drilled for the caps. Install screws, then close the holes with plugs cut from the same wood or cover them with wood putty.
Using Zipbolt (zipbolt)
A relatively new fastening element that can be used to attach balusters to both steps and handrails. It is easy to use, but expensive. If you install the railings with your own hands and “for yourself,” this is a good option. Installing balusters using zipbolts is also good because the connection can subsequently be tightened, eliminating any play that appears.
The zipbolt consists of a threaded rod and a removable gear head. There are two types:
- of two movably connected threaded rods of approximately equal length;
- from one threaded rod (type 13.600).
The option with movably connected pins is good for connecting balusters and railings, railings with support posts. A straight zip bolt is good for hidden connections of perpendicular bars. This is exactly the case for installing balusters on steps, support pillars on the floor, and the ceiling of the second floor. The dimensions of this fastener are substantial - diameter 8 mm, length 96 mm, so it will hold the pole well, and there is no doubt about the reliability of fastening the balusters.
Zipbolt device for perpendicular connection of parts
The algorithm itself is similar to mounting on a stud: you need to drill a hole in the step and baluster for installing a threaded stud. The length of the hole in both parts should be equal to the length of the stud, minus the height of the head.
The difference is that to install the head you need a technological hole perpendicular to the main one. It should be slightly larger in size than the diameter of the head, and its center should coincide with the axis of the hole for the pin. After the pin is installed, a removable gear head is inserted into the technological hole. It has special slots along the key. Install the head so that the slots are accessible. Using a 6 mm hex key, which is inserted into these slots, the head is turned until it stops, pulling the baluster towards and fixing the pin.
When installing railing support posts on the floor using a zip bolt, questions may arise regarding the method of fastening. If the floor is wooden, the threaded part is simply screwed in. If the floor is concrete, you can use chemical anchors. If there are metal embedded parts, the bolt can be welded. The last method, by the way, is the most reliable: at least the bolt will no longer be loose.
Dovetail connection
Another way to connect balusters and steps is carpentry. Using a specially shaped groove and tenon - dovetail. This option is possible if you make the balusters yourself or if they have a significant margin in length at the bottom.
Such an installation of balusters is possible if the railing is planned to be made almost from the very edge of the steps. Then trapezoid-shaped holes are cut into the steps from the end, and the same ones are formed on the balusters. The ends of the cuts are lubricated with wood glue or epoxy resin, aligned and fixed.
When fastening with a dovetail, you can also use nails to strengthen the connection between the baluster and the step
With this method of connection, the racks must be fixed in a vertical position for some time - until the glue dries - as they may deviate. To do this, construct a temporary supporting structure, which is disassembled after the glue has hardened.
To make the steps look better from the side, the ends are covered with overhead decorative strips. The planks can be “planted” with glue, nails, screws, and dowels. The choice is absolutely arbitrary, but the most correct and invisible one is dowels. Such installation of balusters is based entirely on the art of carpentry and requires precise adherence to dimensions.
Installation of balusters on a stringer (string)
When installing balusters on a bowstring or stringer, you can use the same methods of installing balusters: on dowels, studs, self-tapping screws, zipbolts. You can even make a dovetail, but you will have to cut it in a different plane, which is no more difficult, and, perhaps, even simpler. For decoration, you can use strips on both sides.
The difference between installing balusters on a string (string) is that the post must be sawed at a certain angle so that they stand strictly vertically. But in a surface cut at an angle, it is difficult to drill a hole that runs along the axis of the element. To avoid problems with this, first drill holes, then cut at the desired angle. A simple trick that makes the job much easier.
Installing balusters on a string: a simple process
There is one specific method designed specifically for a ladder with a bowstring. They make a baluster: a bar that “sits” on the bowstrings thanks to a groove cut in the lower part. The posts are attached to the baluster through and through - with bolts, dowels or self-tapping screws (the worst option). The choice is yours, and then the entire structure is installed on the bowstring. The connection is adhesive; for reliability, you can use bots, screws, and nails. But they are for additional fixation.
There is another method that is usually used only for this type of stairs: the balusters are secured with nails or self-tapping screws, decorative strips are installed on the sides, and the gaps between the balusters are closed with fixing strips. With this method of fixation, you can also additionally use glue - it will not be superfluous.
A few words about increasing reliability
All baluster fastenings - on studs, self-tapping screws, dowels, bolts - become loose over time and play appears. This is an inevitable process. When loaded, the railings wobble a little. At first, the deviation is a fraction of a millimeter, absolutely imperceptible. As you use it, the deviation increases, and the railing at hand already noticeably “walks.” The softer the wood, the faster the play appears. We have to take it down and redo it. In order to delay this moment to the maximum, they use any available additional methods of fixation.
There is a special fastener for balusters on a bowstring
Most often, glue is used as an additional fixing force. You can use any carpentry resin or epoxy resin. There is no point in looking for more expensive ones - these work very well. All joints are coated with glue. You can even lubricate screws/nails with glue. For better adhesion, the places where the glue will be applied are cleaned of dust/debris and wiped to remove greasy deposits.
How to attach a support post to the floor
Even experienced craftsmen sometimes do not know how to properly attach a support pole to the floor. This is a rather complicated operation, but knowing a few secrets you can perform it quickly and easily.
There are three simple and reliable ways:
- At the bottom of the post, a piece of wood is cut out to create a groove into which a special fastener with a hexagonal head, called a capercaillie, is screwed. With the help of it the pole is attached to the floor.
- The second method is similar to the first, but the groove is cut out very small, and the fastening element is fixed with a bayonet nut.
- In the third method, a very small technological hole is drilled in the support column and floor, and then the two elements are fastened together using a zip bolt.
In hardware stores you can purchase special decorative plugs that can be used to easily close the hole left after installation using the third method.
How to fix a ladder post to the floor?
For the stability of the entire staircase structure, it is very important to securely fasten the support pillar and railing. Even craftsmen sometimes need help attaching poles to the floor, or attaching balusters and railings to steps. Therefore, if you are not confident in your abilities, then use the help of a specialist. Familiarizing yourself with the methods of attaching a support to a wooden base will help you better understand the entire process, and you can decide whether such an undertaking is up to you.
- A groove is cut out at the bottom of the wooden support, a hexagonal fastener is installed into it, which attaches the post to the floor;
- For the second method, you need to cut a very small hole and fix the fastening element in it using a bayonet nut;
- In the third method, fastening is done with a zip bolt, which means two holes in the support itself and one hole in the floor. This method is the most universal and reliable.
These methods will help both attach the pillars of wooden stairs to the floor and install balusters. The only difference is that they are attached to the steps, if the staircase is on corsours, or to the bowstring.
Review of how to install balusters on stairs (video)
After installing the staircase railing, you need to make sure that all fasteners are reliable and strong. This will be the key to long and safe operation. Perhaps a DIY staircase will not look as beautiful as if it had been installed by professionals. But the work will cost much less, and the novice master will gain the necessary experience and next time he will be able to independently install and secure the supports without any prompting.
All about balusters: types and methods of fastening
A baluster is a vertical support located between the railings and steps. The main function is to protect people from falling and guarantee safe descent and ascent. Additionally, supports can serve a decorative function and decorate the staircase. The question of how to fasten the balusters is key when installing stairs, since the safety of your loved ones depends on this.
Wooden dowel plugs in wood color are completely invisible
About fastening methods
So how do you secure the supports to the stairs? There are three main methods:
- using dowels;
- on self-tapping screws;
- using pins.
Sometimes balusters are fixed to the steps and floor directly, and in the upper part - with the help of a sub-baluster strip. But this element is not required.
Wooden balusters can be fastened with studs
Wooden balusters are usually attached using threaded fasteners. Some columns are poured directly into concrete if the stairs are made of it. But impact dowels can also be used to secure supports to concrete. Also, to increase the reliability of connections, assembly adhesive is used when assembling the structure.
On a note! Balusters manufactured in production are usually sold with special fasteners already available.
How dowels are used
This is one of the simplest options for attaching balusters. Dowels are small-sized wooden plugs or choppers; they simply need to be inserted into grooves prepared in advance, which are cut out both in the stairs themselves and in the balusters in their lower part. In another way, this connection method can be called “tongue and groove”.
Wooden dowels
Advice! Using dowels, it is recommended to mount balusters not directly to the stairs, but to the string that will be installed on top of them.
This method is used only for attaching wooden supports - it will not work for other materials. In the case of a bowstring, holes are created in the latter at equal distances, the diameter of which will be equal to the diameter of the dowels. The same holes are drilled at the base of each support. The dimensions of the grooves should be such that the dowel fits tightly into them.
Installation of balusters to the stairs using dowels
Advice! To ensure reliable connections, the grooves are coated with glue (carpentry, assembly or PVA) before installation. Only after this dowels are inserted into them.
One of the balusters will also have the function of supporting the railing, so it should be secured not to a dowel, but to an anchor, and attached directly to the floor. In this case, it is important to follow a simple rule - the inner wedge is not twisted, but driven with a hammer to the limiting edge . The installation of a bowstring or railing is usually done after all the supports have been attached.
Wooden dowel plugs in wood color are completely invisible
Stud fastening method
No less often than dowels, studs, which are metal products equipped with threads, are used to install and fasten balusters. Working with them is also not difficult: on the steps of the stairs, the places where the balusters will stand are marked. Next, holes with a diameter of 12 mm and a depth of 80 mm are drilled into them, into which the pin is screwed. A hole is also drilled at the end of the posts, right in the middle. All that remains is to place the baluster on the pin and you're done.
Fastening balusters to studs
But it is recommended to attach balusters to the railings not with straight pins, but with screwed loops. Thus, the railings will be securely fixed, and their sections at turns will be perfectly connected to each other.
The two outer balusters are installed at the same time. Only then can you begin installing the remaining supporting elements.
How to work with self-tapping screws
Self-tapping screws are a truly universal fastener. They are used in almost all construction areas, including the installation of stairs. With their help, you can also fasten balusters, both made of wood and made of metal.
Self-tapping screws for mounting balusters
In this case, it is best to use a plate to attach the balusters to the steps. It is attached to the base with bolts and holds the support. And if you use a baluster, then the insertion points for the self-tapping screws can be easily hidden at the base of the posts.
The balustrade strip is an additional connecting element that simplifies the method of fastening
It is more convenient to fasten from below if the steps do not have a riser. In other cases, the connecting points can be masked.
Types of supports
Variety of shapes, sizes, patterns and colors
Balusters can be made from various materials - wood, stone (natural or artificial), metal, glass and concrete. A separate type is represented by balusters on a bowstring. The installation of balusters to the floor must be carried out according to the rules; there are not many of them and for most supports they are the same.
Let's consider the types of supports depending on the material of manufacture:
- Wooden posts are traditional and fit in almost any decor. Their peculiarity is that they are easy to finish, so there are quite a lot of types of them - for every taste and color. Plus, wood is an environmentally friendly material.
- Supports for metal stairs are usually made in the form of figured carved elements of various shapes with an abundance of curls and other decorations. This gives the design an antique effect, and the production of such pillars refers us to the ancient traditions of staircase construction.
- Glass supports look stylish and extraordinary, giving the entire appearance of the house a futuristic look. Quite fragile glass is tempered, but most often, instead of the glass itself, a silicate glass substitute (construction triplex) is used, so you don’t have to worry about strength - they will withstand even heavy loads.
The use of triplex guarantees safety, since it does not crumble into fragments if damaged. Even if the blow is strong, only cracks will remain on the baluster.
Types of balusters
Balusters are small posts or columns that support handrails.
They can be of different shapes. Wooden products are often decorated with carvings, metal ones - with forging elements. Thanks to various technological capabilities for processing materials, almost any design idea can be brought to life. In their modern form, balusters first appeared in the Medici Palace and were used exclusively for decorating stairs and forming balustrades (balcony railings, terraces, galleries, roofs).
Later they began to be widely used in furniture production, where their purpose changed somewhat. The easiest way to classify balusters is by material:
- tree,
- metal,
- stone,
- gypsum,
- concrete,
- glass,
- plastic.
Choosing a material is very simple - you need to focus on the material from which the stairs are made. Wood to tree, and stone to stone. If you do the opposite, for example, place stone supports on wooden steps, then both the aesthetics and strength of the structure will be significantly reduced. Although it must be said that metal balusters go well with railings and steps made of wood.
Tree
Wooden balusters are made from carefully dried wood. You should definitely pay attention to this point. Before ordering parts, you need to check whether the material is really high quality. The danger is that the presence of excess moisture will lead to warping, that is, the wood will dry out and in the process become deformed and twisted. In some cases, cracking cannot be avoided.
Racks with a thickness of up to 6-8 mm are made mainly from a single piece of wood, and those that are larger are glued together from two parts. The wood most often used in production is pine, beech, oak and birch.
Each rack consists of a central part, a support and an end. The last two elements are attached to the ladder. There are several types of wooden balusters:
| Type | Description |
| Chiseled | A common type that is made on a lathe. The shape is distinguished by its simplicity and resembles a body of rotation (for example, a cylinder). |
| carved | They are similar to turned ones, but the main part is distinguished by the presence of carvings, which are done by hand. |
| Milled | All other balusters belong to this type. All kinds of shapes, decorations, cuts and elements are made on a router. |
Features and installation rules
The fastening of balusters to the stairs should be as strong as possible; the reliability of the entire structure depends on this. Regardless of what shape the posts are and what material they are made of, there is a set of rules by which they must be installed.
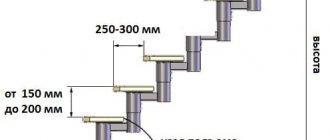
The distance between the center point of adjacent posts should be 152 mm. The gap between the supports should not allow a spherical object with a diameter exceeding 107 mm to pass through.
The height should be comfortable, the standard value is 80-100 cm. Experience has proven that this height is comfortable for most people. The supports must have two attachment points - at the top and bottom - this ensures maximum reliability of the structure. If you follow the rules, the posts will be close enough to each other, which will ensure the safety of movement of all family members, especially the smallest.
Tools for making wooden posts
Thickness is not of great importance when ensuring the safety of the stairs, since the load-bearing function does not depend on this element. Typically, this parameter is determined independently based on individual design preferences.
How to secure a baluster?
The fastening method is selected based on the material used to manufacture the load-bearing elements on the stairs - railings and handrails.
Attaching wooden balusters to the floor is not very difficult; you can do it at home yourself. Here are the step-by-step instructions:
- Initially, vertical fastenings are made - they are best suited for installing staircase balconies and verandas, as well as for balusters on a bowstring. To do this, drill holes for fasteners for the baluster - studs, screws, self-tapping screws. The hole is drilled through the bar located under the handrail.
- The pillars are attached to the string using the following technology: drill holes in the center of the lower ends of the balusters, cut the baluster to the desired angle, glue the pins there (they should stick out by 60-70 mm), drill 14 mm holes in the string and glue the outer balusters on the string, first fixing them.
- For greater stability of wooden posts, we recommend securing them additionally with side fastening - this method is optimal for stairs and various staircase structures.
- When installing wooden poles, keep in mind that each support structurally consists of 3 parts - the main, central and directly supporting parts. At the same time, pay attention to the base - it should be as reliable as possible, since it is the one that connects to the steps.
Examples of fastening stair railings
The central part performs a purely decorative function, so its characteristics are not of great importance. However, it is important that the treatment is durable, so the pole will not lose its presentability for a long time, it will not have to be painted or treated.
The lower part or support (the place of attachment to the railing on the stairs), in contrast to the central part, plays an important role. When performing installation work, you need to install the baluster so that it can be attached as tightly and evenly as possible to the base.
It is best that the wood used in the manufacture of the stairs be of the same species (density) as the balusters themselves.
Installation of metal posts on steps
Installation of metal balusters
Installing glass balusters on the floor
How to install metal balusters to the floor? It's simple - fastening these structures is usually not particularly difficult, since the supports are purchased in a complete set with all the fasteners for the balusters (hinges, brackets, screws) and pre-drilled holes, which can be intended for installing them either on metal or and on a wooden or stone base.
Forged posts must be firmly attached to the main load-bearing elements of the staircase, using special fasteners for balusters. Instructions are included with purchase. The recommended support height is the same - 80-100 cm.
Fastening glass supports
The use of glass pillars has become possible, since currently the balusters themselves do not play a special load-bearing role - their function is more decorative. Therefore, neither the thickness nor the cross-sectional area of the glass element plays a big role.
You can secure them using the included fasteners for balusters made of metal or wood. These are usually metal hinges, but are often inserted into metal attachments attached with screws to the base of the stairs. We recommend installing flat glass supports and glass railings using the sliding method into a groove carved into the floor or wooden base (standard depth is 2 cm).
The main conclusion that can be drawn from the material is that it does not matter what material the balusters are made of. The most important thing is that they are secured in accordance with safety requirements.
What do you know about fastening wooden balusters? What materials and fasteners do you prefer for balusters? How long did the balusters you installed last? Share your valuable experience in the comments. And to consolidate the knowledge gained, watch the thematic video.
Advice from our editors on choosing fasteners for installing balusters made of different materials
Balusters and support posts, also called “root balusters,” have many installation options, but the most preferred ones can be named.
Wooden crafts
A wooden baluster can be easily and reliably attached to a wooden floor or to a wooden step with a hairpin, which has a self-tapping thread at both ends. If the floor is concrete, then a nut should be mounted in the floor, and the thread on the free end of the stud should be metric.
Metal models
If the staircase is metal, then the supporting pillars should be secured to the floor with dowel-anchoring fasteners, and the staircase structure itself should be assembled using bolted connections. But if the homemaker knows welding techniques, then it’s worth thinking about which components to weld.
Products made from natural and artificial stone
You can embed a pin into the ends of stone balusters using a dowel-anchor method, and then screw the baluster into the place prepared for it.
Glass and concrete models
Glass is usually used to create an enclosing surface. To avoid drilling holes in the glass for bolts, you can screw brackets to the balusters that will hold the sheets of glass.
If the balusters are cast from concrete, then for their fastening use the same methods as for stone elements.