What material is chosen for the fence posts is how they turn out. It is better not to “stick out” some, but to hide them in the outskirts of the site. There are also those that I would like to highlight, but it doesn’t work out - no originality!
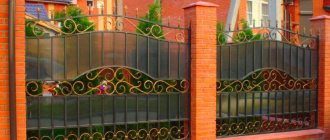
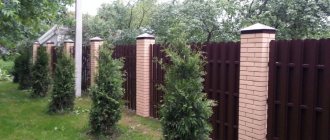
And brick pillars are good for everyone: they are suitable for any material - even with your own hands, the fence turns out to be solid and beautiful. Due to the variety of types of bricks and laying methods, they are not similar to each other. They have one inconvenience: the fastening of the veins, the gates and especially the gates raises questions. Is there a simple and reliable way to install and secure gates to brickwork? How to do it yourself?
Dark metal fence on light brick pillars
Let's try to figure it out.
Foundation
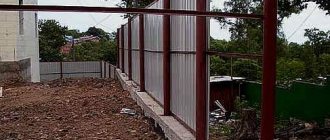
Fences are considered the best option in terms of quality and cost. They make it possible for many decades after installation not to carry out major repairs. For this, the correct organization of construction stages is important. It is necessary to calculate how much material is required, to clarify the area and coverage of the fenced area. In addition, you need to determine whether the gate will be in the fence. This must be taken into account during installation.
When installing swing or sliding views, correct calculation is required. First they are placed in the corners of the site, then 120-150 cm from each other. First, the scheme is worked out on the drawing, taking into account the transferred distances of the site.
Organization of the base
Supports must be marked. Their installation will take the most time. First, the foundation is formed, then the masonry is carried out. For the foundation, you will need tools and materials:
- sand;
- cement;
- crushed stone;
- level;
- shovel;
- brick.
First, recesses are made according to the diagram. On sandy soil they dig until they reach sand. If it is not there, then you will need to dig at least 80 cm deeper than the standard. When the sand is reached, the foundation is poured with a concrete solution; in another situation, a sand cushion is initially formed. Sand is poured onto the bottom of a 20 cm thick hole and compacted using water.
Concreting the foundation
The solution includes the following components:
- a bucket of water;
- three buckets of sand, the same amount of gravel;
- bucket of cement.
The components are combined and mixed thoroughly. The solution is poured into the recess until its level is level with the soil boundary. The foundation will dry out in about 24 hours. Waterproofing is placed on top, only then the laying begins.
Mixing
There is an alternative method for forming the base. It uses crushed stone, sand and water. Crushed stone is poured into the hole - to the brim, with sand on it. Everything is filled with water, grains of sand should fall into the gaps between the pebbles.
Gate post design
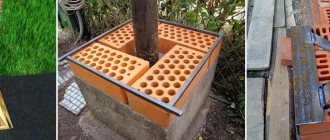
When the fence has hinged gates, the installation of the outer posts on which they are hung is performed somewhat differently than other installation work. The brick pillars on which the gate will be hung must have an internal metal rod.
When the foundation is poured, a metal rod is installed in the hole.
An example of reinforcement for a brick pillar.
It should be slightly higher than the brick pillar itself.
In this case, it is recommended to bury the pillar in the ground to a third of its length, which rises above the ground. Thus, the installation of a brick pillar is done. You can subsequently weld the gate hinges to the metal rod with your own hands.
Return to contents
Brick mortar
It is mixed from sand and cement in a ratio of 5 to 1, respectively, less often 6 to 1. You need fine sand, cement grade from M400. In order to improve plasticity, liquid dishwashing soap is added - approximately 20-30 g for each bucket.
Mixing
When mixing, ensure proper fluidity. The mixture is not too dry, but it is also impossible to work correctly with a very liquid mixture, so water is not added immediately, but gradually, and the consistency is carefully monitored. The required state is controlled - a small amount is poured onto the surface, a simple pattern is drawn with a trowel - it should not float.
If desired, you can make the mixture black - just add soot. It is easy to find in any specialty store. A small portion added to the cement will produce decorative joints that do not require painting.
Any brick will do. The more freezing/defrosting cycles it has, the higher the quality. Size deviations are maximum 2-3 mm. This material is easy to work with. When a batch is too diverse, it is recommended to sort it by size so that there is minimal discrepancy.
Material quality
It must be said that brick is not a very suitable material for laying gate posts. It simply cannot withstand dynamic loads. He needs special reinforcement.
Basically, the outer pillars are always chosen for gates, which are made by hand in accordance with special technology.
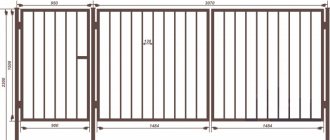
Layout diagram of brick pillars for gates and wickets.
In principle, brick is not a material that can bear the main load when the gate is in use.
In this regard, the brick in the gate post plays only a decorative role. You can easily make brick gate posts with your own hands. They have no visual difference from other pillars. They are also faced with brick, have mortgages and the same color. When laying with your own hands, it is very important to make brick pillars for gates, following a certain technology: with reinforcement of the internal part of the structure, metal addition.
Return to contents
Technology
During the laying process, you need to perform the following steps:
- Rods are placed around the perimeter.
- The solution is poured inside - no higher than them.
- You need to check with a level the evenness of the solution boundary.
- Lay four bricks around the perimeter, remembering to bandage the seams.
- The rods are removed and cleaned.
- The level controls the height; sometimes leveling with a trowel is required, or you can do it manually.
- The seams are filled with mortar.
- The inside is filled with pebbles, then the solution is poured on top. It is important to make sure that it is not too liquid, otherwise it will spill out.
- For a new row, the manipulations are repeated.
Formation of pillars
For sliding models
When installing a sliding structure, drawings of embedded elements are not made. The geometry and parameters are selected arbitrarily, because the main task must be solved - the formation of a base for the rollers and drive.
As a rule, mortgages are made from channels numbered 10-20. The rule works: the heavier the structure, the larger the rolled metal.
Under the gate
There is no need to insert a rod. You can make it nearby by driving it into the ground.
No overly large mortgages will be required. But it needs to be buried in the soil to improve reliability.
Installation can be even easier if you make holes in the channel for the embedded parts.
Brick
When the structure is heavy, with high pillars, there are few vertical channels. At the bottom they are connected by a third horizontal one. Its length is the distance between the supports.
General recommendations
You can often hear that it is enough to weld the embeds to the protruding strips. These mini protrusions will not hold even a light gate.
For swing doors, mortgages 5-7 cm in length are welded to the central post. This is also enough to hold the sliding structure when it is not too heavy.
Rules for the formation of mortgages
Additional tips:
- For heavy gates, welding of rails is allowed. It is more reliable when there are braces. On the opposite side, additional beams are secured by welding.
- If you have no experience, then you should not try to disguise mortgages - it is too difficult for a non-specialist.
- Metal elements must be hammered through pre-formed holes.
- Holes in the masonry are formed at an angle of 45 degrees, a slight deviation is allowed.
Subsequence
- On the prepared foundation along the perimeter it is necessary to spread roofing material according to the parameters of the supports. This way the brick will not attract moisture.
- A centimeter of solution is distributed on top.
- The brick is laid under level control.
- The second row, like the subsequent ones, is done with ligation of the seams, strictly according to the level, preventing even minimal displacement. Each block is tapped to improve joining using a mallet.
- As the project progresses, pebbles and crushed stone are poured into the interior, compacted, and filled with mortar. This approach strengthens the masonry well.
To prevent the building material from absorbing moisture, first immerse it in water for a couple of seconds.
Masonry under the rod
To ensure evenness of the resulting seams, lay them under the rod. For this purpose, first they are placed under each row with a cross-section of 8-10 mm and a length of up to 15 cm. This allows you to prevent subsidence below the desired level and obtain even seams.
Under the bar
After preparation, metal caps are attached on top or a solution is poured with an influx. This way, precipitation will not be destroyed and will not collect.
Methods of mounting supports - which one to choose
When erecting fences, 3 methods of installing supporting structures are practiced:
- direct driving into the ground;
- partial concreting;
- complete pouring of concrete into the underground part of the rack, including the installation of a strip foundation.
Pole installation options
Each of the listed methods is used under certain conditions, depending on the quality of the soil, its saturation with moisture and the degree of freezing. In addition, the choice of technique is influenced by vertical and lateral loads created by the weight of the structure and its windage
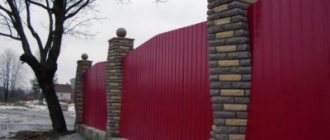
An important rule applies to solid fences: they must be able to withstand wind loads, which sometimes exceed the weight of the fence.
Load on a solid fence made of corrugated sheets
Simply driving posts into the ground allows you to speed up construction and significantly reduce its cost. In contrast to these advantages, the method has numerous disadvantages:
- A post driven into soft or loose soil (chernozem, clay, sand) will quickly become loose in the wind and tilt when solid fence sections with large windage are attached to it. The latter includes corrugated sheets, polycarbonate and various wooden boards.
- If the height of the fence exceeds 2 m, then the wind will turn out the clogged post in any case, even with a chain-link mesh that is transparent to the air flow.
- In areas with clayey, moist soil that swells at subzero temperatures, such supports will come out of the ground by 5-10 cm in the first winter. After which they will finally be tilted by the wind.
- After driving, the post is not able to bear a large load in terms of mass. Metal structures or artistic forging elements cannot be attached to it.
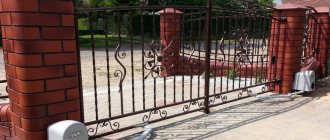
Heavy fence made of forged elements
From the above it follows that driving in racks can be used under the following conditions:
- when your site has hard or rocky soils;
- driving into soft soil is possible if the height of the fence does not exceed 1.5 m, and the spans are made of mesh - chain-link or other wind-transparent material;
- if it is necessary to quickly erect temporary fencing;
- when constructing wickerwork or low decorative fences near flower beds and front gardens.
To fence the front garden, posts can be driven into the soil
Concreting will require a lot of labor, time and money. Just hardening the concrete will take you 3 weeks, not to mention buying the ingredients to prepare the mixture and finding a concrete mixer. In return you receive the following bonuses:
- durability (the fence will easily stand for 30-50 years, depending on the material);
- proper concreting is used on all types of soil;
- reinforcement with concrete mixture is suitable for all types of fences, including heavy ones (stone, brick, metal structures, forging).
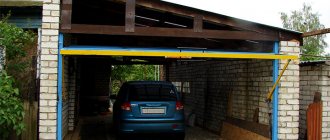
Fence with brick pillars
It turns out that the choice of installation method for racks depends on the conditions in each specific case. Hammering saves time and money, but is not always applicable. Concrete is used everywhere and provides reliability and durability for any structure, although it is more expensive. On stable, dry soils, construction costs are reduced by partially concreting the supports.
Solutions to emerging problems
To better protect the masonry from damage, caps are mounted on it - made of concrete or metal. This gives more aesthetics.
The pillars must withstand loads, so the structure must be strong and support the weight. Strength is ensured by forming brick blocks in a circle. Then the reliability is the highest possible.
It must be placed at an equal distance - this is approximately 2.5-9 m. The exact measurement depends on material capabilities. But experts advise against taking too long gaps. It doesn’t look aesthetically pleasing and also has a bad effect on technical indicators. To prevent installation from causing errors, you need to select the distance in advance.
If you plan to mount a gate on a pole, you will need a pipe built into the block. For other types, they are shortened - enough so that they protrude at least 30 cm above the boundary of the foundation.
Then blocks are laid around the perimeter of the pipe, making periodic knitting of seams. Pebbles are poured inside and filled with concrete mortar.
In the new row everything is repeated. For the bottom three, take the full-bodied version. Others can be formed from a hollow one, but not with a liquid solution.
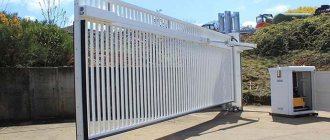
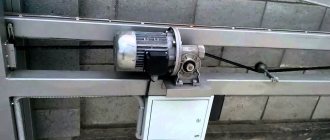
Automation
The technology for installing gate automation is described using the example of the Chinese model PS-IZ, which has proven itself very positively. The automation kit will consist of:
- electric drive;
- signal light;
- gear rack;
- remote control;
- photocells
For installation you will need the following equipment:
- welding;
- drill;
- drills for metal.
The drive will be powered by a cable of 0.2x0.2 cm, and for photocells 0.4x0.07 cm and 0.2x0.05 cm will be required. A cable with a cross-section of 0.2x0.07 cm is connected to the signal light. The electric drive will be fixed to the same channel, as well as the carriages.
Step 1. First, select the location for installing the drive. To do this, take a base (it should be included in the kit) and place the drive itself on it. The base is placed between the carriages and the working position is recreated - a gear rack is installed on the electric drive gear. The location of the channel is adjusted so that the rack is in the center of the gear and is fixed on the outer frame (but only on the profile pipe).
Step 2. The installation location is marked, after which the base is placed there and scalded.
After this, the electric drive is screwed to the base.
Step 3. Next you need to install the rack. The gate opens completely, and a rack is placed in the center of the gear. After measurements, it is welded to the channel.
Step 4. The limit switches are screwed to the rail. They are mechanical and magnetic (the latter are more reliable).
Step 5. The drive is connected according to the manufacturer's instructions and then tested. If everything is fine, remove the Photo-GND jumper and install photocells.
Step 6. A signal lamp is attached to the left side of the structure with self-tapping screws. This is not necessary, but for safety reasons it is still better to install the lamp. To do this, you will need a cable with a cross-section of 0.2x0.07 cm. The cable is soldered to the Light and AC-N contacts on the board.
Actually, after this, do-it-yourself sliding gates, the drawings and manufacturing instructions for which are given in this article, can already be used. For a more detailed look at the nuances of installation, watch the thematic video.
Let's talk about mortgages
One of the common mistakes when making a brick pillar is to insert a steel rod only inside it. As a result, it becomes completely useless. To fasten gate posts, it is impossible to do without profile material:
- channel;
- corner;
- pipes.
At this moment, you should not forget about mortgages. First, they are driven in near the surface of the earth, and then into the upper section of the post. Only after this is the channel welded to the mortgages.
Such work must be done very carefully.
Installation of mortgages in brick fence posts
When the height of brick pillars exceeds two meters, welded vertical channels may not be enough.
A third channel is added, and its length should be equal to the width between the gate posts.
Scheme of device and installation of mortgages
If this design does not create a reliable fastening for the gate, a fourth channel is welded. It is installed on top of the driveway and secured to the tops of the brick pillars. For greater reliability, “ears” are welded to the vertical channels.
The fourth channel will be inserted directly into them.
What will be required at work
First you need to find out what resources you will need to make the gate. It may be cheaper to order a ready-made design than to buy numerous tools. Although most of them will still be useful on the farm. So, you need to prepare:
- shovel;
- welding machine;
- grinder;
- axe;
- building level;
- roulette;
- screwdriver;
- hammer.
Having dealt with the equipment, you can begin to calculate the cost of building materials. In this case, we will talk about gates of standard sizes with an opening of 4 m. Everything you need can be bought in construction stores and metal stores, and also, if desired, replaced with something that is cheaper, more expedient, more durable, etc.
- The concrete solution for fixing the “mortgage” is mixed from cement, crushed stone and sand in a ratio of 1:3:3.
- Roller carriages will be installed on the “mortgage” (channel ½ the width of the gate). For greater strength, reinforcement no more than 1 m long is welded to the lower part of the channel. In total, seven to eight meter sections are needed and three at an angle (17-18 m in total).
- The gate leaf measuring 2x4 m will be covered on one side with corrugated sheeting. To make it you need: 180-200 screws, 10 m² of corrugated sheeting, a package of electrodes, 5 m of 6x6 cm pipes, 20 m of 4x2 and 6x3 cm pipes, a can of primer, a can of paint, solvent.