Before laying the finishing floor covering when renovating an apartment, it is necessary to prepare the base. The service life of the floor in the future will depend on this.
The base must be made strong and absolutely level. Self-leveling flooring is fully consistent with these qualities; it is a self-flowing and quick-hardening mixture.
If desired, everyone can fill a self-leveling floor with their own hands, regardless of the manufacturer, the technology is almost the same for everyone.
Self-leveling floors can be poured onto concrete, wood, metal and other substrates. After complete drying, ceramic tiles, laminate, carpet and other floor coverings can be laid on it.
Kinds
All self-leveling floors can be divided into several large types depending on the binding material:
- polyurethane;
- epoxy;
- gypsum;
- on a cement base.
Polyurethane self-leveling floors
As the name suggests, their base is polyurethane. They have high strength, immunity to chemical influences, and wear resistance. Increased elasticity prevents cracks.
Can be used in both residential and industrial premises.
Polyurethane flooring can be poured onto almost any substrate: floorboard, laminate, metal, concrete.
Epoxy self-leveling floors
The basis of the epoxy floor is epoxy resin and hardener. These are the most beautiful polymer self-leveling floors; a good craftsman can use it to create a real work of art.
The floor can be transparent with any pattern, glossy like glass or matte. It is very hard, resistant to various chemicals and mechanical stress, but is afraid of pinpoint impacts.
Epoxy floors are recommended for areas with high loads (schools, cafes, offices) and for residential premises due to their high decorative properties.
Due to the more complex manufacturing technology, it is recommended to entrust their filling to specialists.
Self-leveling cement-based floors
These are cement-based dry mixtures to increase plasticity and greater spreadability, special modified additives are added to them.
Suitable for leveling large differences, cracks and other defects on the subfloor.
Used as a base for laying the finishing floor covering on it:
- laminate,
- tile,
- linoleum, etc.
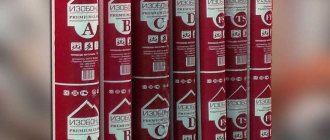
One of the leaders in the modern construction market is the fast-hardening mixture OSNOVIT SKORLINE T-45; using its example below, step-by-step instructions for pouring a self-leveling floor in an apartment will be given.
Osnovit Skorline T-45 is used for surfaces with unevenness up to 10 cm, both for final leveling and preliminary leveling. It is non-shrinking, high strength and crack resistant.
It is also suitable for those who want to install a “warm floor” system. This is facilitated by its high self-leveling and spreadability.
Founder Skorline T-45 complies with all hygiene standards in force in the Russian Federation, it is environmentally friendly and does not contain harmful impurities. When hardened and completely dry, the surface is completely smooth and does not require further sanding.
Video instructions for pouring self-leveling floor:
Main varieties
What is a self-leveling floor? This is a beautiful coating that can withstand heavy loads without losing its attractiveness. The self-leveling floor has no solders, joints, seams - it is a perfectly smooth monolithic surface. You need to fill it in, wait an hour or two and feel free to use it.
The thickness of the layer to be applied, the hardening speed, some other features of the creation technology, external parameters, and scope of application depend on the composition.
The brand's catalog of the best mixtures always contains a variety of options - new products, advantageous positions, and those that can be bought on promotion. But it cannot actually accommodate the entire assortment.
Photos of mixtures for self-leveling floors can be confusing - the bright label looks good, trademarks attract attention, there are instructions for use, however, there is no time to examine and study each package.
First, you need to determine the current subgroup based on the main substance and price. Then, in this group, among the many options, find the optimal one.
All mixtures consist of environmentally friendly materials, so there is nothing to fear, even if you accidentally purchased one that was made for use in industrial facilities.
The exception is methyl methacrylate mixture, which contains toxic substances. It is dangerous to work with, but after the floor hardens, harmful substances will no longer affect the surrounding area.
If the manufacturer of the mixtures indicates that it is important to create a floor using some position in industrial facilities, and not in an apartment, this does not mean that the mixture necessarily contains toxic components. The floor can withstand heavy loads, that's all. While working, just in case, you can put on a respirator mask and gloves and ventilate the room.
Before buying the variety you like, be sure to read the instructions. It indicates the features, composition, proportions and how to dilute the mixture for self-leveling floors, and whether personal protective equipment is needed. It is important to correctly, objectively assess your strengths and calculate everything.
All mixtures can be divided into the following categories:
- cement-based mixtures;
- with gypsum base;
- based on polymers and polyurethane;
- based on polymer resins.
Advantages and disadvantages
Below we present the general advantages and disadvantages of self-leveling floors.
Advantages:
- aesthetic appearance;
- relative ease of filling;
- hardness, high impact resistance;
- durability 10 years or more;
- high adhesion, the ability to pour on almost any substrate;
- hygiene, ease of cleaning and operation;
- there are no seams or joints;
- fireproof;
- resistant to various chemicals;
- maintainability.
The self-leveling floor will meet all the described advantages if the technology for filling it is fully followed.
Flaws:
- high price;
- complexity of technology;
- the floors “do not breathe”, regular ventilation of the room is necessary;
- cold, it is necessary to insulate;
- difficulty of dismantling.
How to choose a self-leveling floor
The choice of type of self-leveling floor depends on:
- future load;
- the material from which the initial base is made, on which the pouring will be performed;
- presence of defects;
- thickness of the future layer;
- type of finishing floor covering.
For living rooms in an apartment, a polyurethane self-leveling floor is better suited; in the bathroom, an epoxy floor with increased moisture resistance is recommended. Both types can be used without finishing.
An industrial self-leveling floor is suitable for administrative and commercial buildings; it has increased strength and can easily withstand heavy loads from various loads and traffic of a large number of people.
Polyurethane self-leveling floors are more hygienic, waterproof and safe and are the best choice for residential premises.
At what temperature
Many users are interested in the question of how to make a self-leveling floor in an apartment. When performing such work, it is necessary to strictly adhere to the manufacturer’s instructions and ensure the correct temperature and humidity conditions in the room. Here you need to be guided by individual parameters for a specific solution. At a temperature lower than the specified value, the solution will spread poorly over the surface, take longer to harden, and its consumption will increase. If the temperature is higher than the specified limit, the mixture will harden faster than necessary, but this will affect the quality of the coating. Cracks may appear on the surface and the durability of the self-leveling floor will decrease.
When laying the screed, the recommended temperature parameters must be maintained until the material has completely hardened. If the room is too hot, air bubbles may form on the coating. The temperature in the room should be constant even at the stage of applying the primer; sudden changes lead to the formation of condensation on the base. It is prohibited to apply the mixture under such conditions; the humidity of the base surface should not exceed 2%.
Important! A freshly laid self-leveling floor is protected from moisture for 24 hours from the moment the installation work is completed.
3D self-leveling floor
3D floors are a multi-layer floor covering with a pattern on the top. This can be any photograph, picture, coins, river sand or other images. The colored design is covered with a transparent protective layer; the thicker it is, the more voluminous the image will look.
Interesting article on the topic: Do-it-yourself self-leveling self-leveling floor
There are two types of floors with a 3D effect; the first has a simple image printed on the surface. In the second case, the drawing takes on new features if you look at it from a certain angle. Construction standards for surface preparation and application of primer are no different; differences are present only in the process of installing the base and leveling layers. Let's take a closer look at the technology.
The base layer allows you to create a background for the future drawing. It is necessary only in cases where individual elements and patterns will be applied to the surface, and not a general photo. The base layer of the self-leveling floor is selected with the same care as the main pattern. The starting composition is mixed in small portions with a drill with a special attachment and leveled on the base. Such requirements are due to the fact that the specified solution hardens quickly. After laying the layer, the surface is carefully rolled with a needle roller, which will free the screed from air bubbles.
Important! Before correcting unevenness, the frozen screed is checked with a building level. In places with elevation differences, apply the required amount of base layer.
At the next stage of work, the design is glued to the floor; this is a difficult and crucial moment. Thick fabric with thermal printing is often used as a decorative pattern. This allows you to avoid deformation of the pattern during operation. When sticking the image, it is necessary to completely get rid of air bubbles; areas with air bubbles are redone. The canvas is attached to a liquid base composition, it is laid on the prepared surface, after which the air is dispersed with a roller in movements from the center of the product to the edges.
At the final stage of work, the finishing coating is laid under the self-leveling 3D floor. The thickness of this layer is maintained at 3-4 millimeters (every m2 of flooring requires 3 to 4 kilograms of the mixture). Material consumption depends on the preparation of the base and composition. Before applying the protective layer, you must read the instructions on the manufacturer's packaging.
The finishing mixture begins to set 20-40 minutes after preparing the working solution, so the builder’s actions must be organized and coordinated. The user calculates the required amount of solution and only after that begins the main work. The finished composition is evenly distributed throughout the room, taking into account the protruding parts of the enclosing structures, columns, if they are in the room, and other interior details. It is necessary to move on the floor covering in paint shoes. After laying the finishing layer, the surface is carefully treated with a needle roller.
Required Tools
You can fill the self-leveling floor with your own hands using the following tool:
- bucket or other container for mixing 20-25 liters;
- needle roller;
- drill or special mixer with an attachment;
- squeegee for drawing out the solution with an adjustable gap;
- wide spatula;
- special paint shoes;
- polyethylene film;
- level.
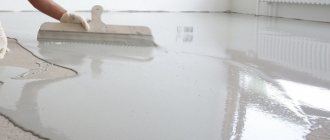
Pouring the floor
The pouring process lasts half an hour - this is the time during which the solution is suitable for use. For this reason, it is better to do the work with assistants. The prepared solution is poured onto the floor surface and leveled using rollers.
To avoid haste, sometimes the solution is prepared in portions, for example, the first portion of the solution is prepared, one of the workers levels it, the second prepares the next one, immediately after leveling the first, the second part of the mixture is poured out and also leveled.
The surface obtained in this way will be even and smooth, it will not have seams. A large room is divided into several parts and gradually they are filled. This is how a cement self-leveling floor is made; in the video you can see this process in more detail.
Having completed pouring the floor, it is rolled with a special roller with needles on the surface - this will ensure a better fit of the solution to the base and will also remove air bubbles from the solution.
You can walk on wet floors in boots with spikes or shoes with metal pads. It takes about 6 hours for the mixture to dry; usually the exact drying time is indicated on the packaging with the mixture.
A cement self-leveling floor, the manufacturing technology of which is quite simple, can be made with your own hands. The bulk of the work will be preparatory work. But, despite the time spent and efforts made, the results of the work will definitely please you with a perfectly leveled floor surface.
Pouring self-leveling floor step by step instructions
As mentioned above, here are instructions for pouring the fast-hardening mixture Osnovit Skorline T-45.
Preparing the base
The base under the self-leveling floor in the apartment must be cleaned of all kinds of stains, paint, crumbling coatings, vacuumed and dry.
All further operation of the self-leveling floor depends on this stage.
Materials for work and stages of manufacturing a self-leveling floor
The process of making a self-leveling floor with your own hands begins with the preparation of tools and materials.
Materials for working with self-leveling floors
We will need:
- container, a plastic or enamel bucket is ideal;
- a concrete mixer, but if you don’t have such a device, an electric drill will do;
- a device for stretching the consistency, ideal if you have a rule;
- level;
- beacons;
- a roller with needles to eliminate bubbles;
- paintshoes.
Let's start work.
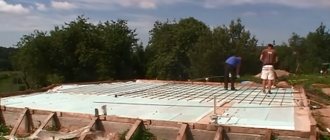
Stage 1. Preparing the foundation
Preparing the base
You begin by pouring the self-leveling floor with your own hands, by working on the base. The final result of the work done depends on the correctness and thoroughness of this stage. Many will think that this stage is not as important as we describe, but they will be wrong. After all, if you pour it onto a dusty, unstrengthened, unprimed base, the hardened compound will quickly crack, lose its strength qualities and peel off from the base.
To organize the work process, the prepared area should be:
- Dried. Try to eliminate all possible moisture. This is especially important if work will be done on laying heated floors.
- Durable. Take care to eliminate all defects.
- Survived. If the solution was poured, then the screed should stand for about a month, but if concrete was poured during preparation, then the floor should be cured for two days.
You also need to remove large and small debris and dust from the floor. Remove possible stains of grease, oil, bitumen and paint. If cracks are found in the base, they must be widened and filled with mortar.
In cases where there are many different stains on the surface and it is impossible to remove them, experts recommend pouring a separating layer. If you don’t want to fill it, then you can use roofing felt or plastic film.
Next, such a screed needs to be sanded down to the filler. Many who do not have such a tool will think, and it will do, why buy a grinder for one time. You don’t have to buy it, because you can rent it, it’s economical and practical.
At the final stage of pouring, the surface must be primed. It is advisable to use compounds with high penetration as a primer. The area is treated with a brush or roller. For high-quality preparation, it is advisable to pour at least 2 layers of primer onto the floor. Approximately 12 hours should pass between coats.
Stage 2. Making the mixture
Scheme for pouring a self-leveling floor
Each manufacturer prescribes instructions on the packaging material for making the solution, indicates how much liquid needs to be added and what temperature of water is needed for mixing.
Do-it-yourself self-leveling floor step-by-step instructions and video material will help you prepare the mixture correctly:
- We pour the exact amount of water into the bucket, and it should not contain impurities and correspond to the temperature indicated on the package;
- gradually pour the composition into a bucket of water;
- mix the consistency well with a mixer.
The solution is ready, but we immediately note that the finished solution must be used within half an hour. This time is the lifespan of the mixture.
Experts warn that if a mixture that includes cement is used, alkalis will be released when dissolved. That is why it is recommended to use protective gloves and not allow the solution to come into contact with the skin.
If during mixing, a larger amount of liquid was used, then the frozen self-leveling floor may delaminate, crack and lose its strength properties. In order to ward off such a threat, water must be added strictly in proportion.
Stage 3. Fill in the resulting composition
Pouring the mixture
This work can be called the simplest compared to the previously performed procedures.
How to pour a self-leveling floor with your own hands, step-by-step video instructions:
- If the pouring is carried out on the base on which the underfloor heating system is placed, then they must be turned off two days before work. And you can turn them on a week after the mixture has hardened. When the base is not hot, you can now begin pouring.
- Pour the finished composition onto the prepared base. Next, use the rule to level it over the entire floor. If when pouring it is necessary to obtain a layer of more than 2 cm, then a water or laser level is already used, and we also install beacons.
- After the base is completely filled, you need to roll the surface with a needle roller. This process will make it possible to remove all bubbles formed on the surface and slightly compact the composition of the self-leveling floor. If the subfloor has cracks and holes on the surface, then it is necessary to mix the finishing floor solution and go through the pouring one more time, that is, apply a second layer.
- After filling, close the room. After all, a smooth and durable surface, when exposed to a draft, will not be as ideal as it should be. Also, you need to cover the filled perimeter with film, so the floor will dry evenly and cracks will not appear on it.
After a week you can use the coating. Many people then decorate it with tiles, linoleum or parquet.
Calculation of mixture consumption
The consumption of self-leveling floor components is affected by the quality of the base - the worse it is leveled, the greater the consumption. High-quality application of primer in several layers also helps reduce the required materials.
The average universal value for calculating the consumption of dry mixture is 1.3-1.8 kg per 1 square meter of floor with a layer thickness of 1 mm.
A more accurate consumption can be found on the packaging of the dry mixture; it may vary depending on the type of floor and manufacturer.
Cracks in the self-leveling floor
If the pouring technology is not followed, cracks may appear on the self-leveling floor. They can be large all the way down to the base or superficial and small.
The main causes of cracks:
- Pouring onto a wet concrete base.
- Movable, fragile foundation.
- The required amount of water when preparing the mixture was exceeded.
- The expiration date of the dry mixture has been violated.
If small cracks up to 1 cm appear, there is no need to refill the entire floor. You can fix them by doing some minor repairs:
- widen the crack;
- remove dust using a vacuum cleaner;
- apply primer and dry;
- Fill the crack with new mortar.
Compliance with the pouring technology will make it possible to create a strong and even base for the installation of any floor finishing covering.
We install a self-leveling cement floor with our own hands - preparatory work
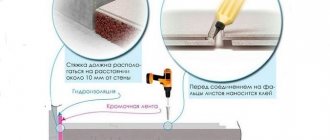
The process can be divided into several stages. Preparatory - involves cleaning the surface of the floor and walls from dust. Next, mark a line at which the floor level will be located, and glue polystyrene foam adhesive tape, which has a spongy structure, along it. The width of the damper tape corresponds to the thickness of the self-leveling coating. If it turns out that inaccuracies were made when gluing the tape, then the parts of the tape protruding beyond the edge of the floor are hidden under the baseboard.
Primer - it is applied to a clean surface in any way, using a roller, brush, or spray. Treatment of all cracks and roughness is mandatory.
It will take about half an hour for the primer to dry; to enhance the effect, the procedure is repeated 1 or 2 more times until a damp shine is obtained. Particular attention is paid to loose, old foundations. New concrete surfaces can be primed in one coat. If darkening and foaming occurs when applying the primer, you should expect a longer drying period due to the increased level of humidity in the room. It will take 6 to 24 hours for the primer to dry completely.
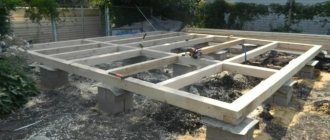
After this time, you can begin installing beacons; this procedure is especially important for rooms with a large area, in which case uniform application of the cement composition can be difficult. The installation of beacons divides the area into segments and allows you to fill the mixture in stages. The cement solution is prepared before installing the beacons, this will make it possible to begin work immediately.
The height of the beacons must correspond to the planned thickness of the self-leveling floor. If the floor surface is flat, self-tapping screws are used as beacons; they are screwed into the floor at a distance of about 1 m in a checkerboard pattern. If there are significant differences on the floor, from 3 cm or more, then metal corners can be used as beacons; they are attached to the floor using gypsum or cement mortar. The correctness of their installation is checked using a building level; strictly observing the horizontal line is mandatory.
If the room has a very large area, then they resort to another method of installing beacons - large areas usually require a thick leveling layer. In this case, the same screws screwed into the base can serve as beacons; marks are made on the walls at the height of the screw heads. The horizontalness is checked using a level, then a thin wire is pulled between the marks. Next, the floor is poured.