Purpose of vapor barrier
Many home craftsmen ask whether a vapor barrier is needed on the ceiling. Living in any room leads to a constant increase in humidity levels. This fact is explained by the regular use of water and cooking. As a result of such events, moist steam, which is much lighter than air, rises. If there were no ceilings in the way, the moisture would easily leave the room.
However, this cannot be, therefore excess moisture settles and has a destructive effect on wood, metal, fibrous and porous materials that are directly included in the multilayer structure of any floor. As a result, dampness appears between the materials, which inevitably causes the formation of mold, mildew and rot. Such processes reduce the main operational characteristics of the floor: strength and durability. In addition, the microclimate in the room worsens, unpleasant odors appear, which negatively affects human health.
However, moisture in the room can also form for other reasons. In particular, we are talking about violations of construction technology or mistakes made at the design stage. In this case, the problem is solved using forced ventilation.
The use of vapor barrier membranes helps prevent premature destruction of construction, finishing and thermal insulation materials. The membrane is a material consisting of several layers, each of which is assigned a specific function. Such protection will be quite expensive, so if there is a budget deficit, you can look for other options.
What types are there?
Basically, everything will depend on the conditions under which the insulating coating layer will operate. If he has to cover a cold attic, then many pay practically no attention to this issue at all - the greatest emphasis is placed on insulation and hydro-vapor barrier of the ceiling in the house.
If the roof covers a heated room, then it automatically becomes the ceiling for it, and in this case, special attention should be paid to all work on isolating the insulation layer from external influences.
Several main types of insulators are used for this:
- Rolled materials, like roofing felt
- Various films with membrane effect
- Coating waterproofing
- Glassine
All of them perform their functions perfectly, but each of them must be used in conditions corresponding to its characteristics.
Types of materials
Vapor barrier and waterproofing are completely different concepts, so it is important to understand how ceiling vapor barrier works. It is a mistaken belief that the problem of excess moisture can be solved by ordinary polyethylene film. This material reliably protects walls and ceilings from the penetration of steam and water. However, condensation will accumulate on the surface of the polyethylene, which will certainly fall on the facing material covering the plastic film. As a result, the cladding is deformed and destroyed, which affects the appearance of the room.
Modern vapor barrier materials are capable of transmitting a certain amount of moisture; as a result, walls and ceilings do not suffer from this negative effect. The ability to control the release of steam from the room gives such materials a great advantage over other analogues.
Among the large number of vapor barrier material manufacturers, it is difficult to determine which vapor barrier is best for the ceiling of a wooden house. There are several popular brands: TechnoNIKOL, Nanoizol, Izospan, Penofol, Tyvek.
Modern vapor barrier is represented by several types:
- Multilayer membrane.
- Foil material.
- Perforated reinforced polyethylene film.
- Polypropylene film.
- Liquid mastic.
You can protect wooden floors with any of the listed materials. All of them have been tested in practice and have many positive reviews. However, it is better not to use coating vapor barrier for residential premises; it is the best option for outdoor structures made of concrete and brick, as well as for industrial premises.
The vapor barrier of a wooden ceiling has some features, in particular we are talking about the following:
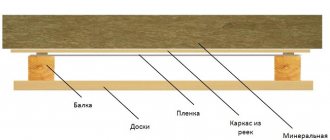
- It is recommended to lay insulation between floor beams, and materials in slabs or rolls can be used.
- The vapor barrier material is installed in several ways: directly in front of the thermal insulation material, after it, or on both sides. The choice is determined by the characteristics of the selected vapor barrier.
- The entire surface of the ceiling, including beams, is covered with vapor barrier material.
- The steam protection must form a continuous sheet. When using several pieces, the joints are securely glued together.
- The edges of the vapor barrier material must be pressed tightly and fixed to the walls, and not to the ceiling.
Do-it-yourself waterproofing of a bathroom ceiling in a wooden house
For obvious reasons, waterproofing wooden buildings is more difficult than brick or reinforced concrete. The instability of wood geometry when humidity changes, the relatively low resistance of natural wood to rot - all this increases the requirements for waterproofing.
But all difficulties can be overcome - even in cases where the work is done with your own hands, without the involvement of specialists. With the right technology and due diligence, waterproofing a bathroom in a wooden house can reliably protect the floor and walls in conditions of high humidity.
When they talk about waterproofing floors, they sometimes mean technologically different measures. There is waterproofing aimed at protecting the wooden floor from moisture coming from below in the form of evaporation or capillary rise from the ground. And there is hydroprotection against dripping water or its vapors arising as a result of normal operation of the premises or a breakdown of the heating or water supply system.
If the bathroom is on the ground floor, then proper waterproofing of the subfloor can not only protect the lower wooden structures from rotting, but also reduce the degree of deformation of wooden floors. This means creating the best conditions for water protection carried out from inside the room. Therefore, when building wooden houses, it is necessary to carry out all the required waterproofing measures to protect the floors from moisture from below. These include the following operations.
- External and internal waterproofing of foundation/basement walls using coating or sticking of waterproofing materials.
- Filling the underground space with sand, expanded clay or slag to prevent capillary rise of moisture from the soil into the underground.
- Treating all wooden floor elements with antiseptics. It is advisable to do this before installing them in order to be able to cover the wood from all sides.
- Laying a water vapor barrier on the lower floor covering to prevent the penetration of vaporous moisture from below into the ceiling and insulation.
The technology for waterproofing wooden floors in a bathroom depends on two factors - the design of the floor and the type of compounds used. The following materials are used to waterproof wood.
- painting and impregnating;
- coating;
- backfill;
- injection molding;
- stick-on
Waterproofing a wooden bathroom floor requires careful preparation of the base. The surface is cleaned of dirt and old paint; if necessary, it is sanded. Putty and seal all irregularities and cracks. Prime the surface in several layers. The joints and interfaces between the floor and the wall are taped with reinforcing tape.
This is the simplest and cheapest method of waterproofing a floor, and if only varnishing is done, then it is the only one that allows you to show the wood texture of the floor covering. In all other cases, waterproofing hides the beautiful texture of natural wood. On the one hand, this can be considered as a disadvantage, and on the other hand, as an advantage, since it allows the use of not only treated expensive monolithic wood for the floor, but also cheaper board materials in the form of fiberboard, OSB or plywood.
Usually, painting the floor, due to its simplicity, is done by hand. When choosing paint and varnish, you need to pay attention not only to their moisture-proof properties, but also to wear resistance.
These conditions are best met by paints based on alkyd-urethane resins, bitumen and polymer varnishes. Painting is done in several layers.
Painting waterproofing has its advantages, the main ones being simplicity and low cost. But at the same time, it is the least durable and reliable method of water protection. It lasts for several years, after which the floor needs to be re-applied.
Coating polymer and bitumen compositions provide a much higher level of floor protection than paints and varnishes. And at the same time, their application is not much more difficult than painting; it can easily be done with your own hands.
Mastics are applied to the prepared surface with a hard brush, spatula (preferably serrated) or a roller with the obligatory approach to the bottom of the walls. To make the waterproofing more reliable, it is recommended to lay a fiberglass reinforcing mesh between the first and second layers. Each applied layer is given time to dry.
Various compositions can be used for coating, but preferably not cement-based. When humidity changes, the wood changes its geometry, and the coating cement compositions may develop cracks.
Liquid glassine, consisting of polymers and various additives, is considered a very good protective material for wood. It is specifically designed for waterproofing timber structures, although it can also be used on brick, concrete and stone. Glassine contains various components that make it a multifunctional coating - fungicides, antiseptics, substances that give the material great penetration into the pores of wood. It can also be used as a primer. An additional plus is that the surface treated with liquid glassine can be covered with ceramic tiles.
Molded waterproofing materials are considered the most reliable of all existing ones. In terms of its composition, it is bitumen or asphalt concrete, which has high fluidity and, when poured, forms a continuous, elastic coating that can compensate for all deformations of the wooden floor. Molding materials are produced in the form of ready-made liquid compositions or powders diluted before use.
Before pouring, perimeter formwork is installed on the prepared floor. First, a small amount of the mixture is poured and leveled as a primer. In total, several layers are required, the recommended total thickness of which is 2-3 cm. Air may remain in the mixture when pouring; it must be released outside by rolling the liquid surface with a needle roller. After hardening, a floor covering is laid on the waterproofing - ceramic or polymer tiles, linoleum, laminate, etc.
Backfill waterproofing is done with so-called bentonites, which are hydroaluminosilicate, or, more simply, a special clay that swells when water is added, forming a waterproof gel. Concrete concrete has low thermal conductivity, so it can also be used as insulation. The layer thickness is usually 6-7 cm.
In general, hydroaluminosilicate is recommended to be used at an earlier stage of waterproofing; it is advisable to lay it between the joists when installing the floor. But bentonites can also be used for waterproofing done from the inside of the bathroom. In this case, you just need to disassemble the floor down to the joists and lay the material between them.
For gluing, rolled sheet materials with a base of polyester or fiberglass are used - traditional hydroglass insulation or new synthetic materials such as mostoplast, isoplast, etc. Insulation strips are laid on a prepared base, overlapping each other and extending 10-20 cm onto the wall. They are used as self-adhesive bitumen-polymer membranes, and materials for fastening which you need to apply a layer of glue (usually bitumen mastic) up to 1.5 mm thick to the floor.
Bonding joints can be done either with or without heating. The first option is more complicated; doing it yourself without practical skill is not recommended.
A cement screed is applied on top of the sheet waterproofing, which serves as the base for the finishing floor covering - for example, polymer or ceramic tiles. The screed turns out to be floating, since there is no real adhesion to the sheet waterproofing. Therefore, to increase strength, it is recommended to lay a metal or plastic reinforcing mesh in it. To prevent the screed from absorbing water in case of emergency spills, sometimes a coating waterproofing layer is also applied on top of it.
You can read about ways to waterproof a bathroom under laid tiles in this article.
Unlike buildings made of brick or concrete, the walls and ceilings of bathrooms in wooden houses also need reliable waterproofing - not as thorough as the floor, but serious enough to successfully withstand the damp atmosphere of the bathroom. Moreover, waterproofing should not be local, but continuous.
One of the options for designing and waterproofing walls and ceilings is covering them with moisture-resistant plasterboard and then covering them with latex mastic. After this, the drywall surfaces can be painted or covered with vinyl wallpaper or tiles.
The waterproofing layer itself is not intended to be walked on. For this, it does not have sufficient wear resistance, and it does not look aesthetically pleasing, so it needs to be covered on top with some standard floor covering. The only exceptions are painting and varnishing, which are finishing operations in themselves. Various moisture-resistant materials can be used as flooring for waterproofing - ceramic or vinyl tiles, linoleum, moisture-resistant laminate. The main thing is that their composition and the glue with which they are attached are compatible with the waterproofing material.
- How to waterproof a floor
- Rules for waterproofing walls
- Ceiling waterproofing options
- Video about the bathroom in the house
Wood is a unique building material, and wooden houses will not lose popularity for a long time. They have many advantages, but there is an important disadvantage: wood is afraid of water, since with high humidity it is most susceptible to rotting. Because of this, the question arises of arranging modern amenities in a timber or log house: waterproofing wooden floors in the bathroom is an obligatory part of construction work, and all surfaces must be protected from moisture: walls, floors, and ceilings.
The most difficult task is waterproofing the floor in the bathroom of a wooden house: moisture will certainly get onto the floor during water procedures, in addition, the floor joists may suffer from increased humidity, which will ultimately lead to a decrease in their strength and collapse. However, with proper sealing, the structure will be reliable, and any plumbing fixtures can be used.
The best means of waterproofing remains a cement-sand screed, but it requires more durable floors. Their reinforcement is immediately included in the design and estimate, and during construction the floor level in the bathroom must be lowered by at least 20 cm.
To create the ceiling, stronger beams are selected; it is better if they are made of larch or cedar. A more frequent arrangement of beams than in other rooms will help to further strengthen the ceiling.
Moisture-resistant plywood is laid on the joists, covered with two layers of waterproofing film on top, then a screed is laid. After laying the multi-layer rough coating, it is necessary to select the finishing material. The choice is quite large:
- Ceramic tile. It itself is waterproof, and if the joints are properly grouted, the coating will protect the ceiling from moisture penetration.
- Mosaic. This is a more expensive, but also more beautiful solution. Custom mosaics are expensive to make, but they will be a timeless addition to your home.
- Moisture-resistant cork. The cork coating looks beautiful, and to protect it from moisture it is additionally coated with varnish.
- Moisture-resistant laminate and linoleum. These materials attract buyers mainly due to their low price, and not all types of linoleum are suitable for a wooden house. Still, this is an artificial coating, and it reduces the overall environmental friendliness of a wooden house.
There are other options: you can choose a coating of different textures and colors. But it is important that it is reliably protected from moisture and rotting.
Waterproofing bathroom walls in a wooden house is a set of works that will prevent rotting of logs or beams. It can be carried out in several ways:
- Treatment of walls with special antiseptic compounds that prevent rotting. They are not particularly durable, and this option is used quite rarely. Its main advantage is that it allows you to preserve the natural appearance of wooden walls in the bathroom, but the threat of rotting will still remain.
- A more durable option - after treatment with antiseptics, the walls are covered in several layers with moisture-resistant paints for interior work. There are several options: these are traditional oil paints, and modern acrylic-based compositions, which will give the walls a pleasant shine and completely protect them from moisture penetration. This is a very effective method, but some may find the design of such a bathroom boring.
- Tile finishing. Tiles can be not only on the floor, but also on the walls: often a tiled carpet is not laid along the entire wall, but only around the bathtub and washbasin, in order to protect the most dangerous areas.
- Sheathing with moisture-resistant plasterboard is an expensive but very reliable option. As a result of such cladding, the walls will be completely protected from moisture, and the gypsum fiber board can be finished with various materials.
- Finishing with modern plastic panels. This option reliably protects the walls from moisture, but plastic is not very suitable for a wooden house, so despite all its practicality, this option is rarely used.
You can line the walls with clapboard made of larch or other wood that is resistant to rot; the clapboard is additionally treated with ship varnish. As a result, they will acquire strong protection from high humidity.
Waterproofing the ceiling of a bathroom in a wooden house plays an equally important role, since heated water vapor rises upward, and as a result, increased humidity can lead to rotting of the ceilings.
To avoid this, only moisture-resistant materials can be used to line the ceiling, or the ceiling boards can be coated with antiseptic solutions and must be treated with ship varnish.
If the height of the room allows, you can install stretch film ceilings: contrary to popular myth, they tolerate moisture and temperature fluctuations well, and the film will not allow water vapor to pass through.
Waterproofing work takes quite a lot of time and requires additional costs, but with its help you can significantly increase the life of the house, and the building will not require major repairs soon.
Polypropylene and polyethylene film
The cheapest option of all the above materials are thin polyethylene and polypropylene films. However, low cost does not mean poor quality and low efficiency; such materials provide controlled release of steam from the room.
Reinforced polyethylene film can be of two types: perforated and multilayer foil. Both options are used with great success to create a vapor barrier layer in houses with wooden ceilings. The foil material simultaneously performs a heat-reflecting function. As a result, heat remains in the room, which allows for some savings on heating costs.
Polypropylene film contains hygroscopic fibers, so it simultaneously allows steam to pass through and absorbs moisture. Thus, moisture penetrates the fibers and, gradually evaporating, comes out.
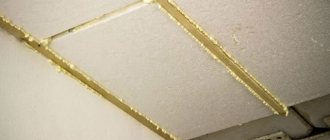
Films made of polyethylene and polypropylene are presented to the consumer in roll form, which determines the method of their installation. Solving the question of how to make a ceiling vapor barrier involves performing the following steps:
- The film is cut into pieces of a certain length.
- Lay the canvases on the ceiling, making an overlap of about 15 cm.
- The joints are hermetically sealed with wide self-adhesive tape.
- Fix the edges of the vapor barrier material using a metal profile or construction staples.
Izospan V has the best vapor barrier characteristics in this group of materials. However, despite the excellent vapor permeability, this isospan for the ceiling in a wooden house has a rather significant drawback - the lowest strength characteristics. This property greatly complicates installation work. When using Izospan B, you should be careful and careful.
The material “Izospan B” is a two-layer polypropylene non-woven fabric. Its top layer has a smooth surface, the bottom layer is fibrous and rough. It is the villi that prevent condensation from penetrating into the insulation and the ceiling. When choosing this material for arranging a vapor barrier layer, you should know one feature: its installation is carried out before the insulation. When vaporizing a ceiling in a wooden house, first of all, lay the Izospan B film, pointing its smooth side down.
The process looks like this:
- The roll is unpacked and the canvas is rolled out. Measure and cut pieces of a certain size.
- The strips are laid with an overlap of 15-20 cm in the horizontal and vertical directions.
- Elements for fixing the canvas are selected depending on the material from which the decorative ceiling will be made. For example, for a plasterboard ceiling, metal profiles are used, for a ceiling covered with clapboard, wooden slats are used.
- Regardless of the material used, it is recommended to purchase self-tapping screws with an anti-corrosion coating.
- The joints of the canvases are sealed with adhesive tape, and this must be done tightly enough.
- The insulation is attached to the ceiling using plastic disc dowels or galvanized self-tapping screws.
- Another layer of Izospan V vapor barrier is installed on top of the thermal insulation.
- Finally, the finishing material is installed. In this case, a free space of about 4 mm should be left between the vapor barrier material and the decorative structure.
Foil vapor barrier
Foil vapor barrier materials consist of several layers, which ensure that several functions are performed simultaneously to create a comfortable microclimate in a living space. In particular, we are talking about vapor barrier, insulation and sound absorption.
When choosing such a material to protect against moisture and a pair of wooden floors, the consumer receives a fairly economical solution. Popular brands in this area are Alucraft, Armofol and Penofol. To understand which vapor barrier is best for the ceiling, you should take a closer look at the main brands.
Peculiarities
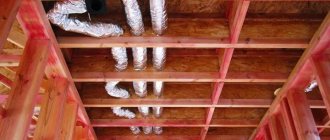
Most of the warm air masses escape through the roof. Therefore, when building a house with an uninsulated attic, you need to carefully approach the topic of insulating the attic floor with wooden beams. After all, it creates a certain barrier between warm rooms and a cold attic.
Let's consider the special criteria for attic insulation that affect the maintenance of temperature in the house:
- Purpose of the room.
The attic is a kind of buffer between the environment and the living rooms. Its task is to regulate the temperature difference between the external environment and the house. - Temperature regime.
In any season and on any day, the temperature of the air masses in the attic will always be higher than outside the window. This is why the attic is very cold in winter, and unbearably hot and stuffy in summer. - Heat loss in winter.
The more a substance heats up, the less dense it becomes. This is a physical phenomenon. This is why in residential premises with a heating system, warm air from household appliances is concentrated in the ceiling area. That is, if you do not insulate the ceiling, then in winter all the warm air will warm the attic.
- Excessive heat in summer.
In summer, the reverse process can be observed. The roof, heated by the rays of the sun, will warm up the attic air, which, in turn, will penetrate into the room through the attic floors. - Reverse circulation of air masses.
In contact with the ceiling without thermal insulation, warm air becomes cold, more dense and, as a result, sinks to the floor. This is reflected in the living space in the form of circulating drafts that cause harm to human health.
- The appearance of excess moisture.
When it comes into contact with an uninsulated attic, hot, humid air turns into condensation. The overall level of humidity in the house increases, which leads to mold growth in the corners. - Saving
. The heat lost through the roof without insulation is about 30%. This means that with proper insulation of the attic floor, you can save 30% of the fuel used. Using air conditioning in the summer will also cost less.
The entry of warm air masses into a technical attic (non-residential) leads to negative consequences:
- Due to the mixing of warm and cold masses, condensation may appear in the attic. Water falling on the surface can lead to rotting of wood on load-bearing beams.
- If the attic is warm, the snow collected on the roof will begin to melt. The water dripping at the same time will begin to turn into icicles. Ice forms on the drainage system.
Main characteristics and advantages of Alucraft vapor barrier
One of the best options is the Alucraft vapor barrier material with a three-layer structure. The top layer is aluminum foil, the bottom layer is kraft paper, and the connecting link between them is molten polyethylene. A special feature of aluminum foil in this material is its high tensile strength, which is ensured by the paper base. In this case, the material allows vapor to pass through and at the same time reflects the heat flow, therefore, the heat returns to the room.
The material of this brand can be called an excellent option for creating a vapor barrier layer in a bathhouse and sauna, with brick, concrete and wooden walls. As for the ceiling of a private house with wooden floors, Alucraft is the best option in this case.
All materials with a foil layer do not pose a risk to human health. They do not tend to emit harmful substances when heated or exposed to solar radiation. In addition, foil vapor barrier for the ceiling is characterized by a very reasonable cost. The material is rolled into rolls, which simplifies transportation to the site and installation work.
Description of the ceiling vapor barrier "Armofol"
Materials of this brand are divided into two types, some have one-sided foil, others have foil on both sides.
Vapor barrier "Armofol A" is a roll material with one foil layer based on a fiberglass mesh. The main purpose is vapor barrier and thermal insulation of rooms with high levels of humidity and high temperature values. Such premises include baths, saunas and catering establishments. In addition, “Armofol A” can be used to create a vapor barrier layer in private houses with wooden ceilings.
“Armofol V” is a roll-type material consisting of three layers, two of which are made using foil, the third layer is glass mesh. High efficiency was noted for vapor barrier and thermal insulation of attic spaces, as well as on wooden ceilings.
A distinctive feature of the Armofol S roll material with one foil layer is the presence of a self-adhesive base. The disadvantage of such a vapor barrier for a wooden ceiling is a decrease in efficiency when installed on uneven surfaces.
Other brands of this brand have a higher cost, so they are used quite rarely in the private sector. They are more suitable for industrial premises in which the air space is filled with vapors of acids, alkalis and other aggressive chemicals.
What materials can be used for vapor barrier devices?
To protect the insulation layer and wooden floors, both traditional and more technologically advanced materials are used.
- Polyethylene films: have become widespread as a waterproofing and vapor barrier material at the same time; to improve their performance characteristics, they can be additionally reinforced with a special mesh or fabric. But in addition to moisture, they will not allow air to pass through, which worsens the indoor microclimate.
- Foil-coated polyethylene, one side of which is covered with foil, which imparts heat-reflecting properties.
- Rolled materials with a base of bitumen or tar: roofing felt, glassine, roofing felt.
- Multilayer membranes made of polypropylene, where a mixture of cellulose and viscose fibers is applied to one side. They absorb moisture and direct it into the atmosphere through ventilation gaps provided in the design.
Characteristics and advantages of Penofol vapor barrier
The materials of this brand are very popular for creating a vapor barrier on the ceiling in a wooden house. The structure of such vapor barrier materials contains a thin aluminum film and polyethylene foam. Modification “A” has one foil layer, materials of group “B” have two layers of durable foil, models of group “C” have an additional adhesive base.
To solve the problem of how to properly make a ceiling vapor barrier, you must follow the following rules:
- The foil layer should be facing indoors towards sources of heat and moist steam.
- It is recommended to lay the panels end-to-end, trying to avoid gaps.
- The joints are hermetically sealed with adhesive aluminum tape.
- To create additional thermal insulation, the sheets are laid with an overlap of 10 cm.
- When using materials with double-sided foil, care should be taken when dealing with low-quality electrical wiring close together. It is important to remember that foil is an excellent conductor of electricity.
How to properly install a vapor barrier on the ceiling: step-by-step instructions
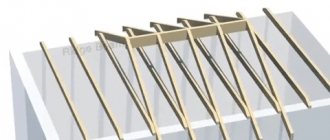
The finished vapor barrier in appearance resembles a pallet with sides. The coating should cover not only the insulation on the ceiling, but also the gap between the heat insulation and the walls. In addition, the film must cover each beam.
The first stages of finishing the ceiling are carried out as usual. The wooden surface is cleaned, treated with antiseptics and fire retardants, and communications are installed. Then the ceiling is waterproofed and insulation is laid on it.
- Laying begins from any wall. The roll or sheets are cut to size and secured to wooden beams with staples. In this case, a gap must be maintained between the heat insulator and the vapor barrier. If necessary, pre-attach the sheathing.
- The film or membrane must cover each beam. There are two ways to do this. A simpler option involves fastening the material around the beams. In this case, the canvases are laid perpendicular to the beams, taking into account some recess into the interblock space. If the length of the film is not enough, gluing the vapor barrier is allowed.
- Another option: cut the film into fragments of the appropriate size; you need to wrap each compartment separately. All seams and joints are additionally taped with tape. As a rule, this method is used for vapor barrier of panel-box ceilings. Laying is done with an overlap. The tolerance on walls is 10–15 cm.
- The joints are sealed with tape according to the following scheme. First, glue the seams between the canvases. To do this, bend the overlap, secure the edge of the vapor barrier with tape, then remove the protective strip from the adhesive tape and attach the overlap on top. The joints with the wall are sealed in the same way. In this case, you cannot stretch the film; it should sag by about 2 cm.
- Then the second and third layers of vapor barrier are laid, following the same rules. Make sure that the joint of the next layer does not coincide with the seam on the first layer. The displacement should be at least 30–40 cm.
Foil material, especially sheet material, is mounted according to a different scheme.
Vapor barrier membrane for wooden ceilings
The most effective and at the same time expensive solution to the question of which vapor barrier to choose for a wooden ceiling can be called a diffuse membrane. This material is available in two types: single-sided and double-sided. When using the first option, you should carefully perform the installation, since such material allows wet vapor to pass through only in one direction. Therefore, one should not confuse which side should be adjacent to the load-bearing surface and which should be adjacent to the insulation. Double-sided material allows steam to pass in both directions, so installation work is not particularly difficult.
When deciding which vapor barrier to choose for the ceiling, you should know that membranes can be single-layer or double-layer. In the first case, the distinctive feature is low cost and simple operating principle. The second option is characterized by the ability to accumulate moisture inside the canvas and gradually remove it outside.
The “smart” membrane attracts special attention in this product category. This material simultaneously absorbs steam and serves as a kind of hydrobarrier, regulating the level of humidity in the room. This is the best option for vapor barrier of wooden ceilings of private houses, however, their cost is at a fairly high level, so most consumers cannot afford such materials.
What kind of film to put under the insulation in the attic All about insulation and energy efficiency
When ensuring insulation of a private house and insulation of the roof along the rafters, one must not forget that special attention should be paid to such a place as the attic. Development of attic floor insulation with mineral wool
Development of attic floor insulation with mineral wool
Warm air tends to rise to the top, and therefore, in a temporarily unheated room, heat can escape through the cold attic space. Therefore, the issue of insulating the attic must be resolved without delay.
1 Why do you need attic floor insulation?
Insulating a cold attic floor with stone or mineral wool is generally necessary in lightly used rooms that are properly equipped with special roof ventilation.
The attic, or rather its ceilings, serves as a kind of boundary between heat and cold. In such places, the attic floors are exposed to intense moisture due to the formation of condensation.
However, you can properly insulate the floors in the attic of a house with mineral wool with your own hands. The very process of insulating the floor in the attic with mineral wool is the creation of a durable thermal insulation coating, which will have a low degree of thermal conductivity.
The technology itself for insulating mineral wool floors in the attic, as well as Energoflex thermal insulation for pipes, implies strict adherence to its stages and requirements.
The technology itself is quite simple and understandable. Good attic floor insulation using mineral wool helps close unwanted gaps.
To do this, the insulation must be laid tightly. In most cases, mineral wool is used to insulate the attic of a house.
The presented insulation is the most suitable for this type of work; it can also be used to insulate the floor surface in the living areas of the house.
Schematic insulation of the attic floor with mineral wool
By organizing good insulation with mineral wool, the most optimal temperature will be maintained in residential premises.
If the procedure is performed incorrectly, moisture rising from the floor of the house will lead to the formation of condensation.
It will accumulate on the ceiling and then seep through the ceilings. The resulting temperature difference in those areas where the attic floors adjoin the walls of the house initiates the formation of mold and microscopic fungi, which can be causative agents of allergic diseases.
1.1 Requirements for attic insulation
The process of insulating the attic floor and insulating the roof of a house with your own hands, or rather the level of its quality, has a direct impact not only on the size of heat loss, but also on the service life of the entire truss structure and roof covering.
The fact is that water vapor located inside the heated room diffuses to the attic of the house. In order for the insulation used to provide a high degree of calculated efficiency of the thermal insulation layer, it must always be dry.
Based on this, the insulation must be protected from excessive humidification by vapors of rising heated air using a special vapor-proof material.
Membrane "TechnoNikol" for the ceiling
The leading position among vapor barrier materials is occupied by the TechnoNikol membrane. Her brand “Optima” is excellent for vapor barrier of the ceiling in a house with wooden floors. The structure of this material contains three layers, two of which are made of polypropylene, the middle layer between them is a high-tech functional vapor-permeable film. Membranes of this brand are in most cases presented in roll form up to 1.5 meters wide and 50 meters long. The material is the best option when creating a vapor barrier layer on any type of floor. Can be used both indoors and to protect the external surfaces of a building.
Installation of a vapor barrier on a wooden ceiling is carried out according to the following scheme:
- The membrane should be laid on top of the thermal insulation, with the smooth side facing the inside of the room.
- The stripes can be located in a parallel or perpendicular direction relative to each other.
- The strips are installed with an overlap of 10-15 cm.
- To fasten the membrane, it is recommended to use galvanized self-tapping screws with a wide head or special brackets that have an anti-corrosion coating.
- The joints of the canvases are hermetically sealed with mounting tape with a self-adhesive side.
- The edges of the membrane sheet must be placed on the wall by 15-20 cm and secured with a wooden strip or metal profile.
- The perimeter of the vapor barrier layer is also taped with mounting tape.
- In areas where the membrane will come into contact with beams, pipes and ventilation ducts, care and attention should be exercised. It is important that the vapor barrier does not have folds or sagging.
- A gap of about 3-4 cm should be left between the vapor barrier membrane and the decorative ceiling for ventilation.
In addition to the main listed brands, there are other materials on the market for ceiling vapor barrier. Their quality characteristics and efficiency are also at a high level.
How to choose a high-quality vapor barrier based on technical characteristics?
So, today there are many materials that have high resistance to vapor diffusion and low vapor permeability. For a long time, ordinary polyethylene films were very popular, which, in principle, do their job, but still do not please with high vapor permeability, low breaking characteristics and fragility.
Therefore, modern manufacturers, following their policy of import substitution, produce quite interesting technological solutions, among which there are even metallized membranes. There are many such materials and it is worth studying their characteristics to understand: what is the best vapor barrier for the ceiling of your home?
Let's list the most important characteristics for a vapor barrier:
- Vapor permeability is a characteristic of films and membranes from 0 to 3000 mg per square meter per day. This indicator tells you how many grams of water in the form of steam can pass through each meter of film per day. And the lower the number, the better, of course. If the numbers show vapor permeability in hundreds or thousands of grams, then you have a vapor-permeable membrane in front of you, and it should be placed not under the insulation, but on it.
- Durability . This characteristic significantly influences how easy your installation work will be. Cheap vapor barrier films are quite easy to tear; they lose their integrity even during installation, when tools fall on them or when they are touched. On the other hand, durable vapor barrier also tolerates temperature changes well.
- Water column pressure. The vapor barrier film is designed to retain water. This indicator is mainly important for a vapor-permeable membrane, which can literally get rained on. For the ceiling, this, of course, is not critical, although attic leaks should never be ruled out.
- UV resistance. This indicator varies from several days to a month. Surely you have observed how polyethylene, which has been on the street for a long time, becomes brittle and breaks. But high-quality material retains its strong performance for a long time. This is valuable if your installation work involves storing the exposed vapor barrier film on the ceiling for a long time without internal lining.
And in order to figure it out and clarify whether you have chosen the right vapor barrier for the ceiling according to the technical characteristics, carefully examine the pictograms shown on the packaging. And trust the brand that is known and trusted in the domestic market. Among such brands are Izospan, Izover, Technonikol, Delfa and others.