Maximum dimensions of a frame house. About the design of a frame house - questions for an advanced teapot
Good afternoon (night, morning - depending on who you are) everyone!
I read SNiPs here, looked at the requirements for fastening various slab materials, read bourgeois books (special thanks to the author of the collection of links posted on the forum). Then I did the math a little and thought about it. Namely:
About the thickness of the rack of a frame house. SNiP requirement: distance from the edge of the lumber to the axis of the dowel (nail, screw) 3 - 3.5d. The requirement for fastening Greenboard 3, DSP, OSB is 15 mm from the edge of the sheet (or more). The recommended diameter of screws is 3.9 - 4.2 mm. Accordingly, the thickness of the rack on which the slab materials meet must be at least: 3.9x3x2+15x2=53.4 mm (if the slab material is installed without a gap between the sheets). If you need a gap between the slab material, then the thickness of the rack should be greater...
About the height of the frame stand. Based on the strength requirements for wooden structures according to SNiP, with a rack thickness of 50 mm, its maximum height can be 266 mm, with a thickness of 45 mm - 240 mm, with a thickness of 40 mm - 213 mm. In this case, the maximum load on a rack with a thickness of 50 mm and a width of 150 mm with a height of 266 mm can be no more than 1507 kgf (the calculation is correct for wood with a moisture content of no more than 12%, I did not find how to calculate it for other humidity levels). I was sitting here, calculating the loads on the racks of the first floor of a frame house for my beloved and slightly tensed - the safety margin was less than 20% with a rack spacing of 600 mm along the axes, and along the central load-bearing wall I could barely fit in with a 400 mm pitch (I will today to recalculate the loads again - it turns out to be a very heavy house). Maybe, of course, out of the old Russian habit, I’m trying to overdo it, but...
This is where some questions arose for me: how do gentlemen in practice attach slab material to racks with a thickness of 50 mm or less, taking into account the fact that manufacturers of slab material require installing self-tapping screws strictly at an angle of 90 degrees to the plane of the sheet?
How are frame struts reinforced, taking into account strength requirements and actual loads? Is this very slab material needed in the frame at all? Actually, as far as I understand, the displacement of the frame from the vertical is affected by wind loads plus unevenly distributed vertical loads? If so, then it seems to me that two or three correctly installed jibs in each wall should be enough?
Off-top: I talked here with several Moscow companies that make frame houses... (a lot of unprintable words)... transferring loads through window and door frames, 4-meter spans with 45x145 beams with a pitch of 600 mm... when asked on the basis of what design decisions were made - They answer on the basis of SNiP, I ask how they thought - but we don’t... When using dry lumber (it’s not a fact that it will be dry), not only the material, but also the work becomes more expensive...
I was forced to sit down to design it myself - I really don’t want to sit in the bathtub on the second floor and end up on the first... And, alas, the budget is strictly limited...
About the “pie” of genders. I see the following designs for dry rooms: 1. Greenboard 3R – 22 mm 2. Plywood – 21 mm 3. Plywood – 15 mm with scraped joints 4. Cork backing – 2 mm 5. Laminate – 9.5 mm For wet rooms: 1 Greenboard 3R – 22 mm 2. Waterproofing 3. Knauf Aquapanel – 12.5 mm 4. Knauf Boden 15 thin-layer gypsum screed with carbon “warm floor” cables recessed into it – 18 mm 5. Knauf Flex tile adhesive – 5 mm 6. Ceramic tile – 10 mm In both cases, the thickness of the “pie” is 69.5 mm (it is clear that I will lose 0.5 mm and it will be 70).
This is what I didn’t find... If I install a multi-span beam and place a wall on top in the places where it is supported, then logically I get a rigid seal in all places where the beam is supported. How then can it be calculated for strength and deflection? Where can I look at the formulas... Or should it be considered as several single-span beams?
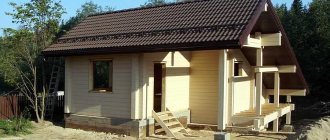
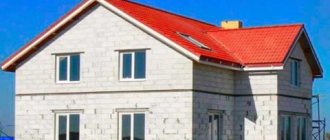
Types of frame houses
The technology of building frame houses is not new. Based on the nature of the frame construction, houses are divided into several types. Modern houses are most often built by combining the best properties of different types of frame houses. You can read about the advantages and disadvantages of frame houses in the article “Frame houses”.
The most common is a frame structure with a slab, sometimes called the Canadian type of frame houses, since this is how they are most often built in Canada and North America. In this design, each layer represents the shape of a platform or tray. The frame is laid from the bottom up. First, the lower frame is laid, which is applied to the base or pillar foundation. The floor joists of the first floor are laid on the frame, which are fastened with the help of auxiliary joists. Then, the frames of all the walls made of boards are installed on the laid pallet. The function of the racks is load-bearing. At the bottom they are attached to the joists, at the top they form a floor support. The construction of the second floor is similar to the first floor.
The elements of the supporting frame provide the spatial density of the frame house. In order to evenly distribute the load between the wall, floors and elements of the supporting structures of the rafters, the distances between the posts, floor beams and rafters must be the same. The distance between the supporting structures of a frame house is from 0.5 to 1 meter. The distance between the racks is selected taking into account the thickness of the racks, the width of the insulation and finishing materials. |
Frames with continuous posts are common in northern Europe, Norway, and Finland. In this case, vertical posts pass through all floors of the house. At the height of each level, support boards are cut in, which fasten the beams of the interfloor floor. Floor joists provide additional strength to the structure. The main difficulty is the ideal parallel arrangement of the posts when attaching the floor beams. In this regard, more problems arise in houses with complex configurations.
The post-beam structure, the so-called half-timbered frame, is common in Germany and Austria. This is a strong and durable frame, a little more complicated due to the numerous cuts and connections. However, in modern construction, notched connections are replaced by metal fastening elements. For the construction, timber 150x150 or 200x200 is used. This technology allows you to equip large windows and doors without the use of additional crossbars.
Frame-rack design
This design is similar to a half-timbered structure. The difference is that the vertical posts are built directly into the ground or concrete supports. Thanks to this technology, the house is raised above the ground, and this ensures good ventilation. The construction of such houses is of particular relevance in areas that are often flooded or swampy. The gaps between the load-bearing posts are filled with intermediate posts, between which windows and doors are installed.
Construction of a frame house
As in many of our articles, when working on this article, we used the advice and experience of practitioners. Having examined many frame houses, we would say that the most popular scheme is the frame scheme with floors. The construction process when we “grow” a house from below:
The basis of a frame house is the lower frame (grillage, murlot), under which timber 150 x 200, 150 x 150 is used. The second size determines the width of the racks and the layer of insulating layer. The wooden frame must be separated by a waterproofing layer; for this, roofing felt folded in several layers is often used. The frame is secured to the foundation with metal anchors. The beams of the lower crossbar are attached to the frame with galvanized brackets.
For corner posts, quadrangular beams with a cross section of 100X150 or 200X200 are used, depending on the selected thickness of the insulated layer. For intermediate posts, double-cut boards with a section of 50x150 or 50x200 are used. Be sure to adjust the parallelism of the corner posts and the ideal verticality of the post - in the future this will help to avoid difficulties with attaching the finish and laying insulation. The racks are secured with galvanized reinforced angles and temporarily connected to each other by beams with a 5x5 section so that they do not change positions. The racks at the top are connected by the top trim. This is a double cut board with a section of 50x150, 50x200. Floor beams are laid on it, and on them - the lower frame of the second floor (50x150 or 50x200).
Most often, the openings of windows and doors are wider than the width between the racks, which is why the racks are cut and crossbars are installed.
More modern construction of a frame house, when the walls are mounted horizontally
While looking through the objects, we came across a more modern method of construction, which is practiced by the frame house builder “Karkasa”. According to them, they practiced the technology presented in the article above at the beginning of their activities, but with the acquisition of skills, and after special consultations with American builders, they greatly improved the construction process itself.
During construction, a much smaller number of fastening elements are used, the house is closer to modular construction. The house frame (grillage) is thinner - 5x150 or 5x200. It is attached to the facade with metal anchors. The walls are first mounted horizontally, laid out on the ground. The bottom trim is 5x150 or 5x200, the posts are attached from below with corrugated nails (they are shot). The top trim is installed; if we plan to use a solid panel for the exterior, it is also mounted to maintain density. This structure rises and is attached to the grillage.
Calculation of the diameter of wooden floors
Wooden floor beams are used in frame houses. When choosing the diameter, the weight is calculated, which, most often, is about 200 kg/m², the operating load is about 200 kg/m². The beams are laid in a narrow span. The distances between the beams must correspond to the distances between the posts.
The diameter of the floor beams, depending on the distance between the walls and the distance between the beams,
with a load of
400 kg/m2.
| Beam length (m) | ||||||||
| Span between beams | 2,0 | 2,5 | 3,0 | 4,0 | 4,5 | 5,0 | 6,0 | |
Wood for frame house
Wood for a frame house must be dried to a moisture content of 15%. With natural drying in the yard, it is unlikely that you will be able to obtain high-quality wood. If folded incorrectly and with constantly changing air humidity, it can become warped. Wood should be dried in a dryer or in a well-ventilated area.
For a frame house, calibrated wood is used (already dried wood is cut with precision), which will no longer bend.
The use of improperly dried wood when constructing a frame house is often the cause of defects in future finishing and a shortened service life.
Insulation of a frame house and wall structure
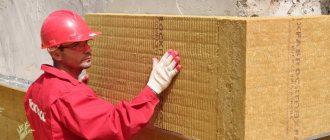
To insulate structures, you can use several types of “sandwiches”. The spans between the posts are filled with a panel of stone wattle, a wattage of about 35 kg/m³ is suitable. The wool should be several centimeters wider than the span, so when the panel is pressed against the racks, the span will be filled completely. The insulation layer is laid from several layers of wool, with the panels overlapping. For example, a 150 mm layer can be formed from 3 layers of a 50 mm panel or from two layers of a 100 and 50 mm panel. We cover the panel by securing the panel from the outside or covering the wind with an insulating film. The spans of the frame can also be filled with foam, but if poorly dried wood is used, the low-permeability foam will affect the process of rotting of the structures.
The exterior must be protected from the wind; several technologies are used for this. Some builders use rigid materials for the exterior, such as OSB or concrete-sawdust panels. They give the building additional rigidity. It is best to use connection panels. According to the head of "Karkas", it is best to use air-permeable and moisture-permeable materials, especially if wetter wood was used for the structure. In such a “sandwich”, an insulating film or a more rigid stone wool panel or a wood fiber panel is attached to the outside of the frame. There must definitely be a gap left for ventilation, which we get by nailing 2.5x5 sheathing beams and not filling the spans. You can mount panels on the binder and nail the facing board.
Inside the house, a vapor barrier film is attached to the posts. The film is shot, 5x5 beams are attached to it to the racks. An Electra installation is installed in this span; the span is filled with stone wool. The wool is covered with a 12 mm OSB panel, which is laid horizontally. You can immediately attach a plasterboard panel to it, erecting it vertically.
Inner layers: the spans are filled with a stone wool panel, covered with a vapor barrier film.
Insulation of floors
Floors are insulated according to the same principle as walls, but rolled mineral wool can also be used for floors.
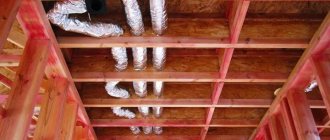
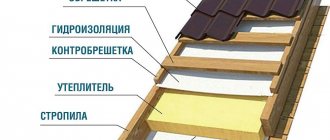
The design of the ceiling on top of the cold space
:
Indoor floor structure
- Drywall 12 mm.
- OSB board 12 mm.
- Load-bearing floor beam 50x150 mm.
- Rolled mineral wool 100 mm.
- Logs 50x50 mm.
- The base of the floor is made of a 20 mm OSB board to be joined.
- Floor covering.
Frame lining
Ventilation boards are nailed to the outside of the OSB board, onto which exterior finishing boards or cladding boards are nailed. If the board is nailed vertically, the boards are nailed horizontally, thus leaving gaps for air circulation. The outside can also be lined with brick, leaving a gap for ventilation between the brick and the outside of the OSB board.
If you use a sawdust concrete slab instead of an OSB slab, the surface can be immediately covered with plaster.
Wall structure
- Plasterboard panel 1.2 cm.
- Panel 1.2 cm.
- Horizontal beams 5.0 cm, the spans between them are filled with mineral wool
- Polyethylene film PE 2 microns
- Wooden frame structure filled with 15 cm mineral wool
- Vertical beams 5.0 cm, the spans between them are filled with mineral wool
- Anti-wind film
- Air span 2.5 cm
- Wood trim strip
Roof structures
The roof structure of a frame house does not differ significantly from a conventional roof. It is recommended that the spans between the rafters coincide with the spans and location of the racks.
Knots of a frame house
A frame house will be warmer and more durable if you use several nodes.
Detail of the connection between the frame wall and the ventilated attic
Additional insulation of the upper floor. The bottom floor board is made narrower than the stand. A stone wool panel is placed in the resulting span, which will isolate the ceiling from the outside.
Fastening the racks. The lower edge (grillage, murlot) is attached to the floor. The stand is attached to the harness in a horizontal position. The raised wall structure is attached to the grillage.
- Finishing from cladding boards
- Waterproofing
- Exterior stonework
- Air flight
- Connection
- Air insulation – Rockwool – Wentirock
- Rockwool stone wool
- Steam insulation
- Interior decoration
Frame wall when plaster is used as finishing
Plaster finishing is carried out according to the manufacturer's requirements. Be sure to adhere to the requirements for fastening stone wool panels. It is recommended to drill holes in the plywood. The holes are drilled in a 250/250 mm staggered pattern, offset in relation to each other. The thickness of the facade panel (7) is not less than 100 mm.
Ventilated pitched roof (small cornice)
- Installation of a drainage system or a special tape coated with aluminum
- Fireplace
- Fireplace finishing
- Air slot
- Lattices
- Rockwool stone wool
- Fire insulation – Rockwool – Airebatts, Wired Mat
- Interior decoration
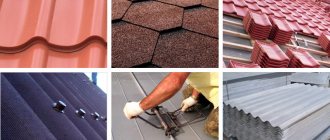
- Roof covering (tiles)
- Additional beam (rafter filing for air gap)
- Wind insulation
- Chimney liner
- Steam insulation
- Additional beam for interior decoration
- Roof covering
- Lattices
- Beam additionally treated with antiseptic
- Ventilated air slot
- Diffuse film
- Metallic profile
- Glulam beam
- Gutter
- Stone wool Rockwool - Fasrock or Fasrock L
- Rockwool stone wool
- Corner metal profile
- Exterior decoration
- Additional beam
- Interior decoration
- Murlot
- Murlot anchor
- Interior masonry
- Steam insulation
Reproduction of information from aca.lv, a guide to construction and housing issues, in the media and Internet sites without the written consent of JSC IKS is prohibited.
With what step should the racks be placed when designing the frame of a house or outbuilding? What should you consider when choosing the pitch of racks in a frame house? The dimensions of OSB sheets, plywood or the width of the insulation? How to take into account the deformation gap between the sheets of external cladding in the pitch of the racks of a wooden frame?
These are the first questions that arise for anyone who has decided to design a frame house or any other building based on a wooden frame with their own hands. In the literature and textbooks, the strut pitch is often given as 600 mm. at the centers of the racks or 575 mm. between the racks, without particularly explaining what caused these recommendations. And the lack of clear explanations makes many people think and start searching for their own path.
The choice of strut spacing when constructing a frame must be approached comprehensively: i.e. take into account the format of OSB sheets or plywood for the outer cladding of the frame, what will be used to insulate the walls, how and with what the finishing of the premises inside the house will be done. This approach will make it possible to optimally use materials, minimize waste, and find new opportunities to save effort, time, materials, and therefore money. So when choosing the pitch of the racks, we first advise you to think about how the wall pie will look in your frame house.
Pitch of racks in a frame houseWhat do you mean? For example, if the frame wall looks like this: siding, hydro-wind protection, OSB, eco-wool insulation, craft paper, drywall. It makes sense to calculate the pitch of the racks according to the dimensions of OSB or plasterboard, since for insulation with eco-wool, the pitch of the racks is not of fundamental importance.
What to choose? Format of plasterboard sheets or OSB boards? In this case, it is more reasonable to calculate the pitch of the frame racks according to the format of the plasterboard sheets, which is 600 mm, and cut the OSB external cladding sheets taking into account the deformation gap.
Pitch of racks in a frame house In another option, Rockwool basalt insulation slabs with a width of 600 mm are used to insulate the walls. with a deformation strip of 50 mm. For external wall cladding, OSB sheets are 2500 x 1250 x 12 mm, and interior finishing is done with clapboard. Here, the determining influence on the pitch of the racks in the frame of the house is in the format of OSB and stone wool slabs. Since we have basalt wool slabs with a deformation strip of 50 mm, the size between the posts can vary from 595 to 560 mm. The length of the lining also does not affect the pitch of the racks in the frame. The only determining factor remains the size of the OSB sheets.
Let's say our building does not have complex corners, balconies and bay windows, which allows us to form an expansion joint between the OSB sheets directly on the wall, simply by installing a circular saw blade on the thickness of the OSB slab and running all the joints of the sheets before installing the rafter system and roof. The size of OSB sheets is 2500 x 1250 mm. Based on this, we obtain a pitch of racks in the frame of 625 mm, and the distance between the racks will be 575 mm. This is enough to install basalt wool slabs solely due to the deformation strip provided on them, without additional trimming of the slabs.
But if the frame of the house or outbuilding is insulated with foam plastic slabs, then it is better to calculate the pitch of the racks according to the size of the slabs. Otherwise, a lot of waste is generated. Calculating the pitch of wall frame posts for foam insulation has its own characteristics. Fresh sheets of polystyrene foam lose about 1 percent in size over the course of about six months; later this process stops, that is, a sheet of 100 x 200 cm will subsequently shrink to 99 x 199 cm.
If cutting sheets is done with a saw with a fine tooth, then you need to subtract another 3 - 4 mm. By sawing a sheet that has been left for six months, we will get two strips about 492 - 494 mm wide. There are two ways to secure foam between the wall frame studs:
Step of racks in a frame houseOption one. the opening between the racks is reduced by 7 - 10 mm, i.e. the racks are placed in increments of 530 - 535 mm. so that the foam sheets fit between the racks slightly during installation, leaving no gaps that could later become cold bridges. For such installation of polystyrene foam, accuracy and experience are required.
Pitch of racks in a frame house In the second option, the racks are installed with a pitch of 560 mm. so that on all sides the opening is 6 - 10 mm larger than the size of the foam boards. After which the cracks on the sides, top and bottom are filled with polyurethane foam. The gap is 6 - 10mm. optimal for gaps less than 5 mm. The nose of the mounting gun does not fit, and the gaps are more than 10 mm. increase the consumption of polyurethane foam.
But no matter what you choose for insulation and wall finishing, when using 50 x 150 mm boards as frame racks. the pitch of the racks should not exceed 650 mm, and when using boards 50 x 100 mm. the maximum distance between posts is 400 mm.
In general, as you can see, there is no universal answer to the question of which strut pitch to choose when building a frame house. You need to choose it comprehensively, taking into account both what the house will be insulated with and what it will be finished with. Otherwise, you may be faced with the fact that you will have to cut and cut all the materials, increasing waste, labor costs, and the construction budget.
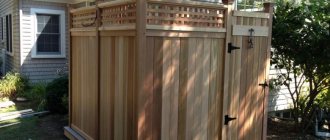
Veranda of a frame house. Part 6.
Description of video material
: The construction of our veranda is coming to an end.
We've taken you step by step from the design project to the staircase construction, and are now ready to install the fencing and finishing. In addition to the fencing, we'll install latticework around the base of our deck and educate you on the necessary maintenance for your deck. Dimensions of a frame house
Marking the position of a frame house on the foundation is the most important part of construction. Any mistake at the initial stage will subsequently lead to the inability to bring the corners vertically and loss of the dimensions of the external walls. Correcting errors during the construction process that were made during the construction of the first floor slab is expensive and takes a lot of time. Therefore, pay maximum attention at the initial stage. Sequencing:
I) Checking the coincidence of the dimensions of the real foundation and the drawings of the frame house;
II) Checking deviations of the upper plane of the foundation from the horizontal plane;
III) Drawing a projection of a frame house onto the foundation, taking into account identified deviations from the drawing.
Please note that I specifically include the possibility of error at the stage of foundation construction. Unfortunately, in most cases you will have to deal with the fact that the corners of the foundation are not straight and one of its parts is higher than the other. This is not a disaster and can be easily eliminated at the stage of installing the bottom trim board. Allow for this stage as much time as it takes to bring the dimensions of the frame house and the horizontal level of the first floor to normal. If everything is checked and corrected, then the construction will proceed according to the template and will be completed in the shortest possible time.
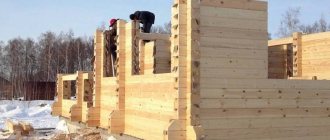
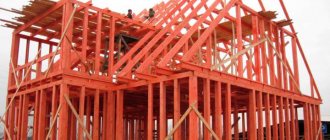
The initial stage of wall construction is frame assembly
The frame determines the geometry of the house, ensures its rigidity and safety. That is why it is so important to choose the right building material for it and follow the construction technology.
Bottom trim - material used and preparation for installation
A week after pouring the foundation, you can begin laying the bottom trim . It provides support for future walls and connects them to the foundation. Most often it is made of timber with a rectangular cross-section of 150x200 mm.
You can choose between solid and laminated timber. Their main differences are strength and price. Glued laminated timber can withstand heavy loads, but its price is higher than that of solid timber.
Immediately before laying the strapping, be sure to check the evenness of the foundation. If the horizontal line is maintained, begin waterproofing work. For this, bitumen or roofing felt is used.
Note! If the horizontal deviation is more than 10 mm, a mortar is used. If the deviation is less than 10 mm, planks are placed under the harness.
Connecting the beams of the lower frame and fixing it to the foundation
The frame is attached to the foundation using anchor bolts. Holes for them are made in the beams and foundation at a distance of 1-1.2 m from each other. Anchors must have a diameter of 12-16 mm and enter the concrete to a depth of at least 100 mm. Choose anchor bolts with a hex nut and a wide washer.
The beams can be connected to each other in several ways. Particular attention should be paid to the corners. The following connection types are suitable for these areas:
- “half a tree” and “in the paw”;
- "dovetail";
- "root thorn".
The last two options are reliable, but labor-intensive. That is why in practice “half-tree” and “claw” joints are widely used.
A half-tree connection involves sawing out part of the timber. The height of the cut is equal to ½ of the thickness of the lumber, and the depth is equal to its full thickness. The “paw” connection is made in the same way, but the cut is made at an angle. As a result, the protruding part of the beam has a trapezoidal shape.
In this case, the beams are additionally reinforced with reinforced metal corners and 120-150 mm nails. You can also use a dowel - a wooden pin connecting the beams to each other. It should be slightly smaller in height and diameter than the hole previously prepared for it. This requirement is connected with the subsequent shrinkage of the frame house.
Installation of vertical racks
Vertical frame posts begin to be installed from the corners. To fix the corner elements on the lower trim, reinforced metal corners are used.
Racks on straight sections can be secured by complete or incomplete cutting or using the same steel corners. In this case, conventional products without additional reinforcement are suitable.
The cutting method involves cutting out special grooves in the strapping beams. Their width corresponds to the same size of the vertical post, and their height is equal to 30-50% of the thickness of the strapping beam. With complete cutting, the end of the rack is completely recessed into it to the selected height, with incomplete cutting - only partially. As a result of drinking, it takes on an L-shape.
Note! If you choose the cutting method, then the length of the racks corresponding to the height of the future walls must be increased by the height of two grooves.
The pitch of the racks largely depends on the pre-selected wall material.
Performing the top trim
The upper harness is performed in the same way as the lower one. Fastening the racks to its horizontal beam can also be done using metal corners or cutting. In this case, choose the method that has already been used when working with the lower harness.
It is important! The upper grooves for the racks should be cut strictly perpendicular to the lower ones. This will avoid distortion of the frame.
Each vertical post is not only inserted into the cut-out groove, but also additionally secured with two nails. They must be recessed into the frame element by at least 100 mm.
Jib bars - what are they for?
Jib beams are boards with a cross section of 25x100 mm. Fixed on the bars of the lower and upper trim and racks, they give the structure spatial rigidity.
Useful: How to use sawdust for thermal insulation
It is important! Do not confuse long struts that connect multiple posts with short struts within a single vertical member.
The jibs are installed at an angle of 45-60°, cutting grooves for them in the frame. In places where they drank, they are additionally fixed with two nails. For walls up to 6 m long, two jibs directed from the center of the lower frame to the two upper corners are sufficient. For longer walls, their number can also be increased.
Stage I. Matching the dimensions of the real foundation and the drawings of the frame house
So, to check the dimensions of the foundation, we need a tape measure about 25-30 m long. If the foundation of your frame house is rectangular, then first we check the diagonals. Note that it is not enough to make sure that opposite walls are equal. When a right angle is lost while pouring the foundation, the rectangle turns into a rhombus. In this figure, the opposite walls are equal, just like in a rectangle, but you cannot build on such a foundation. Checking the diagonals of the foundation immediately reveals deviations from the rectangle. The permissible difference in diagonals should not exceed 2 cm. Life shows that 3 options are possible:
1) The diagonals of the foundation are equal and coincide with the dimensions in the drawings. Ideal situation. The craftsmen who poured your foundation deserve a bonus, since this option is not often found in the vastness of our Motherland. But if you are lucky, then proceed to Stage II - checking the horizontalness of the foundation;
2) The diagonals of the foundation are equal, but differ from the dimensions in the drawings. If your future frame house is smaller than the foundation, then a small shelf will form between the outer frame wall and the foundation base, on which moisture can then accumulate and lead to rotting of the bottom trim board. This can be avoided if you carefully waterproof the shelf with bitumen mastic and install a metal ebb outside that removes moisture from the bottom trim. It may turn out that the foundation is smaller in size than in the drawing. We will not consider the case when the difference is tens of centimeters. Here it is necessary to hit those who poured the foundation on the head and change the drawings of the frame house to the actual dimensions. Most often, differences are detected within a few mm or cm. This option is considered acceptable and does not create any problems in the future. It’s just that the edge of the bottom trim board will protrude slightly above the edge of the foundation.
3) The difference between the diagonal dimensions of the house is more than 2 cm. This means that the shape of the foundation is not a rectangle. At the stage of drawing the projection of the frame house onto the foundation, it is necessary to very carefully eliminate this deviation. To do this, you will need the Pythagorean theorem (the sum of the squares of the legs is equal to the square of the hypotenuse, and simply put, all angles are checked by the rule x2+y2=z2).
Calculation example
As a rule, the size of the wall of a frame house is determined by the insulation, other materials are taken as data. Take, for example, St. Petersburg:
- Rp = wall thickness divided by the thermal conductivity of the material.
- Let's take stone mineral wool with a density of 140-175 kg/cubic. m – 0.043.
- 3.23 = wall thickness / 0.043.
- The required thickness = 3.23 * 0.043 = 0.139 m.
Mineral wool usually has a thickness of 50 mm, we round up to this figure and get an insulation thickness of 150 mm. To this figure we add the dimensions of the finishing, enclosing structures, OSB sheets and drywall.
Similarly, you can make calculations for other cities, as well as for other insulation options - penoplex, glass wool and other materials.
The cost of materials for the construction of the frame, enclosing structures, external and internal wall decoration depends on the manufacturer of building materials. In addition, when assembling a house yourself, you need to purchase tools, as well as fasteners, corners and other equipment.
But with all this, assembling a prefabricated house with your own hands is quite simple, does not require special skills and helps to significantly reduce construction cost calculations.
Stage II. Checking deviations of the upper plane of the foundation from the horizontal plane
You will need a water level or laser level. I am not considering a situation where you have a theodolite and a surveyor's diploma. This is rare in everyday life. Using a water level and a good laser level, you can check the horizontalness of the base with sufficient accuracy. The permissible difference is no more than 1 cm. Select one of the points. For a water level this can be any angle, for a laser level it can be the center of one of the sides. And in 1-meter steps, carefully compare the horizontality of the upper surface of the foundation base. Mark all points where elevation changes are found. The difference within 1 cm can be leveled by using a plane or placing wedges under the lower trim. If the difference is more than 1 cm, then it will be necessary to place a second strapping board on top of the bottom one and, using wedges, bring the strapping level into a single horizontal plane.