Do-it-yourself wooden floors in a private house on joists
One of the flooring technologies is to build wooden floors in a private house on joists.
- We prepare a high-quality base: remove part of the soil (5 - 10 cm), pour out sand and tamp it.
- We lay crushed stone of the same thickness on top and compact it again.
- We lay a vapor barrier (roofing felt, oilcloth) and begin laying the logs on the racks in approximately half-meter increments.
- We fill the space formed between the joists with a heat-insulating pad.
Wooden floors in a private home have a subfloor on which the final covering is laid. This completes the formation. Next, all that remains is to clean it and varnish it.
Wooden floor in an apartment: one of the “pie” options
It is not so easy to master all the information. Let's look at an example of installing a plank floor in an apartment. The apartment is not on the first floor, so there is no hydro or thermal insulation. The order from bottom to top is:
- Floor joists 50*70 mm on Vibrostek-M pads, secured with anchors to the slab.
- Between the joists there is soundproofing Rockwool-Acoustic-Butts.
- Vibrostek-M strips on the joists.
- A layer of non-woven material for covering greenhouses (to prevent particles from sound insulation from flying).
- Board 32 mm thick.
- After sanding, the floor is covered with hard wax in two layers.
If the apartment is on the ground floor or the room below you is unheated, the soundproofing material must be replaced with thermal insulation. If there is a possibility of moisture leakage, the ceiling is covered with waterproofing. The solution must be selected based on the situation, so there are no ready-made universal recipes. That's all. Now you know how to make a wooden floor in an apartment.
Material requirements
There are only two basic requirements for flooring materials:
Environmental friendliness. If you live in the house permanently, then you can choose respectable coating options such as parquet, tongue-and-groove boards, porcelain stoneware
If a private house is used for living only in the warm season, then you need to pay attention to how the coating tolerates changes in temperature and humidity. In this case, linoleum and tiles are optimal. Strength and Durability
If the house is designed to last for several generations, then the service life of the material is of primary importance. Replacing flooring in a spacious private home requires financial, time and labor costs.
Less significant, but also important requirements include the design and comfort of coatings.
Repair of linoleum, carpet, stone coverings
Repairing the floor in an apartment with your own hands is carried out in stages as follows:
- The most common defects in linoleum can be swelling, cracks, peeling or tears. Such problems can be easily solved like this:
- using special glue, which should be drawn into a syringe and injected under the damaged area;
- then place a weight on this part of the floor and allow time for the glue to dry completely;
- if the damage to the coating is significant, then in this case the sections are replaced with new ones.
- In order to repair defective areas of carpet flooring, you need to have spare parts:
- the damaged area is cut out and a patch is put in its place. It is attached using double-sided tape or glue;
- to prevent the edges of the patch from unraveling, they are pre-treated with latex glue;
- Before cutting and gluing the patch, it is worth considering the pattern, as well as the direction of the pile.
- In order to give an aesthetic appearance to the stone flooring, the following series of actions are carried out:
- various cracks and chips can be easily removed by grinding the stone and then polishing it;
- polishing is performed with special chemicals that are rubbed into the stone and make the coating impervious to dirt;
- Such simple manipulations will help get rid of cracks up to 5 mm deep.
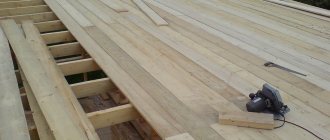
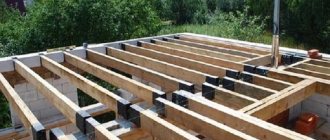
Installing joists for laying wooden floors from boards with your own hands.
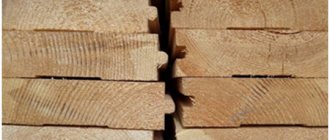
The logs should be made of durable wood, but not poplar or linden. Under the logs, either 50x50 mm timber is used. or boards 50×100 or 50×150 mm.
The lags are laid on concrete floor slabs, brick or monolithic columns (columns) according to the level. If necessary, to maintain the level, planks and bars of the required thickness are placed under them for leveling. You can use the corners for leveling, attaching them on both sides to the joists in increments of no more than 50 cm. You will get a kind of adjustable floors.
The logs are attached in different ways, using special anchors measuring 8x200 or 10x250 mm, with corners, on threaded studs and nuts (adjustable floors). In some cases, the logs are not secured at all, they are simply placed on the base.
Laying the floor boards is done across the joists, so when installing the joists on the base, they need to be laid so that when laying the floor boards, they are long enough to cover the entire width of the room.
If the length of the flooring boards is not sufficient, then they are laid in a “running start”. First long, then short, the next one from the same edge short, then long. The logs are also laid with a “running start”
If the logs rest on pillars, then they must be laid on edge. This way they will hardly sag under heavy weight. When laying wooden logs on a flat concrete base without using leveling pads, you can lay them lying down or on their edges.
Before installing logs for a wooden floor made of boards with your own hands, it is recommended to apply a layer of waterproofing to a concrete or brick base; you can use roofing felt.
The distance between the lags is 50-60 cm - this is the best option, in this case the structure will not sag. If in the future it is planned to insulate wooden floors from planks, then the logs are usually installed to match the width of the insulation, for example mineral wool.
Preparatory work
When choosing materials and methods of floor installation, you should first pay attention to the average soil moisture under the house. In some residential areas, logs are laid on the ground, with cut-off waterproofing laid under them. Such floors reliably last for several decades, but such dehydrated soils are quite rare.
Below we will consider a method of preparing the foundation, which is used almost everywhere in our area. The whole point of this method is to install a concrete screed on a waterproofing pad. In a country house, a concrete screed will serve two functions at once: to insulate the floor from moisture and to serve as a rigid foundation for a wooden floor.
When starting to lay out a concrete base for a wooden floor, you must make a small pit in the house and carefully compact its bottom. A layer of sand 20 mm thick or more must be poured into the hole. You can also add an additional layer of crushed stone under the sand, but this step is often skipped. After you have made the sand cushion, cover it with a cut-off waterproofing material, which can be used as cellophane film or roofing felt. It makes no sense to use vapor-permeable waterproofing, because its properties are not needed at this stage, and the overpayment will be significant.
How to make a floor in a private house from boards
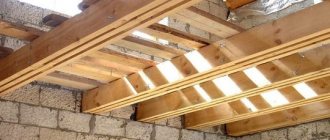
The floor is made of planks in one layer. It is the simplest flooring option. This design is suitable exclusively for summer buildings or housing in warm countries. If the building design stipulates that floor beams are mounted in the walls, then the distance from one beam to another is most often too large to immediately lay the boards.
To provide the necessary strength, you will need to lay joists. If you plan to install the floor on top of the support pillars, then the placement of the beams can immediately be made as required.
Now, logs are laid on top of the supporting beams, which are set strictly horizontally; for this, wooden spacers and wedges are used. After checking the location of all the joists with a level, they need to be attached to the beams using nails, and then the floorboard should be nailed to them.
Floor made of two layers of planks
Installing such a floor will require significantly greater costs and effort, but this is compensated by a reduction in heat loss. It is better to use coniferous wood for the construction of the subfloor. To save money, you can use a non-edged board or slab.
Most often, thermal insulation is installed in the space from the rough to the finished floor.
As thermal insulation, you can use expanded clay, a mixture of clay and sawdust, or straw. Naturally, you can also use modern materials - polystyrene foam or extruded polystyrene foam. For thermal insulation, a finished floor (tongue and groove board) is laid.
Concrete floor
The concrete floor is installed in several stages:
- First of all, marking is done. Here it is better to use a laser level. After installing it, he will mark the walls in the right places for the future floor. To mark the level in the center of the room, threads are pulled from the marks in the walls.
- Next we make gravel backfill. This is the insulation in your floor. The ground should be cleared of plants to prevent them from growing through the floor. After this, drive in the stakes so that their level does not reach the level of the future floor by 100 mm. The backfill starts from the wall opposite the door. After filling the entire area, the gravel is leveled and compacted, and the pegs are removed.
- At the next stage, sand is poured, compacted and leveled.
- Proper waterproofing plays a huge role; moisture insulation of a concrete floor is usually done with polyethylene film, the thickness of which is at least 250 microns.
- Next, we fill. First of all, you should set a level of beacons, which are used as wooden or metal slats, the distance between which is from 1 to 1.5 m. The upper edge of the slats should be in contact with the stretched threads. Then, the rope markings are removed.
- Now the space between the slats is filled with concrete, from the end of the room to the door. After this, the concrete is leveled using a rule.
After the concrete has “set,” the slats should be dismantled and the voids filled with mortar. To level the mortar in the cracks, use a “grater” under the plaster. After this, the floor is covered with plastic film for a month. It is better to periodically moisten the concrete. This will make it possible for the concrete to gain maximum strength.
How to fix the floorboard? — Sharing secrets
Lyshchitsky Valery Ivanovich head of construction and installation works
Wooden floors made of planks, despite their appearance a long time ago, have not lost their relevance today. The plank floor is environmentally friendly, has low thermal conductivity, and is suitable for painting with modern high-tech paints and varnishes.
These and many other positive characteristics determine the popularity of floorboards for flooring. Before moving on to the type of installation of boards, we will consider the types of flooring and its characteristics, taking into account different types of wood.
What will you learn about in the article?
- Pine floorboard
- Larch flooring
- How to attach floorboards to different surfaces
- Attaching floor boards to plywood
- Attaching floorboards to an old base or wooden underlayment
- Laying wooden flooring on joists
- Video about how to turn an ordinary array into something stunningly beautiful
Pine floorboard
A good quality pine board will last a very long time. The density of the dry material is 500 kg/m3. Pine is a light species, which simplifies its installation, but its performance characteristics are excellent. Another important advantage of pine boards is their low cost. The material is in great demand for low-cost construction and, if necessary, to cover large areas with boardwalk. This floor has good thermal insulation and does not require heating.
Photo 1. Pine floor board
- Pine boards contain 4% resin, which prevents rotting.
- Soft, pliable wood is easy to work with.
- Pine flooring provides good sound insulation - a quality that is relevant for apartment buildings and private buildings with several floors.
Larch flooring
Larch flooring is very practical, but this wood is more expensive than its pine counterparts. The manufacturer sorts the boards according to the quality of the raw material and its processing technology, depending on which prices on the construction market for larch can vary significantly:
- Floor boards made from larch of the “Extra”
are high-quality materials that are free from even the slightest defects. The planing is so perfect that the board looks like it is glossy. The wood texture is clearly visible on the pieces. Such coverage is expensive; - “Prima”
batches, while maintaining ideal planing, a small number of knots may be present; - boards marked “AB”
are cheaper due to the presence of a small number of light and dark knots. But if the floorboard is to be painted, this defect does not play any role, but it allows you to save on price; - the cheapest larch board is marked with the letter “C”
. Before painting, such a floor requires a small putty that will hide all the flaws of the board.
Photo 2. Larch flooring
How to attach floorboards to different surfaces
There are several methods for laying plank flooring:
- on the logs;
- on top of old floors without dismantling them;
- on a false base made of moisture-resistant plywood;
- on a concrete screed;
- on board flooring made of low-grade lumber.
Attaching floor boards to plywood
The false base can be plywood with a thickness of at least 18 mm with water-repellent properties. If standard sheets measuring 250x120 cm are used, they are cut into modular elements, the assembly of which is quick and easy. Installation of flooring from boards is carried out using screws and self-tapping screws.
Photo 4. Installation of floorboards
The design of the self-tapping screw is such that at the end it has a sharp drilling spike, which enters the wood, maintaining the integrity of the board, preventing it from cracking. High-quality fasteners are treated with special wax, which ensures good sliding of the metal in the wooden base. Screws made of high-strength alloy allow for hidden installation of boards. Fasteners are inserted from the side and obliquely, so that their heads are completely invisible on the finished coating. Such fixation methods are considered to be as strong as possible and extend the life of the wood material.
Photo 5. Screws for fastening
For pine floors, it is recommended to use Eurotec Paneltwistec SK 4x70
or
4x80
mm or
Rusconnect 4x70
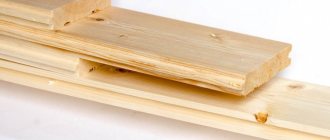
. In places where electrical communications pass, bitumen mastic should be applied locally. The floor boards are equipped with tongues (tongue/groove system), which ensure a perfect fit and tight fit of the pieces to each other. To ensure that the next panel fits well into place, the fasteners of the previous one are recessed 2 mm deep.
Attaching floorboards to an old base or wooden underlayment
By analogy with installation on an old floor, boards are fastened using wooden flooring made from low-grade lumber. Therefore, these two technologies will be described in one section. If the base is strong enough, it is not dismantled, but boards are laid on top. Old boards and new untreated ones are pre-grinded using an eccentric machine with a 40-60 grit wheel. A foamed polyethylene backing is laid on top, which provides waterproofing and protects the finished floor from fungus and mold.
Photo 6. Antiseptic lag
To even out unevenness and differences, plywood is placed on top (you can do without it). The board is attached to the plywood using glue or self-tapping screws, as described above. But even if glue is used, self-tapping screws are still screwed in at wide intervals.
Laying wooden flooring on joists
Laying on logs is practiced where the height of the ceilings allows this to be done without compromising the space of the premises. For this method, the thickness of the board must be at least 3 cm. For the first floor, it is necessary to waterproof the base. The role of waterproofing material will be performed by roofing felt, which is mounted with an overlap.
Next, the logs themselves are installed; for this purpose, timber 5-7 cm thick is used. The distance between the logs should not exceed 60-70 cm, otherwise the soft board may not withstand the load. Laying soundproofing material will eliminate the drum effect. Expanded clay or mineral wool are ideal for this purpose. The boards begin to be laid from the wall - towards it with the groove, tenon forward. Self-tapping screws are screwed into the first board from above; subsequently, the caps will be covered with a plinth. The screws are screwed into the tenon at an angle; they should be slightly recessed. The joining of short panels should only occur at the joists.
Photo 7. Wooden flooring mounted on joists
Don't be alarmed if the floor board (especially a six-meter pine board) is a little screwed. When laying, the board is pressed and tightened with self-tapping screws.
Video about how to turn an ordinary array into something stunningly beautiful
offers you to purchase high-quality wooden floors, as well as. Our professional teams will perform the work efficiently. Call! Contact us.
See how we can
April 25, 2019521
Parquet oak boards for floors in your home
Today we decided to address the issue of choosing floor coverings
in your house, city apartment, namely oak parquet boards.
This is a widely used material, as it combines high performance in terms of service life, technical characteristics and, of course, with the natural nobility of wood, its texture, pattern, and tones. Parquet oak boards for floors in your home
April 25, 2019
521
06 December 20181976
Beautifully chamfered floor board in a sauna complex
We present for your viewing another one of our wonderful objects, this is SNT “Santoria”. The customer asked for help with laying floorboards made of pine, grade AB
in the relaxation room in the bathhouse, since the walls and ceiling of the room were covered with pine clapboard, for complete harmony, only the floors were missing.
Beautifully chamfered floor board in a bathhouse complex
December 06, 2018
1976
06 December 2018847
Pine floor board varnished from the Italian company Renner
The customer contacted us with a request to install floors
on two floors of the cottage.
Let’s say right away that there was no talk of expensive materials, the budget is such that you won’t be spoiled too much. Yes, this is for the better, since the use of inexpensive building materials allows many who want to do repair work without depleting the family budget. Pine floor board coated with varnish from the Italian company Renner
December 06, 2018
847
View other works
Pouring the floor in a private house instructions
To pour a concrete floor yourself, you do not need any special construction skills. The main thing here is to prepare the necessary consumables and calculate their quantities. If this is done, then filling the floor in a private house will be effective and simple.
Don’t forget, installing a durable and level concrete floor is the key to quality installation of any floor covering. To carry out quality work you must use:
- vibrating rammer;
- roofing felt;
- plastic film;
- expanded clay;
- foam boards;
- reinforced mesh;
- restrictive slats;
- building levels.
Work procedure or instructions for pouring a floor in a private house
1. First of all, you need to prepare the base surface for the future concrete floor. To do this, the top layer of soil must be removed to the required depth. Make an effort to ensure that the plane is as even as possible. Now, it must be compacted using broken bricks or crushed stone. A vibrating rammer will help you with this. If you do not have the opportunity to use such a tool, and you need to arrange the floor in a small area, then compaction can be done manually.
- 2. At the next stage of work, waterproofing and thermal insulation should be installed. It is most rational to use roofing felt for these purposes. If you want to save a little money on installing insulation, and you are sure that the groundwater level will never reach the floor in your house, then floor insulation can be done by laying several layers of a material such as ordinary plastic film. Here your personal preferences and financial capabilities play the main role.
- 3. When the waterproofing is completely installed, you should begin laying the heat-insulating material. For these purposes, you can use expanded clay or foam boards. Although this material is being used less and less, glass wool can also be used to create a heat-insulating layer. When insulating a concrete floor, take a responsible approach to the process of calculating the amount of consumables, otherwise, performing such repairs can cost you dearly.
4. Now, you can begin the process of filling the floor with mortar. Concrete is laid on top of the prepared surface from the end of the room opposite the door, while gradually moving towards the beginning of the room. The use of limit rails, which are set in accordance with the floor level, will help you in this process. It is very important here to strengthen the final layer with a metal frame. To carry out reinforcement, a regular chain-link mesh can be used. Using these actions, you can increase the impact resistance of the top layer.
5. Well, now we can proceed to the final stage. Here you will need to carefully make a screed using a leveling layer of cement, which has been diluted with water, until it turns into a liquid slurry. For these purposes, you can use a special leveling mixture, which is freely sold in specialized stores.
Preparing the subfloor
Considering your financial capabilities, you can choose several bases for your wood flooring:
- plywood;
- concrete;
- lags.
Let's look at each of them in more detail.
Concrete base
Self-leveling floor mixtures
If your rooms have low ceilings, then you can forget about joists, since the height of your room will decrease by 10-15 cm. Self-leveling concrete screed is just what you need. To do this, you just need to purchase self-leveling material and follow these steps:
- clean the floors of the room from the previous coating;
- remove all construction debris from the cement screed (if it is an apartment or a cement floor in a house);
- mix a self-leveling concrete screed in a metal or plastic container in the ratio indicated on the packaging;
Self-leveling mixtures. Instructions for mixing and pouring - mark the room and fill the floor with screed;
- wait until the composition hardens.
Pouring a self-leveling floor
Laying wooden boards on joists
Laying wooden boards on joists
This option is ideal for those who have a significant height in their rooms. Moreover, it is very easy to install communications under the logs. Before using logs as a base for a wooden floor, they must be left for several days in the room where they will be installed. The logs can be attached both to the walls of the log house themselves and to the main foundation of the house.
Hidden communications can be secured under the logs
You need to place the logs along the walls opposite each other and pull the ropes every 150 cm. They will become a guide for you, with the help of which laying the joists will be easier and faster. Insulation is placed between the joists. The logs are laid on the floor, at a distance of 80 cm from each other. It will be possible to mount a wooden board 4-5 cm thick on them.
Example of laying lags
The principle of laying lags
Pieces of plywood or wooden pegs are often used to adjust the height. They can be secured to the joists using self-tapping screws. If you decide to lay the logs on a concrete screed, then you will need dowels and anchors as fasteners. Don’t forget that the caps of these fasteners should be recessed into the wooden base by 2-3 mm! After this, you can safely attach the wooden boards. The first row of boards should not be laid close to the wall, but after retreating 1-1.5 cm. This distance will subsequently be covered with a plinth. We attach each board to the joist.
Laying floorboards
The first method of fastening boards with self-tapping screws
The second method of attaching boards to joists
Base for wooden plywood floor
Plywood base
The plywood base is suitable for those rooms and spaces that will not subsequently be exposed to moisture. If you have this option, then plywood is an excellent solution. This material is not subject to severe deformation, as it is quite durable. It is also easy to dismantle if the need arises to replace the floor covering.
| Type of plywood | Description |
| Plywood FC | moisture-resistant appearance; urea resin is used for gluing veneer sheets. This plywood is intended for indoor use. |
| FKM plywood | has increased water resistance and is made on the basis of melamine resins. This type of plywood is unique, since environmentally friendly melamine resins are used for its production. Due to its environmental characteristics, plywood is used in furniture production and for interior finishing work. |
| Plywood FSF | Veneer sheets are glued together using phenolic resin. This type of plywood also has increased water resistance. It is not recommended for interior decoration, as phenolic resins are harmful to health. Typically used for exterior finishing work |
| Laminated plywood | It is based on FSF plywood, which is covered on both sides with a special film. Laminated plywood is used for the manufacture of formwork. This type can be used repeatedly |
| Bakelized plywood | Bakelite resin is used to glue veneer sheets together. This type of plywood is used in aggressive climates, sea water, aggressive environments, and sometimes for monolithic work. |
| Marine plywood | similar to bakelized, but less durable. Made from foreign wood species |
| Plywood Flexible | foreign version. A distinctive feature is the ability to bend well in the transverse and longitudinal directions |
Before laying the flooring, use a level to check the entire floor surface. You can use special beacons. After this, we lay the logs (described above) and attach plywood sheets to them. It is worth noting that in the case of installing plywood sheets, the distance between the joists should not be more than 40 cm. To prevent condensation from forming in your wooden floor, glassine is placed between the joists and the plywood.
Plywood over joists. Arrangement example
To eliminate the creaking of the logs, these wooden beams are impregnated with glue. Only after the glue has completely dried are sheets of plywood attached to the joists. Be careful! The edges of the plywood sheets should be attached directly to the joists. It's easier to do this with self-tapping screws. Between the sheets you need to leave gaps of 2 mm. Don't forget to sand the joints of the sheets as well. This can be done with sandpaper.
The joints of the sheets are located strictly on the joists. In the case in the photo, the logs are covered with felt
Laying a wooden floor on a concrete screed
After pouring the floor with self-leveling concrete, the floorboards themselves are laid directly on it.
Regardless of what base you will lay your wooden floor on, you should adhere to the following universal rules:
- do not forget to number the boards during preliminary measurements, this will later help you when adjusting the floor;
- do not forget to retreat 1-1.5 cm from the edge of the wall for ventilation;
Layout of floor boards - if you chose nails as fasteners, then they should be driven deep and at an angle;
- After completing the process of laying the first board, it is worth driving the bracket into its edge and leaving a gap. A rail is inserted into this gap;
- after laying the next board, the batten can be removed and the second board can be nailed to the joist;
- all staples are removed after the boards are already nailed; Use a mallet to compact it.
Many people have a lot of problems with laying the last remaining board. You can remove all irregularities with a plane. After this, all that remains is to glue this floorboard and drive screws or nails into it.
After laying the floor boards it is necessary to varnish
You should start sanding the joints only when you have already laid all the wooden boards and installed the baseboards. They should completely cover all the gaps that you left for floor ventilation. After sanding, the floor can be varnished or painted. Do not forget that the movements of the brush must be carried out parallel to the grain of the wood.
Although the process of laying a wooden floor yourself is quite labor-intensive, it is worth it. In addition to the environmental friendliness and naturalness of the floor, an incredible atmosphere of coziness and comfort will envelop your home for many years. What is this unique smell of wood worth? Don’t forget that such a floor will become a natural air purifier in your home. With wooden floors you will not freeze in winter and will feel the coolness of the forest in the summer heat.
All the benefits of wood flooring do not depend much on the type of wood. Owners of beech floors and oak flooring will benefit from the above opportunities. The only question is durability. Therefore, if your budget only allows you to have a wooden floor made from inexpensive pine, be sure to take advantage of this option. You will never regret it.
We hope that our tips will help you install a wooden floor yourself and enjoy all its benefits.
Video - Installation of floorboards
How to lay an array with your own hands
The solid board is laid on plywood sheets. The base can be either a concrete floor or a wooden floor on joists.
- It is necessary to measure 15 mm from the walls to create a ventilation gap and in case of seasonal deformations.
- The finished floor boards must be laid so that they are located across the subfloor boards. The first row is placed with a tenon to the wall and screwed with self-tapping screws. It is necessary to tighten the screws so that they are covered by the baseboard near the wall. On the second side, the screws are screwed into the groove at an angle of 45°.
- A wooden spacer is placed in the gap between the board and the wall. If the size of the room is greater than the length of the floorboards, then the boards are laid “staggered”. This will make the floor more durable.
- The second and subsequent rows of boards are laid with a tenon in the groove of the previous row, compacted with a mallet and fastened with self-tapping screws on the other side into the groove. If you want your wooden floor to last as long as possible, you need to lay the boards in such a way that the growth rings are located opposite each other.
The parquet board is laid "staggered". Solid parquet boards can also be used as a finished floor. In essence, this is the same tongue-and-groove solid board, only shorter. Its installation is slightly different:
- Can be fixed with self-tapping screws only from the tenon side.
- Installation is carried out only “staggered”.
- If the base is made of plywood, then it is better to glue the parquet board first and then additionally secure it with self-tapping screws.
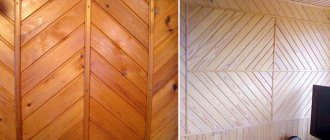
- If you lay the board diagonally, the room will visually look larger.
Technology for laying tongue-and-groove floor boards - step-by-step diagram
Step 1: Calculations and cutting of blanks
The first step is to measure the required length of the board. The length should be equal to the width of the wall from which installation begins. You can cut it using a hacksaw.
Step 2: Lay the first row
The first board is tongue-and-groove mounted to the wall. In order for the tree to expand freely in the future, you need to leave a gap of about 1 cm between the wall and the board.
Step 3: Secure the first board
The starting board is secured with self-tapping screws or screw nails through the entire thickness to the joists or subfloor.
Step 4: Lay the second row
The second row already fits into the groove of the first board with a tongue and groove and is secured with screws/nails into the lower part of the groove. Subsequent rows are installed in the same way.
Parquet for renovation
Parquet as a floor covering has been known since the 17th century, when it was first used in the palaces of the kings of France. The main advantage of parquet flooring is its environmental friendliness. Modern manufacturers offer a wide selection of colors, sizes and methods of laying parquet and parquet boards, which allows you to renovate the floors in a room in a style unique to each room.
Before laying such a covering, the floors are leveled with a special screed so that the differences in the heights of uneven surfaces do not exceed half a centimeter. Next, the humidity of the room is determined, for which a small piece of plastic film is laid on the floor for a day, the edges of which are secured with tape. If there is high humidity in the room, the film will become covered with perspiration from the inside. In this case, it is not recommended to lay parquet.
The disadvantages of this coating are the high price and instability to moisture. Also, this material cannot be used when installing “warm floors”.
Methods for laying wooden floors
The installation of a wooden floor can only begin after the frame structure of posts and beams is finally ready. A layer of roofing material is laid on the posts, which serves as good waterproofing. Beams are installed on the waterproofing layer, and for additional strength, logs are fixed to the beams. It’s good when the width of the room corresponds to the length of the logs, but if you have to connect the logs, then it is better that the joints are directly on the supporting pillars, and they are fastened with self-tapping screws.
The structure of the wooden floor itself can be either single or double. Single floors are not very durable and are usually installed in summer cottages. This type of floor does not withstand weather fluctuations well and is not intended for year-round use. To make you feel comfortable in winter, it is recommended to build double insulated floors. It will require a lot of time and the necessary material. But the extra effort is worth it because it increases durability and reliability. To do this, a list of works is performed in a certain sequence:
- Install logs;
- Lay moisture-resistant plywood between them, and lay insulation on top;
- Lay the rough subfloor on the joists.
Double plank floor pie
To create a subfloor, low grade boards with a thickness of 15-50 mm are suitable. Such boards, carefully processed, are adjusted to each other. Then the finished boards are attached to the joists using self-tapping screws.
The boards are laid 15-20 mm from the wall. This promotes ventilation and prevents the floor from swelling during seasonal wood deformation. Waterproofing is carried out using a polyethylene film with a thickness of 200 microns, and additional thermal insulation is made of polyethylene foam. The film is laid overlapping, the edges are glued together with tape. You need to make an overlap of 20 cm on the walls and glue it with tape. After this, the finishing floor and finishing coating are laid.
Sheets of plywood or solid wood are used for laying the finished floor. The plywood is placed on top of the thermal insulation layer and secured with self-tapping screws.
The solid board has an attractive appearance, is convenient to lay, and is also easy to use. The advantage of solid wood flooring is that you can apply varnish or paint to the floor and thereby avoid additional costs for finishing materials. Solid boards are produced in two versions: regular and tongue-and-groove. The difference between them is in the installation method. A tongue and groove board is much easier to install. However, before installation, it must lie indoors for three days.
Laying floors
First, let's mark the level at which the floor will be located. To do this, we will place beacons along the perimeter of the walls in the corners and in the center of each wall. It is best to draw a straight line between them so that right angles are formed at the corners. If we are replacing the floor in one room, then the top edge of the new floor should be flush with the top edge of the old floor in the adjacent room or corridor.
Next, check the level of the floor slab. If there is a slope, you can straighten it using waterproofing or special pads that are placed under the logs. Next, install waterproofing. We install logs on it. The distance between the two extreme ones should be 30 cm and no more. Between subsequent lags - 50 or 60 centimeters. We check the level. If there is a slope, we correct it with pads or insulation. After correction, you can lay the floor. But first, from the side edges, especially the board, you need to remove all burrs and other irregularities.
Floor installation in a wooden house
We begin to lay the board. We lay the board tightly so that the gap between the boards is minimal. If we use a floor lath, then the first lath is placed with a tongue and groove against the wall, the next one is connected to it using a tongue and groove, which is inserted into the groove of the first one, the subsequent ones are mounted in the same way. The slats are flattened using a mallet. Simply put, they pack together as tightly as possible. Ideally, there should be no gap between them.
The floor is usually laid along a blank wall, from the entrance to the window. A small gap is left between the wall and the floor. Its size is no more than 3 cm. This gap is needed so that the board or batten can freely expand as the temperature rises.
Video - Laying floorboards with your own hands
Video - Wooden floor. Advantages and installation
Video - Flooring
Once the floor is laid, it can be secured. But screws or nails must be placed in such a way that when sanding the floor they do not damage the sanding machine. That is, they will have to be buried into the floor to a depth of several millimeters. There is no need to scrape a planed board, but it is worth sanding. Before sanding, you need to repair cracks, gaps, scratches, and chips. To do this, we need wood putty, pre-selected according to the color and texture of the wood. All damage must be cleaned of dust and dirt. The putty is applied with a spatula. It is carefully leveled, the remains must be removed from the floor surface. The putty takes a day to dry.
wood putty
After it sets, we sand the floor. You need to do this operation twice. The first time - with a large skin, the second - with a fine one. After each operation, be sure to clean the floor with a damp cloth.
Sandpaper for sanding floors
If you plan to use a wooden baseboard, then you need to install it after sanding, since it will be painted or varnished at the same time as the floor. The wooden plinth is attached to the floor with screws or nails. It is leveled using a level. It is better to choose a plastic skirting board to match the color of the already finished, painted or varnished floor. This plinth is attached to the wall using a hammer drill and self-tapping screws. The plastic plinth is installed after painting.
Installation of plastic plinth
Pouring a concrete floor
The installation of a concrete floor in a private house begins with preparatory work. First, markings and gravel filling are made on the site of the future floor. The soil is first cleared of plants and the top layer, and then compacted. Next, a layer of gravel is poured, which also needs to be compacted well. In the construction of a concrete floor in a private house, gravel will act as thermal insulation. Sand is poured on top of the gravel. After compacting it, a thick polyethylene film is spread on the surface, acting as a waterproofing material.
How to make a concrete floor in a private house? After installing the waterproofing layer, you can begin pouring the screed. A cement screed in a country house is poured in the same way as a screed in an apartment: levels are set and the mortar is poured, which is leveled from wall to door according to the rule.
When pouring a concrete screed, several features should be taken into account. The solution for pouring must be fresh; for its preparation it is recommended to use cement of a grade not lower than M-300, screening out sand and water. To increase the strength of the concrete layer, you can add special compounds to the solution - plasticizers, which will give the future coating additional strength.
When pouring a screed with a height of 5 cm or more, you can use reinforcing elements or a reinforcing mesh, which is laid on the waterproofing layer before pouring. In the case of installing warm water floors in a private house, the use of reinforcing mesh and the addition of plasticizers to the cement mortar are mandatory procedures.
When the concrete hardens a little after pouring, you can remove the beacons. The voids left after their removal are filled with the same solution. After filling and leveling all the cracks, the floor is covered with polyethylene and left to dry. Drying a concrete floor is a long and responsible undertaking. The concrete must dry on its own within a month; if you have a heated floor system, heating should not be turned on until the screed is completely dry. By turning on the heating elements, you will help the concrete crack before the room is used. When drying, it is recommended to periodically moisten the concrete screed with water and cover it again with polyethylene: if this requirement is met, the coating will gain maximum strength and will not crack.
In order to correctly fill the cement, remove the beacons and dry the concrete, it is recommended to look at photos of the work of builders who specialize in arranging floors in private homes.
Floor repair sequence of actions
You can make a floor from scratch in a private house with your own hands. First you need to remove the old structure, which usually in an old private house is made in the form of a system of logs and wooden covering. If you plan to create a floor covering made of ceramic tiles, you need to make a screed. Tiles cannot be laid on a wooden base. For other types of flooring, for example, linoleum or laminate, you can restore the joist system and insulate the structure.
The process of repairing floors in a private house.
A new floor in a private house with a screed is created in the following sequence:
- The old structure is dismantled and the base surface is leveled.
- A cushion is constructed from gravel or brick chips and sand.
- A layer of film or roofing felt is laid to prevent moisture from penetrating from the soil.
- The level of the future screed is determined and marks are placed on the walls.
- Insulation is laid (expanded clay, polystyrene foam, mineral wool).
- Reinforcing mesh is laid.
- The base is divided into sections of 2 m using slats. The height of the slats must correspond to the height of the future screed (at least 7 cm).
- Cement mortar is mixed and poured into each section.
- The solution is leveled using the rule.
- The finished subfloor is covered with film and left to dry for 2 weeks. Concrete should be moistened periodically.
- After the concrete has dried, a leveling screed is made.
- The flooring is being laid.
Concrete base can be used for any type of flooring.
A multi-layer cushion of crushed stone and sand serves as a shock absorber in case of subsidence and heaving of the soil.
Scheme of pouring a heated floor with concrete.
In addition, it is a container for all communications that exist in a private home. Pipes and wires are insulated in special boxes and hidden under a layer of sand and crushed stone. The bulk pillow is created as follows:
- A layer of gravel (5 cm) is poured, then it is leveled, moistened and compacted.
- A layer of sand (10 cm) is poured, moistened and compacted.
- A layer of gravel (10 cm) is poured and compacted again.
Concrete flooring is more reliable and durable than wooden flooring on joists. It can serve for decades, maintaining its qualities. Concrete does not contain harmful components, retains its strength, remains dry, and does not deform due to temperature fluctuations.
Wooden structures are susceptible to external factors. Logs can be destroyed by pests. When temperature fluctuations occur, the boards become deformed, cracks appear in the floor covering, and the boards begin to creak. Mold can form on wood if there is high humidity. But creating a wooden structure is a more economical way to make a floor in a private home.
Floor installation
There are two methods for laying floors in your home. One of them involves laying boards directly on the base, the second involves laying a wooden floor using logs.
Necessary tools and materials for laying a wooden floor
The following tools are used to lay boards:
- Self-tapping screws;
- Dowels;
- Saw;
- Screwdriver/screwdriver;
- Hammer;
- Nails;
- Stapler;
- Pruning saw;
- Construction level;
- Grinding machine;
- Mount.
Variations are possible.
How to lay plank floors on joists and a finished base
Wood processing
Before installing logs and laying the floor, it is necessary to completely treat the wooden material: with bio-impregnation - to protect against rot and fungi; fire retardant - to increase fire resistance.
You can learn how to properly process boards from the following video:
Waterproofing
It is imperative to lay waterproofing under the future floor. Penofol or polyethylene are perfect for this. It’s better, of course, to put penofol. It will protect from moisture and noise, and will become an obstacle to electromagnetic radiation.
Installation of the base on the joists
Floors on joists allow you to hide all communications.
In private houses, it is customary to lay floors on joists. Correct installation of such a structure will hide differences in the level of the wooden flooring. By the way, various pipes and other communications can be placed under it. The lag is usually a wooden beam 5x10 cm.
Important! Laying a floor on joists with your own hands is only possible in a house with high ceilings, since when laying such a base, 7-15 centimeters of height are hidden.
The logs are brought into the room several days before the start of work. The beams should be placed at a short distance from each other to eliminate the possibility of the boards sagging.
Laying lags
Table of the distance between the logs depending on the thickness of the board.
First, two logs are laid at the same level near opposite walls. Threads are pulled between them every 1.5 meters. The remaining lags are set based on the threads. Between the beams you need to lay insulation or several layers of fiberboard.
Important! For laying boards up to 30 cm thick, the logs are laid at a distance of up to 60 cm. To lay material 30-40 cm thick, you need to place the beams within 80 cm of each other. For wood thicker than 40 cm, it is allowed to install logs at a distance of 1 m.
The height of the logs is adjusted using plywood wedges. They, together with the beams, are attached to a wooden base with nails or self-tapping screws. They are fixed to concrete with dowels or anchors. Plywood should be laid on top of the fixed joists.
Clean coating from an environmental point of view
Wood floors come in different types.
When choosing, both price and prestige play a decisive role:
- Solid board is an expensive classic material that is often used for flooring. Perfect for a log house. Solid layers are always quite good.
- Parquet boards are made of wood and are equipped with grooves that make joining easier. The thickness of the standard material reaches 0.25 cm, and the length up to 200 cm.
- Parquet glue board is not much different from the previous version and is not inferior in quality. Has a long service life. Its top layer is usually made of valuable wood, its thickness can be up to 5 mm. Other layers are not so large.
- Regular parquet is a set of planks that have grooves. This material is ideally suited and is often used for creating exquisite floors.
Choosing wood for wood floors
Wooden board for laying floors
The first step in laying wood flooring is choosing the wood. In this case, it is necessary to take into account the financial capabilities of the family, climatic conditions of residence, the degree of load expected on the floor, and the type of room where the floors will be laid.
For small residential buildings, it is recommended to choose softwood: spruce, larch, pine, fir or cedar. Boards made from these types of wood are characterized by their low cost, special strength and wear resistance. Of the wood in the mid-price segment, oak is universal. Aspen and alder are also widely used in flooring; they are especially suitable for bedrooms and children's rooms.
What should you keep in mind when choosing wood?
- The wood must be dry. A damp board will subsequently lose its shape. Overdried wood can also become deformed.
- Carefully inspect the boards for visible defects: cracks, resin stains, splits. You should not buy wood with such defects, even if you are offered a discount on it.
- Buy a board with a reserve: it is better to take 15% more.
- Choose a board at least 2 m long.
- Make sure all the boards are from the same batch. Then you will be sure that the material was processed under the same conditions. This means that both the pattern and the color scheme of the boards will approximately match.
- To make wooden flooring, it is better to use tongue and groove wood, which does not require additional sanding.
Types of wooden floors
For laying wooden floors use:
- solid wood board;
- a parquet board made of solid wood, which has grooves on all sides (and not on two, like a standard board). The length of such a product is 0.5 - 2 m, the recommended thickness is 18 - 25 mm;
Solid wood parquet board
- glued parquet board, which does not differ in size and appearance from a solid parquet board made of solid wood. At the same time, it maintains the same performance qualities. It consists of at least three layers glued together under great pressure. Valuable wood species are used to make the top layer. Its thickness is 4-5 mm. The other two layers are made from less expensive species. Therefore, the cost of glued boards is relatively low;
Glued parquet board
- parquet (small planks with tongues and grooves on all sides).
Parquet is an environmentally friendly material
If you have a cold floor in your apartment, then the usual wooden covering is often not enough to ensure comfort and there is a need for additional insulation. You will learn about how best to insulate the floors in an apartment and choose the material for this from the article:.
Wood floor repair
Repairing old wood floors begins with identifying creaking floorboards and joists, as well as those parts of the structure that are covered in mold. Defective parts found are replaced with new elements. The entire floor area is treated with an antifungal agent. If certain areas of the floor in the room are more often exposed to moisture than others, then they should be covered with waterproofing materials, since antifungal impregnation alone will not be enough.
Often, cracks form in wooden flooring due to drying out of the wood. You can eliminate them as follows:
- The floor is treated with a sanding machine.
- The cracks are sealed with a primer and another layer is removed with a sanding machine.
- The boards are primed with nitro varnish.
- After the nitro varnish dries, it is primed with a finishing coat (matte or glossy).
Installation of wooden flooring from boards along joists with your own hands.
When laying a wooden floor along joists with your own hands, place the first board with a groove against the wall, from which you need to retreat 10-15 mm. At the same time, it should be aligned as accurately as possible using a tape measure, because the entire row will go from it. And if the first board goes crooked, then the entire row will be like this, respectively, at the opposite wall you will get a wedge (triangle).
Floor boards are laid from one edge, gradually moving towards the other wall. Each board is laid in this way, after securing the first one.
But first you just need to lay them out on logs to see what happens in the end, like with laying floor tiles. Tighten them with temporary wedges, hammering them against the walls and leave them like that for two or three days for acclimatization.
The material should be adjusted carefully, without leaving gaps.
To avoid gaps between the boards, they should be pressed together with a hammer.
However, only tongue and groove boards can be pressed tightly against each other. If you tightly tighten the floorboards from a simple edged board, then at best your wooden floor will creak and no additional tightening will get rid of the creaking, and at worst, the floorboards will begin to warp. Since wood absorbs moisture well, increasing the size of the floorboards cannot be avoided.
When laying wooden floors with your own hands, the annual layers should be directed in opposite directions, as in the picture. This method provides a more even flooring, while the floors will practically not warp.
Wedges are driven between the last floor board and the wall to press the floor boards tightly together for driving nails.
If it is not possible to pull together all the boards without gaps in this way, you will have to pull them together one at a time. To do this, you can use a special tool that you probably have, an ax or a mounting tool.
The ax is slightly driven into the joist at an angle of 45 degrees and pulled towards the adjacent board.
To tighten the installation, you need to remove one or two floorboards from the previously laid out floor and placing the installation in this gap, resting it on the flooring, pull together the floor boards one by one, but placing the cuttings of the boards on both sides of the installation, so as not to spoil the flooring.
At each intersection of the joist with the floorboard, nails are nailed, two at each intersection with the joist, the heads of which must be completely buried in the wood.
They need to be driven in at an angle so that they press each board against the previous one.
When nailing wood flooring, nails are used that are 3 times the thickness of the board. Using a hammer, it is recommended to recess the caps a couple of millimeters. This way it will not interfere with planing.
Instead of nails, it is more effective to use self-tapping screws; they hold the boards better, preventing them from tearing away from the beams. Pre-drill holes, but not in the joists. This way the flooring will be pressed tighter.
Do not use black self-tapping screws; they are overheated and may burst under load or may tear off the cap when tightened.
Important! In order to bring a wooden floor as close as possible to the parquet look, you need to purchase a special material - boards made using the glued method.
Do not forget to leave gaps between the walls and floorboards, which will be covered with baseboards.
Installing a concrete floor
To properly install a concrete floor with your own hands, first make markings and fill the soil with gravel for thermal insulation. A layer of sand is poured on top of the gravel, each layer is carefully compacted. Then the sand is covered with waterproofing material in the form of polyethylene film or sheets of roofing material.
Insulation in the form of crushed stone or another layer of gravel is laid on top of the waterproofing, then the waterproofing is laid again and only then a concrete screed is made. The solution is used only of fresh grade not lower than M-300. To increase the strength of concrete, special plasticizer compounds are added to the mixture.
It is important to dry the concrete properly. Typically this takes three to four weeks.
During drying, the surface should be covered with film and the screed should be periodically moistened with water. Do not use heating elements or turn on the heating in the house before the concrete has dried! Otherwise the surface will crack.
To enhance the thermal insulation of a concrete floor, you can use additional insulation. The concrete is covered with wooden materials on top or a “warm floor” system is laid.
Installation of wooden floors
When building a private house, many people prefer to make the floor out of wood. This desire to have high-quality wooden flooring under your feet is explained by the desire to use environmentally friendly materials, which include wood. In addition to being highly environmentally friendly, such a floor has a number of other advantages.
Wooden floors are easy to install and easy to repair during use. Due to the low thermal conductivity of the material, such a floor will retain heat inside the house without letting it out. Plank flooring made from high-quality wood has a long service life and an attractive “natural” appearance.
To make a floor in a private house, you need to choose the right wood. The choice of source materials should be based on the design features of the structure itself. The installation of a floor in a country house must necessarily include the presence of a subfloor that acts as an air gap. If such a layer is missing, the wooden floor will quickly become unusable due to exposure to moisture.
In addition, for a good floor it is important to have all the layers of the structure, including joists, rough flooring, hydro- and thermal insulation, finishing coating
The floor in a private house is subject to significant mechanical loads, so for its construction it is necessary to choose wood with good technological characteristics. The boards must be well dried, the recommended moisture content is no more than 12%. Any chips or cracks on the surface of the material are not acceptable. Experts recommend giving preference to coniferous wood; pine, larch, fir, and cedar are suitable. To increase the service life of the future floor, all boards must be treated with an antiseptic and fire retardant.
Installation of a wooden floor begins with determining the locations for the support posts and their installation. The fertile layer of soil around the entire perimeter of the house is removed and removed, gravel is poured in its place, and sand is poured on top of it. Layers of gravel and sand must be compacted well. Waterproofing material is laid on the ends of the support pillars; most often, ordinary roofing felt is used for these purposes.
Next, we make beams that need to be secured to the posts with metal corners. It is better to make floors in a private house with double insulation. Experts suggest first laying plywood sheets on the sides of the beams, and then placing mineral wool or other insulating material on them.
When the insulation layer is ready, you can begin laying the rough covering. The boards of this layer should fit well to each other; ordinary screws can be used to attach them to the beams. It is better to leave some distance between the flooring and the walls of the house: a gap of 1.5 cm can be considered the norm for this part of the floor. These gaps provide ventilation to the entire floor structure and protect the walls from expansion of the floor boards as they subsequently dry out.
A layer of vapor barrier made of polyethylene film with a thickness of 200 microns is laid on top of the subfloor. The joints of individual pieces of film must be taped, and the edges must be folded onto the walls to a height of about 20 cm - the height of the final coating. When the film is laid and secured, you can proceed to assembling the finished floor.
The finished floor is assembled from solid wood boards or plywood sheets. Plywood sheets are easier to attach, but in the end they don’t look very attractive. Therefore, if you want to leave wooden floors in your house, then it is best to immediately assemble the final covering from a tongue-and-groove board, and if you plan to cover it with decorative material, just secure plywood sheets. After assembling the finished floor, plank floors must be coated with varnish, which will not only protect the material from external influences of a mechanical and chemical nature, but will also emphasize the decorative qualities of natural wood.
Floor installation
Floor beam system
The logs serve as the basis for the floor itself; they can be fixed to floor beams, which are laid on a strip or columnar foundation. All this is permissible only if your room has a width of no more than two and a half by three meters.- In order to create the well-known air gap, floor beams are often raised with soil to a certain height, while laying them on the upper waterproofed surface of the foundation itself. They can also be very tightly secured, or simply laid very firmly on top. In this case, there is a second option, which should be chosen when the foundation simply has not yet had time to shrink, and at the moment when it occurs, all this simply will not pull along the entire system of your floor, which will begin to deform from such influences.
- If the width of the room is very large (more than three meters), it is reasonable to install additional columns between the walls, which can create some rigidity for the floor system. We recommend laying waterproofing on all supporting structures under the floor beams so that all your wooden parts serve you for as long as possible.
The thickness of the beams and floor joists generally depends on the width of the free span, that is, the gap between the support points that are located nearby.
The standard is based on the following indicators:
- After the installation of the floor beams has already been carried out, it is necessary to secure the logs to them. The gap between them should be calculated based on the thickness of the flooring boards you choose.
- When laying logs that consist of two separate areas, their special overlap of four hundred or five hundred millimeters must be on the support pillars or on the beam. The logs must be leveled to a simple building level; if necessary, to achieve truly excellent horizontality, small pieces of wood are placed under the logs;
- The subfloor boards cannot always be secured to the cranial blocks; generally, they are simply placed very tightly together. A vapor barrier film should be laid on top of the subfloor, and it should be secured with staples to the boards and joists.
- After all the joists have been fixed and aligned, we advise you to arrange a subfloor; even low-quality boards may be suitable for it. To install them, cranial bars with dimensions of thirty by fifty millimeters are screwed to almost the entire length of the log in the bottom position;
When arranging this floating floor structure, the logs, and then the boards, must be located at a distance of at least twelve by fifteen millimeters from the walls, that is, they must be simply independent. An insulating component should be laid into the opening between the floor system and the walls, which will allow your wood to breathe and, with sudden changes in temperature and humidity, to expand quite easily and freely.- Insulating material should be placed very tightly between the logs on the vapor barrier - this can be a dry backfill of slag and expanded clay, or mineral wool in rolls and mats.
- Another layer of vapor barrier should also be laid on top of the insulation. The individual sheets should be glued together with simple tape, after which the film should be attached to the joists with simple staples.
- The topmost layer of vapor barrier is needed to ensure that various kinds of particles and dust from the insulating component cannot enter the living space. Thick plywood or floorboards are already laid on top of absolutely this entire floor system.
Joists, fastening to a concrete base
Often, to create an insulating layer for the floor in houses or apartments on a concrete base, you should also install a wooden floor on joists.
Here the whole difficulty will lie in the process of leveling the lags on the surface. Especially if it is already planned to raise the wooden covering just a few centimeters above the concrete base.
If your apartment is located above the first floor, then the logs are often laid out and leveled, and then secured to a concrete base using so-called anchors.
Just like in the first and second cases, the logs are drilled through. To raise the logs above the base itself, various types of plastic and metal components are used. Basically, these are the so-called studs; they are capable of lowering and raising the logs from one side to the other, while aligning them in level. The excess section of such a pin, after all the joists have been brought to the required height, is simply cut off using a grinding machine.
In almost each of the options, insulating materials can be laid on a concrete base between the joists, which can add a thermal insulation coating, and can also muffle noise, both from the apartment itself, located below, and from the rooms where the joists are installed under the wooden floor. As such an insulation component, you can use mineral wool, bulk insulation or polystyrene foam.
We advise, in both the first and second options, to fasten and stretch a vapor barrier film over the joists, and only then proceed to laying a clean coating.
Laying a wooden floor on a concrete base
In some cases, a wooden floor is laid on a concrete floor without the use of any joists. Plywood or floorboards are used as a simple covering.
It is advisable to lay a very thin insulation component under such a floor; often foamed polyethylene , but you should choose the insulation that has a foil coating.
Individual sheets of this underlay component can be fastened together with simple tape to create a so-called complete coating - it will make your floor warmer and also muffle noise. If plywood is used for flooring, you must know that a decorative covering must be laid on top of the plywood. Floors made of very thick boards and bars look very respectable, if, of course, they are covered with varnish, high-quality paint or wax.
Installing boards on the floor
Having chosen the board of the thickness you need, it is very important to determine the correct direction for laying them on the floor itself. As quite a lot of experience shows, the best way to lay the boards is in the direction of natural light, that is, from the window. That is why planning the laying of the board itself must begin with simple markings and fastening the joists.
Floorboards have a variety of joints:
Tongue-and-groove connection in the presence of tongue-and-groove boards;- The quarter connection is considered the most common and easiest to install; boards with this particular fastening are often used. In addition, this connection creates one covering with almost imperceptible gaps between the boards. This option is quite good in the case of maintaining heat in the room;
- Connection using an insert-liner in the grooves of two boards.
The boards can be attached to the joists using fastening methods, of which there are two:
- Self-tapping screws or nails are driven into the groove, which is located on the side of the board, at a simple angle of forty-five degrees, with the head recessed into the board. Some experts prefer to do the exact opposite, driving nails or screws at an angle into the edge of the tenon.
- In the second case, screws or nails are screwed or driven into the front part of the board.
When starting the installation of the floorboard, it is necessary to retreat twelve to fifteen millimeters from the wall. After this, a strip of insulation should be placed in this gap, and then everything should be covered with the installed baseboard. This is necessary for the wood to expand when measuring the temperature threshold and humidity.
The board is attached to the joists with simple self-tapping screws of seventy or one hundred millimeters, or with nails of eighty or one hundred and twenty millimeters. The caps should be deepened under the cover, after which everything needs to be sealed with a simple putty, which should be chosen to match the color of your wood.
If insufficiently seasoned wood is used, the laid floor will require a drying period from the owner, which will last from six to eight months. Over a given period of time, the coatings can shrink and shrink; the gaps between the boards increase in size, and it is at this moment that the relaying process must be carried out. In this regard, when laying the flooring for the first time, basically all the floorboards are nailed to the joists in their entirety, and only the fifth or seventh board is attached. After the drying process, they need to be placed very tightly together and slightly closer to the joists.
If you have chosen boards with a tongue-and-groove , for the tightest connection, use a mallet, with the help of which the tenons are driven into the grooves through the wood. Often, special clamps are used for this connection, especially in those moments when, due to the simple curvature of the board, installation is carried out by coating all the tenons and grooves with wood glue.
The gap between the boards must very strictly be kept at around one millimeter, and in no case wider than this threshold. If your board simply does not install to the very end, then there is simply a burr left on the canvas or simply a rough surface; In this case, this flaw should be immediately removed, and then the tenon should be adjusted to the groove.
To connect the last board, which is placed against the wall, as tightly as possible, temporary wooden wedges are used; they are simply driven in between the wall and the board.
Treatment of the floor surface after final flooring
After your floor has been resurfaced and then secured, its surface should be sanded down a bit. This process should be carried out only at the moment when the bars dry out a little, and the surface becomes uneven.
After sanding the floor, we advise you to cover it with a simple grain pattern with starting varnish. After everything has dried, it takes ten to twelve days, and then the surface should be sanded.
The so-called starting varnish can help identify not-so-smooth areas on the board - which is why, after complete drying, it is easiest to find roughness and carry out additional sanding.
After the sanding process, skirting boards are installed, which can very well hide the gaps between the boards and the wall of your floor. If, at the end of this procedure, there are still gaps between the baseboard and the floor, then they should be sealed with putty.
Now that you have completely prepared the floor in this way, you should proceed to the final coating of the surface with oil, paint, varnish or wax.
Plank flooring is mainly covered not only for respectability, beauty and aesthetics, but also for protection, that is, long-lasting service to the delight of the owners.
Oil treatment
If your boards have a textured, expressed, beautiful pattern, then this is why you need to cover the floor with special oil. It can make the floor very warm and non-slip, as, for example, when covering the floor with varnish, and also gives the floor an antistatic property. Oil is able to penetrate the wood structure and very reliably protect it from moisture penetration.
Wood that has been coated with oil is much less susceptible to various types of damage, and those defects that were there initially can become simply invisible. Oil can clog the pores of wood, while maintaining its naturalness and allowing the entire material to simply breathe, which creates a fairly favorable climate in the room.
The floor, which will be covered with oil, will be protected from dust until it is completely absorbed. Also, during use, this floor requires special care from the owners. An important point is that we do not recommend placing all kinds of furniture with metal legs on the surface, because there is a risk of unwanted reactions, and as a result, dark spots may simply remain on the wood.
We advise you to cover your floor with oil only if you have high humidity in the room, for example, it could be a terrace, kitchen or bathroom. This kind of covering is also quite suitable for corridors and hallways, because the boards are impregnated with a special substance that is most capable of protecting the coverings from abrasion.
There are also floor coating compositions in the world, which, as they say, do not consist of pure oil, but with the addition of various liquid waxes, which can give your floor a soft and matte shine. You can also apply simple pure oils to the floor - they are absorbed very well into the floor surface, are quite economical in application and do not require a long wait for drying.
Also, floor oil can be colorless, or it can have bright shades that can make your wood darker, or, on the contrary, give it a very bright color.
The oil can be applied in two or three steps. It can be rubbed in or simply applied with a brush, and excess oil can be instantly wiped off to avoid problems with the formation of an uneven film.
The oil composition can be applied cold or hot in several layers. The faster the wood absorbs the oil, the more coats you will need to apply. The heated composition penetrates much deeper and faster into the pores of the wood, and this coating also lasts much longer than with a cold application.
Waxing the floor surface
Wax is often combined with different oil coatings. In some cases, waxing can be done with a composition that may consist of linseed oil and natural beeswax. This coating perfectly protects the floor surface from various types of scratches and dirt, as well as from moisture, but will not withstand intense mechanical stress and cracks. The wax coating can give the floor a very pleasant matte or even golden color.
Wax should be applied to an already cleaned surface using a very wide roller, also in several layers. The first layer must be thin in order to be absorbed well enough into the surface itself. After this, the floor is sanded, and then it is covered with another layer of the compound and then sanded again.
Wax in combination with oil is considered an environmentally friendly material, and it is quite good to use in adults and children's rooms. Wood that has undergone this treatment has the ability to breathe - which is why these floors can serve you for a long time and can create a favorable microclimate in your room.
Varnishing a wooden floor
You can apply the varnish coating with a brush, spatula or roller at room temperature, without drafts and moderate humidity.
The first layer of nitro varnish should be applied to the cleaned surface, which will serve as a primer.
It is mainly applied in a very thin layer according to the textured pattern of the wood. If necessary, the primer can be applied in two layers. After the primer has dried, the surface should be sanded using simple sandpaper.
Next, the floor must be washed with soapy water, and then dried and wiped very thoroughly. After this, you should begin applying the final layers. There can be two or three of them, and each of these layers must be sanded and dried.
Applying varnish to the floor is a very complex procedure that simply requires careful selection of the composition for a specific type of wood. That is why, if you have chosen this option for processing a wooden floor, then the best way would be to entrust such work to a specialist who is already able to determine in advance the amount of work to be performed and will also be able to select the necessary components.
The varnish coating is very fragile in its structure, it is very easy to damage from various mechanical influences - in this case, you should not walk in heels or move furniture. In addition, you should know that varnishes are often made on chemical bases that can clog the pores of the wood and prevent it from breathing.
Staining a Wood Floor
In the last moments, paint is very rarely used to simply cover a wooden floor, but this happens in cases where a special interior style is chosen.
In addition, paint is used in cases where it is necessary to cover up the not very attractive appearance of wood, because this coating almost completely covers the surface of the floor. For final processing, you have the opportunity to choose paint on various types of bases: enamel, acrylic, latex, water-dispersion, nitrocellulose and oil.
Water-based paints are preferable for simple residential premises, because they will not contain any harmful additives and solvents for the human body, however, after their application, the room must be ventilated, because fumes can pose a threat to your health.
Before painting the floor with water-based compounds, the boards are coated with a special primer. For other coating components, preparation of the base is required using various types of impregnating compositions; drying oil can act as such a main component.
The paint can be applied in one or two layers, or you can apply three layers. We advise you to choose some kind of golden mean, because paint that is applied in a very thin layer will immediately begin to wear off, and thick layers, on the contrary, will peel off. Almost each layer of primer or paint must dry very well before applying the next layer.
What repairs and when to do them
Repairing a floor on your own is a rather complex, time-consuming and responsible process. First you need to understand the types of manipulations that will have to be carried out
To do this, it is important to assess the condition of the structure and decide what needs to be done: cosmetic or permanent. repair
Owners of new buildings have a floor with a ready-made and well-made screed. In this case, it will be possible to get by with cosmetic repairs: if necessary, fill in the leveling mixture and lay the floor covering.
An old apartment often requires capital. floor repair, especially if wood was used as a covering. Wooden floors have a limited service life; over time, the floorboards begin to creak or collapse when walked on. There can be no talk of cosmetically finishing a wood covering that has expired.
Types of floor repairs largely depend on the type of coating that will be used. There is a standard classification of coatings used in floor repairs. It includes such materials as parquet, laminate, ceramic tiles, linoleum, solid boards, stone coating, carpet, self-leveling floors.
Installation of concrete screed
There is no strict thickness of the expanded clay layer, however, it must be at least 40 mm. It is worth noting that the larger the fraction, the thicker the expanded clay layer should be. The thickness also depends on the local climate, in some cases the thickness of such a layer can reach 100 mm. If you cannot decide on the thickness yourself, then use the universal size of 80 mm.
There is no need to dwell in detail on the construction of a concrete screed, because our website provides many articles about its installation. A solution made from sand and cement, or a ready-made mixture, is poured between the beacons installed directly on the expanded clay. Remember that it will take several weeks for the screed to dry completely. This base can last for decades; in addition, it extends the life of the floor itself.