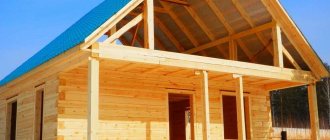
Housing built from profiled timber has a huge number of positive qualities. Such houses have long established themselves as very reliable and incredibly warm. Currently, you can build a house from profiled timber with your own hands in a relatively short time.
A house made of profiled timber does not need wall cladding.
What are the features of profiled timber?
What is profiled timber and what are its advantages? This material for building houses is made from coniferous wood, for example, spruce, larch, cedar, pine, etc. In order for the construction of a house to meet all the required standards, and in addition, go faster, each individual beam has a tongue and groove, which ensures absolutely simple and reliable fastening of the material. This explains the preference of most people to build a house from profiled timber themselves. The material has a relatively inexpensive price, while its qualities are in no way inferior to other materials intended for the construction of houses. A house made of profiled timber is considered environmentally friendly. It perfectly retains heat in frosty weather and coolness on hot summer days.
But do not forget: profiled timber is made of wood, which means that the material has natural pores. As you know, pores absorb moisture very well, and this is already a favorable environment for the development of mold. In addition, material made from wood is very susceptible to attack by harmful insects. All these troubles can be easily avoided by treating a house made of profiled timber with specially designed compounds.
It is not enough to build a house from profiled timber yourself. In order for your housing to serve you for a long time, without requiring frequent major repairs, it is very important to comply with all requirements and recommendations even during construction.
Construction
In the process of building a house from timber, a number of subsequent stages will need to be completed, starting with pouring the foundation and ending with building the roof. Each of them will require the most responsible approach to work.
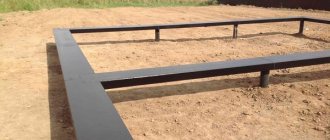
Foundation
The durability of a timber house depends on the quality of the poured foundation. This type of work is one of the most important when building a house. In addition, building the foundation is the most difficult stage. However, if all the subtleties are observed, such work can be done independently.
First, you should decide what type of foundation to choose for a house made of timber. Strip foundations are especially popular among private developers. It is usually built for multi-level buildings. You can also install a pile or monolithic foundation. In the latter case, the cost of pouring the base will be significant. In addition, such foundations are usually not built for timber - wooden structures are lightweight.
What type of foundation will be chosen for a house made of timber depends on the landscape features of the site. The cost of the foundation is equal to 30% of the budget of the entire structure. The filling process is quite complicated, so you will have to be patient.
Advice! To make installing the foundation of a house made of timber faster and more convenient, you can purchase screw piles. They are installed in 1 day.
Laying the first crown
First, the bottom trim is laid. This structural element is more exposed to bad weather and insects than others. The foundation should be as level as possible. The first crown is always treated with an antiseptic. This will ensure its full protection from various negative influences.
Important! When laying the external walls of a house made of timber, you should use 150x150 mm timber. When installing internal partitions and floor beams, it is better to choose 100x50 mm timber.
Flooring and walls
After installing the bottom trim, the timber flooring logs of the house are laid. It is better if they are mounted on an edge. The joists are covered with a subfloor. It should be made from boards 25x150 mm. The work of laying the floor is completed by laying the final covering. It is usually made from tongue and groove boards.
Walls
The walls are quite simple to build. In the process of work, you just need to lay the beams on top of each other. The main thing is to carry out the correct installation of the first crown. To fasten the rows vertically, special elements are used - dowels. They prevent the beam from twisting or moving. Wood or metal can be used as a material for dowels.
When choosing wooden pins, they are made from the type of wood from which the timber itself is made. Metal dowels are more reliable and more expensive.
The pins are driven in as in the case of brickwork. The dowels are driven through several rows, one at a time. Holes of the appropriate diameter should be pre-drilled for the pins. The pins must be inserted effortlessly. They are installed every one and a half meters.
Important! To insulate the walls and give them greater strength, a sealant should be laid between the rows. Tow should be used as a material.
It is best to make a corner connection of the “warm corner” type. The corners are not blown through with this connection. Partitions must be embedded into main walls. Their installation is carried out after the construction of the frame.
Window openings are cut out after laying the timber. Then the house must be left for 1-2 years to shrink. Only after this can the doors and windows themselves be installed.
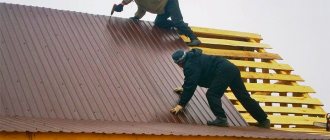
Roof
The ceiling beams, as well as the rafter system and sheathing are laid according to the design. The drawings must indicate all materials used and the dimensions of each element. After the walls are built, it is necessary to lay logs protruding 50 cm beyond the base.
To make the roof as reliable as possible, you should choose a beam of 150x100 mm. Wooden elements are mounted on an edge. There should be 90 cm between them. After this, it is necessary to assemble the rafter system. For it, it is better to choose 5x15 cm boards. This structure will be the basis of the roof, so it should be strengthened with crossbars, braces and racks.
After the frame is installed, you can start laying out the fronts. Their frame is made of 150x150 mm timber. Board or siding is used as cladding. At the last stage, it is necessary to nail down the sheathing from 2.5x15 cm boards. The sheathing should be done in increments of no more than 400 mm.
The roof covering is made of various materials:
- metal tiles;
- corrugated sheeting;
- ondulin;
- roofing felt
Usually, along with the house on a country plot, a bathhouse is immediately installed. That is why its construction is worth considering in more detail.
Where to start building a house from profiled timber
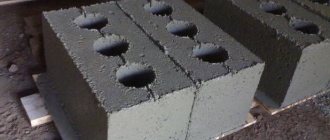
Types of profiles and sizes of profiled timber.
First of all, you need to draw up a plan for your future home. It is very important to correctly calculate the required amount of material. If everything is in order with your imagination and artistic skills, you can handle the project of a house made of profiled timber yourself. If difficulties arise in this matter, you can always contact the construction company.
The most suitable time to start building a house from profiled timber is winter. It is necessary to store building material at home at a certain room temperature. The fact is that profiled timber should under no circumstances be exposed to dampness. At the same time, it is very important not to overdry it, since in this case the material will become brittle.
Profiled timber should be selected very carefully. It is important that the material is free of cracks and has a uniform color of healthy wood.
Building a house from timber with your own hands: laying the foundation
First, it’s worth studying all the geological features of this area. It is very important that all indicators comply with the standards.
In order to build a house from timber, you can give preference to a shallow strip, pile or columnar foundation.
Laying a shallow strip foundation should begin with markings. Here you need to act as accurately as possible. All corners (not only external, but also internal) are marked with pegs inserted into the ground. Next, they should be connected with a rope.
The next step in building a house from timber with your own hands is to dig a trench no more than 60 cm deep. First, the bottom of the hole is filled with sand or dense soil, it is important that the layer is about 10 cm. The next step is to lay crushed stone.
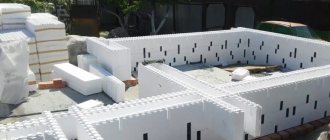
Lego for adults
The manufacturer will deliver the finished log house to the site in a sealed package, making it easier to assemble it yourself. It is difficult to assemble your own house from solid timber without experience and skills, since the correct connection of the corners is required. But more on that below.
Harness
Before laying the first crown, it is necessary to waterproof the foundation. The tree is hermetically sealed, and through microcracks in the foundation, moisture will get to the first crown and over time it will begin to rot. For work you will need materials: bitumen mastic (price from 350 rubles) and roofing felt (price from 220 rubles)
Waterproofing is performed as follows:
- The top of the foundation is coated with hot bitumen mastic.
- The first layer of roofing felt is rolled out on top. When joining, the material is overlapped.
- The roofing material is again coated with bitumen mastic.
- The finishing layer of roofing material is rolled out.
The width of the roofing felt should exceed the width of the foundation by 15–20 cm. The remaining ends of the roofing felt can later be hidden under the sheathing of the base.
First crown
The first crown of the log house is laid level on the dried waterproofing. The cross-section of the first crown is larger than the others in the box. This will increase the stability of the structure.
The first crown of a log house is the most important in the structure, so to increase durability it is worth paying more for larch or aspen. They are less susceptible to moisture, and over time they acquire a hardness comparable to iron. But we do not recommend using aspen from the Volga region. The tree has a fragile core and in 90% of cases is not suitable for construction.
Before laying, the first crown is covered with protective compounds (Sanezh, Belinka Bio, Tikkurila, Neomid 440 and Valtti Aquacolor (price from 120 rubles/l). The first crown is laid on laid out slats or a backing board. The slats are laid in increments of 30–40 cm across the foundation strip, the boards are sewn to the base using metal pins. The slats are 10 mm thick and create an additional gap between the foundation and the frame, which creates additional ventilation. The wooden frame is attached to the foundation using metal anchors. But the box is attached to the base only for lightweight structures.Large houses with several floors are quite heavy and will not move from the base without additional fasteners.
Folding the box
It’s not difficult to build a log house from a ready-made kit, but you’ll have to tinker with a solid beam. There are several options for corner connections of the beam with the rest and even ones:
- Assembly in paw. Spikes and nests for them are cut out at the ends of the timber. It has disadvantages: it is blown out, over time the material will dry out and serious insulation will be required.
- In the dovetail. The option is similar to the previous one, but has a special cut at an angle. The downside is that it's difficult to drink.
- Into the bowl. In each beam, a bowl is made from below for the upper link. The upper crown fits into the bowl and creates an airtight connection. Cons: you will need skill and a special cup cutter.
- Half a tree. Half of the section is cut out in each end part. The upper crown is placed in the resulting nest. Disadvantages: airflow and unreliable connection. To increase adhesion, a wood key is made to connect the ends.
A corner connection with a remainder is considered warmer and more reliable. The corners and timber are additionally connected to each other using dowels. Dowels are used wooden or metal. The latter option is more reliable, but when the log house dries, cracks form in the walls, and metal pins spoil the appearance of the house. Wooden dowels can be made independently from leftover lumber or birch. The dowels will give the structure additional strength and will prevent the timber from twisting when drying. Dowels are attached to every two crowns, skipping one, with a step of at least 150 cm.
Between each beam, jute insulation is rolled out (price from 110 rubles). If the material is profiled, then between the tenons and grooves there is a special groove for laying strip insulation. If beam connections along the length are needed, then a joint in the main tenon is used. The essence of the connection is in the tenon and groove cuts, which are securely connected and additionally secured with dowels.
The internal partitions in the log house do not need to be assembled immediately. They are made of a material with a smaller cross-section and are attached to the main walls. But if you are planning a two-story log house with your own hands, then at least one partition is assembled immediately. It serves as additional support.
Subfloors can be laid immediately. They subsequently serve as the basis for the warm “pie” of the finished floor. Mineral wool or ecowool, polystyrene foam can serve as floor insulation. The most inexpensive option is to use polystyrene foam; it will provide additional sound insulation between floors.
It is not recommended to cut out window and door openings in a log house right away. The building must stand. Even chamber drying during the first three months will give a shrinkage of at least 3%, natural humidity of at least 10%. Before inserting the frames, a socket is made, which will give the structure greater strength and prevent distortions from occurring during ground movement.
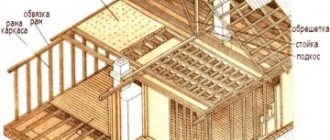
Formwork for the construction of a wooden house
Building box assembly diagram.
In order to build a house from timber yourself, the formwork can be made of wood. It is very important that the material is of good quality. Many people make formwork to order; in this case, you can give preference to one of the materials offered by the company. Here the most correct choice is metal or plastic.
The formwork is installed in a dug trench, after which it must be aligned in the center. To ensure maximum strength for the future foundation for building a house, use reinforcement with a diameter of 1 cm or more. The frame must be made of at least two belts of this material. When working with welding, position the reinforcement so that there is a distance of at least 5 cm between the rods. The next step, after wetting the formwork with water, you can begin pouring concrete. In the case of wooden formwork, you should be more careful, since this material, as you know, absorbs moisture very strongly, including from the mortar. After the solution has dried, the formwork should be removed.
For insulation purposes, use extruded polystyrene foam in the form of slabs. The sides of the foundation must be tarred, then fill the formwork with crushed stone. This way you will ensure waterproofing in the house. In order to insulate the foundation from above, you will need roofing felt.
The foundation is the key to durability
The foundation is the basis of any house or bathhouse. The reliability of the building will directly depend on its quality. The foundation is the support of the house, which consists of:
- Sand pillow;
- Ground;
- Frame made of reinforced structure;
- Concrete;
- Holes for ventilation;
- Waterproofing.
There are several types of foundation:
- A strip foundation is a reinforced concrete strip that stretches along the entire perimeter of the house. This tape is laid under all walls of the building;
- A columnar foundation is erected in the form of pillars located at all intersections of walls and at points where there is a large load. This is an economical and reliable option that can only be used for houses with low weight, for example, the construction of a house from laminated veneer lumber is often carried out on this type;
- Pile foundation is a structure consisting of piles. Most suitable for large buildings.
Laying the foundation requires a lot of attention, as this is one of the main processes in the construction of a log house or bathhouse made of timber.
Base and floor: step-by-step instructions
Wooden floor insulation scheme.
For the floor and internal walls you will need a profiled beam with a cross-section of 150×150 mm. To ensure reliable strengthening of the surface, each row of laid material must be treated with an antiseptic.
Place the logs on the walls opposite each other, and stretch threads (preferably nylon) between them at a distance of 1.5 m. This will give you a guideline for the location of the remaining joists. Insulation material should be placed in the voids formed between the joists. Here one of the following insulation materials can help you out: isolon, polystyrene foam, polystyrene foam, sawdust or mineral wool.
To lay lags from 30-40 cm boards, distances of 80 cm should be left. For thinner boards - 50-60 cm, for the thickest building material - about 1 m. Use wedges from a thin plywood sheet to adjust the height of the lags. Use dowels or anchors to secure the joists. The next stage of work will be strengthening the boards.
Step back 1.5 cm from the wall, focusing on the stretched thread, and secure the boards laid in the first row. A board is laid on top of each log, after which it must be strengthened. The remaining cracks along the wall should be covered with skirting boards. On both sides of the subfloor, thermal insulation material is laid, which is suitable for dense polyethylene or penofol.
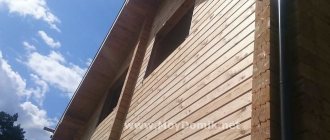
Finishing a timber house
Finishing a house or bathhouse from a log house is an essential part of the DIY construction process. There are only two options for the development of events - leave the outer walls unchanged, treating them only with protective varnish or covering them with decorative elements. This is a difficult choice, because the wood texture looks beautiful and attractive, but I also want to try modern finishing options. For decoration, you can use clapboard, siding or block house.
The interior decoration of a log house comes down to two processes - mandatory and additional. The first option includes flooring, as well as installation of windows and doors. Additional features include the design of a certain interior and style in the house.
Construction of a house from timber at the stage of wall construction
Connection diagram of profiled timber.
A very important stage in order for a house made of timber to be built efficiently and reliably is the correct construction of walls. Each row of material is secured with special pins designed for vertical connections, called dowels. The distance between the fastening elements must be at least 1.5 m. Insulation material must be laid between each row of profiled timber. A house made of timber must be reliably insulated on each side.
All walls in a wooden house are treated with fire retardant (a special fire-resistant composition).
Another important stage of the work is the creation of window openings. Keep in mind that windows can only be installed after the building has finally settled.
Designing your home
Before assembling a house from timber, you need to choose the right project. Log houses are assembled according to standard or individual designs; they can differ in architectural complexity or have simple shapes. If you plan to assemble a ready-made factory log house, we recommend choosing a standard project, which has advantages:
- The log house has already been tested in operation, and the manufacturer has eliminated the main shortcomings.
- The manufacturing material is used as economically as possible, so the price of the finished box is cheaper.
- It’s easier to choose finishing materials and roofing, since you can see several finished houses with your own eyes and chat with the owners.
When choosing an individual design, timber is also the most suitable material. It has the correct shape and can be adjusted to any size. Therefore, with the advent of this lumber, it became possible to assemble wooden boxes of the most complex and unusual shapes.
By choosing timber of the required cross-section, any project can easily be adjusted to any region with different average temperatures and climates. For a garden or country house, material with a small cross-section is suitable: 100x50 mm, 100x100 mm. For permanent residence, timber with a section of 150x150, 150x200, 200x100 mm is taken. The simplest option is a square section - 150x150 mm. The square shape allows you to quickly assemble the walls without selecting the technical and external sides. But provided that the beam is simple. In this case, a section of 150x150 mm must be additionally caulked and insulated.
One of the economical options is profiled material. The tenon and groove on the technical sides of the beam are firmly connected during installation and create a reliable barrier to the wind. The walls are insulated using tape insulation directly during assembly. And if the front and back sides are additionally sanded, then after assembling the box you only need to go over the walls with paint and varnish material and the house is ready to move in.
A separate group is the log house made of laminated lumber. This beam consists of lamellas that are connected to each other under the influence of a press and glue. But scientists are still arguing about the environmental friendliness of laminated lumber. The positives stand out: high strength of the walls and increased thermal insulation properties. So, for the construction of a residential building from glued material, a section of 100x100 mm is suitable; at winter temperatures down to -15 degrees, additional wall insulation will not be needed.
When choosing a project, it is worth considering what type of timber the walls will be assembled from. Since further finishing work depends on this, which means additional material investments.
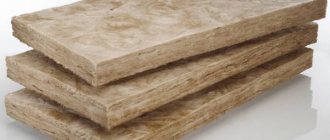
What you need to know about home insulation and finishing
Insulation of a timber house using the “ventilated facade” type.
It is necessary that the thermal insulation of the house meets all specified parameters. Otherwise, heat will noticeably escape in cold weather, and this is already a reason for additional work. The exterior decoration of a house built from profiled timber is no less important. In addition to the fact that it protects the timber from external influences, isolating it from moisture, ultraviolet rays and other undesirable factors, exterior finishing is also needed as additional insulation.
You can give preference to any insulation material, it could be tow, flax-jute fabric, mineral wool or glass wool slabs.
Read more about profiled timber as a building material
There is no need to explain what an ordinary profiled beam is: it is a log hewn into four sides. Due to the environmental friendliness of the material, ease of assembly and low cost, it was in use, despite the need to caulk the crown joints and its unattractive appearance.
It has been replaced by materials that allow you to get all the advantages of a timber frame without the disadvantages: profiled timber made from solid wood and its improved version - laminated timber.
Main types of profiled timber
Profiled timber differs from ordinary timber by the presence on the upper and lower surfaces of a special profile in the form of ridges and grooves, which ensure a tight fit of the crowns and the absence of cracks.
At the manufacturing stage, good manufacturers impregnate the material with antiseptics to protect against rotting and fire retardants to increase fire safety. The profile of a high-quality timber is calculated so that moisture cannot get between the crowns, and no gaps form during assembly. Interface insulation, which, if necessary, is placed in the grooves of the profile, is completely invisible from the outside, the walls are smooth, so their finishing is not necessary: forging and glazing are enough, which does not hide the natural structure of the wood and completely preserves the characteristic charm of a wooden house.
Profiled timber can be naturally wet or chamber dried. The higher the moisture content of the timber, the greater the likelihood of its deformation and shrinkage after drying. Profiled beams shrink much less and more evenly than simple ones, however, these deformations (about 10%) are taken into account during design and construction and compensators are provided: shrinkage bolts, special rafter fastenings.
This does not eliminate the need to stand the log house for at least six months before the final finishing work. Until the house has completely settled, it is not recommended to install windows and doors, lay floors or a finished roof.
Chamber-dried timber, due to its low moisture content (about 18%), gives minimal shrinkage - up to 3.5% for coniferous wood and 4.5% for larch. Dried timber usually costs more, but you can save money by purchasing timber with natural moisture in winter. While the house is “drying” under natural conditions, the box should be well ventilated and protected from dripping moisture. ADVANTAGES of profiled timber:
- the structure can be erected at any time of the year if the weather is dry;
- the process of assembling a log house is simple, takes relatively little time and does not require heavy construction equipment;
- wood is a fairly light material, so a log house does not require a deeply buried, expensive foundation.
DISADVANTAGES stem mainly from the natural properties of wood:
- any tree has a tendency to form cracks; no processing of timber, alas, guarantees that it will not crack over time;
- fire hazard: wood, even specially treated, remains a fairly flammable material;
- it is believed that a house made of profiled timber does not need to be caulked after shrinkage, but practice shows that sometimes over time, deformation of the wood, especially when using timber with natural moisture, leads to the appearance of cracks that require caulking;
- the impossibility of redevelopment, especially if the house is built from timber with the so-called “German” profile.
Glued laminated timber is the most expensive, but also the most practical. It is made by gluing together several lamellas under high pressure.
The moisture content of laminated veneer lumber is about 12%, it is uniform throughout the entire thickness, since the lamellas undergo chamber drying before gluing. This is especially important for timber with a thickness of 200 mm or more. When gluing, lamellas with different fiber directions alternate, which compensates for stress when atmospheric humidity changes, which can lead to warping of the wood.
Areas with defects (knots, cracks) are removed during the production process, which increases the strength of the finished timber.
Thanks to this technology, record low shrinkage is achieved: about 1%. The log house does not need to stand before finishing; you can start immediately after assembling the house. Glued laminated timber is more resistant than usual to sudden temperature changes, severe frosts and changes in humidity, and rarely cracks.
The disadvantages of laminated veneer lumber include the physical and chemical properties of the glue used. It is environmentally friendly and does not emit harmful substances, but it reduces the wood’s ability to breathe and can decompose over time. This is especially true for laminated veneer lumber from unverified manufacturers.
Log houses are insulated from the outside.
Stone wool is the most commonly chosen insulation material due to its environmental friendliness, durability and non-flammability. If the house is intended to be used in the warm season, then even walls with a thickness of 150 mm or less provide sufficient thermal insulation. If the house is intended for year-round use, it is necessary to use 100 mm thick thermal insulation. It will allow you to maintain a comfortable microclimate and also protect the timber from external influences.
You can buy kiln-dried timber and build a house from it only in dry weather: in the rain, the wood will quickly gain moisture and lose all its benefits. Experts also note that thick timber (200×200 mm cross-section) is technically difficult to completely dry, so you need to be especially careful when purchasing it.
Main types of profiles of profiled timber
Profiles according to their shape are conventionally divided into “Finnish” and “German”; various simplified options are also widely available on the market. They differ in the number and size of longitudinal grooves and grooves, as well as in the technology of insulation of inter-crown joints. “Classic” versions of both profiles are quite complex in execution and very expensive, so they are less common than mixed and intermediate varieties with a reduced number of tenons and a simpler configuration of corner joints, called connecting bowls.
With proper execution and high quality timber, both options perform well. One of the significant differences concerns the redevelopment or partial dismantling of the log house: the “Finnish” profile has difficulty and limitations, but allows for this possibility, but the tenons of the “German” one break off when trying to separate the crowns from one another. The “German” profile is the most complex and expensive, but when executed correctly, the most reliable in terms of heat retention.
It has the maximum number of ridges, and the shape and size of the grooves are designed in such a way that even in the absence of any seal in the longitudinal connection, an insurmountable barrier to cold and wind is created. Only the connecting bowls, which are laid with flax-jute fabric or self-expanding tape, need a sealant.
The quality of the material plays a key role: deformations of the timber can negate all the advantages of the special profile geometry.
Bending, shrinkage, and warping of the timber can disrupt the density of the longitudinal connection and cause the appearance of blown cracks. The “Finnish”) profile has a simpler configuration and requires sealing not only of the connecting bowls, but also of the longitudinal grooves. The connecting bowls have a semicircular shape, but more often manufacturers cut flat ones to reduce the cost of technology and simplify assembly. The seal between the rims is laid either in the middle, in a special groove (or grooves), or above the spikes.
The quality of the sealant and the conscientiousness of the installers when laying it are of great importance. The material must be laid carefully, in each inter-crown connection, without gaps or gaps. It is preferable to use a self-expanding seal; If sealing over tires is intended, sealant may be used.
Tyrolean castle
There is a method of angular connection of timber, which allows you to do without compaction in the corners. This is the so-called Tyrolean castle. in which the ends of the beam are cut in the shape of a dovetail. If high class I equipment is used in production, it is possible to achieve the most tight and durable fit of the joints, which, together with the shape of the ends of the beam, creates absolute protection from the penetration of moisture and wind.
Roof of a wooden house
The last of the main stages of building a house made of profiled timber is the roof. Here you can use any material you like, for example: corrugated sheets, roofing felt, metal tiles or ondulin. According to the selected material, installation of ceiling beams, rafters and lathing is required. After the walls are erected, ceiling logs are installed; they should protrude 50 cm beyond the wall. Such logs are made from timber with a cross-section of 150×100 mm. They are laid out on edge, and it is necessary to maintain a distance of about 90 cm between them.
The next step is to assemble the rafter system using boards with a cross-section of 50×150 mm. It is very important that the structure is firmly and securely fastened with racks, crossbars and braces, since it represents the skeleton of the roof. The rafters are installed in increments of approximately 1 cm. Having finished with the frame, you should lay out the fronts; they can be made from siding or use timber with a cross-section of 150×150 mm. Then a sheathing having a cross-section of 25x150 mm is nailed to the installed rafters. Its pitch is approximately 400 mm. To prevent condensation from accumulating, vapor insulation is very important here. Therefore, lay a layer of waterproofing.
Birch dowels
Wooden dowels have long been used to vertically fasten adjacent crowns of a frame made of timber or logs. These elements can have different configurations: triangular, round, square, but the most common are round dowels. For their production, only hardwoods are used: beech, oak, but most often birch - such dowels have an optimal price-quality ratio. They are round sticks with a diameter of 20-35 mm and a length of a little more than a meter, which are sawn on site into blanks of the required length (about one and a half diameters or the thickness of the crown of the log house).
During installation, the dowels are driven into pre-drilled (in place) holes in two crowns at once (their pitch is 1.5-2 m). The fastener must reliably connect both crowns, and it is necessary that the top of the dowel is recessed into the surface of the wood by 20-30 mm.