Determining the condition of the floor
To choose the right alignment method, you first need to accurately assess the extent of the damage. To do this, you need to walk over the entire surface, carefully examine every centimeter of the floor, remove 1-2 boards and inspect the joists. If rotten or bug-eaten areas are visible, serious repairs will be required, with replacement of damaged parts. If the logs and boards are in good condition, without cracks or rot, the floor does not bend or creak under load, and the only defects are peeling paint and a wavy surface, repair costs will be minimal.
Assessing the condition of the floor
One or more boards will have to be removed to assess the damage.
Small cracks or squeaks are also not a problem, since such defects are not difficult to eliminate. If the gaps between the boards are wider than 10 mm or there is a noticeable slope of the floor, the wooden surface will have to be covered with sheet material, such as chipboard.
What can you use for repairs?
Dismantling and reassembling a plank surface is a complex, long, labor-intensive process.
Therefore, not every apartment owner will decide to do this work. But the longer a faulty floor is in use, the more difficult and expensive it is to fix. Among the ways to level the floor in an apartment with your own hands:
- looping;
- local alignment;
- dry screed;
- use of self-leveling compounds;
- leveling with lags or pads.
It is necessary to measure the differences with a 2000 mm long laser level. If their indicator is higher than 2 mm per 1 sq. m, then alignment is required. If it’s less, then you can put up with it. But it’s still not worth delaying the repairs.
Alignment by scraping
Alignment by scraping
So, if the damage is minimal, the easiest way to level the floor is to treat it with a sanding machine. If you couldn’t rent a machine, you can use an electric planer.
scraping machine
Step 1. Surface preparation
All unnecessary items are removed from the premises, baseboards are removed, and trash is carefully swept away. The protruding nail heads are hammered in using a hammer so that they are recessed into the boards by a few millimeters. Areas of the floor that are loosely adjacent to the joists are additionally reinforced with self-tapping screws.
Step 2. Looping
Floor scraping
Parquet scraping
When working with a sanding machine, you will need headphones and a respirator. Start working from the corner, slowly moving along the wall. Having reached the second corner, they turn the machine around and move in the opposite direction, treating the floor surface in narrow stripes.
Step 3. Seal the cracks
After removing the top layer of wood, all the cracks and cracks in the floor become clearly visible. To seal them, use acrylic putty of the appropriate shade, which is carefully applied and leveled with a metal or rubber spatula.
acrylic putty
Restoring a wooden floor allows you to transform the surface
Step 4. Final floor treatment
After waiting for the putty to dry, the boards are scraped again, then the floor is vacuumed and primed. If the primer is absorbed very quickly, another coat should be applied to properly close the pores of the wood. After this, the boards can be painted or sealed with wood varnish.
The parquet is varnished
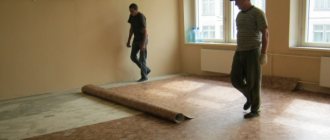
Leveling with sheet material
In the case where the floor has wavy unevenness due to the deformation of the boards, but is strictly horizontal, it can be leveled using sheet covering - plywood, chipboard, cement bonded particle boards or gypsum fiber board. Fiberboard is not suitable for these purposes, since over time it takes the form of a base.
Leveling with sheet material
Comparison table of sheet materials for flooring
| Name | Characteristics | Thickness |
| Moisture-resistant plywood | High strength, thermal insulation properties, suitable for any finishing coating | From 4 to 24 mm |
| Cement particle boards (CPS) | Durability, environmental friendliness, non-flammability | From 10 to 32 mm |
| Chipboard | High strength, sound and heat insulating properties, ease of processing | From 6 to 28 mm |
| Gypsum fiber boards | Suitable for any coating, has a perfectly flat surface, heat-insulating properties | From 10 to 12.5 mm |
| OSB | High strength, durability, suitable for any coating | 9 mm |
To work you will need:
- screwdriver;
- jigsaw;
- self-tapping screws;
- primer;
- acrylic sealant or putty;
- any sheet material for flooring.
Step 1. Preparing the base
The baseboards are removed, the peeling paint is removed from the floor surface, the protruding nails are hammered in, and the cracks and recesses in the boards are covered with putty. Then the debris and dust are removed and the floor is primed.
The photo shows the process of priming a wooden floor.
Step 2. Cutting and adjusting the material
The size of a chipboard sheet is 250x185 cm, plywood is 125x125 cm, so for convenience the sheets are cut into several parts. Optimal for installation are squares of 60x60 cm; they are less affected by thermal expansion, since the number of damper joints increases. The material is cut with a hacksaw with fine teeth or a jigsaw; To prevent the edges of the chipboard from crumbling during cutting, you need to stick masking tape along the cut line. Cutting plywood should be done as carefully as possible to avoid torn edges.
chipboard
Cutting plywood
An important point: if, when cutting a plywood sheet, its edges delaminate, the material is not suitable for laying on the floor.
So, the sheets cut into squares are brought into the room, laid out on the floor and adjusted to the size of the base. They cut out the material to fit the existing protrusions or niches, cut off the outer sheets to move the seams, leave technological gaps around the perimeter of the room and damper seams between the squares themselves. To avoid mixing up the elements during installation, immediately after fitting each square must be numbered.
It is better to number the plywood before installation
Step 3. Laying the coating
When using waterproof plywood, you can immediately begin laying, but chipboard must be pre-treated with drying oil or covered with 2 layers of primer. The first sheet is laid from the corner, leaving a gap of 1-1.5 cm between the edge and the walls. The length of the screws for fastening should be three times the thickness of the material. Screw in screws in places where the material is in close contact with the board, that is, in the upper part of the wave. If the waves run along each board, you can use sheets with a thickness of 8-10 mm, but if the distance between the waves is more than 20 cm, the recommended thickness is from 16 mm.
Laying the covering
The distance between the screws should not exceed 20 cm; The holes for fasteners are first expanded at the top with a drill of a larger diameter so that the heads of the screws are hidden in the thickness of the material. A gap of up to 10 mm is left between adjacent sheets of plywood; the rows are laid with the seams offset by half the sheet. If necessary, you can install a second layer of coating, covering the bottom seams with whole sheets. Both layers are fastened together with self-tapping screws.
Fastening plywood sheets
Step 4: Finishing
When the rough coating is laid, the joints between the sheets and the recesses from the screws are covered with acrylic putty or sealant on the same base. Next, use a level to check that the floor is horizontal and that there are no unevennesses. Rough areas are treated with sandpaper or a sanding attachment, dust is removed from the surface, and primed. After this, the base is completely ready for laying the finishing coating.
Plywood is the cheapest and fastest way to level a wooden floor
Plywood can become a topcoat if it is varnished
Video - leveling the floor with plywood
Polyurethane foam
Bonding plywood or OSB boards with foam is a fairly common option for leveling the floor. But you need to know about some features of this installation method:
- firstly, the foam may crumble over time, voids will appear, and the floors will become deformed;
- secondly, the foam is attractive to rodents; they do not feed on polyurethane, but are happy to use it to make nests;
- thirdly, this is a sealing material that does not have sufficient strength; it is elastic and compressible, so the position of the slabs is unstable and they can sag under load.
It is rational to use polyurethane foam to seal joints between sheets, but not as the main leveling material.
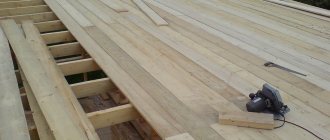
Leveling with plywood on joists
Leveling with plywood on joists
If, in addition to the wavy surface, the floor has a noticeable slope, another leveling method is used - attaching plywood to joists. This way you can even out differences from 3 to 10 cm in height and prepare a reliable base for any coating. Beams, strong boards, and strips of plywood up to 4 cm wide are used as lags. The preparation of the base is carried out as standard: everything unnecessary is taken out of the room, the baseboards are removed, the old coating is cleaned, and defects are repaired.
Step 1. Marking the floor level
From the highest point of the base, a mark is projected onto the wall using a level gauge. Step back upward a distance equal to the thickness of the coating and put another mark. Now, using a water level, marks are placed at this height along the entire perimeter and connected in one line. This is the floor level.
Step 2. Installation of logs
Plywood joists
If there is a risk of the base becoming damp, a waterproofing film is placed on top of the boards; in other cases, the logs are attached directly to the wooden surface. The beams can be installed both along and across the boards.
Installation of logs
The logs are laid flat in parallel rows at a distance of no more than half a meter and fastened with nails. Then, using a level and wooden pads of different thicknesses, each joist is aligned horizontally. To prevent the linings from moving, they are glued together. When all the logs are level, the nails are driven in completely, securely securing the beams to the wooden floor.
If the plywood is thin, the logs should be placed at a short distance
The thinner the plywood, the smaller the distance between the joists; in places where increased load on the floor is expected, cross members made of beams of a smaller cross-section are additionally attached between the joists.
Step 3. Laying plywood
Laying plywood
Sheets of plywood are cut into squares and laid out on joists for fitting. On each square it is necessary to immediately mark the places for fasteners so that during installation you do not drill extra holes. If the material lies neatly and evenly, there are no unnecessary gaps, you can attach it to the joists. Start with the outermost square and gradually move along the row. The screws need to be slightly recessed into the plywood so that the caps are 1-2 millimeters below the surface. Be sure to watch the joints - they should not match anywhere.
moisture resistant plywood
Plywood flooring on joists
Step 4. Installation of ventilation holes
To extend the life of the wooden base, it is necessary to make small holes in the floor for ventilation. In opposite corners of the room, preferably under heating radiators, determine a place for ventilation grilles and make neat cutouts in the plywood. A ventilation grill is installed on top, covering the joints with glue or sealant.
Ventilation grill
Step 4. Finishing the floor
The finished coating is checked with a building level, all joints and fastening points are inspected. If no defects are observed, the seams and recesses from the screws are covered with putty, then the surface is sanded and dust-free. Finally, apply the primer mixture and allow the base to dry.
Priming a plywood floor
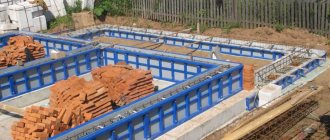
Leveling with a screed
If the wooden floor is installed on concrete floors, the boards are thick and strong enough, and the unevenness is no more than 1 cm, a screed will help level the surface. To make the mortar, the dry screed mixture Vetonit 3300 is best suited.
floor mixture
Dry mixture for floor screed
During the work you will need:
- kneading container;
- construction mixer;
- fiberglass mesh;
- primer;
- putty knife;
- putty;
- polyethylene film;
- stapler
Step 1: Preparing the floor
Floor priming
The boards are cleaned of old paint, grease stains, debris and dust, the baseboards are removed and thin planks are laid instead so that the solution does not get into the gaps. The gaps between the floor and the boards, as well as small cracks and recesses, are filled with putty, and the entire surface is primed.
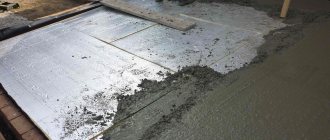
Step 2. Waterproofing and reinforcement
Waterproofing and reinforcement
A plastic film is laid on the floor, the joints of the overlapping strips are secured with tape, and a fiberglass mesh is laid on top for reinforcement. To prevent the mesh from moving and floating up when pouring the mixture, it is fastened to the floor with staplers. In this case, it is very important to drive the staples so that the mesh is not pressed tightly against the base. It should be in the thickness of the solution, and not under it, otherwise there is no point in laying it.
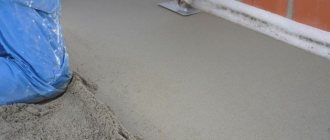
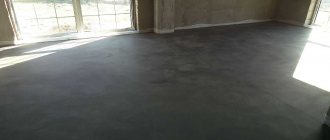
Step 3. Pouring the mixture
The dry mixture is poured into a container with clean water, observing the proportions indicated on the packaging, and stirred for a minute with a construction mixer. The finished composition must be applied and leveled within 15 minutes until the solution begins to harden. The mixture is poured onto the floor and leveled with a wide notched spatula over the entire surface.
Step 4: Finishing
4 hours after applying the screed, the boards along the walls can be carefully pulled out and the joints can be sanded. After this, the surface is ready for any finishing coating.
The mixture is poured and leveled
Sometimes, to level a plank floor, a cement-sand screed up to 7 cm thick is used. But in this case, both the floor itself and the ceilings must be very durable, in excellent condition, which is rare for an old floor.
Video - Leveling a wooden floor
How to do the job yourself: step-by-step instructions
To minimize time and financial costs, you can use an interesting method - applying a self-leveling mixture.
Leveling technology includes:
- Preparation. Clean the surface from dirt and dust. Seal gaps and cracks.
- Prime the base thoroughly and let dry.
- Dilute the mixture according to the manufacturer's instructions.
- Pour the mixture over the entire area and roll it out with a special roller.
Attention
Self-leveling mixtures harden very quickly. If you do not have time to level the surface, it will harden and deteriorate. It is better to fill large areas in sections.