How to make a cellar in a house
The most successful option would be to build a cellar during construction. In this case, the creation of the element must be taken into account in the design documentation of the structure, since the cellar can be made correctly only with proper calculation of the entire structure.
Making a cellar under a house with your own hands in an already built house is a more difficult task, but quite feasible. All excavation work will have to be done manually, and there will also be difficulties in ensuring the reliability of the structure. If you make a mistake when creating an underground cellar, the cottage itself may collapse or lean, so you should carefully consider developing an action plan.
You can make a cellar with your own hands
Cellar materials
We select materials based on construction conditions and budget.
Cellar made of rubble or brick
Traditional, centuries-tested natural materials. They allow you to create a cellar in your house with your own hands of any shape, right down to vaults and arches. Only red, well-burnt bricks, such as “Zheleznyak”, are used. Sand-lime brick is not used in underground construction.
It is recommended to lay out the thickness of the walls in brick. When laying half a brick, the spaces between the soil and the masonry are filled with clay, followed by compaction. A brick partition perpendicular to the long walls will reduce the pressure on the walls. Cement plaster will strengthen the masonry.
Concrete cellar
A reliable structure that will last for decades and centuries - concrete. The unambiguous choice of this material is dictated by hydrographic conditions: high groundwater levels, tendency to waterlogging, melt water in lowlands and on slopes.
A do-it-yourself cellar in the ground - a monolith - will not give water, which moves in the soil under free gravity, a chance to penetrate inside. The use of reinforced concrete allows you to make a caisson out of the cellar. In case of flood it will remain dry.
Building a cellar with your own hands when the groundwater level is high from reinforced concrete is not an insurmountable task. The main thing here is to prepare a concrete mixture of the required strength class. In such conditions, B35 (M450) concrete is used. It becomes impermeable to water thanks to waterproofing additives.
Such additives can be purchased at any hardware store. In addition to their main function, they reduce the time it takes for concrete to gain strength several times and increase the strength itself. The concrete mixture is ordered in mixers or prepared on site.
In difficult soils, the wall thickness should not be less than 100 mm. This scheme provides a good margin of safety.
- Floor – 200 mm.
- Walls – 150 mm.
- Overlap – 100 mm.
This is the most correct cellar: even heaving soils are not afraid of it.
In areas with dry soils, concrete is also preferable. But in this case, it’s easier to make a cellar at the dacha with your own hands: you can use sand concrete with fiber reinforcement, and only reinforce the ceiling with reinforcement.
Cellar walls made of concrete blocks of the FBS type, road slabs, fragments of piles, and pillars have proven themselves well. The cellar does not have a design component; waterproofing will take a little longer.
Cellar made of foam blocks
Foam blocks or gas blocks for cellars should be used only in dry soils. Brand - no lower than D 500 or D 600. The main disadvantage of these materials is the ability to absorb moisture. When a block saturated with water freezes, it collapses.
Based on this, there is a need for high-quality waterproofing on the outside of the walls. To install it, a technological corridor along the external walls of at least 0.7 meters is required. The costs of an enlarged pit and modern waterproofing materials will cover the economic benefits of purchasing and laying such blocks.
Plastic cellars
In this case, the question of how to build a cellar disappears. They are manufactured in the factory from propylene with a thickness of 10 mm. The strength of the products is given by stiffening ribs and an internal metal frame. For soils saturated with water, external concrete pouring of walls and ceilings is provided. The floor in the cellar can be wooden or concrete over plastic.
The undoubted advantage is the complete internal configuration.
- Wooden staircase.
- Racks with wooden shelves.
- Exhaust and supply ventilation.
- Moisture-proof lamp.
- Temperature and humidity sensors.
Of course, you can order an individual package. There are many plastic models, including budget ones. The main advantage of such a cellar-tank is complete tightness.
You can build a cellar in your house with your own hands from such a tank in one day. A plastic underground cellar with a horizontal entrance is compact and does not require treatment with antifungal compounds during operation.
Advantages of a cellar located in the house
The basement of a private house is convenient due to its compact placement and optimal air temperature inside for storing food. In addition, you do not need to leave the cottage to use the cellar.
A basement located separately from the housing will require special efforts in constructing its roof, insulating the walls, and other difficulties will arise. Therefore, professional builders recommend building a cellar in a private house, and not outside it.
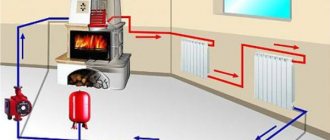
Another option for using a basement is to install a boiler room in it. In this case, the heating system will not take up much space in the house; only pipes, radiators and a chimney will remain there.
Using the basement as a storage room
The basement space is quite suitable for storing household items, food, work and seasonal clothing, tools, sports equipment (skis, sleds), strollers, bicycles and much more. etc.
Using the basement as a storage room
Such a pantry noticeably frees the house from bulky things; There is less street dirt and dust in the rooms. You should think in advance about the placement of utility cabinets in it. Cabinets can be built-in, with natural ventilation. It is connected to the kitchen or stove smoke ventilation duct. The lower part of the door of a ventilated cabinet is equipped with holes for air flow. Typically, such holes are drilled on site or the door leaf is not brought to the bottom by about 10-15 cm.
Ventilation at the bottom of the door
If you want to store various food products in the basement, then it is better to place them in special utility cabinets located near the outer wall and equipped with natural ventilation. Here you can store potatoes, vegetables, fruits, pickles, marinades and other supplies all winter. Typically, such cold storage rooms are located on the north side of the house . To enhance thermal insulation, the perimeter walls are covered with sawdust or covered with tiled insulation, which is covered with board cladding. Keep the pantry temperature low with ice. On the side of the house, a cold, unheated room should be adjacent to the wall (figure below).
Arrangement of a cold storage room in the house: 1 - ice chamber; 2 - metal sheet of the wall; 3 — cabinet for food; 4 — shelves; 5 - racks; 6 - supply of firewood (for stove or fireplace heating)
To provide the pantry with fresh air, various simple adjustment devices are used. Thanks to them, you can get an additional refrigerator of impressive size inside the house. Ventilation is provided by an additional attached duct or pipe. You can install two additional ventilation ducts (supply and exhaust) in the main internal wall and lead them to the roof or attic. Channels made in a brick wall, as a rule, have a cross-section of 140 x 140 mm.
Shelving in pantries is made of wood and its derivatives; plywood, chipboard and fiberboard. The simplest rack (figure below) is a structure consisting of metal or wooden racks, to which wooden or thick plywood shelves are attached. If desired, the side surfaces of the rack are limited by sides. You can make the sides through.
Rack for storing products and equipment: a - welding unit; b, c connection nodes; 1 - wooden stand with a section of 20 X 50 mm, height 1600-2700 mm; 2 - stand made of pipes or round fittings with a height of 1500-2500 mm; 3 - wooden shelf measuring 20 X 200 mm, length 800-1200 mm; 4 - side made of plywood 4 mm thick
If the racks are made of metal, then they need to be welded; wooden ones are easy to make yourself. The racks are attached to the wall using plugs pre-hammered into the wall. Installation of shelves with racks is carried out using metal hooks. Before installation, metal and wooden parts are sanded and coated with nitro enamel.
The indicated dimensions are, as it were, basic, basic. If desired, the dimensions of the rack can be changed both smaller and larger. It can occupy the entire wall, running along the entire room, or stand in the corner.
Storing food in the basement
Before placing vegetables and fruits in the basement, you should ensure that they sit for about a week in a well-ventilated area. This measure will allow you to prepare the products for long-term storage, while possible cuts and damage to the surfaces of vegetables and fruits will be covered with a crust.
After a week of aging, the harvest (or purchased supplies) is carefully placed indoors.
Storing food in the basement
There is a certain loading rule that should be followed whenever possible: vegetables are placed along the air flow - from inflow to air removal. First, large products are laid out : cabbage, watermelons, pumpkins, large zucchini, etc. Then something smaller is placed - apples, pears, eggplants, etc. Potatoes and onions are added at the very end.
Cellar construction
Structurally, the cellar consists of the following elements:
- ceiling;
- walls;
- floor;
- ladder;
- ventilation system
- hatch cover.
In this video you will learn more about the cellar: In addition, you can provide vertical ceilings (walls) to divide the internal space, as well as additional elements, such as built-in cabinets or shelves.
The structure of the walls and floor looks like this:
- the soil itself;
- clay castle;
- floor and walls (concrete);
- sand cushion on the floor between concrete and soil.
Types of basements
Construction of a cold basement with natural ventilation
There are 2 main types of basements: insulated and non-insulated. The first can serve not only as a storage area for supplies or old furniture, but also become a living room. The second option can act as both a utility room and a technical room.
Cold cellar
Such a basement has no heating sources, is not insulated and communicates freely with outside air through ventilation holes and windows. Such a room is finished in a minimal way: the dirt floor is compacted, the walls are sheathed with wood or plastered. It is important to ensure good ventilation here, otherwise the basement will become damp.
In fact, rooms with passive insulation are often included in this category. They also have no heat sources, but the walls and ceiling are thermally insulated. This option helps retain heat in the house and prevents freezing of the base. Since insulation is accompanied by hydro- and vapor barrier, such a cellar does not become damp, and the dry and relatively warm air in the cellar retains up to 20% of the heat in the building.
An insulated basement is often used for a garage. Thermal insulation ensures stable temperatures.
Even in a cold cellar it is necessary to thermally insulate communications. Otherwise, water in the pipes may freeze and the pipeline may be destroyed.
Warm residential basement
The residential basement needs to be insulated or radiators installed
In order for the basement in a house to be considered warm, it must be insulated and finished in the same way as the residential floor. The walls and floor, and sometimes the ceiling, are insulated with appropriate materials. It is taken into account that heat loss here is no less than in ground floors.
Usually simple thermal insulation is not enough, so the basement is equipped with heat sources. These can be electric heaters or water heating. The latter is cheaper.
The main problem of a residential underground floor is poor ventilation. Small windows are enough to ventilate a non-residential cellar, but in an insulated basement it is necessary to install forced ventilation.
Preparing and digging a pit
Building a cellar under the house will require some effort, especially if the owner prefers to do all the work with his own hands. This can be described step by step as follows:
- planning;
- excavation;
- formation of walls and floors;
- finishing work, including installation of shelving;
- creating ventilation;
- hatch installation.
First you need to determine whether it is even possible to build a cellar on this site. To do this, you should ask your neighbors whether their buildings are flooding (if the answer is positive, it is better not to build a basement). Or invite hydrogeologists for consultation.
Experts recommend building a cellar under the entire building, otherwise the foundation will weaken and additional strengthening will be required.
At the very beginning, you will have to choose where in the house the entrance to the underground will be located. Usually the hole is located in the hallway or in the kitchen area, if it is large enough.
The pit will have to be dug manually; during the work, you will need to strengthen the walls and ceiling with plywood panels and temporary supports.
The depth of the basement should be 2-2.1 meters, and if a boiler room is planned, then at least 2.5 meters.
It is important to remember that the floor should be located at a slope of 1-2 degrees, directed towards the technical gutter (pit).
When the excavation work is completed, the future floor and walls should be leveled.
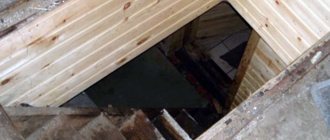
First you need to dig a pit
After this, you need to pour out a layer of sand (the pillow should be up to 20 cm thick), compact and level it until it is firm and even, and then pour in gravel of different calibers.
A layer of waterproofing is laid on top of the cushion to protect against groundwater and leakage of liquid cement during pouring. You can use polyethylene or roofing felt.
A mesh of reinforcement should be laid on top, the thickness of the rods should be at least 5 mm.
Now you can fill it with cement, you should end up with a layer 10-15 cm thick, and wait at least 5-6 days. Complete hardening will only occur after a few weeks.
If everything is done correctly, the underground cellar will have a reliable floor that is not subject to deformation.
Advantages of building a basement under the house
The question of the feasibility of building a basement under the house is most often determined by the cost estimate.
The construction of a basement floor leads to an increase in the price of the project from 15 to 30 percent, and in monetary terms this amounts to an impressive amount. Before you dig a basement under your house, you need to determine the pros and cons of building it.
The arguments in favor are:
- Seismic resistance. A one-story building, in which there is a basement under the house, has higher earthquake resistance ratings than a traditional two-story building.
- Warm floor. If the basement is heated, this guarantees that the floors in the rooms on the first floor will always be dry and warm.
- Additional area. Here you can equip almost any utility rooms, which frees up useful space in the living area of the house. In the basement you can place a pantry, boiler room and laundry room, storage for tools and any equipment. The basement can be used as a garage if necessary.
- Rest zone. In addition, the basement floor can be used as a relaxation area, and it can be equipped with a sauna, billiard room or gym (see Basement sauna in a private house: how to do it right).
Sauna in the basement of the house
There are also arguments against:
- The high cost of excavation work. This is due to the use of special equipment or digging a pit by hand, which is a very labor-intensive process, especially in cramped spaces.
- Ventilation. The presence of musty air in the basement and covering the walls with mold or condensation will make it unusable. This can be caused by insufficiently good ventilation of the basement, which will cause damage to supplies and lead to premature wear of the base and all structures of the structure.
Particular attention is required when installing a basement ventilation system when groundwater is shallow, if the basement is used as a boiler room or workshop. Otherwise, even with heating, there will be high humidity in the rooms.
- The cost of maintaining a house is significantly increased by heating the basement, which must be constant to create a comfortable climate.
Tip: The basement ventilation system under the house must be carefully calculated at the design stage in order to take into account all the nuances of the structure.
- Waterproofing. A very unpleasant moment when operating a basement is the likelihood of it being flooded by groundwater or rain flows, which requires high-quality waterproofing.
- It is necessary to take into account the difference in heat capacity of the soil, where it is higher, and the air. This requires installation of insulation.
Walling
The best option would be to make monolithic concrete walls. But if you do the work in the house yourself, you will have to order ready-made concrete, since it will take too much time to create the required volume of solution yourself.
When ordering concrete, you should inform an employee of the manufacturer for what purposes the solution is intended, so that the builders add a special mixture to the solution, which will create penetrating moisture insulation.
Before pouring, you should prepare formwork from boards and bars. It is better to use planed lumber to make the structure easier to disassemble.
Important. When creating walls, you need to provide ventilation ducts, as well as install electrical wiring in advance if it is planned to be hidden.
After pouring concrete, it is recommended to pierce the surfaces of the walls with a steel rod to remove foreign air from the solution.
After about 7-10 days, the formwork can be removed, but the concrete will “stand” completely in another 4-5 weeks.
How to make your basement comfortable
A basement will only become comfortable if all work on its construction and finishing is carried out in accordance with generally accepted standards. Then you won’t have to go out every year in a “death battle” with mold, remove frost from jars of pickles in winter and sort frozen vegetables. To make the premises suitable for habitation, several stages of work must be completed:
- Carrying out heating, ventilation systems and electrical wiring. Unfortunately, you won’t be able to stay indoors for a long time without batteries, even in the summer; if there are no outlets, the use of equipment is impossible, and neither guests nor owners will want to breathe stagnant air;
- Finishing. In this case, we are talking about the use of especially durable heat and waterproofing materials that will help reduce the percentage of humidity and stabilize the temperature;
- Selection of furnishings and room design.
If no mistakes were made during construction and finishing, then the room will be no different from an ordinary living room in a house.
Cellar ventilation
Since it is quite difficult to provide full ventilation in the cellar of a finished house, many owners prefer not to deal with this issue.
The result is increased humidity inside the room, since in any case liquid particles will penetrate into the cellar from the outside. Stored foods (vegetables, fruits) will also release moisture. This is interesting: how to arrange ventilation in the cellar.
Ventilation pipes should be laid in pre-made shafts, and if the house has already been built, this will have to be done before pouring concrete.
The exhaust vent should be located under the ceiling and above the technical gutter (pit), and the supply opening should be located opposite it (at the bottom of the floor).
Both pipelines lead to the street. The exhaust pipe should be located as high as possible - in the area of the roof slope, and the air intake - at the bottom of the wall of the house. Be sure to use protective nets to protect against the penetration of rodents and insects or special filters.
Cellar ventilation is an important element of the cellar
If the cellar is small, then it is allowed to use a single pipe, which will ensure both the penetration of fresh air inside and the flow out.
And if the basement is large, then it is recommended to provide forced ventilation using electric motors, this way you can get constant air exchange and there will be no condensation or unpleasant odors inside.
Options for using the basement floor
Options for arranging the basement floor can be very different. A sauna with a swimming pool, additional living rooms for guests, a home laundry, a music studio or a workshop are often located here. Some grow mushrooms and vegetables in their basements.
Sauna with swimming pool
Relaxation area in the basement with sauna
Guest area
Storage area with built-in wardrobes
Music studio
Workshop
But most often the additional area is used as:
- Gym or sports hall. In this case, a fairly simple decorative finish is performed, and the main emphasis is on high-quality flooring, good ventilation and lighting. Such a room should have a sufficient number of mirrors and sockets for connecting exercise equipment.
A personal gym is the dream of many people.
- Billiard room . In addition to the billiard table, you can place a tennis table and a court for darts and other games. As well as comfortable places to relax - armchairs, sofas. The decoration of the room can be anything you like.
The billiard room in the photo is decorated in a modern style
- Wine cellar and bar . The room is finished with stone, brick, wood or materials imitating them. Forged ceiling lamps suspended on chains will look harmonious in such an interior. There is also a bar or area for wine tasting with a table and chairs.
Wine cellar in the basement of the house
Advice. If the cellar is used to store food supplies, vegetables and pickles, you can save on heating and finishing, and make the racks metal, treating them with compounds that protect against corrosion.
- Home cinema. Sometimes only in a spacious basement room can you equip a full-fledged cinema hall with a projector and a large screen, high-quality sound. Here you can organize not only family movie viewings, but also invite large groups of friends. And even in a rather modest area you can install a large widescreen TV. The “auditorium” can be either a set of comfortable upholstered furniture or chairs with armrests arranged in a row. Any design style is allowed, from retro to ultra-modern.
Arrangement of the basement for a home cinema
- Library, office . The cost of converting a basement into a library can be quite high, since in this case you will have to take care of high-quality climate control and maintaining normal humidity in the room. And also about equipping it with a large number of shelving. They can be installed from the floor to the ceiling, and a stepladder can be used to access the top shelves. It is necessary to allocate a place for working and reading with a table, a chair and several chairs or ottomans for guests.
A large home library can be placed in the basement
- Children's playroom. A large separate playroom is a royal gift for children. If space allows, you can place here not only shelves with toys and a soft carpet, but also a sports corner, a dry pool, a place for board games and for creativity: drawing, modeling, modeling, etc. You can also select a relaxation area for children and parents with cozy sofas and a TV.
Place for children's leisure
Advice. It is advisable to have heated floors in a playroom for children, since children spend most of their time on it.
It is not at all necessary to devote the entire basement floor to one thing. It can be multifunctional and serve as a place for the whole family to relax. In a large space, it will not be difficult to allocate areas for active games, reading, hobbies, storage and wine tasting, etc.
Recreation area for the whole family
Waterproofing the cellar from the inside
For internal waterproofing of walls in the basement, roll materials (such as roofing felt) or coating materials (bitumen mastic) are used. It’s even better to combine both materials, it’s much more reliable.
You need to know this: how to waterproof a basement from the inside.
First, layers of mastic are applied (with a brush or roller), and after that the walls are covered with sheets of roofing felt in 2-3 layers. In some cases, it is advisable to lay a brick wall in one layer, this will significantly strengthen it.
Ventilation
Regardless of what needs the basement will be used for, air exchange must be established during construction. Even if the finishing of the room was done correctly, with the walls impregnated with special solutions, if air circulation is disrupted, moisture will stagnate. Unfortunately, this is fraught with the appearance of fungus and mold. Spores of the latter can enter the lungs along with the inhaled air, multiply there and provoke a number of chronic diseases, some of which are fatal. Ventilation systems in the basement are classified into two types:
- Artificial;
- Natural.
The latter are suitable only for “cold” basements, which no one plans to equip for living quarters. Natural ventilation is a simple pipe system that connects a room with the street. The air circulates freely in them. Artificial or forced ventilation systems pump fresh air into the room from the street, and pull stale air out of it. Modern split systems are able to regulate the level of humidity and temperature within the regime set on the control panel. Such “smart” ventilation will eliminate many problems and become a universal “climate control” in the basement of a private house.
Insulation of the cellar
Insulating the ceilings of the cellar will allow you to safely store various products; they will not be frozen even in winter. The most commonly used tile materials are polystyrene foam, polystyrene foam and their analogues. It is best to install panels with a density of 25 kg/m³ or higher.
This is interesting: what needs to be insulated in the cellar from freezing.
It is also possible to use mineral wool, but if the humidity is too high, it will lose its properties in 1-2 years, so good preliminary waterproofing will be required.
Spraying a layer of polyurethane foam is the most reliable method, since the resulting coating will be seamless, and the material itself does not absorb moisture at all and retains heat well. But its cost is quite high when compared with mineral wool and polystyrene foam.
The main method of insulation involves creating a frame from wooden blocks or a galvanized metal profile, which is attached to the walls and ceiling.
Insulation is placed in the cells of the sheathing, after which it is recommended to stretch polyethylene film, and lay sheet plywood, boards made of boards on top, or simply glue the mounting mesh if solid materials (foam plastic or analogues) were used as insulation. After this, the wall surfaces can be plastered.
Types of cellars
In essence, a cellar is a fairly deep hole in the ground with a reinforced ceiling and walls.
The depth of such storage can be different:
- deep-seated: completely underground to the entire height of the cellar; maintaining a comfortable temperature for vegetables and preservation at any time in such rooms is not difficult - a layer of soil reliably protects them from heat and cold;
- upper (ground) cellars: they can be erected on any type of site, but most often such structures are used when groundwater is close to each other, when it is not possible to deepen the cellar too much; to protect such structures from heat and cold, they are thermally insulated by backfilling with soil (embankment);
- semi-buried: somewhere between high-mounted and deep-buried storage; its lower part is buried in the soil, and its upper part is located above the ground.
When choosing the type of cellar, you need to focus on the depth of groundwater. They should not rise higher than 50-60 cm from the bottom of the cellar.
It is not easy to determine the groundwater level on your own, without the help of specialists. You can navigate to neighboring areas. Go around your neighbors and ask them what types of cellars are used in this area. More accurate measurements can be made by drilling test wells. Before measuring the water level, the finished well should stand for 1-2 days.
Based on their location, all underground storage facilities can be divided into 2 types:
1Freestanding
2 Wall-mounted: in order to save free space, it is allowed to attach the cellar to the walls of sheds, garages and other outbuildings; Cellars can also be located inside such premises; but in order to avoid excessive heating of the air, it is not recommended to attach the cellar to heated rooms.
Ladder and manhole cover
The simplest solution to the question of how to easily build a staircase in a cellar is to use boards and bars of wood. If desired, you can use concrete or even metal. It all depends on personal preferences and capabilities.
It should be noted that wood will require impregnation with special compounds (to prevent rotting), and metal will require painting with a primer.
There are many types of stairs, for example:
- stationary wooden;
- complex concrete staircase;
- retractable.
Don't forget about the hatch
The hatch cover can be made hinged (hinged) or completely removable, it depends on how large the hole is inside and where it is located.