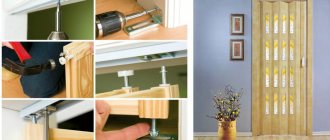
An iron door to a wooden house is the best product option for installation. Such doors can have a reinforced design, which will prevent the intrusion of uninvited guests, or have a thermal break, which will provide additional warmth at any time of the year. Installing a door in a wooden house with your own hands is a responsible process, the quality of which will depend, first of all, on your safety. Today we will talk about how to install an iron door in a wooden house. You can familiarize yourself with the installation features in the following article.
Installing a door in a wooden house with your own hands
The advantages of an iron entrance block over wooden analogues are obvious
The advantages of an iron entrance block over wooden analogues are obvious. Basically, manufacturers or trading platforms, when selling a metal door, undertake the work of measuring and installing their own products. Most often, payment for installing a door block is included in the price of the product, sometimes an additional amount is charged for the work. However, installing the entrance structure with your own hands is not so difficult for a skillful owner, especially if it saves the family budget:
The installation of a metal door at the entrance should be approached with the utmost responsibility. It’s worth assessing your own strengths, stocking up on patience and some tools. Even if the installation is not done with your own hands, it is still worth knowing a lot about the process itself in order to control the installers.
The installation of a steel door structure is expected at the entrance to the apartment, so it is important to know that the door leaf must open outward in accordance with fire safety standards. There are, of course, exceptions regarding the method of opening the door, which were discussed earlier.
When installing metal entrance doors, it is important to take into account the technological features of the building material from which the structure is constructed. To dismantle first and then install the door block, you will need the following tool:
Installing an entrance door in a wooden house
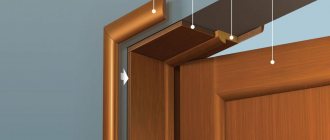
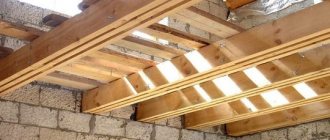
Installation of the entrance group in a wooden house is carried out using casing. This design is also called a pigtail. It is a frame made of wooden blocks of appropriate thickness. This part has a movable attachment to the frame. The joining of individual elements of such a structure is carried out using grooves and tenons. After installing the frame, the door frame is fixed to it.
If desired, you can install a metal entrance door in a wooden house. This is facilitated by the casing frame. Its installation is an important undertaking, which determines how convenient the operation of the front door will be. It performs a very important function, as it acts as a counterweight to the shrinkage of a wooden residential building.
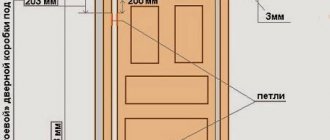
The organization of the casing frame begins with the formation of the first groove, which is made in the doorway. For the pigtail, a timber with a non-standard shape is used - in the form of the letter “T”. The groove width indicator should be slightly smaller than the similar tenon parameter. After organizing the groove, you need to hammer a tenon into it. In this way, the frame is sequentially formed.
Installing wooden entrance doors differs from installing a metal group. Here it is worth considering the differences in fasteners, as well as taking into account the characteristics of the materials. For example, a wooden door, like the building itself made of the same material, is subject to seasonal expansion and contraction.
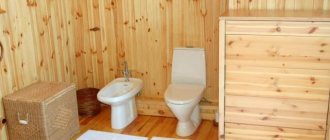
Important! There should be a decent gap between the posts and the opening - approximately 3-4 cm. It is necessary to compensate for the expansion of the wood. This gap must be closed using mineral wool.
Many people are interested in the question of how much it costs to install a metal entrance door in a wooden house. The average price in this case is 4 thousand rubles. After installing the frame, the door frame is fixed to it. Anchors are not used in this case, as they are useless. Instead, it is customary to use long screws. They are screwed into pre-prepared holes. The drill for organizing such recesses should have a smaller diameter than that of self-tapping screws. This will allow them to be pressed tightly into the wood and prevent them from loosening.
Low tide installation
The final stage of work is finishing. One of its important elements is the ebb above the windows in a wooden house: it is designed to remove rain moisture from the walls and thereby increase their durability. In addition, it covers the lower part of the casing and improves the decorative qualities of the walls.
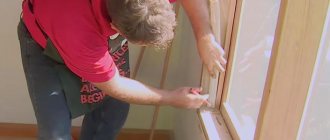
A wooden house or bathhouse changes in size all the time - it either “sits down” a little, then rises again. Therefore, simply taking and rigidly fastening windows and doors into the openings will not work: either the frames will bend or the walls will “hang” and will not be able to sit down when they dry out. To prevent this from happening, a wooden casing (casing or casing) is installed in the opening, which is held in place only by friction. It is already possible to attach a window or door frame to the elements of this box.
First, let's look at the casing profiles. Fixation due to friction is ensured by a simple tongue-and-groove lock. In one case, a tenon is made on the logs/beam of the opening, in the other, a groove is cut out.
If your bathhouse is wooden - a frame made of logs or timber, then the technology for installing windows and doors will be exactly the same as in the house. No difference. So everything described applies to the bathhouse.
Monolithic casing boxes
The counter part is often made from a solid wooden beam. They are also called monolithic or finishing. Depending on whether the groove is cut or a tenon, the mating part is made U- or T-shaped
Please note that when installing windows or doors, the fasteners should not go into the beam/log of the wall. To ensure proper reliability, the frames are mounted in the “thickest” parts of the casing
The casing is made of timber, in which a groove is selected or a tenon is cut. Accordingly, casing/edge profiles are U- or T-shaped
The material for the casing is monolithic or laminated veneer lumber. The use of laminated veneer lumber in bathhouses is not recommended: when using non-moisture resistant glue (and this usually happens), constant changes in humidity cause the glue to break down and the timber to crumble. Therefore, it is better to use monolithic timber of the required size
Just note that the timber must be dry - no more than 12% humidity. If wet, it will crack or lead
Order chamber-drying timber of the required size from the sawmill, or dry it yourself in the shade in a draft for 4-6 months.
This type of casing is called monolithic or capital. You can already attach a window or door frame to it. If the windows/doors are plastic, the “face” of the casing can be left flat. If you plan to install wooden products, choose a quarter for them.
Which of these two casings/pipelines is considered the best? When done correctly, both perform their tasks normally. Everyone chooses what is easier for them to do.
How to make a tenon on an opening
There are two options - first cut a tenon in the doorway, then make a casing block under it. The second option is to mark the tenon along the finished groove. In any case, markings are applied first.
The width and depth of the tenon should be 4-5 mm less than the dimensions of the groove. The casing is “planted” on the insulation, so space is required for it. The width is marked at the end of the logs/beams, the depth - on the side surface of the walls
When marking, it is important to maintain the verticality of the lines.
Next, take a circular saw or chain saw and make cuts according to the marks.
In this case, it is important to maintain the required cutting depth on the side surfaces and not cut off the tenon completely. If you are not very good with a chain saw, it is better to use a circular saw - you won’t be able to cut very deep there.
For an example of the formation of a spike, see the video.
Making a groove in the opening
It’s safer to make a groove: even if the cuts are too deep, you don’t have to remove the entire core; in extreme cases, you’ll make the tenon on the post larger.
Everything is simpler here: you mark the width of the groove at the end. In this case, it is 4-5 mm larger than the groove on the casing/pipe. Make two cuts and remove the middle between them. There are virtuosos who do this with a chain saw, but mostly they work with an axe, then they work part-time with a chisel.
How to install an iron door: preparing the structure
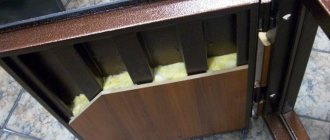
At the next stage of preparing the door for installation, the frame is insulated with mineral wool
Inserting a lock into a door structure yourself is a rather problematic task. Therefore, experts do not recommend doing this process yourself. It is much easier to order a design that already has an embedded lock of appropriate quality.
Door handles most often come uninstalled in the kit. Self-tapping screws are used to secure them. Before installing a metal door, an important point is to check the door locks and latches. Their performance should not raise any questions.
At the next stage of preparing the door for installation, the frame is insulated with mineral wool. It is worth noting some nuances here. For example, if you install an entrance door yourself in a private house and the structure has access directly to the street, then it is necessary to perform additional insulation of the door frame from the outside.
As insulation, you can use the most suitable option - stone wool. The process itself is quite simple: the material must be cut into strips suitable in size to the voids of the door frame, and installed in the frame.
However, mineral wool has one significant drawback: it is not resistant to moisture and during operation it absorbs and accumulates water vapor from the air. Subsequently, this leads to the door frame beginning to rust from the inside. Therefore, before installing an iron door, it is worth taking this shortcoming into account. There are two more common options for insulating door structures: polystyrene foam and foam. Both of these materials have good moisture resistance.
When installing this structure, it is necessary to protect its surface from damage. The paintwork material is scratched quite easily, so masking tape is placed over it. It is removed no earlier than the installation of the door slopes is completed.
Advantages of a metal door
If you are installing the front door yourself, it is better to opt for a metal model. There are a number of good reasons for this:
- Strength. Withstands heavy loads and mechanical stress.
- Safety. High-quality steel is an excellent protection against burglary.
- Thermal insulation. Keeps the house warm, it is possible to use additional insulation.
- A wide range of. A wide variety of models that will suit any situation.
- Fire resistance. It will help contain the spread of smoke and fire, which is especially important for wooden houses.
- Moisture resistance. Does not allow water to pass through, is not afraid of moisture and freezing.
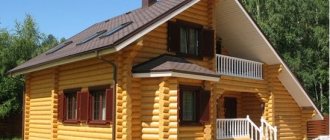
- Durability. Resistant to weather conditions, lasts a long time, maintaining useful qualities.
This is the best option not only for wooden buildings, but also for other types of houses, as well as apartments in high-rise buildings.
Strength and durability are the main advantages of a metal entrance door
Entrance door: installation of the structure in three ways
Today, there are several ways to fix a door frame to an opening. It is important to remember that installation of the structure requires at least 10 fasteners. The traditional mounting option requires exactly this number of mounting points. Moreover, the vertical ends should have three such points, and the horizontal ends should have two. There are the following methods of fixing the door frame:
- through the eyes;
- through a through hole;
- through metal grips.
Through the eyes. Many people are interested in the question of how to install a metal door using this method. Metal lugs are a basic component of some types of doors. They are a frame that is used to regulate the fit of the structure in the opening. They already have ready-made holes that are needed to fix the door.
The process of attaching such boxes has some nuances and includes several stages. First you need to bend the planks towards the wall surface. They must be pressed against it as tightly as possible, since the future performance of the product depends on this. The cost of installing an entrance door of this type is the most affordable. This is due to the fact that such designs are widespread.
Next, at the location of the holes made in the planks, you need to drill recesses of the appropriate length. Their size is selected depending on the dimensions of the anchors. After this, the plank is fixed to the wall using an anchor. To do this, you need to insert the part into the hole and tighten it with a wrench. This is how the entrance metal door to the apartment is installed.
It is worth noting that other devices can be used instead of anchors. For example, their function is often performed by ordinary reinforced steel pins. They are first hammered into the holes (through the eyes) and welded to the structure using welding equipment. For reinforcing bars, the hole depth should be quite large - no less than 15 cm.
We install Factor series doors
Guardian doors from the Factor series are in demand among consumers who want to buy entrance doors inexpensively with installation by specialists or who plan to do it themselves. The procedure should be as follows. After unpacking the product, you need to separate the door leaf from the frame (it needs to be removed from the hinges).
The door frame has vertical posts into which mounting eyes are installed. They are secured with self-tapping screws. Eyelets with a bend are placed in the middle part of the racks.
After this, the box is placed in the opening. Please note that its flange should fit well against the wall. The box is checked for level and plumb, and secured with wedges.
After drilling holes with a diameter of 12 mm through the eyes to a depth of at least 150 mm, the anchor bolts are inserted into them. To prevent the platband from moving away (from turning out), the end of the bent shelf of the eye should rest against the opening or wedge.
Handles are installed as for doors of the DS series. The canvas is hung on the frame and the doors are closed, checking the uniformity of the gaps around the perimeter. Fasten the lock post so that it fits evenly. On the side of the lock post, you need to drill holes with a diameter of 12 mm to a depth of at least 150 mm in order to install anchor bolts and bend the nuts. The bent flange of the eyelet must be supported against the wedge.
Next, close the locks and check how tightly the blade adheres to the seal, and whether the keys turn freely in the locks. If necessary, press part of the stand towards the canvas or away from the canvas. Then a hole with a diameter of 12 mm (depth - 150 mm) is drilled in the supporting structure of the opening through the middle fastening plate with the bend of the rack. Insert the anchor bolt from the kit included. A wedge (gap plate) is installed under the end of the bent shelf of the eyelet. The bolt nut is tightened through the wedges to ensure uniform gaps between the leaf and the door frame. At this stage, you need to check that the platband fits well to the wall along its entire height.
After this, a peephole is installed and the gaps are filled with foam or cement-sand mortar M-70. If a door from the Factor series with a laminated coating was installed, the film is removed.
Installing an iron door in a wooden house: tools
The owner of a wooden house will need a hacksaw and a chainsaw instead of a hammer drillConstruction level;
- Medium sized crowbar;
- Nail puller;
- Hammer or electric impact drill;
- The owner of a wooden house will need a hacksaw and a chainsaw instead of a hammer drill;
- A chisel is needed in order to install a block in a structure made of timber;
- Depending on the method of fastening: anchor plates, self-tapping screws, steel rods;
- Construction foam for filling technological gaps.
Operating procedure
It is worth noting that if the unit’s configuration does not include anchor bolts, then it is permissible to purchase them yourself. These are simple hardware products, the length of which is up to 15 cm. The diameter of the bolts purchased will depend on the holes for installation in the box (usually d = 12-15mm). The pieces of steel rod that are mentioned in the list of tools may also work.
- Dismantling the old structure;
- Preparation of the doorway;
- Installation of an iron door.
The old entrance doors to the apartment are dismantled like this (mostly wooden):
- Provided that the door leaf worked on collapsible hinges, we pry it open with a crowbar or other lever. This way the panel will rise and jump off the loop.
Provided that the hinges are not dismountable: you need to unscrew the screws that hold the door in the frame using a screwdriver or screwdriver.
- It is not difficult to dismantle an empty box with your own hands if it is made of wood.
To do this, fasteners (visible) are unscrewed: screws, anchors, nails are pulled out. If the box is firmly held in the opening and cannot be removed, its side posts are sawed off and torn off with a crowbar. After which the lower and upper parts can be removed without any problems. - If a metal box is being dismantled or a wooden box is attached to the opening with anchors, then it is easier to saw them off with a grinder, just like metal posts.
- Next, the opening is cleaned of old insulation, remnants of plaster, protruding fasteners, and other things.
Provided that the doorway for the new door has been previously correctly measured, its size should exceed the perimeter of the frame by a couple of centimeters. This is necessary so that there is enough space to align it in the opening. If you made a mistake in measurements earlier, you will have to work hard to widen the passage with a grinder with a circle on the stone. If the opening is too wide, it can be narrowed by additionally applying cement mortar. A metal frame can be attached to a doorway in two ways:
- through technological holes in the box profile;
- using special mounting plates.
It is permissible to install the box through the holes in the profile provided that the wall thickness exceeds 150 mm, otherwise the box can easily be torn out from the wall along with the canvas
It is permissible to install the box through the holes in the profile provided that the wall thickness exceeds 150 mm, otherwise the box can easily be torn out from the wall along with the canvas. We put the input structure:
- A door frame without a leaf is installed in the opening. Wood wedges are placed under it, which are necessary for fixing, adjusting its position and to ensure technological clearances.
- Having adjusted the position of the box, they begin to drill holes in the wall through the previously made holes in the profile: 15-20 cm deep. Anchors are inserted into the drilled sockets, and the position of the racks is checked again. When positioned correctly, the anchors are twisted and covered with decorative elements matching the color of the box.
- Next, the door leaf is hung on pre-lubricated hinges and all the fittings are attached. The canvas is covered, and the gaps around the perimeter of the rack are checked, which should not exceed 4 mm.
Mounting the door block on plates is one of the most common methods and is somewhat simplified for doing the work yourself. Often, metal structures are equipped with mounting plates with prepared holes for fasteners, which are welded directly to the frame.
How to install DS series doors
The installation of doors of different series has its own nuances, which should be discussed in more detail.
When installing serial DS doors, the door leaf must be removed from the door frame. Install the mounting plate into the hole on it and turn it 90º degrees. To ensure rigidity of the block, it is recommended to weld the plates to the box before installing it.
The door frame is installed in the opening and set to level and plumb. It needs to be secured with wooden wedges. Holes are drilled through the holes in the plates 150 mm deep into the opening in order to drive in the mounting rods and weld them to the mounting plates. The diameter of the holes is 14 mm. There will be three or five of them in total (for DS 8U and DS 3U).
To install the handles, they must be set taking into account an overhang of at least 24-26 mm and secured with screws (they are provided in the kit).
After this, the canvas is hung on the box and closed. At this stage, you need to carefully study how uniform the gaps are on all sides. If necessary, adjust the door frame lock post horizontally and vertically. The seals must fit evenly and the holes for the locking bolts must be appropriate.
After this, you need to drill two holes (for DS 3U and DS 8U - four) on the lock post through the mounting plates and weld them. We check how the key and the turntable turn, having previously closed the lock and bolt. At this moment, nothing should stick, tug, or interfere.
If necessary, press the box in the middle of the rack, drill a hole in the wall and hammer in the middle rod. If the locks and latches work flawlessly, the rod must be welded. When checking the operation of the crossbars, you can bore holes for them in the door frame, if necessary.
The door block with fastening through the frame should be installed in a similar sequence.
Entrance door design
From a technological point of view, installing door metal products at the entrance is not so difficult, but this issue should be approached responsibly, since the thoroughness of the work will further guarantee the quality of operation of the structure. Common mistakes made during installation work boil down to the following, which is worth knowing before installing the product:
- The distortion of the door frame lies in its incorrect alignment relative to the vertical and horizontal.
- The unevenness of door installation depends on how thoroughly the seat is cleaned.
- Installing an entrance door in panel houses is more difficult because when drilling under the anchors, reinforcement may be caught, which will pull the fasteners to the side. This error can be avoided by using metal rods that shift the drilling point deeper.
Installing an iron door: fastening with metal clamps
Operating procedure
Another way in which it is possible to fix the door frame to the opening is by fastening it with metal clamps. The main feature of this method is that its implementation requires an additional external frame. This frame is made of profiled steel metal.
Let's take a closer look at the process of installing the front door. The price of installation ordered from the manufacturer may vary and depends on the dimensions of the structure, as well as its weight. Fixation using grippers begins with attaching metal strips to the loots. This operation is performed using welding equipment. Metal strips must be welded to the attachment points around the perimeter of the door. Their width should completely match that of the end of the doorway, with the recommended thickness being 2-3 mm.
The result is a stable structure, which is supported from the outside by a frame made of profile pipes. The door is secured on the inside with metal hooks.
How to install an entrance door in openings made of different materials: installation features
Currently, there are three most common types of materials used in construction: foam, gas and expanded clay concrete. Installation work differs in features depending on which type of raw material is used in a particular case. Useful information! The materials listed above are used to construct buildings that belong to the group of fragile load-bearing structures.
How to install a metal entrance door in this case? The installation process in this situation is carried out taking into account two rules, which are described in detail in building codes (SNiP). The first of them tells us that to increase the strength of the structure it is necessary to use a larger number of locking elements.
As mentioned above, to secure the door you will need three points on one end side. For a door structure installed in an opening made of expanded clay concrete (or other similar material), this number will be higher - from 4 to 6. Moreover, the depth at which the fixing elements should be located is at least 20 cm.
Currently, there are three most common types of materials used in construction: foam, gas and expanded clay concrete
How much does it cost to install a door in this case? Professional services in such a situation will cost several thousand rubles. Self-installation of the entrance group allows you to save money, but you will still have to spend money on additional materials.
For fastening to a wall that consists of foam concrete, it is strictly forbidden to use traditional metal anchors. This is due to the fact that they quickly become loose in soft walls during operation. The most suitable option in such a situation is chemical anchors.
When choosing a design of this type, it is recommended to calculate the price of the entrance door to the apartment with installation. This will allow you to determine whether there is a need for self-installation.
The second point that you need to pay attention to is additional frames. Soft walls require strengthening. For this purpose, a crimping structure consisting of two frames is used. Such elements are made from profiled steel pipes, the width of which can be 40 or 50 mm. Both frames are fixed to each other using steel plates.
The nuances of installing an iron door in a wooden house
Log houses shrink significantly over time. You should not work with openings in a wooden house in the same barbaric manner as with other materials. It is highly not recommended to drive pins into 150 mm long timber in a wooden opening. Tips on how to install an iron door in a wooden building yourself:
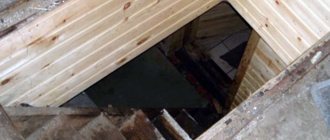
In the finished opening of the end wall of the house, vertical grooves are cut out and filled with tow. It is worth installing sliding bars in the given recesses. The number of grooves required is equal to the number of fixing points.
A special casing needs to be placed in the opening; it is secured to the sliding bars with self-tapping screws. The gaps on the racks in the house should be 2 cm, on the horizontal crossbars - at least 7 cm, so that after a year the shrinkage of the log house does not jam the door.
Sources:
- https://remoo.ru/okna-i-dveri/vhodnaya-dver-ustanovka
- https://myvestaforum.ru/dveri/ustanovka-zheleznoj-dveri-v-derevyannom-dome-svoimi-rukami
- https://delajdveri.ru/montazh/kak-pravilno-ustanovit-derevyannuyu-dver-s-korobkoj-svoimi-rukami.html
How to make a doorway in a wooden wall
To cut a doorway in a wooden house you will need a chainsaw or electric saw.
Additionally, they stock up with bars with a cross-section of 10*10 cm. The length of the blanks is equal to the height of the room. The bars are needed to strengthen the wall. When cutting out a doorway, the wooden partition can bend. To avoid deformation of the structure, the bars are placed vertically on both sides of the wall near the slots for the future passage. Through holes are drilled in the racks and partition and the structure is tightened with long bolts.
To properly make an opening for a house made of logs, make sure that there is a solid element on top of the passage. This will be the load-bearing jumper. The markings are applied so that an additional 1/5 of the thickness of the whole log remains at the bottom and top of the passage during cutting.
Sawing laminated veneer lumber with a chainsaw can result in the boards delaminating. To prevent destruction of the material, nail the bars with long nails near the cut site. At the end of sawing, the passage is strengthened and the temporary bars are removed.
To arrange a doorway in a frame house, the sheathing along with the internal insulation is first dismantled. After cutting, a timber frame is installed around the perimeter of the passage. The thermal insulation along with the sheathing is returned to its place.