Frequency and hygiene are important aspects of every person’s life and such principles should be maintained in all conditions. If in an apartment building you can safely take a bath, then in a summer cottage or garden plot this is a difficult task, but you can refresh yourself in the shower if you build such a structure yourself.
Assembling, installing and connecting an outdoor shower with your own hands is not the easiest task, but after studying the procedure step by step, you can get to work. At the preparatory stage, you should think through all the nuances, select the type of structure and all the necessary materials, draw up a project and select the location of the building on the site.
Types of summer shower designs by installation method
The simplest and easiest types of structures to build are portable or folding summer showers. Their construction will require a minimum of materials and time; the frame can be covered with film, and for the winter the structure is disassembled and stored in a utility room until next summer.
Building a stationary summer shower for a dacha with your own hands is a little more difficult and you will have to take into account many nuances. But the advantages of such a building include its durability and thoughtful design, the ability to be used for several seasons and possible modernization.
How to build a shower in the country with your own hands from various materials
As already mentioned, the use of various materials in construction has its own specifics. It is very important to understand which of them can be combined and which ones should not be combined. For example, it makes no sense at all to mount a frame made of thick timber if the exterior is planned to be made of polycarbonate. In this section we will analyze the nuances of certain combinations of building materials. Let's start with the most common option - wood.
Outdoor shower for a cottage made of solid wood
This is the heaviest material, requiring reliable support and, most often, a pile-screw foundation. It is better to use timber as racks here. At the same time, the thicker the boards used in finishing are, the wider the edges of the timber should be. Most often, such buildings are sheathed with thin clapboard. In this case, a beam measuring 50x50 mm is sufficient.
Wood looks much better than other materials PHOTO: zsad.ru
How to build a summer shower from profile pipes
The profile pipe is lightweight, but its strength is quite high. A frame made of this material is usually covered with polycarbonate sheets. If we talk about cost, then such a shower stall will be quite expensive, but its appearance will be at a fairly high level. The only problem here is the difficulty of choosing the finishing material. Low-quality polycarbonate does not tolerate direct sunlight and temperature changes. It happens that it begins to crack already in the second year of use. This often happens when there is overvoltage, when the bending of the canvas is too strong.
PVC panels can be used as a finishing material for a summer shower made from a profile pipe - this option will be more practical. The advantage of such a building is that it does not require interior finishing.
Interior decoration of the shower with plastic panels PHOTO: fishki.net
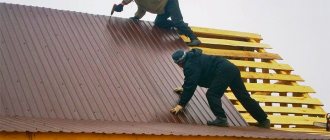
Summer shower made of corrugated sheets: another finishing option
Corrugated sheeting as a finishing material can be used both on a wooden frame and on a pipe. However, the appearance of such a shower stall will not be very presentable. Such buildings are often compared to a shed or shed for storing garden tools. However, such a shower will be profitable in terms of cost, and the rinsing process in it is no worse than in a polycarbonate building.
Corrugated sheeting does not look very attractive PHOTO: metkon24.ru
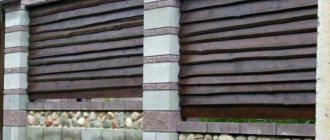
Summer shower made of brick: nuances of construction
This is the most thorough of all the options listed. Such a cabin requires a high-quality foundation. But, despite the fact that such a building is very durable (if laid correctly), a brick shower is inferior to others in terms of comfort. The fact is that brick does not warm up so well, which means that the shower stall will always be cool. This will entail the need for additional heating of water. And the construction of a brick building, and then its interior decoration, will take much more time than a structure built using polycarbonate or corrugated sheets.
PHOTO: pinterest.ru
PHOTO: sdelaysam-svoimirukami.ru
PHOTO: udec.ru
PHOTO: udec.ru
Foundation arrangement
Stationary shower structures require additional fixation to give them strength and stability. To do this, you can build an inexpensive foundation from prepared timber, brick, or fill the site with concrete, which will strengthen the foundation of the building.
Often the foundation base is replaced with a reliable pan, which is formed from a cement pad with a hole for draining wastewater into a drainage ditch.
Making a wooden shower with your own hands
First of all, you need to decide on a place for construction.
Further ease of use will depend on this. A secluded place where there is no draft or strong wind is best - so that after taking a shower you will not catch a cold on cool evenings. It is desirable to have sunlight so that the wood from which the cabin is made has time to dry out. It also requires distance from home and places of rest - there may be a slight stagnation of water under the shower, and dampness always means the presence of insects. The construction of a shower for a summer house itself will not take much time. The necessary materials are available in a wide range in construction stores.
Main stages of construction :
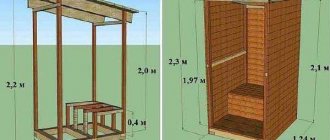
- The first step is to make a pallet for the cabin, which is lined with roofing felt. You need to measure carefully, since this will determine how to make the frame. The optimal pallet size is 3*3 meters, no more is required. A cabin of this size will be well ventilated and there will be enough space in it to place the things necessary for shower procedures. You can purchase a ready-made pallet, thereby saving time, but if you are in the mood to do the work entirely by hand, then it is not difficult to make it.
- A drain hole is dug out at a distance of a couple of meters from the cabin. The need for it arises if more than three people wash, then the water will not have time to be absorbed by the ground, and there is a need for water drainage. It must be remembered that it is imperative to organize the pit at a distance from the beds with edible plants, since soap and foaming substances will get through the soil onto the roots of the plants, which can lead to either their death or poisoning of the fruits with chemicals. Drainage needs to be done around the hole.
- A drain is made from the cabin to the pit . The gutter is laid with waterproof materials. Gently dig it into the ground and ensure that the depth is optimal.
- Making a shower stall. The most optimal material would be larch or coniferous wood . The height will be about three meters. The frame of the walls is made of timber, the base of which must be tarred, wrapped in roofing material and dug into the ground, and preferably concreted. This is necessary to create stability for the entire structure and prevent it from wobbling. The shower floor is made of slats knocked together at intervals through which water will flow. They are first carefully sanded, coated twice with a layer of antiseptic and attached to the frame with self-tapping screws. The walls of the cabin are sheathed with boards, in the upper parts of which it is necessary to provide ventilation.
- A water tank is installed. Typically, barrels with an average capacity of 100 liters are used. For a large family, a 200-liter tank with reasonable water consumption is enough for a couple of weeks of use. Having purchased a suitable one, you can paint it a dark color so that in the sun the water heats up faster. Reflective material placed on the roof, such as foil, is also suitable. A pipe with a tap and a water diffuser is installed in the tank. If the set will be carried out manually, you need to provide a ladder . But it is better to provide a pump so that there are no problems with water during the watering season.
Frame shower base
The frame of the shower cabin must be as strong and reliable as possible and not susceptible to corrosion. Most often, it is constructed from galvanized metal pipes, PVC materials or timber; it makes sense to impregnate the wood with special solutions that prevent rotting.
Specialized stores sell ready-made frames for outdoor showers, and such a purchase can be included in the construction budget, assessing the costs and payback of the structure.
Shower with a cabin made of wooden beams and a car tire
The simplest and most comfortable outdoor summer shower can be made from a wooden frame and plastic film, as in the photo below.
For work you need the following materials:
- wooden beam: 50 by 50 by 3000 mm – 10 pcs; 20 by 50 by 3000 mm – 10 pcs.;
- 90° mounting angles – 36 pcs; at 135° – 16 pcs.;
- self-tapping screws of different lengths from 1.5 to 10 cm;
- loops;
- polyethylene foam for walls – 10 m;
- profiled sheet;
- car tire;
- water tank 50 or 100 l.
You will also need any means to treat wood against rotting.
Do this:
- Prepare the cabin frame according to the preliminary drawing. The assembly steps are in the video below.
- Dig a hole and install a car tire in it.
- Install a booth on 4 blocks around the perimeter of the pit.
- Lay a slatted floor.
- Treat the frame with anti-rot wood impregnation. After drying, cover the booth with polyethylene foam.
- Assemble the frame for attaching the tank. Sheathe it with polyethylene foam and screw it to the corrugated sheet for the roof.
- Pass the hose and secure the watering can.
- Hang the curtain.
The cabin is ready. It’s easy to do and can be done in 1-2 days.
Shower room made of corrugated sheets
A shower stall with a metal frame and walls made of corrugated sheets will last a very long time. It is quite simple to do, but to install the frame you will need a welding machine.
To install the cabin, you need to dig a drain hole and strengthen it if necessary. The cabin is dug into the ground with its legs.
To assemble the cabin you need:
- profile pipes 30 by 30 mm for racks 220 cm high;
- profile pipes 30 by 20 mm;
- corrugated sheet 200 cm.
Do this:
- Cut blanks for racks and crossbars from pipes and weld them. You need to leave 15 cm for the legs, then the total height from the floor to the roof is 205 cm.
- Weld the door frame and place it on the hinges.
- Clean all joints.
- Prime and paint the frame.
- Lay the floor from the boards.
- Cover the walls and door with corrugated sheets, leaving windows.
- Cover the roof with galvanization.
Then you can install the tank on the roof, cut a hole, and bring out the hose with the watering can. Inside, you can, if desired, screw hooks or make a small shelf.
Summer shower made of a metal frame with a hinged door and an awning made of polypropylene
If you have the opportunity to weld a metal frame yourself, you can make a reliable summer shower with an awning covering. The wall covering can be changed as it wears out, and the frame will last a long time.
If desired, the cabin can be installed for a long time in one place, then you need to dig a drain hole under it. In this case, you will have to lay a floor or make a tray with a drain. If you don’t want to make a hole, the cabin can be portable with a smaller tank.
To work you need:
- metal pipe 40 by 25 mm;
- polypropylene film with eyelets around the edges;
- roof tank 115 by 115 cm matte black, so that the water warms up well.
The sequence of actions is as follows:
- Cut a metal pipe and weld the frame according to the drawing.
- Weld the door and place it on the hinges.
- Weld crossbars on top for the frame under the water tank.
- Cover the frame with polypropylene with eyelets using rope. The door can also be covered with film.
- Install the roof tank on top. It is made in the shape of a square 115 by 115 cm. Its capacity is 200 liters.
- Screw the faucet with the diffuser to the tank.
The cabin is ready. You can hang a light plastic shelf inside. The cabin is installed on the ground, the legs are dug in for reliability.
This is a very simple and quick option on how you can make a summer shower at the dacha or on a camping trip with your own hands from the simplest materials at hand. All these materials are not difficult to take with you, since they take up little space and have almost no weight, and in the summer you will always find a water bottle.
Post Views: View statistics 1,470
Coating material
When choosing building materials to cover the frame, you can pay attention to opaque, most reliable and durable materials:
- opaque cellular or monolithic polycarbonate, it can be of any color and is available in sheets;
- corrugated sheet metal with a polymer protective coating, it is easy to drill and fasten to the frame base;
- natural or artificial rattan, such wicker coverings allow air to pass through and help decorate the area;
- processed lumber, for the shower you can choose boards and timber impregnated with special solutions;
- agrofibre or fabric with a water-repellent coating, inexpensive and high-quality materials with a long service life.
To furnish a shower, you can use polymer, opaque films, which will be cheaper than purchasing other materials.
Tank for a summer shower for a summer cottage with heated water
Tanks of different shapes and volumes are used to store water in the shower. Most often this is a metal barrel painted black. Due to its instability to corrosion, it quickly rusts and begins to leak.
More durable - tanks made of plastic or stainless steel. There are flat square containers on sale that are conveniently mounted on supports and quickly warm up in the sun.
A ready-made or home-made tank is provided with fittings for connecting tubes for supplying water and fastening the spout, and a lid for maintenance. Factory-produced containers can be additionally equipped with a water heating device with a thermostat and a float valve that controls the water level.
Liquid collection container
To ensure a constant flow of liquid, a tank or special container is installed on the roof of the structure. This can be a plastic or metal barrel, with a hole for filling and draining, equipped with a filter for water purification and a heating element for heating in cold weather.
In a metal container, water heats up faster, and it is important to choose a tank with an internal anti-corrosion coating to prevent rust.
Tools and materials
Before we start work, we need to stock up on everything we need.
The instructions recommend using the following for construction:
- Wooden beams with a cross-section of 50x50 mm and a length of up to 2.5 m. We will need from 4 to 6 such parts for the manufacture of vertical supports.
- Beams or thick boards for the top and bottom trim, and to strengthen the frame.
- Wooden slats for flooring.
- Lining for covering the walls of a shower stall.
Advice! The best option would be to purchase larch blanks. Maple, pine and ash also tolerate loads well, but cope less well with moisture. In principle, it is possible to use oak, but for this purpose it is too expensive.
- Water tank on the roof. You need to buy a special container with a wide neck and a lower pipe to which a faucet and shower head are connected.
- If necessary, a shower tray (you can do without it).
- Various accessories - towel racks, shelves, curtains, etc.
In addition, we will need consumables:
- Fasteners - screws or nails.
- Concrete for installing supports in the ground.
- Materials for constructing a drainage well or ditch to a sewer septic tank.
- A product for impregnating wood and protecting it from liquids and microorganisms.
As for the tools, you can get by with a standard set:
- Entrenching tool for excavation work.
- Equipment for mixing concrete (mixer or simple trough)
- I used a wood saw (disc saw, saber saw or hacksaw).
- Drill or screwdriver.
- Building level.
- Hand tool.
- Brush or sprayer for applying moisture-proof impregnation.
At the time when everything is ready, it is possible to start work.
Filling the tank and heating
Collecting rainwater is very economical, but in dry summers it will take a lot of effort to manually fill the tank. The best option would be to install a pump with medium or low power, which will help quickly and at the right time fill the container in advance of swimming.
The additional installation of an electric water heating element will ensure that the liquid is warmed to a comfortable temperature, and such a shower can be used even at the beginning of autumn.
Draining water in an outdoor shower
Wastewater disposal is organized in various ways. The choice of option depends on the design of the pan, the volume of water consumed and the permeability of the soil. The simplest drain for water is a shallow drainage in the form of a hole filled with broken bricks, stones, gravel, and crushed stone. It is effective if the soil is sandy and easily absorbs moisture. A wooden grate is installed on top.
Clay soils are poorly permeable. Water flows through them with difficulty. Often with such soils there is a high level of groundwater, and there is no point in digging a deep hole - it will be constantly filled.
In this case, it is better to dig an empty container next to the shower and put a gutter or pipe there. You can arrange a drainage groove somewhere to the side, then the water will not stagnate directly under the shower.
If the floors are concreted, you need to make a slight slope towards the drainage funnel or pipe. The second end of the drain is discharged into a drainage hole, well or ditch.
Wastewater removal and drainage
When planning to install a summer shower with your own hands in a private home, it is necessary to provide wastewater disposal technology. To do this, you will have to dig a drainage or drainage ditch through which water will be drained from the site, which will prevent it from flooding and damaging the upper, fertile layer.
For stationary showers, it is possible to provide a drainage system constructed from PVC plastic pipes connected to a filter unit for repeated purification of the liquid.
Do-it-yourself installation of a stationary summer shower in the courtyard of a private house
The first thing you should think about when planning such a structure is water drainage. If a portable shower for a dacha can be moved, then such a number will not work with a stationary one. It is also important to understand what the weight of the building will be. If you install a shower stall with the expectation that it will last for more than one year, you also need to think about the construction of the foundation. Based on our step-by-step instructions, we will try to figure out step by step what actions and in what sequence need to be performed when carrying out such work.
How to make drawings of a summer shower with your own hands
This question is relatively simple. If you do not plan to use stones or bricks as a building material, then highly complex and accurate calculations will not be required to draw up the project. For example, you can look at ready-made drawings drawn up by home craftsmen. After that, you can choose one of them or create your own, different from the others.
Garden shower-toilet - drawing compiled on a computer PHOTO: promtu.ru
How to prepare a site for a summer shower
Everything here is extremely simple.
You just need to level the area for the outdoor shower with your own hands and dig a cesspool. It can be located either directly under the booth or to the side. It is best to choose a place with soft soil that easily absorbs moisture. The idea of combining a toilet with a cesspool is not very rational, although it has a right to exist. If the soil from the walls is crumbling significantly, it makes sense to install partitions around the perimeter or use concrete rings. The bottom of the hole is filled with broken bricks or large crushed stone - this will allow moisture to seep into the ground faster.
The cesspool can be located directly under the shower stall PHOTO: sam.mirtesen.ru
How to make a foundation for a summer shower with your own hands
Such structures are rarely too heavy, so there is no point in installing a strip foundation. It is better to simply dig up the installation sites for the shower stall supports and place blocks in them, slightly raising the floor of the building above the ground. However, this statement is not always true; if the soil is sandy, subsidence is quite possible. In this case, it is better to mount a pile-screw foundation with a recess of 1-1.5 m.
Sometimes ordinary blocks for racks are enough PHOTO: dacha.kotelsangai.ru
How to make a frame for a shower in the country with your own hands
Depending on what you plan to cover the structure with, the material for it is also selected. For example, if you will use wood to decorate a shower in a private house with your own hands, then it is better to assemble a frame from timber. Such a structure will be much heavier, but it will not break under the weight of the array.
Sometimes a timber frame becomes the best option PHOTO: ogorod.mirtesen.ru
Often shower stalls in the country are made lighter by sheathing them with PVC panels or polycarbonate. In this case, you can assemble a frame from a metal profile, similar to the one needed for installing drywall. This is very convenient, because such work does not require assistants, it can be done alone. Moreover, such a construction will not require much time. But more often a profile pipe is used.
The profile pipe is ideal for the frame PHOTO: nafundamente.ru
External and internal finishing of the shower cabin
If the outside of a shower in a private house can be decorated with any material, then it is better to make the internal walls waterproof. Despite the fact that many try to use lining for such purposes, experts say that wood that has absorbed moisture does not dry out for a long time, which means it will quickly begin to rot. This is quite logical, here the room will not warm up like in a bathhouse, which means that the appearance of mold and mildew is almost inevitable.
You can get creative with the decoration of the shower stall PHOTO: remontbp.com
How to make a heated water shower tank
To ensure that the water from the tank is supplied already warm, you can use 3 options. The easiest way is to paint the container black. It will attract the sun's rays, which will lead to natural heating during the day. The second option is to install a solar collector for a heated summer shower on the roof of the building. When assembled correctly, water will heat up as it passes through the manifold. Such a heater can be called flow-through, provided there is low pressure. Only in sunny weather will the water warm up to the required level.
Foot pump for summer shower “Topotun” PHOTO: dacha.gramix.ru
The most difficult in terms of implementation is the installation of heating elements inside a container with water. The main problems here are to ensure tightness during installation and connection of tubular electric heaters. It is also important to ensure that the fluid level in the tank is correct. Its absence will lead to burnout of heating elements. In dachas, this method is rarely used due to the high energy consumption. Although heating water for a country shower in this case occurs much faster.
Such a tank with a heating element can be purchased in the store PHOTO: slayn.ru
You can purchase a tank for a country shower or make it yourself from a large-volume barrel. The main thing is that the container is closed. Otherwise, dust, leaves and other debris that the wind can bring into the water will get into the water. Below you can see the various options for such devices.
Photo examples of tanks for summer showers
We suggest considering several types of water containers that can be used when building a shower.
PHOTO: roomester.ru
PHOTO: sampaer.ru
PHOTO: vseinstrumenti.ru
PHOTO: 36-voronezh.buyreklama.ru
How to automate filling the container of a garden shower for a summer residence
This is easy to do if you have experience working with toilet cistern fittings. It is best to use it by setting the float to the desired level for stopping the water supply. In this case, liquid can be added to the container as it is consumed. As a result of uniform filling, the water in the tank warms up better. After all, when using fittings, the container will be replenished in small volumes, which will immediately mix with the already heated contents.
A float from such fittings will help automate the supply of water to the tank PHOTO: rmnt.ru
How to make a watering can for a country summer shower
Most often, such parts are purchased at hardware stores; they are inexpensive. But if you wish, you can make the device yourself. To do this, use the tip of a broken garden watering can to water the beds. This can be found in almost any dacha. The main thing to remember is that you must install a tap between it and the container, which will prevent water from flowing out of the tank immediately after it begins to be filled. Absolutely any faucet can be used. Most often, ball models with a 45º rotation and a long handle are used - these are much more convenient to use and very rarely break.
Such watering cans are inexpensive PHOTO: lanshaft.com
Shower tray: installation features
As a pallet, you can use a prefabricated board made of boards with small slots. Many people say that the easiest way is to place a ready-made pallet for bricks or cinder blocks on prepared supports, but the width of the openings between its boards will not allow you to shower comfortably. There is a risk of your foot falling between the boards, which means you will have to install another floor covering on top. This means that a self-assembled shield is much more suitable for these purposes.
The pallet should be located at a level of 15-20 cm from the ground. This will provide protection from the wood coming into contact with wet soil, which means it will protect the boards from premature rotting.
Even such a pallet is enough PHOTO: lanshaft.com
Photo examples of ready-made shower cabins for a summer residence, made by yourself
Often it is enough just to look at the finished shower stall to understand how to make it and in which place in the summer cottage it will look best. To do this, the editors of Homius invite you to take a look at ready-made buildings made by home craftsmen.
PHOTO: ooovista.ru
PHOTO: economics.com
PHOTO: dachavremya.ru
PHOTO: hroomy.com
PHOTO: newenglandpondhockey.com
PHOTO: stroy-podskazka.ru
How to choose the right place to install a shower
After the type and type of structure has been selected, the budget has been approved and materials have been selected, you need to think about where to install the shower. In this case, you should take into account the principles of energy saving and saving your own finances, and when choosing a place for installation, it is recommended to adhere to a number of rules:
- the shower is installed in a well-lit place. When installing a water heating element in a container of water, it will heat up on a hot summer day under the influence of thermal solar radiation;
- the structure should be on an elevated position. This design will facilitate the natural drainage of water and wastewater discharged into the drainage ditch will not be able to cause damage to the garden plot;
- It is better to place the building next to a residential building. After washing and an invigorating procedure, you won’t have to run to get to the house, and from the walls of the building it can also be shared with a residential or outbuilding.
By choosing the right location for installing a shower, you can not only save on building materials and use resources carefully. A well-placed building will not violate the integrity of the landscape design composition and the usable area of the site will be used as rationally as possible.
It’s very simple to build a summer shower for your dacha with your own hands from wood or other building materials; you just need to design the building correctly. Temporary and permanent structures will last as long as possible, and their construction will pay off if the calculations of building materials are carried out correctly.
Even when building the simplest structure, over time it can be modernized and functional elements can be added that will help improve the outdoor shower.
https://youtu.be/cuD6J7WD3Gwhttps://youtu.be/E45E4xO9dSk
_
Summer Shower Design Ideas
The professional design projects in the photo once again remind you that not only the external cladding of the shower stall is important, but also the comfort inside the building. Therefore, before proceeding with the construction of a standard structure with a minimum area that satisfies only hygienic needs, it is worth considering other options.
If you have a general interior design project - path fences, supporting walls, it is advisable to fit the booth into the overall style. It will be much easier to do this at the design stage, making the optimal layout and combining decorative and functional elements of landscape design.
For example, you can make an original wall from natural stone using the dry masonry method. By giving the perimeter of the wall a rounded shape, or by building it as a blank element of a rectangular labyrinth without doors, you can create an original and comfortable structure without doors with a place for a changing room with hangers, and low barriers like benches and bar counters.
Original concrete structures with a streamlined shape that can be painted in any color, combined with a shower suspended on dry wood, is another stylish solution.
- Do-it-yourself tandoor - step-by-step instructions for quick production at home (100 photos)
Do-it-yourself bathhouse made of timber - 120 real photos of ready-made solutions. Step-by-step instructions for beginners
Country cabins - an overview of the best options. 100 real photos + DIY construction instructions
Rectangular structures made of white plastic with a removable roof, equipped with a designer set of plumbing fixtures and decor, will become an elegant addition to minimalist architecture. High-quality wood paneling is ideal for eco-style; slats painted in soothing colors are an option for lovers of Provence.
Combining and zoning with decorative tiles, pebbles and flat stones for decking, painted concrete and stone will recreate the atmosphere of the tropics.
Sheathing of unpainted corrugated sheets for an adjacent wall in combination with a wooden floor is a relatively cheap and labor-intensive option for an external shower adjacent to the house.
To increase the pristine effect of design buildings, water tanks and outlets are masked, or a separate line of water supply, sewerage and lighting is provided for the summer shower. Typically, such capital buildings are built near a residential area, so this approach may be completely justified.
In modern outdoor showers, it is also justified to use ready-made shower rails for outdoor use, equipped with a pump. In this case, the construction of fences can be replaced with a waterproofing decorative wall and a drainage floor, and you can shower in bathing suits.
Plants in tubs or flowerpots are also used to decorate showers. Climbing crops can create a living fence.