Design and shape options
A step is the main component of a flight of stairs. According to experts, the minimum permissible number of steps in a staircase is 3, and the maximum is 18. There are three main criteria that determine the type of steps.
By location:
- Frieze - there are upper and lower ones. The first one ends the climb at the upper level, and the second one starts it at the lower level.
- The rank and file are all the other steps that form the march.
By geometry:
- Straight - ordinary elements that have equal depth along the entire length of the tread. The predominant number of flight stairs consists of them, especially for direct ascents.
- Winders are elements used in modeling turning marches. They are used in screw structures and have unequal tread depths: narrower at the inner edge and wider on the opposite side.
Types of steps
Depending on the presence or absence of risers, stairs are:
- Open - have steps in which there is only a horizontal part or tread. The distance between structural elements remains empty.
- Closed - have steps with risers.
In addition, the elements of a flight of stairs differ from each other in shape:
- Direct. They look like a rectangle. This type is not recommended for screw structures. You can attach such elements in any way.
- Round ones are characterized by radial edges. They are often used to decorate a porch on the street and as the lowest step when climbing.
- Semicircular steps are also used when entering a house from the street. They have a semicircle on one side and a straight line on the other.
- Trapezoid-shaped elements form the design of spiral staircases and rotary staircase models.
Steps are made from different materials: wood, concrete, metal, glass, brick, veneered plywood. According to experts, it is easiest to work with wood: the blanks are easy to make and the tools for making them are quite easy to use.
What could be the shape of the steps?
The most common shape of steps in the porch of a private house is, of course, a rectangle. Sometimes building designs also include spiral street staircases. In this case, the steps of the external porches have a trapezoidal shape.
Steps for the porch. Photo of the trapezoidal version
According to the cross-sectional shape, the following types of steps are made:
- Block. In such stairs, the upper cladding hangs over the lower one by about 3 cm. However, the steps themselves do not lie on top of each other and are separated by a mortar seam;
- Triangular (wedge-shaped). They have a beveled vertical plane and a fold about 3 cm deep that serves to prevent slipping;
- Slab. They have unlined risers or no risers at all;
- Angular. They have an angular cross section. Can be hanging or standing.
In cross-section, the steps can have very different shapes.
The simplest to manufacture are the usual rectangular standing corner and slab versions of the steps.
Types of wood for steps
Reliability, aesthetic appearance and durability of elements directly depend on the characteristics of the material. The following requirements apply to the tree:
- Structural uniformity of wood fibers. High-quality workpieces are free of cracks, delaminations, knots and other defects.
Unacceptable defects in raw materials
- Integrity. Before buying wood, you should pay attention to ensure that there is no rot or traces of wood-boring beetles on the workpieces.
- Humidity is within normal limits. This figure should not exceed 12%. Otherwise, the boards should be thoroughly dried before use, avoiding direct sunlight.
It is recommended to make elements that will be subject to constant load from solid wood. If this is not possible, then it is permissible to use laminated veneer lumber.
Different types of wood are suitable for making steps with your own hands. But the most popular are:
- Pine. This is an inexpensive and easy to process material. It is characterized by a low degree of hardness, therefore, when working with it, you can use the most common tools. In addition, pine is always available: it is not particularly difficult to find lumber of the desired size and shape. The disadvantage of pine products is considered to be low wear resistance and the appearance of yellowness on the tree a few years after installation.
- Birch. It is distinguished by its durability and special textured pattern. Unlike pine, it is more difficult to process, but birch parts will last much longer. When using birch in construction, the selection of blanks is especially difficult. It is almost impossible to find large boards of uniform color and without defects. Therefore, experts recommend covering the composite structure with veneer.
- Larch. Steps made from this type of wood do not deform, do not shrink, or rot due to the high content of tannins. The main disadvantage is the high price.
- Beech. It is considered a more suitable material for stairs inside the house. The appearance of the blanks is beautiful color and texture. The main disadvantage of wood is its instability to temperature fluctuations and humidity. Even beech blanks soaked in varnish will change shape under the influence of natural factors.
- Ash. It has a high degree of hardness and is therefore ideal for the production of steps. However, due to the complex processing and bright texture, the material is not to everyone’s taste.
- Oak. Wooden steps for stairs made of solid oak are the best choice. Such steps will last for decades. The only disadvantage of this material is its high cost.
Treatment of steps with protective agents
Steps made of larch or oak are quite resistant to external influences. But there are several techniques that can further improve the protective properties of the material. Oak steps can be varnished. This adds shine and prevents minor scratches on the surface. Temperature changes and humidity have a negative impact on wooden steps; they can become deformed. Varnishing the surface eliminates such a nuisance.
It is better to use polyurethane mixtures as varnish, which can withstand significant damage. The varnish is applied in three layers, but first a primer is applied.
The next operation to extend the life of the product is wood impregnation. At the stage of selling wooden products, no one can say for sure in what conditions they will be used: in dry places with high loads or wet conditions.
Positive effects of impregnation:
- creates a surface wear-resistant layer and improves the performance of wood (not so important for steps made of larch and oak);
- reduces the sensitivity of the material to ultraviolet radiation - paints and varnishes last a long time and do not fade;
- improves the moisture resistance of wood.
Advice! A board treated with paint and varnish coatings and various impregnations does not allow air to pass through it well, so unpleasant odors will accumulate in the room more quickly. This drawback can be eliminated by good ventilation of the room.
Calculation of stair steps
Having decided on the material of the workpieces, it is necessary to begin making calculations.
Geometric parameters of steps
Dimensions of steps
When manufacturing steps, standard dimensions are used:
- The height of the step is equal to the length of the riser and varies from 150 to 220 mm.
- The depth of the element is the segment from the outer edge of the tread to the riser. It should be such that the foot is completely on the tread. The minimum depth is 25 cm, the maximum is 40 cm.
It should be noted that the depth of the step may not be the same along the entire length of the tread. This is observed in spiral and rotary models. It is larger on the outer edge than on the inside. The depth of the tread remains unchanged only in the center of the step. However, this disadvantage can be dealt with in two ways: using protruding steps or eliminating risers.
- The width of the step is the distance between the edges of the tread. This indicator depends on the intensity of traffic. The standard value is from 900 to 1000 mm. If the traffic is busy, then the flight of stairs can be increased to 1.5 m.
- The thickness of the tread is in a ratio of 1:20 to the width of the step. So, with a width of 900 mm, the tread thickness will be 45 mm. It should be remembered that the minimum permissible tread thickness is 35 mm.
- The thickness of the riser varies from 1.8 to 2.5 cm.
Based on the data obtained, the angle of inclination of the structure and the number of steps are calculated.
Optimal slope of the stairs
The most convenient inclination of a staircase structure is recognized to be a slope from 23 to 37 degrees. The usable area occupied depends on the steepness of the structure. Naturally, steeper structures require significantly less space than flat ones.
Selecting a slope for a structure
Stairs with a slope of 45 degrees are quite difficult to climb, and with a slope of less than 23 degrees they can be replaced with a ramp.
Calculation of the number of steps in a march
To get the exact number of steps in the staircase, you need to divide the height of the floor by the height of one step. The number of marches does not matter at all. It should also be noted that the floor height refers to the distance from the floor covering to the floor on the second floor, taking into account the thickness of the covering.
Knowing the staircase structure and the height of the upper floor, the number of steps can also be determined using a graphical method. Then, using safety formulas, find the width of the tread.
The dimensions of the steps must be taken based on the safety formula
Having decided on the scale, a flight of stairs is drawn on graph paper. Errors that appeared as a result of rounding are distributed to the frieze stage of the lower tier. All remaining steps are made the same size.
Calculation of riser height
Made of brick
You can also make steps from brick. To do this job you will need:
- container for preparing the solution;
- Master OK;
- shovel;
- plumb line;
- Bulgarian;
- cement;
- sand;
- crushed stone
The work consists of several successive steps. First of all, it is necessary to build the side walls of the steps. To do this you need:
- Make markings. Clear the area of debris. Drive in pegs in the places where the walls should be. You also need to make sure that the diagonal is equal.
- Now you need to carry out the excavation work to dig a trench for the foundation. If the prevailing soil is soft, then you will need to dig trenches 1.5 m deep, if the soil is hard, then 1 m. Width - 100 mm.
- Place reinforcement Ø10 mm along the edges of the trench. In the place where there will be pillars for the porch, the reinforcement should be 100 mm higher than the top of the step.
- The bottom of the trench must be filled with crushed stone and then compacted. You can also use broken stones and blocks.
- Then you need to pour the liquid solution onto the crushed stone that you compacted.
- When the base has hardened, apply waterproofing using roofing felt.
- Now you can lay bricks. For a better connection, the next row should start with 3/4 of the bricks of the previous row.
- For the seam to be beautiful, it should not exceed 1 cm.
- Make a straight platform on the top of the masonry, and lay out a place below for mounting the steps.
It is important to use a plumb line while working. Otherwise, there is a risk of “flipping” the corner.
Upon completion, you will only have to do the jointing of the masonry. If during this and previous work mortar was splashed onto the bricks, it should be removed and wiped with a dry cloth.
Making steps
The steps are made according to the principle of pouring concrete steps. The technology was described above. The steps can also be made of brick. Please note that it is important to carry out reinforcement. This is necessary to connect the entire structure. Finished steps must be lined. To do this, you should choose a frost-resistant material.
If you are laying tiles, pay attention to the seams. Make sure they line up with each step. The result will be a beautiful appearance.
Finally, all that remains is to fill the ring and install the railing on top. Also, the surface of the ring is tiled. Please note that the tiles must have an anti-slip coating. Otherwise, in winter you may get injured from a fall.
How to make steps from wood with your own hands
Making steps for stairs from wood requires the following set of tools:
- electric plane;
- a circular saw;
- grinding machine;
- router for edge processing.
Prepare templates of the required size and transfer them to the workpieces. Then cut out the treads and risers. When performing this work, difficulties may arise only when cutting out the turning steps due to their unconventional shape.
The resulting parts should be treated with protective agents and then installation should begin.
Installation of wooden steps
There are four types of fastenings for wooden staircase steps:
- Metal carcass. A tread is secured to a corner, channel or metal plate.
- Stringer or bowstring made of wood, plywood. The tread is placed on the ridges and fixed with nails, bolts, and glue.
Stringer mounting options
Methods of attaching to a string
- The central pillar on which the steps of screw models are attached. By the way they are placed, they resemble a spiral with equal distances between the steps.
Installation of screw steps - Console or Bracket. The cantilever type of fastening involves fastening protruding steps to the reinforcement using welding or anchors.
Let's assume that you want to attach elements to stringers. Then the tread and riser are connected in one of the following ways:
- screws;
- using a groove that is cut into the tread at the intended junction with the riser;
- by installing an auxiliary triangular rail that acts as a support.
Attaching to a stringer
Whichever method you choose, it is recommended to additionally glue the parts being connected to ensure greater strength.
In the case of attaching stair steps to a bowstring, they can be fixed using a block, a metal corner or a groove.
The final stage after installing the steps is finishing them with plinths.
Manufacturing technology
The method of manufacturing steps depends on what material is chosen for them.
How to make steps on a wooden porch
The steps of any staircase consist of two elements: the tread (the part on which the foot directly rests) and the riser - the vertical part.
The porch march consists of treads and risers
The construction of wooden marches begins with the selection of a suitable board. The thickness of the tread correlates with the width of the flight as 1:20. That is, with a staircase width of 90 cm, you will need to use a board 4.5 cm thick. For risers, you can take material that is thinner, 2-2.5 cm. In this case, steps for a porch with your own hands are usually attached either to the bowstring beams or to the ends of the cutouts of the stringers. Risers and treads can be connected in several ways:
- Using screws “in the back”;
- In the groove In this case, a groove is cut in the step for the end of the riser;
- On galvanized corners.
The method of fastening treads and risers “in a hidden way”
The fastening to the bowstring is carried out:
- On pre-nailed bars;
- On long metal corners;
- In the groove (2-3cm). In this case, the ends of the boards are additionally coated with glue.
Methods for attaching treads and risers to stringers
On stringers, fastening is done to the ends of the cutouts using glue and screws.
Video on how to build a porch with original oak treads:
[su_youtube url=”https://www.youtube.com/watch?v=HbCAmPXk2dM”]
Manufacturing of concrete marches
The formwork for the concrete porch steps is made of thick boards. It breaks down like this:
- On each side of the future concrete march, several boards are installed in a vertical position. Their length corresponds to the height of the steps. That is, the closer the board is to the wall, the longer it is;
- Next, transverse boards are also placed on them in a vertical position.
The formwork for a concrete flight consists of several tiers.
Reinforcement of the concrete steps for the porch must be done. How to upload a march? Concreting is carried out in layers of several tens of centimeters with a tamper. To remove air bubbles from the mixture, you can use either a vibrating rammer or a regular stake.
Do-it-yourself concrete semicircular porch steps are poured into formwork made of bent tin or plastic.
Metal staircase with wooden steps
The wooden elements are attached to the metal base using holes made at a distance of 150 mm. In this case, it is necessary to make an indentation from the edge of 20 mm.
A plywood backing will eliminate errors that arise when welding metal elements
When welding metal components, errors could be made that caused minor differences in height. In this case, to eliminate irregularities, a substrate is glued to the frame. Plywood with a thickness of 10 mm is suitable for this.
Metal structure cladding
To ensure that the substrate is securely fixed, self-tapping screws are additionally used. Polyurethane foam is not suitable for these purposes. After hardening, it will begin to crumble under the influence of load, which will lead to loosening of the steps.
The wooden tread is pressed against the plywood with clamps and secured with self-tapping screws. To make a staircase with a metal frame look attractive, craftsmen advise making steps with protrusions. They will hide the ugly metal frame.
Installation of wooden steps
Since the wooden porch is an extension to the house, it needs its own foundation. The foundation for it can be included in the house design initially or done later.
Accordingly, each case has its own design features. If the porch was originally planned and has a common foundation with the main building, it is called built-in, and it is called attached if it has a separate foundation. Another option is a simplified design, in which the porch is a small platform with several steps supported on pillars made of rubble stone or brick, and a canopy.
Since the attached type of porch is the most common, let’s consider its construction in more detail. The foundation for wooden steps for a porch can be piled, columnar, strip or slab. When choosing a specific type, you need to be guided by the terrain and design features. If the porch is very small, you can rest it on flat stones or concrete pillars.
Wooden steps are easy to make with your own hands
When arranging a pile foundation, it is necessary to take into account the level of soil freezing and bury the piles 20 cm below it. This will prevent the destruction of the building due to severe swelling of the soil. Other types of foundations are usually made less deep; for them, a pit with a depth of 50-70 cm is sufficient.
Note! The concrete foundation of an attached type porch cannot be attached to the base of the building, as this can lead to splitting of the concrete structure due to natural deformations of the soil.
After the foundation has solidified, you will need to calculate the required number of steps in accordance with the height of the base and begin creating all the elements of the staircase - stringers, mauerlat, riser and steps. For the mauerlat, it is recommended to use a strong beam with a length equal to the width of the stairs. It is necessary to lay roofing felt on top of the foundation, then fasten the mauerlat with anchors, and, in turn, secure the stringers on it and the upper support column with construction brackets. Steps and risers are attached to the resulting structure using self-tapping screws. Installation should be done starting from the bottom and gradually moving to the top of the stairs. A visual diagram of the work is given below.
Wooden staircase assembly diagram
If you are planning a porch with 4 or more steps, you will also need to build a railing. It should be taken into account that their optimal height is about 90 cm, and it is better to use self-tapping screws or dowels as fasteners, not forgetting to additionally glue the joints, since nails do not provide the necessary strength and tend to quickly become loose. Next, all you have to do is eliminate minor defects, sanding the steps if necessary, and treat the entire structure with enamel, stain or varnish.
Concrete staircase with wooden steps
Despite their strength, concrete structures cannot boast of beauty. Therefore, such structures are usually laminated or decorated with wood. Wood cladding is not cheap, but the results are excellent.
Before you begin installing the steps, you need to wait until the structure is completely dry. Otherwise, the sheathing will be saturated with moisture from the wet concrete and deform in the future. The staircase must dry for at least three weeks.
After the concrete mixture has completely dried, installation can begin.
The success of the operation largely depends on how carefully the formwork is prepared. But even in the best case, distortions and irregularities appear, which can be easily eliminated with the help of a screed. After it dries, the surface is cleaned and treated with a primer.
To completely level the concrete surface and create a moisture-proofing layer, sheets of plywood are glued onto a special mastic, and additional fastening is done with dowels.
Plywood eliminates possible geometric inaccuracies of the concrete base
Having carried out the preparatory work, they begin to install the steps. The treads and risers are connected to each other using grooves made in all parts.
Installation of steps begins with the lowest riser, which is bolted to the floor. They are screwed into the end of the part so that the caps stick out 8 cm. Then they are cut off and marks are placed on the floor where they will go.
Dowel connection
Holes are made in the marked areas and filled with epoxy resin. Finally, the riser is attached. After this, a tread with another riser attached to it is placed on the plywood with glue. To make the product stick better, it is recommended to use a weight.
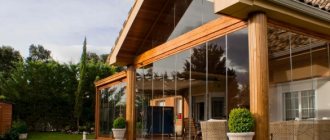
What types of porch are there?
In addition to its functional qualities, the porch near a private house also performs a decorative function, being, in fact, the “face” of the entire house and enclosing the entire architecture.
Therefore, you should carefully think through the decor of the future structure in style in accordance with the rest of the structure, choosing the most suitable material for this.
In the numerous photos presented, it is easy to see certain dependencies: therefore, we will use a simple rule that says that “it is better to see once” than to delve into the intricacies of design art.
In general, there are three main classification criteria:
- By device type.
- According to the building materials used.
- By the presence/absence of a canopy or canopy over the porch.
In principle, it is not so important for us to know how a simple, attached and built-in porch differs from each other (the first classification criterion): it is clear that the built-in is an integral part of the house and is designed together with it, and there is no need to particularly understand the other two - that’s business professionals, it’s our business to build.
Of great practical interest to us is the second criterion, which distinguishes four types of porches depending on the material used:
- wooden;
- concrete;
- metal;
- brick/stone.
This is what we will deal with. All four types are good as a porch for a private house or country house, the only question is:
- a) in price,
- b) in your specific processing skills and preferences for a particular material,
- c) the material from which the house is built.
You shouldn’t, say, attach a concrete porch to a wooden house, while a wooden porch will fit on a building built from any material.
Yes, you can see for yourself in the pictures under what conditions it is better to build a porch from one material or another.
Therefore, let’s move directly to the issue of the design and technology of constructing each of the four types of porch, leaving for last the issues of arranging a canopy (canopy) for protection from precipitation and the hot sun.
Wooden porch
Let's start with a wooden porch, since wood is the most affordable material for most owners of a cottage or summer cottage.
Unlike metal or brick and concrete, we all (or almost all) made all kinds of crafts from birch bars and planks in childhood and youth, so it’s quite possible to handle this material even with basic skills in handling a hacksaw and a hammer with nails.
You will also need a square to accurately mark the corners (don’t be afraid of the calculations, here they will be elementary) and a simple pencil.
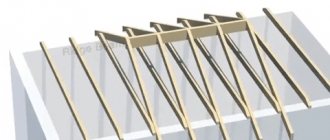
Several designs of wooden porch are available for independent execution, in particular, arrangement of steps. However, the most common and practical is based on the so-called. “stringer” (it is also sometimes called “string”).
A stringer is a support beam with corner cuts, on the plane of which steps are attached. The proposed diagrams and photos show that most often a thick and wide board is used for stringers.
Typically, the width of the stairs is at least 1.2 m. This means that to create a durable structure you will need 3 stringers with a half-meter distance between adjacent ones. You can also use four support beams if you want, which is not optimal, but overall stronger.
When building a wider staircase, calculate the number of stringers based on the 50-centimeter distance between them.
The best material to use is larch (this is ideal) or coniferous wood, which are more resistant to the damaging effects of moisture.
Additionally, the boards are treated with special impregnations that add strength and moisture resistance to them.
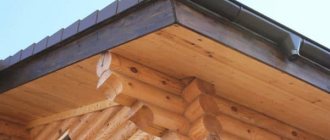
An important question that often does not arise for DIY beginners who are trying to build a porch for a house with their own hands in one way or another is the presence of an overhang on the steps, which prevents the accumulation of moisture on them after rain and freezing in the winter.
An overhang is a slight inclination of a step at an angle sufficient for water to drain and individual drops to roll freely.
The usual calculation for the amount of overhang is 1-2 cm per 1 meter, but since the width of the step does not exceed 40 cm (in reality - from 27 to 32 centimeters), such an angle is practically not felt underfoot and is perceived as strictly horizontal.
Another thing is where to ensure the water drains: in most cases you will see recommendations about the external slope, i.e. moisture flows from each stage to the previous one.
However, there is another opinion, which is to allow water to flow inward, into the space of the riser (if it is made closed, a gap three millimeters wide can be left for this purpose).
It is best to concrete the space under the steps and the upper platform of the porch. This provides a kind of foundation for the entire structure of the wooden porch, as well as providing a tidier space and diverting water running down the steps away from the foundation of the house.
- You will need to mix cement mortar at the rate of 1 bucket of cement to 3 buckets of sand, to which add 3-4 buckets of crushed stone for reinforcement.
When mixing, add water gradually so that the solution does not turn out to be too liquid. After the concrete composition has set, the surface is usually smoothed with a cement screed.
A small “life hack”: even before concreting the site, the stairs should already be ready. Then, during its installation, the lower ends of the stringers are pressed into the not completely hardened concrete solution and thus provide excellent support for the entire structure!
The upper platform of the porch - the one immediately in front of the front door of the house, is sheathed either with the same material from which the steps are made, or with a special decking board, which is produced with a special coating for use in conditions of year-round exposure to precipitation: the service life of the decking board exceeds (sometimes significantly) 20 years.
It is worth noting once again that the structural staircase of a wooden porch can be made in other ways, clearly recognizable in the photos presented, but the described design is perhaps the most popular and has proven itself well.
Concrete porch
A porch made of concrete is also often given preference over other technologies, especially by those who are somehow familiar with concrete work or are generally specialists in this matter.
Perhaps you are not such a specialist, but something attracts you with this particular method of building a porch near the house (for example, because of its solidity), which means it’s time to try your hand at working with this material.
When planning the construction of a porch made of concrete, you should keep in mind that its height, together with the steps, is equal to the height of the foundation of the house, and the porch itself is, as it were, a continuation of it.
However, a small layer of rock wool should be placed between the back surface of the concrete porch and the adjacent foundation surface. This is a deformation layer that prevents further cracking of the porch and relieves the load on the foundation.
The porch is built by pouring concrete mortar into wooden formwork. We discussed the composition of the solution above, but note that, in addition to crushed stone, to achieve optimal strength, additional reinforcement of the steps and upper platform with metal mesh will be required.
One of two methods of arranging formwork is usually used. The first method is a stage-by-stage casting of steps: the first part is the largest, occupies the entire area allocated for the porch and is always a couple of centimeters higher than all the other steps.
We do not spare material for reinforcement!
After the site has hardened, we build another, smaller one on it - we form steps, and so on to the entire height of the foundation.
The second method is to construct a complete formwork, recreating the outer frame of the entire porch. In this case, the process is relatively continuous, so a concrete mixer is required. It is important to make each step whole, in one pour.
And don’t forget about reinforcement with metal mesh or lattice! We smooth out all possible unevenness with cement mortar.
After the concrete has completely hardened (and this is about 10 days for a solid cast structure and about a week for each tier in the first of the described methods), using cement mortar or special glue for exterior work, finish the surfaces with non-slip (clinker) tiles or artificial stone in accordance with the instructions in advance. a well-thought-out plan.
Often the dimensions of the porch themselves are calculated based on the dimensions of the selected facing tiles, which is very reasonable and will allow you to avoid unnecessary cutting of tiles.
Metal porch
To work with metal, you will need the most special skills, and tools should be prepared for cutting metal (grinder) and welding it (a portable welding machine, which you need to know how to use), as well as an electric drill.
A simple metal porch to the house can be equipped without forged elements, which must be ordered in advance and a considerable amount of money must be prepared for the blacksmith for the work.
In the simplest and most accessible (but far from the only!) form, such a porch repeats the version of the porch of a wooden structure described by us, only a metal channel with L-shaped parts welded on it from a metal corner acts as a stringer.
- The length of the short part is the height between adjacent steps, the long part is equal to the width of the step or slightly less.
- The “stringers” channels are welded together with an angle along the width of the future porch, forming a rigid structure.
The steps can also be made from a metal sheet with stamping (usually herringbone) for rigidity, which, in our case, helps to better grip the sole of the shoe. However, this option is not very popular, since metal steps are usually noisy (the steps of a person walking on them echo loudly) and get very hot in the sun in summer.
More often, the material for the steps of a metal staircase is a thick wooden or porcelain stoneware board, which is screwed with two bolts to each corner of the “stringer”.
The upper landing is usually made of the same material as the steps. For reliability, they form a circle of cross-welded corners, the ends of which are welded to the support posts.
Before installing the steps and the upper platform, the entire structure, if necessary, is cleaned of rust, carefully primed with a special primer for metal and then painted with good paint using a brush or spray - whichever is more convenient, as long as it turns out well in the end.
It is worth noting that, if you have the materials and good skills in working with a welding machine, this is the fastest way to build a porch near the house, taking only a few hours, or a day at most.
The main thing is to first draw a detailed diagram and determine the exact number of individual parts and their sizes.
Concreting support columns, for which you can use a thick-walled metal pipe or the same channel, can slightly increase the total construction time.
Brick porch
To be honest, brick, as a material for building a porch near a house, does not have any special advantages. Brick for these purposes is chosen mainly in two cases:
- the owner is a bricklayer himself, has extensive experience in bricklaying and loves this familiar material;
- After construction there was a lot of brick left that needs to be used somehow.
The disadvantages of brick include the laboriousness of the laying process, painstakingness and constant monitoring of the level, and the lack of guarantees of a good result for an inexperienced homeowner who dares to pick up a trowel.
In addition, not every brick is suitable for our purposes. In general, silicate should be immediately crossed out from the list of materials under consideration, even if it is available in sufficient quantities: quite quickly it will begin to crumble, bringing the hour of repair, or even a complete redo of the porch, closer.
A red brick made of baked clay will do. By far the best option is clinker brick, which is unreasonably expensive for a porch.
It would be better if you “deceive” those around you a little by simply covering the surfaces of the concrete (or cinder block) porch with tiles imitating red or yellow brick, if you really want to implement the “brick” theme.
As a last resort, cover it with brick, initially leaving a tolerance in the dimensions for the brick.
By the way, natural stone is no better for building a porch. It is a strong and durable material, however, it requires a lot of experience and effort in processing so that it can be laid as tightly as possible without relying on filling the voids with cement mortar.
It is easier and more expedient to recreate the surroundings of a stone building by lining a concrete (cinder block) porch with facing stone.
But you finally decided to build a brick (stone) porch. In this case, you need to start from the foundation in order to balance the considerable load and prevent the destruction of the masonry due to uneven subsidence.
- To do this, you need to dig a hole in the ground in the shape of the future porch and to a depth of 10-20 cm, fill the bottom of it a quarter with sand and compact it, not forgetting to water it.
- Then a quarter is filled with gravel, thus creating a sand and gravel cushion, onto which the remaining volume is poured with a concrete solution of cement, sand and crushed stone in a ratio of 1/3/3-4.
- After the concrete has reliably hardened, you can begin laying the brick porch.
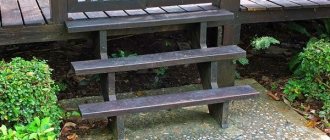
Steps for outdoor entrance staircase
A neat staircase on the porch has not yet lost its relevance. Solid wood species that are resistant to constant external influences are suitable for its manufacture. As a rule, this is oak, ash, maple, beech.
To protect against external influences, the street structure is treated with protective agents
In order for the structure to serve faithfully for many years, it must be protected from natural factors such as moisture and temperature changes. Elements in contact with the ground are impregnated with oils, and the open surfaces of the steps are treated with drying oil and covered with paint or varnish.
The street staircase should be periodically inspected and, if necessary, rotten areas of the structure should be eliminated.
Exterior wooden staircase design
The facing of stairs on the street has its own specifics. During the construction of the porch, metal bookmarks are left in the concrete, to which wooden steps will later be attached.
Design of marches and their independent finishing
So, the construction of the porch is completed. Next, the owners of the house are faced with the question of how to decorate the street staircase. The safety and practicality of the porch directly depends on what material is chosen for decoration.
Porch steps tiles. Photo of rough facing material
Of course, the decoration of the porch should also be aesthetic. However, you certainly shouldn’t neglect safety for the sake of beauty. Approach the choice of material responsibly, and you will get an attractive and at the same time very comfortable porch.
How to decorate wooden steps
Finished wood porch steps are usually simply painted. Their surface is first primed. Then the porch is painted with two layers of paint. What is the best way to paint a march? Alkyd moisture- and frost-resistant enamel is considered the most suitable means for decorating wood outdoors.
How to properly finish a concrete march
To finish concrete marches, stone or paving slabs are usually used. For example, marble and granite steps for the porch look incredibly impressive. You can often see clinker marches in country houses.
Clinker steps on the porch. Photo of a wide, comfortable street staircase
Facing is carried out in several stages:
- A concrete screed reinforced with a chain-link mesh is installed on the porch. When pouring it, you should maintain a slope of a centimeter away from the building;
When installing the screed, a slope of one centimeter is made
- The next day, the surface of the screed is sanded and primed with PVA glue diluted with water;
- Twenty minutes after applying the primer, the actual laying of the tiles is carried out on the steps of the porch and on the upper platform. Glue is applied to ceramic, granite, etc. elements in a layer of 1 cm and press them tightly to the concrete surface. The latter also needs to be coated with glue;
The tiles on the porch are laid with special glue
- The next day, grouting is done.
To the question of what to use to cover concrete porch steps, there is another answer - wood. In this case, plywood is first secured to their surface with dowels and nails. Next, wooden boards are glued to it. For reliability, they can also be fastened with screws. A very beautiful design is obtained using decking boards.
Sheathing of metal marches
DIY steps for a metal porch are usually just a frame made from a corner. To make treads, wear-resistant wood is used (oak, ash, larch, beech, pine). How to make their lining? In this case, fastening is very simple. Holes for fasteners are drilled in frames and cut boards. It is best to fix wooden boards with bolts and nuts.
Metal march covered with wooden boards. The porch is made in the same way
Steps for a porch made of concrete, wood or metal must be installed with your own hands in compliance with all required technologies. Only in this case can you build a reliable, durable, beautiful and, most importantly, safe and comfortable outdoor staircase near your home.