Roof insulation
In addition, if the roof is insulated, thoroughly waterproofed and provided with effective ventilation, this will allow, in addition to effective energy saving, to expand the living area of the room due to the resulting attic, which can be made as cozy and comfortable as all other rooms.
If the roof is located above a non-residential attic and consists of rafters, sheathing and roofing, then insulation is not always necessary. The attic is continuously ventilated, and the temperature and humidity in it are almost the same as the outside air. In such houses, the main thing is to carefully insulate the attic floor.
But if under-roof thermal insulation is installed, the temperature and humidity of the air inside the attic floor differ significantly from the air outside. Moisture rises along with the warm air and comes into contact with the colder, lower surface of the roof. This causes condensation to form on it. Also, moisture can penetrate into the roof elements, which is facilitated by inaccurate laying of the vapor-proof layer on the inner surface of the insulation, insufficient overlap of the vapor barrier strips, their loose fit to the walls and pipes, accidental ruptures, etc. Therefore, first of all, when insulating the roof, you need to take care of the device reliable vapor barrier located on the interior side. On the roof side, the insulation is protected by a layer of waterproofing laid along the rafters or a special flooring.
Such protection of an insulated roof on both sides is quite reliable, but sometimes this is not enough. It is necessary to provide a way to remove moisture that accidentally gets into the insulation. This effect is achieved by air circulation in cavities, one of which is located between the roof and the under-roof waterproofing, and the other is located between the under-roof layer and the thermal insulation layer. In order for outside air to freely enter these cavities and be removed from them just as easily, it is necessary to install vents in the roof overhang and in the upper part of the roof. To ensure free movement of air between the roof and the under-roof waterproofing, lay counter battens along the rafters. Their thickness determines the size of the air cavity. Air enters this cavity through holes located in the side overhangs of the roof.
How to avoid the problem of high humidity
After thermal insulation work, the humidity inside the room may increase, which negatively affects the microclimate. There are several reasons for this.
- Insulated structures have gaps or cracks, which means their integrity is compromised. Therefore, before starting work, it is necessary to carefully check all the bases and eliminate all existing defects in advance.
- There is no vapor barrier layer or it is damaged. In this case, moisture does not leave the room, but accumulates in the insulating material. Therefore, it is imperative to use a vapor barrier film, gluing the joints of the sheets with a tape specially designed for this.
- The system of natural and forced ventilation of the room was broken. For example, during the renovation, the ventilation holes were moved or blocked, the shaft was blocked, and metal-plastic windows were installed. All of the above actions lead to a decrease in air circulation due to excessive tightness of the structure, so it is necessary to periodically ventilate the room or take care of installing supply and exhaust ventilation.
Algorithm for roof insulation, how to lay thermal insulation
Installation of a roof with insulation comes down to the following sequence of actions:
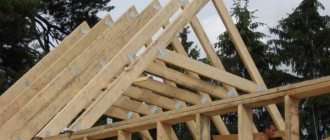
First, the installation step of the rafter legs is measured. The heat-insulating material slabs are cut in accordance with the obtained dimensions, but 1 cm is added to them - this will allow the insulation to stay in place on its own. You can simplify this stage of work when installing a new roof by calculating it so that the distance between the rafters corresponds to the width of the insulation boards. A waterproofing layer must be installed in the space between the rafters and the finishing coating. The membrane must be attached to the rafters so that it envelops them. For fixation, you can use a construction stapler, which attaches the waterproofing to the rafters and sheathing. Waterproofing material must be applied to the eaves so that the collected moisture escapes beyond the roof. The described method of fastening does not allow for proper ventilation, so only a special waterproofing membrane should be used as a material. If waterproofing is already installed under the upper part of the roof, then nails are driven into the rafters every 10 cm so that the distance between them and the membrane is at least 3-5 cm. The driven nails allow you to stretch a cord along the line of which the air gap will pass in the space between waterproofing and thermal insulation material. If the insulation itself is attached using a cord, then the nails will also need to be hammered along the outside of the rafters. When using insulation materials produced in the form of slabs, installation is reduced to inserting them into the space between the rafters (naturally, they will have to be compressed a little so that they fit into the gap). Before properly insulating the roof, more rigid materials must be carefully adjusted to fit the gaps in the rafter system. For maximum efficiency, it is worth installing two-layer insulation. When installing narrow fragments that require joining along one of the planes, you need to make sure that the joints of the first and second layers of thermal insulation do not coincide with each other. The thermal insulation layer should not extend beyond the rafters, and if this happens, then additional timber will have to be placed on the rafters. To attach the insulation, a cord stretched between nails or a lath made of slats can be used. These slats need to be nailed to the rafters at a distance of 30-40 cm from each other. In this case, the vapor barrier layer must be attached before the sheathing is installed - due to the thickness of the slats, an air gap is provided. When installing a vapor barrier, you need to make sure that the material is installed hermetically. To do this, the joints need to be covered with two layers of adhesive tape.
Particular attention should be paid to the points where the material connects to the wall and chimney. When all structural elements are installed, you can proceed to the final stage - installation of the sheathing.
Conclusion
Roof insulation is a very important part of the structure, which allows you to increase the thermal efficiency of the roof. Knowing how to properly install insulation on a roof and high-quality performance of all work will allow you to create a reliable and high-quality structure that will perform its functions throughout the entire period of operation.
Insulation of pitched roofs
You can insulate a roof with a frame made of rafter systems in one of four ways: by laying insulation between the rafters, on the rafters, under the rafters, or in a combined way. In most cases, thermal insulation is carried out in the simplest way - by laying thermal insulation material between the rafters.
Roof insulation between rafters
The insulation with this method of insulation must be continuous, gaps are not allowed. This also applies to areas adjacent to walls, pipes and windows that are built into the roof plane. This approach is explained by the fact that any place where thermal insulation is interrupted leads to the formation of a cold bridge. Also, in insufficiently insulated places, condensation may occur due to temperature differences, which will gradually destroy the entire structure. It must be remembered that the attic always brings greater heat loss than other floors, since its entire surface is in contact with the street. Since heat escapes not only through the slopes, but also through the gables, it is necessary to insulate the entire roof contour.
For example, an uninsulated gable wall connecting to the roof structure can cause a problem. When insulating walls, Mauerlats are usually not insulated. When thermal insulation of a roof slope is carried out, it is also quite often brought only to the level of the Mauerlat. Thanks to this, a powerful cold bridge appears, along which heat leaves the room. To avoid such a negative phenomenon, you need to wrap the insulation of the attic slopes onto the Mauerlat to the place where the insulation of the outer wall reaches.
Selection of thermal insulation material for roof insulation
The most popular materials for thermal insulation of roofs are mineral fiber mats, polystyrene foam and polyurethane foam boards, which have a thermal conductivity of 0.35 - 0.40 W/m × K.
When choosing a material, you should pay attention to ensure that it does not shrink or sag under the pressure of its own weight. If this happens, cold bridges may appear. This effect is often observed when using low-density fiberglass materials.
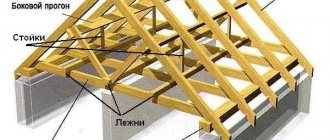
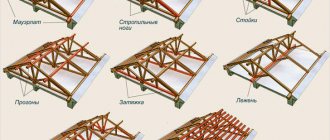
Mauerlat is a special beam that holds the roof rafters. It is designed to evenly distribute the load from the weight of the roof onto the walls of the house. Thanks to it, the roof lasts a long time and does not collapse under the weight of snow in winter.
Expanded polystyrene is only partially suitable for insulating pitched roofs: when using it, it is necessary to carry out a number of fire-fighting measures, which include fire-retardant impregnation of wooden structures, installation of fire-retardant layers, etc. The most appropriate material is hydrophobized slabs made of basalt rocks and laminated with foil or fiberglass. They are ideally suited for thermal insulation of unloaded roof structures. You should also pay attention to the fact that all selected materials are accompanied by hygiene certificates.
Roof preparation
First of all, to carry out the work it is necessary to draw up a clear work plan, as well as select the materials that will be used.
Any roof, regardless of its type, has several parts, external and internal. So, its outer part is the roof itself, and the inner part consists of floor slabs, as well as a frame of rafters.
In order for the roof to serve for a long time and provide high-quality insulation, it is necessary to first carry out certain preparatory work.
First of all, you need to get rid of moisture, as well as any other negative elements on its structure, such as rust, mold and even mildew. To do this, the surfaces are cleaned with a metal brush, after which it must be coated with anti-corrosion agents.
Do-it-yourself roof insulation step-by-step instructions
First, waterproofing is done. The film is rolled out horizontally in the direction from the eaves to the ridge of the roof with an overlap. On the film, the places of such overlap are indicated by a special strip, and its magnitude directly depends on the slope of the roof. If the slope is up to 21%, the overlap must be at least 20 cm, at 22 - 30% it is 15 cm, and for a slope greater than 31% an overlap of 10 cm is required. The waterproofing film is attached using a construction stapler or galvanized nails with a wide head. Overlapping areas must be insulated with special adhesive tape.
It is advisable to roll out the film so that the overlaps fall on wooden structures (counter battens, rafters, spacer bars). If the lathing was impregnated with a special antiseptic, you should make sure that the impregnation has completely dried before laying the film.
The waterproofing layer at the eaves and roof overhang above the gable should protrude beyond the wall line by at least 2 cm, and at the ends of the roof extend onto the end boards. At the eaves, it runs directly along the rafters and is secured with a special adhesive tape.
When laying perforated film, you must ensure that the perforation “looks” outward. Otherwise, it will allow moisture to pass into the roof and prevent steam from escaping from the inside. The film always has inscriptions indicating its front (outer) side.
The film must be laid, leaving a sag between the rafters equal to 20 mm. It is necessary in order to eliminate possible film tension and rupture due to a decrease in its size due to the cold. It is desirable that the distance between the rafters be no more than 1.2 m.
The next stage is laying insulation. At the junction of the wall insulation and the roof slope, you need to try to make sure that both of these layers fit very tightly to each other. Also, such places need to be additionally reinforced with reinforcing mesh and protected from rain. In a pitched roof, they are usually located under the eaves, which protects them from atmospheric moisture, and for a flat roof, protection is required using tin aprons and sealing polyurethane tape.
Then an anti-condensation film is laid. It must be laid out on the rafters in the direction from the eaves to the ridge of the roof. Laying is done with an overlap, the absorbent surface down, and then secured using staples of a construction stapler or galvanized nails with a wide head. The film must be laid with tension, avoiding sagging. It is advisable to reinforce the gluing area with a pressure strip. This is especially important if the roof slope is less than 30°. The bottom surface of the film should not come into contact with the insulation. To ensure ventilation, the distance between the insulation and the anti-condensation film should be about 40 - 60 mm.
If the vapor barrier film is foil, then it is laid with a reflective surface inside the room. The joints of such material are glued with special foil tape.
In those places where the film is adjacent to internal walls, chimneys, etc., you must pay attention to the nature of the surface to which it will be attached, since the connection must be airtight. To materials with a rough surface (unplaned wood), a vapor barrier film is glued using polyurethane, acrylic or synthetic glue. On such surfaces, you cannot use adhesive tape or polyurethane sealing tapes, since the tightness of the connection may be broken. If metal beams are used in the roof structure, then a vapor barrier is attached to them using glue or double-sided tape.
Vapor-proof films when used in living rooms lead to an increase in air humidity, disrupting the normal microclimate, so the room must be regularly ventilated.
After laying the film along the rafters, counter-lattice bars with a cross-section of 40 × 25 mm are nailed in increments of 100 - 150 mm using galvanized nails. On top of these bars, lathing is made for the roof covering.
If a diffusion membrane with high vapor permeability is used, it can be laid directly on the thermal insulation layer without leaving a bottom gap. In this case, an overlap of 20 mm should be made. In this case, only one ventilation gap will remain - the top one, located between the membrane and the sheathing and amounting to 30 - 40 mm. The membrane is laid after reading the manufacturer's instructions, turning the painted side towards the insulation and the back side out. It is mounted in the same way as the film: using galvanized nails with a wide head or staples from a construction stapler. The joints of the membrane strips must be connected with double-sided self-adhesive tape to protect them from capillary moisture.
You need to pay attention to the following: the width of the air gap located between the insulation and the under-roof waterproofing in all areas of the surface must be at least 2 cm.
In this case, it is necessary to ensure that the waterproofing material does not sag too much, which can interfere with normal air circulation. Therefore, sometimes waterproofing is laid over a continuous wooden flooring. To ensure air escape from the cavities located above and below the waterproofing layer, special tiles are installed near the ridge for ventilation or gaps are left when constructing the ridge itself.
How to install insulation in the attic
The main thing is not to confuse its sides. On the outside it is covered with a moisture-proof layer. Laying is done from the cornice upwards, the canvases overlap by 10-15 cm and all joints will need to be taped with construction tape. To attach the film to the rafters, it is most convenient to use a construction stapler or you will have to work with a hammer. The main thing is that the nails are galvanized.
It is not recommended to stretch the waterproofing film over the rafters. As temperatures drop, it will begin to shrink a little and simply become damaged at the fastening points, and the canvas may also come apart with the formation of gaps.
Next, a lath is placed on top of the superdiffusion membrane. It will require wooden slats of 2.5-5 cm, depending on the planned space for ventilation and the type of roofing material. Galvanized self-tapping screws are quite suitable as fasteners. Finally, the roofing covering is installed on top of the sheathing.
If the insulation is carried out in an attic with an already laid roof and if the waterproofing was missed during its installation, then the roofing material will need to be removed and the film laid. Otherwise, the under-roof insulation will get wet and lose all its thermal insulation properties.
If membranes are laid from the inside and wrapped around rafters, they will simply begin to rot from excess moisture.
The technology considered involves the use of sheet roofing materials (slate, metal tiles, corrugated sheets). To insulate a soft roof along the rafters, you will need to nail moisture-resistant plywood over the sheathing, and then attach the finishing coating to it.
Insulating the roof from inside the house
When laying thermal insulation material below the rafters, most often the under-roof waterproofing is installed from above, along the rafters, without making a solid wooden sheathing, because the ventilation gap in any case will be large - almost the entire thickness of the rafters. The disadvantage of this method of roof insulation is the reduction in the volume of the attic.
Selecting material for roof insulation
As insulation, you can use the same materials as when installing thermal insulation between the rafters: glass wool and mineral fiber mats, polystyrene foam and polyurethane foam boards. The thickness of the thermal insulation material should not be less than 100 mm, but at the same time it cannot exceed the thickness of the rafters.
Do-it-yourself roof insulation
The first stage when performing insulation work is waterproofing. As mentioned above, in this case it is laid on top directly along the rafters. Attach the waterproofing film using construction staples or galvanized nails with wide heads.
If the room is not heated or the attic is cold, a vapor barrier is not required. It is enough to lay only the waterproofing layer.
At the second stage of work, thermal insulation material is laid. Laying is carried out below the rafters. The material is secured using a construction stapler. A vapor barrier film is installed on top of the thermal insulation layer.
The final stage is installation of the internal cladding. Sheets of plasterboard, plywood and lining are suitable as building materials here. The cladding is attached using galvanized nails equipped with wide heads or self-tapping screws. In order for the finishing to be of high quality, you need to ensure that the heads of the nails or screws are recessed into the facing material. Before performing the final finishing, the recesses from screws or nails are puttied. Then you can stick wallpaper onto the drywall or plywood.
Warm roof: installation technology
The process of do-it-yourself insulation involves creating a “sandwich” from several layers of heat, steam and waterproofing. Work can be carried out both during the construction stage of the house and after that. If insulation occurs when the house is already built, then before installation you need to inspect the roof, repair it if necessary, check the serviceability of the wiring and other communications. To carry out insulation work yourself, it is recommended to install all materials from the inside of the building.
In order for a warm roof to serve for many years, you need to select high-quality materials. All of them are purchased in order to cover the entire roof area. If you do not know this value, then before starting work you need to measure the parameters or calculate the area using the following formula:
S = 2* (a*b), where
S is the required area of the entire roof, a is the length of the slope, b is the length of the house.
Roof insulation from above
Thermal insulation of the roof above the rafters will qualitatively protect most of its structural elements from precipitation and temperature changes. In this case, the insulation is laid on solid wooden sheathing. This method is also interesting because it provides the opportunity to use open rafters when decorating the interior of the attic.
But a problem immediately arises - where and how to attach the waterproofing material? The modern market offers thermal insulation panels with already provided waterproofing. In this case, you need one level of air circulation located between the thermal insulation material and the roof. The air cavity is created by means of a counter-lattice, in which the slats are laid parallel to the rafters. A necessary condition for the high-quality functioning of such thermal insulation is the installation of a good vapor-proof layer on the inside of the roof.
The advantages of this roof insulation scheme are the minimal risk of cold bridges, constant temperature and humidity of all structural elements, which eliminates the possibility of thermal deformation of materials; the most effective sound insulation compared to other constructive methods; maximum use of the entire internal space of the attic floor.
Disadvantages - the difficulty of performing insulation work on a roof with a complex shape, high requirements for under-roofing films, and the impossibility of carrying out installation work in bad weather conditions.
Is it worth insulating the roof of a house?
Whether you choose to insulate the roof of your house or abstain is up to you, but this type of work implies the following advantages:
- reduction of heat losses by approximately 15%. And if we take into account the regular rise in energy prices, then insulating the roof is a significant saving in energy resources, as well as finances;
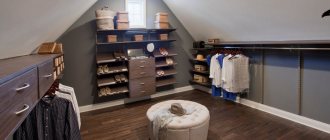
- increase in living space. When the roof is insulated, the building acquires additional premises, but only on the condition that it is done accordingly;
- reduction in temperature fluctuations. Temperature indicators have a fairly noticeable effect on any type of roof. For example, let’s take the lower part of the attic, located directly under the roof - the temperature there is close to room temperature. From the outside, the temperature varies depending on weather conditions. Insulating the roof will solve problems associated with large temperature changes, since external air currents will not penetrate inside the house, and warm air will not escape outside.
The roof can be insulated both from the inside and outside of the house
Therefore, there is no need to doubt the need for roof insulation.
When choosing a material for roof insulation, consider not only its temperature characteristics, but also moisture resistance, environmental friendliness, resistance to negative formations, as well as diffusion and capillary humidification.
Roof insulation from inside and outside
You can use a combined roof thermal insulation scheme - two-layer insulation. With this method, one part of the thermal insulation material is laid between the rafters, and the other under them.
Roof insulation material:
When laying insulation between and above the rafters, mineral or glass wool of normal density can be used for the main thermal insulation layer. The top layer must have high shear strength. Fiberboard or basalt slabs are suitable for it. When laying the top slabs, it is necessary to completely cover the rafters to prevent the formation of cold bridges.
Read our article: Which insulation is better to use
Do-it-yourself roof insulation
First, the waterproofing material is laid, it is secured using a construction stapler or galvanized nails with wide heads. Then insulation is laid under and between the rafters. The inner layer of insulation is laid between the cross beams, completely covering the rafters. The thickness of the timber should be equal to the thickness of the heat-insulating layer.
A vapor barrier layer can be laid between layers of insulation, but then to prevent the accumulation of condensation on the film, the inner layer of thermal insulation must have a thermal resistance of no more than 20% of the main one.
It is permissible to lay a vapor barrier on top of the inner layer of insulation, but with this method the risk of damage to the film during the installation of interior decoration of the room, installation of electrical wiring and lighting devices increases.
How to insulate a flat roof
Thermal insulation of a flat roof differs from the insulation of a pitched roof in that it can be performed not only from the inside, but also from the outside of the building. But in this case, you will have to spend more time and money on its insulation. To avoid unnecessary expenses, it is better to first insulate the roof from the outside, and after use for one year, insulate it from the inside.
Insulating a flat roof from the outside
It often turns out that external roof insulation alone is enough, and insulation from the inside is not needed.
What material to choose for insulating a flat roof.
For insulation of ventilated attic roofs, polystyrene foam with a density of 12–15 kg/m², as well as mineral wool with a density of 20–35 kg/m², are suitable. If the roofless roof will serve as a terrace, then a more solid insulating material will be required. Expanded polystyrene with a density of at least 20 kg/m² or mineral wool with a density of 150 – 220 kg/m² is suitable. The best option for this case is extruded polystyrene foam, which has high water resistance. In any case, the thickness of the thermal insulation layer must be at least 150 mm, and the insulation itself is carried out in two layers to reduce the risk of cold bridges.
When cutting and installing mineral wool slabs, be sure to wear gloves and loose-fitting protective clothing, safety glasses and a dust respirator. The workplace must be well ventilated. Upon completion of work, you should thoroughly wash your hands and take a shower.
The best material for external roof insulation is slabs made of basalt mineral wool, which are characterized by durability, high vapor permeability, low thermal conductivity, good fire safety, and excellent resistance to mechanical loads.
Main types of insulation
Not long ago, the most popular insulation material was glass wool . Using glass wool is cheaper than using other types of insulation, but it has some significant disadvantages that force people to abandon it and insulate their roofs with other materials.
For example, cotton wool is not suitable for insulating inclined surfaces - it simply rolls down, exposing the very top of the roof, through which heat will leak. In addition, when using cotton wool, you need to think about how to protect it from moisture. However, cotton wool is still used in some homes, mainly due to its low cost.
The most commonly used materials now are polystyrene foam and mineral wool (for example, rockwool) . The thing is that they do not have the disadvantages of glass wool, but they have a number of additional advantages. Polystyrene foam is a fairly durable material and can withstand significant loads, and mineral wool is an excellent sound insulator . You can read more about roof insulation with mineral wool here.
Do-it-yourself insulation of a flat roof
External insulation of a flat roof includes the installation of a vapor barrier layer, laying thermal insulation, waterproofing, and then a roll covering. The final layer is the laying of bulk material.
Before starting work, you need to clean the roof surface from debris, dust, and level it. Then install a vapor barrier as described above. After this, glue the insulation boards using cold mastic or special glue. The slabs are laid with a semi-overlapping seam, which ensures uniformity of the coating. It is permissible to lay several layers of slabs staggered and glue them with tape. This method of installation will prevent the occurrence of cold bridges.
Next, waterproofing is laid. The fire method of gluing a waterproofing carpet is often used: a cement-sand screed is laid on the slabs in a layer of at least 3 cm. After laying it, you need to wait until the concrete gains the necessary strength, then clean the surface from sagging and dirt. The waterproofing layer is glued using short-term exposure to fire. The gluing method is described in great detail on the packaging of the material. As a result of exposure to fire, the insulation does not lose its properties. After this, a rolled roof covering is laid and expanded clay or other similar material is poured.
Insulating a flat roof from the inside
There are times when it is necessary to insulate the roof from the inside. The most acceptable way of internal insulation of a flat roof is from the ceiling.
The main thing is to choose a fire-resistant material. The thermal insulation process is not difficult, but the placement of lighting fixtures will need to be redesigned.
What material to choose for insulating a flat roof from the inside
For this method of thermal insulation, fire-resistant polystyrene foam boards such as PSB-S-25 or PSB-S-35, with a thickness of 25 mm, are suitable. They meet all fire safety requirements.
Stages of work
First, strips made of soft wood must be screwed to the ceiling every 40 cm. The first is attached along one of the walls, which is perpendicular to the beams of the supporting structure. The second is mounted along the opposite wall. After this, glue the expanded polystyrene slab flush to the first plank, using special glue or mastic. Then the next plank is screwed in the same way and the second heat-insulating board is glued, etc. The laying of planks and heat-insulating boards is alternated. When the insulation layer is completely laid out, a plastic film is attached to the entire ceiling area. Decorative panels are then nailed to the slats. Galvanized nails are suitable for fastening.
Read our article: Roof insulation from the inside
What is the best way to insulate a roof?
We have already answered the question of how to insulate the roof of a private house above. But site visitors want to know how to insulate a log house, garage and bathhouse.
Log house The wooden frame is covered with a pitched roof. Therefore, basalt wool has no competitors.
Garage. Typically, a garage roof is flat. Therefore, expanded clay and basalt wool can be used there at approximately the same cost.
Bathhouse. Anyone who has ever washed in a village bathhouse knows that the roof there is not insulated. Only ceiling insulation can retain steam. You can see how to do it in the work “Rules for choosing insulation for the ceiling.”
How to properly ventilate a roof
- The area of exhaust and supply openings must be determined taking into account certain parameters, which include the volume and concentration of removed vapors, etc., which in practice is not always possible to do. Therefore, they usually use existing empirical findings. 2. The height of the ventilation gap between the base of the roof and the insulation must be at least 5 cm. It directly depends on the length and angle of inclination of the roof slopes. 3. The flow of air is organized both along the entire eaves and in local places - with the help of ventilation grilles that cut into the lining of the eaves overhang. 4. The total area of exhaust ventilation openings installed only at the highest point of the roof must be no less than the area of the supply openings for each slope. Exhaust devices are ventilation hoods for hipped roofs, ventilation ridges, roof aerators, etc. You can use both ready-made (store-bought) devices and those made by yourself. https://www.youtube.com/watch?time_continue=3&v=uzNCsJO2k6w