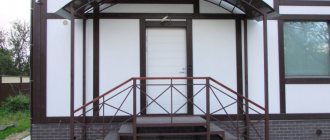
A veranda will be built directly in front of the front door of the building in accordance with building codes and regulations and at the request of the owner of the house.
The design of the staircase of the constructed veranda should consist of several steps - at least two steps.
Of course, many will be interested in how to build a wooden terrace themselves. At first glance, it may seem that the veranda is a complex structure.
However, everything is quite simple, and even an inexperienced person can build it with his own hands.
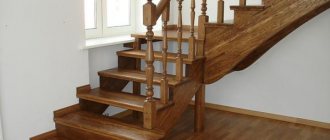
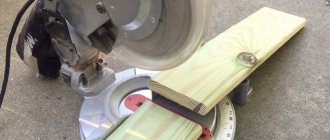
Wooden porch stairs
Owners of private houses that have a beautiful wooden terrace know all the advantages and disadvantages of this design.
Professionals:
- Ecological purity of wood;
- Huge possibilities for decorating a wooden terrace;
- Decorative;
- Originality.
Minus points:
- High price;
- Harmful consequences of decay processes;
- If a wooden staircase is used for a long period of time, the steps may accumulate and become dark;
- Sometimes the railings (rails) themselves and wood stair railings need to be loosened, repaired or replaced.
It must be said that all the shortcomings depend entirely on the quality of the wood. If you choose the right material, a wooden deck will last a very long time.
Metal and concrete stairs with wooden steps
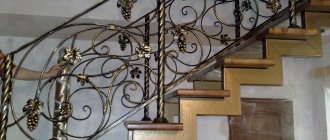
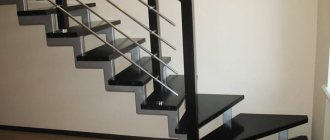
Wood is a warm and pleasant to the touch material, so it is also used if the base of the staircase is made of other materials. If a metal structure is chosen for the house, boards can be laid on the frame of the steps as treads.
They can be painted in any color, and the staircase will look harmonious. A wooden porch will look especially beautiful if you combine metal railings with forged elements with varnished wooden handrails.
Another option is concrete stairs with wooden steps. This option is used if the owner intends to cover the concrete porch with any materials. Wooden treads, unlike marble ones, will be non-slip, and even if the steps wear out over time, they will be easy to replace.
Building a porch yourself will not be as difficult as it seems. This work is within the capabilities of a home craftsman, and as a result of all the labor, the house will receive a convenient entrance that will be pleasant to use in any conditions. A simple wooden porch with a canopy can be closed on all sides, then the porch and the residents of the house will be reliably protected from rain.
During construction, it is worth paying attention not only to the reliability of the porch, but also to its appearance. Leaving wood without finishing is not a good solution, as over time it quickly begins to darken.
If you do not want to hide the natural beauty of the wood, you can buy translucent glazes that will preserve the natural beauty of the steps. Working with passion will allow you to get the optimal result, and the finished porch will last a very long time.
Nikolay Kazakov
Author of publications on 1Drevo.ru with the topics: Windows in a hip roof | Window shapes | Inserting a window into a log house | Tonkomer houses | Rounded timber | Domokomplekt | Rounded cottages | Heating electric boilers | Polycarbonate canopy | Cordless drill | Log cottages | Wood or brick | Gazebo for a summer residence | Cottage made of laminated timber | Log cottage | Columnar foundation and others.
Was this publication useful to you?
Bookmark it on social networks!
Total score: 9Votes: 1
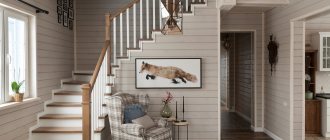
Enclosed terrace to the house: continuation of the house design
Shed roof made of metal profiles at the dacha
We recommend! — Encyclopedia Wooden Houses — NEW
You can find out detailed and expanded information on the topic of the article from the book “Wooden Houses,” which reflects all stages of building a house, from laying the foundation to installing the roof. Book price = 77 rubles.
You may also be interested in other BOOKS on building houses from wood with your own hands.
We recommend other posts on this topic:
How to make a truss for a canopy: do-it-yourself metal truss
Stylish wooden houses made of timber with a balcony and a terrace
How to build a wooden veranda for an already finished house
How to make a porch in a bathhouse: options and manufacturing stages
Making a wooden frame for a canopy
Wooden deck frame: strength of a wood frame
DIY staircase to the porch
Before you start building a wooden staircase for the veranda in your house, you need to carefully rethink its design and choose materials for finishing.
A wooden veranda is best suited for houses built from multi-layered wood. Therefore, the first stage of constructing a veranda is creating a project. First of all, you need to draw up a drawing of the future design. At the same time, many parameters must be taken into account:
- Height
- Length
- Parameters and number of steps;
- Floor;
- Wingspan;
- Veranda corner.
Wood is a very practical building material. This allows you to give the design a very diverse look: it can be very simple or a real work of art.
However, experts do not recommend complex designs to inexperienced clients. A regular square wooden porch with a low staircase is the best choice.
In order for the surface of the wood to last as long as possible, it is necessary to treat the wood against moisture and rot with special substances that strengthen the material and increase its durability.
What does a step consist of and how is it calculated?
Any wooden house needs a porch: due to the high plinth, the door is located quite high from the ground, and it will be inconvenient to enter the house. You will need a porch with at least two steps, and the exact number and size of them depend on the specific features of the house.
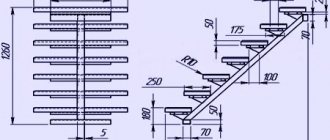
DIY steps for a porch made of wood consist of a tread (horizontal part) and a riser (vertical part). They are built based on the following parameters:
- The height of the step is the size of the riser. Normally, it will be from 16 to 21 cm: a steeper staircase will be inconvenient to climb.
- Depth of steps. This is the width of the tread that should be comfortable to step on. The depth of the step should be at least 27 cm, the optimal size is 32 cm.
- Width of the flight of stairs. For one person you need at least 90 cm of width, and on such a staircase it will be difficult for two people to separate.
- The angle of the porch. An angle starting from 27 degrees is considered normal. The staircase to the house will be gentle, and even a small child or an elderly person can easily climb it. Flights of stairs with a slope of more than 45 degrees can only be attached; such structures are usually used for attics and attics.
A wider flight of stairs (125-150 cm) is suitable for a large family so that there are no collisions on the stairs. Wider spans are made in public institutions that are constantly visited by many people.
In addition, it is necessary to calculate the total span height. It depends on the level of the base and the thickness of the first crowns of the house to the doorway.
The porch area should be located a few centimeters below the front door, especially if the house has just been built. During shrinkage, the overall height of the house may decrease, then the door will touch the surface of the porch when opened.
Installation stages
Materials:
hacksaw; level; rod measuring 100 x 200 mm; Railings 70 x 70 mm for the production of railings; Plates for the construction of stairs (thickness - 30 mm); Nails and hammer.
- Before starting work, treat the wood with antiseptics and dry completely (within 48-72 hours);
- Even a small porch needs a foundation. This increases the stability of the stairs and reduces the processes of decay. Typically, the column foundation is installed under a wooden veranda. Metal pipes or structures made of asbestos, logs, concrete blocks or bricks are used as support pillars. Holes up to 80 mm are drilled under the supports, at the bottom of which a sand and gravel mixture is filled. It should be noted that metal supports must be treated with special anti-corrosion inhibitors before being immersed in the ground;
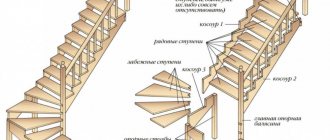
- Then you need to prepare bowstrings or stringers - these are the main load-bearing elements of the staircase to which the steps are attached. The grooves are made in bowstrings (or longitudinal beams), and the steps are cut out. The beams are attached to the walls of the building (taking into account the width of future steps) and nailed. The bottom edges of the beams must be attached to the support posts;
- The panels are then cut to specifications for future steps and processed using a planer or sander. Reinforce the steps from bottom to top. Seams should be secured with self-tapping screws or nails;
- After installation, the structure is covered with boards and only after that can it be used to make handrails;
- Railing posts are mounted on all steps. This element is attached with self-tapping screws. A regular square beam can be used as a railing, but it is best to use shaped balustrades. At the top of the balustrade, the balustrades are "hidden" under the balustrades and are also secured with screws;
- Then the conductor is treated with a primer with antiseptic properties (2-3 layers). It is recommended to install a canopy on the veranda, the surface of which should cover the entire area of the veranda.
Recommendation! Wooden porch stairs can be stained or painted, but the surface (clear) must be applied to seal the result.
The surface of the stairs should be well sanded and then covered with a layer of glaze. After stain treatment, the coating must be thoroughly dried. Only after this can clear varnish be applied. If you wish, you can paint the stairs (this article explains how and how to do it).
Watch a video on how to make a staircase to a porch from logs:
Page 2
Modern cabins and private houses have 2 or more floors, and the highest of them can be residential and non-residential premises. Either way, you need a ladder.
It is already quite difficult to build a reliable intermediate or attic staircase from concrete or metal structures, which cannot be said about a wooden staircase.
Even a beginner can pick it up.
In this article you will learn what types of wooden stairs exist, what is their difference, and what material is used to make the spans. In addition, each of you can build a wooden staircase to the second floor - the article provides examples of calculations and photographs.
The role of stairs in a home
The staircase at the entrance to the home plays an important role, and its arrangement must be given the utmost attention, since it takes on a large load.
Let's try to figure out how to make a wooden staircase for a porch with your own hands, choose the right material, shape and color of the structure, so that it creates harmony with the porch of the house.
Wood is most often used to create porch stairs. The popularity of this material is explained by its environmental friendliness and attractive appearance. In addition, wood is easy to work with; you can create any design and even order handrails with ornate carvings from craftsmen.
Advantages of wooden stairs to the porch
- Ease of processing the material;
- Low weight does not create obstacles for transporting wood;
- The ability to create fancy decorative designs;
Disadvantages of wooden stairs to the porch
High cost of material;- Loss of visual appeal after long use;
- Tendency to deformation, putrefactive processes, insect damage;
- The material requires additional protective treatment with antiseptics and coating with paints and varnishes;
- Wood is less durable than concrete and metal;
- Railings and balusters can become loose, and repairs are not always easy.
The disadvantages of some types of wood for creating a wooden staircase for the porch of a house can be compensated for by the correct selection of material.
How to choose wood for the stairs to the house
Most often, pine or larch are used for wooden structures that will be installed outdoors, since they have a number of positive characteristics.
Pine staircase
- Needs periodic treatment with antiseptic compounds against rot;
- The density of the material is low compared to larch;
- Can be easily processed;
- The cheapness of wood and its widespread availability make it popular.
Larch stairs
- High density of wood (the material can last for centuries and turn into stone);
- Resistance to putrefactive processes and deformation;
- Expensive;
- It has a low prevalence in the building materials market, since its growing area is small. Importing larch from remote regions only increases its cost.
Thus, pine is a more affordable and budget-friendly material for making wooden stairs to the porch with your own hands. Larch, if desired, can be afforded by home owners for whom costs are not of great importance.
Drawing a drawing of a wooden staircase for a porch
This stage before starting work is a mandatory point in the process of creating stairs for the house. To make a high-quality sketch, it is necessary to carry out careful measurements and calculations, taking into account the following parameters:
Structure height
To get it, you need to measure the distance from the ground to the top of the porch or doorway if the staircase is planned directly to enter the house.
As a last resort, you need to make a gap from the door opening to the top step, taking into account the fact that wood is prone to expansion when humidity is high, and this threatens to block the entrance.
Stair slope angle
After measuring the height of the stairs, it is necessary to calculate the maximum expected slope. When making calculations, remember that an extremely steep staircase is inconvenient to use, and a too sloping one takes up a lot of space.
The angle of inclination of the structure is adjusted by lengthening or shortening a continuous sequence of steps between two platforms.
Length of string or bowstring
The bowstring is a structure with special grooves that are necessary to secure the steps. Stringer - the design of a flight of stairs, is a beam with a comb located on it for installing steps.
Scheme for installing steps for a wooden staircase on stringers on the porch and bowstrings.
Important! Do not build a very steep or sloping staircase, if its length is within 5 meters.
Formula for calculating stringer c = a / sin (α)
- c is the length of the stringer;
- a is the height of the stairs;
- α is the roll angle of the flight of stairs.
Taking into account the angle of inclination of the stairs, you can calculate the distance to the first step from the porch using the formula for the length of the stringer:
c = √ a² + b²
- a – height of the stairs;
- b – gap to the first step from the porch;
- c – length of the flight of stairs
The width of the stairs most often corresponds to 9 m, so that at least a person can stand on it. If the yard area allows, the staircase can be made wider for the convenience of the residents of the house.
Size and number of steps
To determine the required number of wooden steps for the porch in the entire structure, you need to calculate the size of the step (250 - 320 mm) and divide it by the gap between the base of the porch and the stairs.
If you get a result of about half a meter, you will need 5 steps. The height of the riser ranges from 150 to 200 mm. When calculating the depth and height of the steps, the level of ease of use of the structure is taken into account; everyone determines it for themselves.
Instructions for determining the size of wooden steps for a porch
- The calculation must begin by measuring the height of the porch or the gap between the ground level and the threshold.
- The depth of the step, as specified by SNiP, must be at least 30 cm. Thus, if the span length = 1 m, then 3 steps can be placed, with a depth of 3 m 30 cm.
- It is necessary to check compliance with accepted standards. A simple wooden staircase to the porch, half a meter high, is divided into the required number of steps. Result: 50: 3 = 16.5 cm.
- At the end of the calculations and measurements, the result is transferred to the drawing of a wooden staircase for the porch.
Types and types of structures
There are different types of wooden staircase structures:
Stairwells. Easy to make and convenient to use, but takes up a lot of space. A marching staircase can be placed along the wall or mounted in the middle of the room; Spiral staircase. Usually placed in narrow spaces. Since the structure's throughput is very small, it is better to move along it sequentially. A spiral staircase (if you build it yourself) is much cheaper than other structures and lasts about the same; Combined staircase. Can be used in the construction of a private house, if the installation allows it. Most stairs are built with a spiral element.
The types of wooden staircase structures illustrate the following:
Hospital Stairs - Stairs are attached to huge, mounted bolts (balustrades); Stairs on bowstrings - the flight of stairs is mounted on a beam with special cutouts on the inside of the hinge and the tongue; stairs on the slopes. The kosura is an inclined beam with ladders attached above it.
Types of materials for the porch
The modern construction market offers home owners who want to make a porch with their own hands a huge number of different building materials and technologies. The most popular materials for porches are metal, concrete, stone and wood. Each of these materials has both its pros and cons. In addition, various combinations of these materials are often found - a concrete base and a surface made of decorative stone, a metal frame and wooden steps.
All these options provide the widest possibilities for decorative finishing. Forged metal staircases with curved railings decorated with floral patterns can be distinguished by high aesthetics. Concrete steps lined with slabs of polished marble or granite have no less aesthetics. However, such options have two main drawbacks that make DIY construction very difficult:
- High cost of building materials.
- High demands on the level of construction skills.
To make a porch from wrought iron with your own hands, you need to have sufficient knowledge and skills in blacksmithing and welding. In order to make beautiful steps from marble or granite with your own hands, you also need to have sufficient construction skills. In addition, such options will require significant financial investments.
The most democratic option is wooden steps. It is completely devoid of the above disadvantages. The cost of construction wood is much lower than the cost of facing stone tiles or the same metal. In addition, wood is much easier to process, and making a wooden staircase with your own hands is not difficult. It is these factors that determined the popularity that wooden entrance stairs have earned in modern construction. As practice shows, actually working with wood does not cause any particular difficulties for a person who knows how to hold carpentry tools in his hands. The greatest difficulty in building a wooden porch with your own hands is the work of mathematical calculations, including determining the slope of the flight of stairs, the height and depth of the steps. In this article we will dwell on these issues in more detail - how to build the most convenient porch to use.
What kind of wood can a staircase be made from?
The choice of staircase material depends on the preferences of the owner of the house or apartment, the characteristics of the wood and its cost. Different breeds have their own advantages and disadvantages:
Maple. Stairs of the corresponding race will be the strongest and most durable. Color - light brown. Missing maple stairs are a high price to pay. Larch The color of the structure is golden yellow or dark yellow with brown veins. Excellent resistance to external factors. A larch staircase will be strong and durable. Oak. The peculiarity of an oak staircase is that the older it is, the darker the shade. Yale The most popular material due to its low cost. Spruce has a uniform structure and light color. Jaw. Due to the low density of wood, it is very easy to work with. Another advantage of pine is that it requires very little material. The disadvantage of a pine staircase is its short service life. A pine staircase is best installed in a country house, where it is used seasonally.
How to make a wooden staircase
The platform for installing the stairs can be not only 4-angled, although this is the most common solution. You can make a porch of a round, hexagonal or other shape, in addition, it can be corner. All the features of each model are reflected in the drawings; the master must clearly understand how the structure will be constructed.
How to build steps to a wooden porch? Work on the construction of the porch begins with concreting the supports. The platform can be supported by 2 or 4 pillars, depending on the size; in some cases, it is supported by a horizontal beam attached to the wall.
For a light porch, you can choose wooden supports made from boards: they are placed at one end in the pits, and the base is filled with concrete. The supports must also be soaked in advance with any antiseptic.
In addition, concrete “nickels” should be located in those places where bowstrings or stringers will rest on the ground. This will allow the ladder to support the weight of one or more people. When the base is ready, you can begin assembling the system:
- Site assembly. It consists of a wooden frame to which logs are attached and flooring is installed. The platform is installed on a concrete base at one end, and the other is attached to a beam installed on the wall of the house.
- When it is completely ready, you can move on to making stringers or bowstrings and securing the steps. The bowstring can be made according to a template: you need to take a piece of hardboard 40 cm thick and attach one edge to the support platform, and place the other on a concrete platform on the ground.
- The finished bowstrings are attached with self-tapping screws to the support platform and installed on a concrete base. You can proceed to assembling the steps, which is always carried out from the bottom up.
- Risers and steps are inserted into the worked grooves; they can be additionally secured with metal corners so that the stairs do not creak.
Based on the resulting angle, a template is drawn up; it must be depicted on a piece of hardboard. After this, two identical strings are cut out of the boards according to the template, in which grooves need to be made for installing the steps.
Assembly takes little time, and very soon the ladder will rise to the support platform. You can check the reliability of the steps, after which you need to move on to arranging the parapet and canopy.
Pros and cons of wooden stairs
Wooden stairs have their advantages and disadvantages. Let's get to know them in more detail.
Positive aspects:
Low costs for building materials; environmental friendliness of wood; simple processing; possibility of installation with your own hands; light weight; aesthetic appearance.
Negative aspects of wood:
Low strength compared to concrete or metal stairs; Wood is a natural material that deteriorates and will change its nature. Therefore, after some time it may be necessary to take preventive measures; danger of material fire.
Features of wooden construction
Compared to other materials used to make porch stairs, wood is a natural material that remains environmentally friendly even after processing.
The main advantages and disadvantages of such designs can be seen in the table:
| Advantages | Flaws |
|
|
Tip: If you want to make the porch of your home original, you should choose wood. And some of the disadvantages of wood can be eliminated by choosing the right wood species.
Choosing a wood type
Any structures used outdoors are usually made of pine or larch. However, they have some distinctive features.
Pine:
- It often needs to be treated with a protective compound against rotting;
- It has a lower density than larch;
- The material is easier to process;
- The cost of the material is lower;
- You can buy it almost anywhere on the planet.
Features of larch:
- High wood density;
- High resistance to rotting, which makes it popular among materials for the manufacture of porches and stairs;
- High cost;
- Inaccessibility to the general consumer. It does not grow in many regions. And when purchasing goods imported from afar, the costs of transporting the material increase, which also significantly increases the price of the structure.
From what material the wooden staircase to the porch will be made with your own hands, everyone decides for himself. Pine is suitable for an economical budget, and if finances allow, it is better to choose larch. In this case, the wooden staircase to the porch will last a very long time.
Porch made of pine boards
Larch boards on the porch
Drawing development
Sketch of a wooden staircase
Before you make a wooden staircase to the porch, you need to carefully carry out all the calculations and draw up a drawing.
In this case, it is necessary to take into account such design parameters as:
- Product height. To obtain it, measure the distance from the ground to the top of the porch area, or to the height of the door opening, in the case of constructing an entrance staircase to the house. In the latter case, when calculating, you need to make an indent from the door opening to the top step. This is due to the fact that wood swells when exposed to moisture and can, over time, block the passage;
- The angle of inclination of the stairs. After measuring the height of the stairs, its optimal slope is calculated. It is worth keeping in mind that a very steep staircase will be inconvenient to use, while a very flat one takes up a lot of space in the yard. The inclination of the stairs can be adjusted, lengthening or shortening the length of the flight of stairs;
- Length of bowstring or stringer. A bowstring is an element with special grooves that serves to fasten steps, and a stringer is a supporting structure for a flight of stairs, which is a beam with a comb placed on it for installing steps.
In the outdoor version, a wooden staircase uses only one of these two options. However, their calculations are identical. The length of the stringer directly depends on the angle of inclination of the flight of stairs, which can range from 27º to 45º.
Scheme for installing steps for a staircase with bowstrings and stringers
Advice: Do not make the stairs too steep or flat, the length of which is 5 meters.
The length of the stringer is calculated using the formula c=a/sin(α), where:
- a is the height of the stairs;
- c is the length of the stringer;
- α is the angle of inclination of the flight of stairs.
Knowing the angle of inclination of the march, you can determine the distance to the first step from the porch using the formula:
Formula for calculating the length of the stringer
Where:
- a is the height of the stairs;
- b- required distance to the first step from the porch;
- c is the length of the stringer.
So:
- Width of the flight of stairs. This value is usually 900 mm or more, so that at least 1 person can freely fit on the stairs. If you have free space and sufficient funds, it is better to choose a larger width, which will allow two people to climb the stairs at once conveniently and comfortably.
- Number of steps and their sizes. To determine the number of steps for the entire structure, you need to: select the size of the tread, usually it is 250 - 320 mm, and divide it by the distance between the base of the stairs and the porch. So, if this distance is 1.5 meters and the tread size is 300 mm, 5 steps will be required. The height of the riser is taken in the range of 150 - 200 mm.
The height of the steps and depth are calculated. These indicators determine how convenient a do-it-yourself wooden staircase to the porch will be during operation. The height of the steps and their depth influence the total number of elements and the slope of the stairs.
From the table you can see the dependence of the parameters of the steps on the angle of inclination of the stairs:
| Angle of inclination of the stairs, in degrees | Step width, cm | Step height, cm | Slope factor |
| 30,5 | 29 | 17 | 1,7 |
| 32 | 28 | 17,5 | 1,6 |
| 33,5 | 27 | 18 | 1,5 |
| 36,5 | 26 | 19 | 1,36 |
| 41 | 23 | 20 | 1,15 |
| 45 | 21 | 21 | 1 |
- Calculation of step sizes. The depth of the step should be such that the foot rests completely on it without hanging down. The excessive height of the steps makes the climb quite inconvenient, especially for children and elderly family members.
According to SNiP, the most convenient dimensions for climbing and descending wooden stairs are: depth - at least 300 mm; height 150 - 180 mm.
Instructions for calculating the size of steps are as follows:
- The entire calculation begins with determining the height of the porch, or the distance between the threshold and the ground level. For example: with a height of 0.5 meters, in order to obtain a comfortable slope of the stairs, the length of the flight must be at least one meter. In this case, the slope or the ratio of the length of the march to its height will be 1:2, or 45º.
- According to SNiP standards, the minimum step depth is 300 mm.
- Based on this, it turns out that with a span of one meter long, only 3 steps will fit, each with a depth of 330 mm, which complies with building regulations.
- Compliance with these standards is checked. To do this, the height of the stairs - 0.5 m is divided by the number of steps. The resulting step height is 50 / 3 = 16.5 cm.
After receiving and checking all calculations, the dimensions are transferred to a drawing or sketch.
Diagram for calculating the size of a staircase
The photo shows some designs of wooden stairs:
Materials for making stairs
You must install stairs on the second floor:
Stepped beam; Support for stairs (footrests); Governing body; Beam width 30 - 40 mm; rod for longitudinal beam 50 x 240 mm; Screws, self-tapping screws; Joiner's glue; Building level, angle, tape measure; Handrails and railings, but it is better to buy them at a hardware store.
Staircase calculations
If you decide to build a wooden staircase with your own hands, think through the nuances of construction: Determine its dimensions, calculate the number of steps and supports. It is important to first imagine the function of the staircase: connecting floors or accessing the attic. (Information about self-insulating an attic can be found here).
It's also easy to draw the diagram yourself. They usually lead down straight stairs. It connects the first floor with the second floor and reaches a height of several meters. For reasons of comfort, the angle of inclination of the structure should be 30-40 degrees.
Beware! Wooden houses shrink significantly in the first two years after construction, so the angle of inclination may change.
So, for your convenience, we present the basic calculations of the elements of stairs (using the example of a wooden structure):
The base length is 3.5-4 m; the flight of stairs is 2.5 m; staircase width 30 cm; height of the stairs is 15-20 cm.
You may also be interested in an article about fences for dachas: //6.com//-/ //6zabor-dlya-dachi.html
Necessary calculations
Determining the height of the stairs. The average value from ceiling to floor is 250 cm. To this is added the thickness of the ceiling between floors. The average is 35 cm. We understand this: 250+35=285 cm
to calculate the number of levels: The height of the staircase is divided by the height of the step. The last value (for example, the height of the steps) is better taken as the average value of 17 cm. We understood this: 285 cm / 17 cm = 16.76 cm = 16.76 cm = 16.76 cm
The value is rounded up. There are 17 steps in total.
Determine the width of the step. The permissible width of the step (flat fit) can be in the range of 22-40 cm. In Russian practice, the following formula is used to calculate the width of the step and the rise (step): a + b = 47 cm, where a is the height of the step, b is the width of the step. We got it: 47-16.67=30.3 cm.
The value is rounded to the nearest 30 cm. - This is the step size.
The width of the stairs should be a multiple of the width of the stairs. In our case, this value can be 60 cm, 90 cm, 120 cm, etc. Calculate the length of the stairs. The length of the staircase corresponds to the product of the number of steps and the width of the staircase. We got it: 17*30= 480 cm
Recommendation! The value we received is quite high. Not every house can build such a project. Builders recommend building a revolving staircase or a staircase with a platform.
calculates the length of the longitudinal beam. Calculations are based on the Pythagorean theorem: the sum of the fields of the legs corresponds to the square of the hypotenuse. This is A²+B²=C². In this formula: A is the height of the stringer, B is the length of the ladder, C is the length of the longitudinal beam. We got it:
230400 + 81225 = 311625 The root of this number is 558.23 cm. You can round it up to 560 cm.
Tip: If it is difficult to make a geometric calculation, you can draw a ladder for the appropriate size paper and measure the angle and length of the base.
How to build a porch with your own hands: make a rise, its fencing and canopy
Stairs or steps to a porch have strict design requirements. First of all, to ensure safety. Knowing about them and determining the best option, you can save time and money. Let's see - based on the standards - how to properly make a porch with a beautiful and reliable rise.
Parameters: GOSTs, SNiPs and construction practice.
Porch design options
- The slope of the porch stairs is from 30 to 40°.
- The width of the steps for the passage of one person is 80 cm, in order to warm up - 120 cm. If the width is more than 2.5 m, additional railings are installed in the center.
- The number of steps is always odd.
- The optimal height from step to step (misdemeanor) is 17 (or from 15 to 18) cm. The first step must have a standard height.
- Tread, or step depth, is 29–32 cm.
- Overhang (tread protrusion) – no more than 50 mm.
- To avoid stagnation of water, wooden steps for the porch are made with a slope of 2 mm.
- Porch fencing is installed when ascending three or more steps, with a height from the sidewalk level of more than 45 cm. Height according to GOST: 90 cm.
- If the porch is high, it is recommended to build a platform every 15 steps.
- The porch foundation - in order to avoid uneven shrinkage - should not be rigidly attached to the foundation of the house (except in cases where both of them are poured at the same time).
- Flooring is an essential part of the porch. Entrance doors always open outward: opening them directly from the stairs or leaving the house on the steps is extremely difficult. The size of the flooring along the front must be at least one and a half times the width of the front door.
- A canopy or canopy over a porch is always 20 centimeters or more below the window sill of the 2nd floor.
The width of the steps for the house should not prevent the entry of large items. It should also be possible to temporarily install a ramp on part of the stairs. For cases when you need to roll a baby stroller or organize a lift for people with disabilities. Since we are making a porch from wood, it is necessary to consider the natural ventilation of the internal cavities.
We make the steps to the porch with our own hands, photo report:
Selection of design, design
A porch as a structural element of a building can be built into it or attached to it. Both options have both advantages and disadvantages. The built-in porch already has a foundation (common with the entire building), a canopy (common roof) and decking; the steps to the porch are closed on two or three sides. That's a plus. On the other hand, it takes away part of the internal volume and makes the wall fencing system more complex. This is most often a minus. The built-in porch looks more organic in voluminous houses with several floors. Of course, the steps here are wide.
Built-in porch
An attached porch is an excellent option for small one- and two-story cottages and country houses. It diversifies the architectural appearance of the building and serves as a link between the structure and the landscape of the site. Naturally, the steps to the house should fit into the overall design, or - based on the tastes of the owner - on the contrary, add variety with their contrast.
Attached porch
The ideal option for constructing such a porch is when it is provided for by the project. This means that the foundation for it is already there. All that remains is to make steps for the porch, handrails and an awning. Yes, and a foundation with a support beam - a mauerlat, on which the lower step will rest.
The most common material is stairs with wooden steps and the same base. Wooden stairs on a concrete base are also common: this option can be a budget option in sparsely wooded areas. In the dictionary we saw the phrase: “to go up to the porch.” It means that everything should look smart. This is the main thing you need to focus on when building a staircase for a porch with your own hands, both from wood and from other materials. Therefore, the sketch of the entrance group is the main thing where you need to start. According to the sketch, a project or diagram with drawings is made: the basis of all calculations.
Assembling the stairs
Before installing the stairs on the second floor, it is necessary to determine the location of the embankments (the supporting structure of the stairs). Installation of a ladder (in our case, a swamp structure) consists of several stages:
Installation of inclined planes. Secure the bottom of the longitudinal beam with a support beam. Cut the top of the crossbar into the ceiling plate beam.
Assembling the steps and attaching them to the spacers with self-tapping screws.
Installation of balustrades and handrails (1 balustrade per 1 step). At the bottom of each step, grooves are cut out, which are inserted into the railing and mounted on them.
Sanding stairs, applying protective coating. Varnishing and painting. A roller or brush is used for this. Paint the stairs in 2-3 layers, each additional layer should be applied after some time to allow the previous layer to dry.
Preparing for the installation of stairs
A few simple steps can make a wooden staircase much more reliable.
To install the structure on the porch you will need to purchase:
- Bars and boards are the main materials of the product;
- Hacksaw for processing parts;
- Screwdriver;
- Self-tapping screws for assembly;
- Building level;
- Components for the production of cement mortar;
- Crushed stone or large stones;
- Sandpaper;
- Protective agents against fungus;
- Varnish or paint.
Before you make a wooden staircase for the porch, you need to lay a separate foundation for it. In places where wooden parts meet the soil, three-layer insulation is made: sand, crushed stone, cement mortar.
Stones are placed under the beams to support the railings. This will protect the wood from rotting and will not allow the structure to sag under its own weight.
Installation diagram of stairs with different bases
Next, the details are prepared:
- Blanks for the manufacture of steps and risers of rectangular shape;
- Sections of bars for balusters and fencing;
- Stringers are made. To do this, markings are made using cardboard, plywood or hardboard patterns;
- All wooden blanks are treated with protective compounds;
- Tools and materials are located in an accessible, convenient place for work.
The procedure for installing the stairs
Fastening stair stringers
Before you begin installing the structure, it is better to preview the video in this article.
When constructing the entire structure, you should adhere to the following recommendations:
- Installation begins with the installation of stringers. They are attached to the upper part of the porch platform, on a piece of timber, which can be additionally reinforced with metal corners. In this case, one side of the beam will be adjacent to the flooring of the platform, and the other - to the stringer;
Tip: To increase the reliability of the structure, the installation of stringers should be combined with the design of the base of the stairs. In this case, the lower part of the stringers is connected to the first riser, the evenness of the structure is checked, the remaining parts are applied and fixed with cement mortar.
- When installing steps and risers, nails must not be used. This will lead to rapid loosening of the wooden stairs. You need to use self-tapping screws, or better yet, fastening the elements using the tongue-and-groove type, but this will be more difficult. The easiest way is to install the first step on top of the bottom riser, and rest the next riser on it;
- If this is a simple do-it-yourself wooden porch staircase to the terrace, at this stage you can finish the installation, but when making a porch, after installing the steps, you need to proceed to installing the canopy and railings. For reliability, support posts for them can be fixed in places where they are adjacent to the stringers;
- The weak point of the structure is the fastening of the railings. They should be reinforced with connections on self-tapping screws, and all joints of the parts should be additionally glued.
Scheme for attaching steps to strings
Railing options
Cost of a finished staircase
Those who decide to purchase a prefabricated wooden staircase or place an order should know that the cost depends on the complexity of the design and the type of wood.
For example, the most common staircase design with a 90-degree turn from pine will cost 60-8,000,000 rubles, from birch - 100,000 rubles, from oak - 150,000 rubles.
You can order a wooden staircase in a specialized store or on company websites. The production of stairs takes on average 5-10 working days.
You can build your own wooden staircase or order it from specialists. Independent editing is not a quick process, but it has its advantages. The first is to save money and visually evaluate the quality of building materials.
In this video you will learn how to build a wooden staircase with your own hands:
Page 3
The most common design style for country houses and dachas is the Provence style. This style is called "Russian hut".
The wooden house itself is an oasis of comfort and cozy warmth.
It radiates the beauty and power of nature, breathes purity and comfort. In such a house there simply cannot be a fireplace or a wooden staircase leading to the second floor.
And if there is no second floor, then there may be a desire to complete it at any time, and then the owner of the house faces questions related to the calculation and construction of the stairs.
Installation of a wooden porch in 2 options
As already mentioned, it is better for amateurs to make a staircase on stringers or bowstrings, but in addition to assembly and finishing, there is also such an important point as the foundation for a wooden porch, and that’s where we’ll start.
Foundation for a wooden porch
It is easiest to install a porch under a wooden house. You need to arrange a support platform on the ground, and the porch, or rather the stringers or bowstrings, are attached directly to the wooden house with special canopies.
I recommend pouring a small reinforced concrete slab as a support platform.
- According to the size of the slab, a small pit is dug and immediately compacted to a depth of 30 cm.
- The bottom of the pit is covered with roofing felt or geotextile.
- Next, a sand and gravel cushion is filled in and compacted at a depth of 200 mm.
- A small formwork is constructed on top; the slab will be poured 50 - 100 mm above the ground.
- Now a cage of metal reinforcement is placed on the cushion and concrete is poured, and when the solution hardens, all you have to do is remove the formwork.
The reinforced concrete slab holds up well on any soil, including heaving soils and peat bogs.
With fastening to the wooden house itself, everything is simple, previously the stringers cut directly into the frame of the house, now this is not necessary. There are metal hangers on the market for arranging the rafter system; with their help, supporting structures are screwed to the house quickly and reliably. By the way, the porch can also be attached to concrete with hangers.
Metal hangers will save you a lot of time without losing the quality of fixation
But if the house is new and is still shrinking or there is no way to pour a reinforced concrete slab, then the porch is placed on bored concrete piles. Filling them with your own hands is not difficult.
- Take a garden drill and make holes at the reference points. The depth depends on the type of soil; on dense soils, half a meter is enough, and on heaving soils, the hole is drilled just below the freezing level.
- Next, pour a sand and gravel cushion into the hole to a depth of 100 - 150 mm.
- Make a pipe from roofing felt and insert it into the hole.
- Insert a reinforcement cage into the pipe and fill everything with concrete.
- After pouring, raise the pipe by 100 mm to expand the support base.
Important! A threaded pin is either inserted into the bored pile, or reinforcement is brought up to fix the porch structures.
Bored piles are suitable for any soil, the main thing is to correctly determine the laying depth
Option #1. Staircase on stringers
Do-it-yourself steps for a wooden porch are easier to install on stringers.
- You need to take two or more wide boards with a thickness of 40 mm and mark them for future steps.
- Next, take a hacksaw and cut out the bed for the steps.
- After installing the stringers level and fixing them to the base, all you have to do is cut the treads with risers and screw them to the stringers.
Instructions for assembling stairs on stringers
Option #2. Ladder on bowstrings
Installing a ladder on bowstrings is also not very difficult. The entire preparatory stage and calculations remain the same, only the principle of fixing the treads and risers on strings changes, there are 3 main methods.
- The easiest way is to screw thick bars to the strings and put treads on them, but this option is good if you plan to install risers; the bars look ugly on open structures.
- It is much more convenient to assemble a staircase on metal corners, however, for a street staircase you need stainless steel corners, and their price is not the lowest.
- Professionals prefer to cut grooves in the strings and install treads and risers in them. To do this you will need a hand cutter; cutting with a hacksaw and chisel looks rough. The treads themselves are fixed with self-tapping screws through the string
Options for attaching treads to a string
Finishing a wooden porch
Finishing a wooden porch begins at the wood harvesting stage. If you want the porch to stand for at least 20 years, then it is better to take a board with deep vacuum impregnation. The price for such material is 2 times higher than for ordinary wood, but it is worth it.
If for some reason you had to build a porch from ordinary dry or freshly cut wood, then first cut it to size, plan and lightly sand all the elements, and then treat them a couple of times with a complex protective compound.
Protective impregnation is applied to wood at least 2 – 3 times
Advice! There are tips online to saturate the wood with used machine oil, but under no circumstances should you try to do this. Despite the fact that the porch is located on the street, the smell of machine oil will last for several years.
When the wood has dried after complex impregnation, a final fine sanding is carried out and you can proceed to applying decor. If you are working with coniferous species, then after sanding the wood still needs to be bleached (the resin is washed off).
Decor is a delicate matter; the easiest way is to paint the porch with some covering paint for exterior use, but in this case you will hide all the beauty of natural wood.
After bleaching, wood and light-colored species can be tinted with stains; they are inexpensive and there is quite a large selection.
Wood stain can be used to make wood darker, but not lighter.
For adherents of environmentally friendly coatings, oil-wax is now sold, if you don’t trust industrial compounds, then you can make such impregnation yourself, the recipes are “HERE” . But keep in mind that you will have to renew the oil-wax every year, because the beauty and protection will last a couple of years at most.
If you want the porch to look beautiful and the coating to last a long time, you will have to fork out for a good yacht (alkyd-urethane) varnish. These compounds can even withstand sea water, so you don’t have to worry about the porch here.
On the porch, waterproof yacht varnish will last at least 3 - 4 years, without updating
Important! Whatever finishing composition you choose, it is applied to the wood at least 2 times with a break for drying.
Wooden stairs
Wood has been used in construction since ancient times. It is a durable material that is very easy to work with, adaptable to your needs and can be made without much difficulty or skill.
To build a staircase, it is necessary to choose a very strong tree species, since it is loaded with a certain load. Best suited for this purpose:
Jaw; Oak; Birch; Lumen; Beech
The most beautiful wood is oak, but it costs more than birch or pine. All slabs must be carefully checked for the presence of knots, chips and other defects that affect the reliability of the material.
Before using wood in construction, it is necessary to keep it in the house for 3 days to dry it and avoid further deformation of the structure. Then the tree should be disinfected with an antiseptic:
Vinegar and soda; Salt and boric acid; Copper sulfate and others.
Since wood is highly flammable, it is impossible to build a ladder near a fireplace or other possible sources of ignition. It is also important to remember that wood does not like constant temperature fluctuations. This reduces the durability and reliability of the material, so there is no need to build stairs in a house with uneven heating.
Create a drawing
Before making a staircase to a wooden porch, you need to carry out all the calculations and make a drawing. If you have made a porch with your own hands, then you are already familiar with the drawings of this kind of buildings, but if you do not have drawing skills, you can always order a drawing remotely. In any case, when drawing up a drawing, it is necessary to take into account such parameters as:
- Stair height
- Length of string or bowstring
- Number of steps and their sizes
- March width
Let's look at each of the points in more detail.
Stair height
To obtain the height of the stairs, you need to measure the distance from the ground to the porch leaf, or if you are building the entrance staircase to the house, then the calculation is made to the height of the doorway. In the latter case, in the calculations it is necessary to make an indent from the doorway to the top step, because under the influence of moisture the wood will swell and can block the passage.
Stringer and bowstring
A stringer is a supporting structure of a flight of stairs, in the form of a beam with a comb on top, on which steps are installed.
Bowstring is an element within which steps are located. It has special grooves, due to which the fastening is carried out.
Wooden stairs use only one of these options in their design. Further we will use the term kosour, since the length calculations will be identical for both the first and second options. The length of the stringer depends directly on the angle of inclination of the flight, which in turn must have an angle of at least 27 degrees and no more than 45. The staircase should not be too steep, but it is also not worth making it flat 5 meters long.
To calculate the length of the stringer, you must use the formula c=a/sin(A).
Where c is the desired length of the stringer, a is the height of the stairs, A is the angle of inclination of the flight. If you do not know the angle of inclination of the flight, but know where you need to make the first (lower) step, then use the formula where c is the length of the stringer, a is the height of the stairs, b is the distance from the porch to the first step.
March
The width of the flight is usually 90 cm or more, so that at least 1 person can fit on the stairs. Of course, if the terrain and finances allow, it is better to do more, then even two people climbing will be convenient and comfortable.
steps
To obtain the number of steps, you first need to select the tread dimensions, usually take 25-32 cm, and divide by the distance between the porch and the base of the stairs.
Thus, if the distance between the porch and the base is 150cm, and the tread size is 30cm, you will need 5 steps. The height of the riser should be within 15-20 cm. Only after receiving and verifying all calculations, we begin to transfer them to the drawing. The drawing itself can be quite schematic, the most important thing is that all the calculations in the drawing agree.
Here are some examples of finished drawings.
Shape of steps and types of stairs
The shape of the steps depends on the type of staircase chosen for construction. There are rectangular shapes, wedge-shaped or “wedge-shaped”, trapezoidal shapes (extraneous steps).
Therefore, before choosing the shape of the steps, it is necessary to determine the staircase option, namely:
The staircase is a flight of stairs; Spiral staircase; Hospital staircase (from the German word "Schraube", which means the way the steps are attached and the absence of a supporting structure among them).
If the staircase is a flight of stairs, then the steps form a simple rectangle of varying sizes. The same steps are used for stairs in hospitals.
Recommendation! In a hospital staircase, the staircase is only attached to the wall, and the weight goes into the middle of the staircase, so that the staircase can be reinforced in the middle with an additional metal pipe. In a house where disabled or elderly people live, there is no need to use screw structures: The elevator on this staircase is too steep.
If the staircase is spiral, then the shape of the staircase is wedge-shaped, and the smaller the opening, the steeper the staircase.
In the case of revolving stairs, the stairs are usually made up of extraneous steps and save a lot of space since they are installed instead of interstates.
Porch and staircase made of burnt timber
At the end of the article, we will give an example of a creative approach to arranging a beautiful open porch and staircase, which was built from burnt hardwood timber by Green0568.
The entrance group was made using timber with a cross-section of 20x15 cm.
The beams are fastened together with wood grouse using polyurethane glue. Through one wood grouse the dowels are hammered. Under the fourth step in the middle there is a jack, under the third there are two jacks, which are placed at the edges with an indent.
Green0568 Member FORUMHOUSE
The timber was immediately completely fired, and the gluing surfaces were thoroughly cleaned. After assembly, the glue is removed, then fired again to level the surface, cleaned and impregnated with linseed oil.
An important nuance: according to the user, larch, depending on the area where it grew, has a different texture. Firing before final assembly allows you to understand where the tree has a more beautiful “facade” side, and which is better to hide. Swamp larch still has splinters even after treatment. For this purpose, it needs to be fired before assembly, in order to remove this plane inside as much as possible.
Calculation of stair steps
Let's talk about flight stairs, because this is the most reliable and easiest to build perspective. To build a reliable and safe staircase, you need to correctly calculate, draw a drawing, and then proceed to construction.
The angle of inclination of the stairs should not exceed 450 degrees, although sometimes the angle of inclination reaches 300 degrees due to the small area of the room.
To calculate the length of the stairs itself, you need to use a simple formula: c = √ (a2 + b2)
Dimension c is the length of the frame, i.e. the base of the stairs, b is the length from the beginning of the stairs to the second floor line projected onto the floor, and this is the distance from the floor to the second floor.
The staircase should have an average of 16 steps. If there are many more of them, then it is better to build a staircase with two stairs, otherwise it may make it difficult to climb to the second floor. The height of the stairs should be about 18 centimeters.
Taking very high or very low steps can cause you to stumble and lose your balance on the ascending steps. The recommended step width is 25 centimeters.
Once you have made all the calculations, you can start building the stairs.
Recommendation! Pay special attention to the calculation of the height of the steps: It is easier to walk at low altitudes, but longer and at higher altitudes - faster, but if there are elderly people or children living in the house, it will be difficult for them to climb.
You may also be interested in an article about fences for dachas: //6.com//-/ //6zabor-dlya-dachi.html
Calculation of the entrance staircase for the porch: what you need to know and what to build on
Contents
Introduction
1. Porch
2. The most important parameter when calculating stairs for a porch is the height.
2.1. The 1st indicator is the upper surface, which is what our ladder comes to
2.2. The 2nd indicator is the bottom surface where we will place the ladder
3. Comfortable height and width of the step
3.1. From general to specific
3.2. The optimal indicator is where the comfortable step height is 160-190mm
3.3. The optimal indicator is where the comfortable tread width is 220-330mm
4. Calculation of stairs
5. Indicator number of lifts
6. The second important parameter for the porch is the width
7. Let's move on to the site itself
7.1. Site depth
7.2. Platform width
Introduction
In this article I will tell you how easy it is to calculate your entrance staircase yourself, analyzing all the important points that you need to pay attention to. So that you can independently calculate a comfortable staircase for yourself and understand that this is exactly what you need, it doesn’t matter whether you install it yourself or contact a company.
1. Porch.
Street staircases are different, in this article I will share with you how to calculate a street staircase specifically for a porch. After all, the porch is the most important indicator, where it is impossible for any private home to do without it. Street staircases for the porch mainly consist of one flight and they serve mainly for the front entrance of the porch or are connected to the terrace. The variety of stairs for a porch is huge: there are stairs with landings, stairs with turning steps and just straight stairs. The directions of staircases for the porch can also be different: - someone wants a staircase with a central entrance;
— someone prefers to enter from the side and along the house.
It all depends on your wishes, as well as your initial layout, and often you already have your own idea of how everything should be, and perhaps there are limitations that cannot be corrected and you just need to fit our staircase so that it would be comfortable . And in order to fit our staircase you need to make a calculation, which depends on such parameters as height, width, as well as length (in case of adding a platform) for a comfortable staircase.
Let's look at these parameters:
2. The most important parameter when calculating stairs for a porch is the height.
And here, to calculate the height of the porch, you need to take into account two indicators:
2.1. The 1st indicator is the Upper surface, which is what our ladder comes to
The upper base to which our staircase will end can be different: Whether it is an existing platform for a terrace or simply an existing entrance door and wall. And it is important to understand exactly where our stairs will go and take into account several options:
1) Let's look at the 1st option, when our staircase comes to the existing terrace, when there is already an existing platform and it is to it that our staircase will come. It is important to understand the height from the upper base where the ladder will go. That is, you need to start measuring from the top of the floor: and it is important to calculate it from the clean floor of the existing site.
If you already have a finished floor on an existing site, then measuring will not be difficult. Even if at this stage you still have a rough surface and have not yet laid out the top finishing floor, it is important already at this stage to understand what material you will sheathe on the top base and its dimensions in order to correctly calculate our porch.
For example:
You have an existing terrace, where at this stage there is no finished floor, but only joists. And you are going to sheathe this terrace with a larch wooden board, the board thickness of which is 35mm, and before that, lay out the lathing, where the thickness of the block is 40mm. In total, we get the thickness from the joists to the finished floor: 40mm + 35mm = 75 mm. And when we measure the height, we will need to add 75 mm to the existing height, so we will determine the exact height, taking into account the rise of the finished floor.
2) Another option, when there are no existing terraces, but only an entrance door and a wall, where the calculation of the height we need starts from the bottom of the door. To understand the height from the bottom of the door, you need to take into account that over time, especially in wooden houses, the door can sag and become lower than it is now; few people take this point into account, but it is very important for the calculation. Therefore, when you calculate the height of the porch, you need to take a small margin of 20-40 mm from the bottom of the door, it will be lower than the height from the beginning of the door itself.
This will not affect the comfort of the step from the stairs or landing to stepping over the door itself, since 20-40mm is a small error that will not be felt. But for sagging of the door itself over time, this indicator can greatly help, where you will always have a reserve. Also, in winter, when there is a lot of precipitation in the form of snow, a layer of snow or ice may form on your stairs or landing, which will also serve as an obstacle when opening the door. Therefore, when you calculate the stairs from the beginning of the door, you definitely need a reserve! Having understood where our ladder will arrive, we have determined the upper indicator of the ladder's arrival, now we move on to the lower indicator.
2.2. The 2nd indicator is the bottom surface where we will place the ladder.
This could be: Foundation, paving stones, earth, tiles, asphalt.
If you already have a finished bottom surface, then measuring the height will be easy. Since there is already a final basis for measurement.
But this does not always happen and often, the foundation that now exists is not final and is considered rough, on which the finishing floor will later be poured or laid out. Here, as with the top surface, you need to understand what material you will use for the finishing surface and what size it is. For example:
You have an existing bottom surface that is poured concrete. You plan to lay paving slabs on top of it, where their thickness is only 30mm, before laying the tiles you will need a special tile solution, where its thickness will be approximately 10mm. As a result, we get a size of 30mm + 10mm = 40mm for the finished floor of our lower surface.
And if you start calculating the height from the subfloor, then you need to understand that the finishing surface of 40mm will then rise onto it and you will need to subtract the height of 40mm from this height of the subfloor.
Attention: if when raising the finished floor on the upper base we add, then when raising the finished floor on the lower base we subtract. This is important to understand and take into account.
Thus, taking into account this rise, you can calculate the same height of all steps, which will make your staircase comfortable.
From our example, we can conclude: that the finishing floor of the upper surface will rise by 75 mm, and the finishing floor of the lower surface by 40 mm. The height from the subfloor of the upper surface to the subfloor of the lower surface is 1090 mm, thereby we get:
1090-40+75= 1125 mm - total finished height.
Conclusion: When calculating the height, from the top surface to the bottom surface, you need to take into account the surfaces themselves, namely whether they are finished (final) or whether they are not finished (not final). If they are not clean, then what layer of finishing will be built on them in the future, namely what material and its dimensions, so that in the future it would be possible to correctly calculate the number of steps, and most importantly, make them the same for a comfortable step.
Once you understand what height you have, you can calculate the number of steps.
But before you calculate the number of steps, let’s figure out what height and width of the step is the most comfortable and what you need to start from when choosing a comfortable height and width of the step.
3. Comfortable height and width of the step
3.1. From general to specific
In order for you and I to understand exactly what comfortable height and width of the step we prefer, you and I will have to go through another difficult path.
According to GOST requirements, it is optimally considered that the height of the step should be -150mm, and the width of the step should be twice as large - 300mm. If the width of the step is greater, then the person walking along the stairs will lose his step, and a significant reduction in the width of the step will significantly complicate the descent.
And the main rule, according to our Guest, which allows you to build a staircase that will be comfortable and safe to walk on, is to maintain the ratio between the height and width of the step.
According to history: In the 17th century, the French engineer Blondel derived a formula that relates these two quantities to each other:
2x+y=60
Where “x” is the height of the step, and “y” is the width of the step - this formula was called the “ideal staircase”
What happens: 2x150+300=600
From this formula the following two were derived:
x+y=450mm - formula for “safe stairs”
y-x=120mm - formula for a “comfortable staircase”
Based on these formulas, we have concluded that there is a certain standard to which we need to strive. The thing is that, according to the standard, the step part (tread) is 300mm, and the step height is 150mm, but these are not strict numbers, but only an indicator of a safe step.
For a more clear example, let’s look at this figure, which shows the most comfortable option for the ratio of the height and width of the step.
But there is also a GOST for the height and width of the step, which prescribes adherence to the dimensions: for the height of the steps in the range of 150-200mm, and for the width of the step to adhere to 220-330mm, that is, there are no strict numbers, but only there is a certain interval that you need to strive for for comfortable and safe lifting.
Therefore, there is also an optimal indicator, which is a comfortable solution when calculating steps:
3.2. The optimal indicator is where the comfortable step height is 160-190mm
This value is the main one that needs to be adhered to, but you also need to understand that the difference from 160 to 190mm is a variable value:
1) Because there are restrictions that do not allow us to adhere to strict numbers and build on what we have. That is, it often happens that when calculating street stairs, we have limitations that do not allow us to reach exactly the height that we are striving for. This is due to the fact that our standards require more space allocated for stairs and this is not always taken into account when constructing houses.
2) Also, the value is variable, since the type of people for whom this staircase is intended varies. And each person may have his own ideal of a comfortable level.
Here's an example:
For people of retirement age and small children, the average comfortable step height is: 150-160mm, where the main indicator for them is the low rise.
For teenagers or middle-aged people, the ideal step height is 170-180 mm, since they are more active and a step height of 150 mm is too small for them. For them, climbing low steps is an indicator of too frequent, where they, in turn, try to step over two steps.
3) Another value can be variable, because staircases are different and each staircase has its own purpose, where the angle of elevation of the flight of stairs should be within 26-45 degrees.
When calculating, it is necessary to take into account the slope angle of the structure. Its permissible values lie between 26° and 45°. Taking into account the permissible angle (45°), we find that the appropriate value for b = 200 mm, for h will also be 200.
Conclusion: The comfortable height of steps varies and is different for everyone. We need to understand how it is calculated and for what purposes your staircase will be used, and also understand whether there is anything stopping us from choosing exactly the height that suits us.
3.3. The optimal indicator is where the comfortable tread width is 220-330mm
The width of the step is also a variable value and is determined by several indicators:
1) One of the main indicators for choosing the width of the steps is the material that you are going to cover your stairs with. And, based on this material, you need to calculate the exact width of the steps.
For example:
1) If you are going to cover the stairs with wood, then you need to take into account the dimensions of a standard wooden step. Their width is usually 300mm, but often upon request, they can make it smaller or larger in size. But if you took a standard 300mm step, then you can make the frame itself 20-30mm smaller so that you can make the step overhang for beauty;
2) If you are going to cover the stairs with WPC (wood-polymer composite), then you need to decide where you will buy and what sizes of WPC from this seller, since WPC come in different sizes and types (we will talk more about this in a separate section article).
The same applies to other cladding materials; you need to consider what material you want to use, and most importantly, what dimensions of this material you need to put on your stairs. In order not to make a mistake, it is advisable to think about this at the measurement stage.
2) Another indicator for choosing the width of a step is space limitation. That is, when there are restrictions on the length of the stairs themselves.
For example:
1) At the construction stage, you poured the foundation along the house, and when the construction of the house was completed and it was time to install the entrance staircase, the foundation turned out to be short and your staircase extends beyond this foundation;
2) Or, your staircase has a configuration that runs along your house and has a side entry into the house. At the same time, there are restrictions on the edge of the house: your length from the doorway to the edge of the house has a limitation that does not allow you to go outside the house and make a comfortable staircase. What do you have to sacrifice?
And in order to fit the number of steps you need, sometimes you have to sacrifice the width of the step itself. Especially when the height is large and the length limits you. In this case, the only option is to sacrifice the width of the step.
We did it, we went through this thorny path and now we already know exactly what width and height of the step will be ideal for us.
4. Calculation of the stairs.
Now let's move on directly to the calculation itself:
First, we need to understand the approximate number of steps on our staircase. To do this, we need to divide our resulting height into standard step heights.
In our example, we determined the total finished height, which is: 1125mm.
Next, we divide our height into standard step heights that can be used on stairs:
Formula: Divide the total height by the height of the step to obtain the number of steps.
1) 1125/150=7,5
2) 1125/160=7,03
3) 1125/170= 6,62
4) 1125/180=6,25
Let's summarize our calculation of the stairs:
We take the results of calculations from the minimum size to the maximum. According to these calculations, we see that the approximate number of steps is: from 6.25 to 7.5. Since there is no such thing as one and a half steps, we need to round the number of steps, either up or down. By rounding, we can conclude that from 6 to 8 steps can be applied to our stairs.
We need to fit this number of steps, and if nothing limits us, then we have a choice and we can make the most comfortable staircase for us.
For example:
I choose for myself the number of steps 7. Next, in order to accurately determine the exact height of the step, we need to divide the total height by the number of steps that I chose, i.e. 7, what happens:
Formula: Total height, divided by the number of steps, we get the height of the step
In our example:
1125/7=160.7142857143 mm
160.7mm is the height of the step. This is 160 millimeters and seven tenths of a millimeter. Naturally, this figure needs to be rounded. It is not possible to make a staircase with a step height of 160.7 mm, since ordinary machines and grinders do not cut metal or wood with such an error. Therefore, we usually round this parameter to the nearest millimeter.
Conclusion: We round the height of the step to 161 mm.
You may have a question: “Where will the error of 0.3 mm go if we rounded the numbers 160.7 to 161?”
Answer: the deviation will go to the lower level, it will be different from all the others. 7 * 0.3 mm = 2.1 mm.
This means that our first stage will be 2.1 mm shorter than the rest.
If you have reached this point and understood everything, that’s very cool!
But that is not all! There is one more indicator that may be useful to us and it also needs to be taken into account.
5. Indicator number of ascents.
According to our calculations, we have chosen 7 steps with a step height of 161 mm, but that’s not all. There is another indicator here - this is the “ number of ascents ”. In this example, we got 7 rises, since there are also 7 steps. But you and I can reduce the number of steps by 1 unit, while leaving the number of rises at 7 and we also maintain the height of the steps - 161 mm. Thus, we will reduce the length of the stairs by minus one step.
And this is not magic at all!
How to do it? Let's figure it out, and I'll tell you how the number of climbs differs from the number of steps.
This indicator “ number of ascents ” differs from the number of steps by 1 unit. That is, the number of rises can be +1 unit more than the number of steps, while the height of the steps remains unchanged.
That is, we can add +1 to the number of steps, but no more. This implies:
That the number of climbs may differ from the number of steps!
It depends on the following: whether the top surface is used, what the ladder comes to as a step or not.
This is one of the possibilities, as with limited space for stairs, you can reduce the height of each step by at least 10mm
We simply make it so that the top step of the staircase will be the top surface itself, and from there our staircase will go down one rise. And this lower rise is +1 to the number of rises. Therefore, it may turn out that there are 7 climbs left, and the number of steps has been reduced by 1.
Or we can make 7 steps and 8 rises, thereby the height of the steps will become lower and it will be 141mm, which is 20mm less than our first option.
Conclusion: The height of all steps depends on how our top step begins, and thanks to this, you and I can use 1 step less if we use the existing top floor as the step itself.
6. The second important parameter for the porch is the width.
The width of the street staircase for the porch is varied and depends on many factors and limitations of its buildings. Often, what the width of the staircase will be has long been clear by its limitation, namely by its opening or by the existing terrace, and often it is narrower by the width of the doorway.
But if you don’t have these restrictions, and you want to make a comfortable width, without knowing what to refer to, then many people have divided opinions and each of us has our own ideals of a comfortable width.
Let's figure out what restrictions stand in our way, and if they don't exist, how to determine your ideal for yourself.
To determine the width of the staircase you need, you need to understand where the staircase goes:
If the staircase comes to an existing terrace, then the maximum width of the staircase is usually determined by the width of the terrace itself. It can be different, from a minimum of 1 meter (sometimes less) to 10 meters, or even more. Here it is important for yourself to understand what the ideal width will be for you, especially when the width of your existing terrace is large, then it is not necessary to make the staircase the entire width, it is enough to make the width slightly wider than the width of the doorway, but the minimum you need to do is 1200 m wide if you have The width of the terrace allows. Since this is a street entrance staircase and its permeability must be taken into account with the condition that two people can pass through the staircase at the same time, since for the normal passage of one person 600 mm is needed. For comfortable passage of two people, so that they can pass each other without falling off, a minimum width of 1200 mm is needed.
If the staircase comes to the front door, then the door itself serves as the basis for the calculation. In this case, it would be best to use the platform for comfortable entry, since from the step it will not be comfortable to immediately enter the doorway, because the door itself will be an obstacle and while standing on the step you have to take several steps back to let the door itself through and come in later. But let’s look at the option when you decide to abandon the site and just make a staircase, since its entrance is a spare one and you don’t go there often.
For example:
Your door is 900 mm wide, for a comfortable width of the stairs, provided that nothing limits the width of the stairs, use a minimum width of 1000 mm so that the door is at the level of the stairs, in this case 100 mm is used as a reserve and is distributed along the edges of the door by 50 mm. This way the staircase maintains symmetry in relation to the door.
In this case, I looked at the minimum width. But if you have space, you can increase the width of the stairs, make it 1200mm, or 1500mm, it depends more on how comfortable it is for you to open the door itself when entering the house. It is better not to make a wider staircase, the width of which is more than 1500mm, since there is no point in doing this if your door goes up to 1000mm. Because the door will still limit the area of passage through it, so there is simply no point in making a wide staircase.
7. Let's move on to the site itself.
When making an entrance staircase for a porch, knowing its width and height, we can calculate and determine the staircase we need, but often our stairs also require a platform.
This mainly happens when there is no existing terrace, and all we have is a doorway in the wall, in which case the presence of a platform for the stairs is simply necessary, especially if your porch is the central entrance and it is important to make it as comfortable as possible.
Because when we open the door and want to go into the doorway, the door itself (usually the front door opens from the outside) prevents us from standing on the steps and going inside, so we have to stand lower and skip the door itself and go inside. This is very inconvenient, especially if this porch is central and is used constantly.
7.1. Site depth.
That is why it is necessary to make a platform with a comfortable depth. It is the depth of the platform that serves as the main indicator when making a porch to the front door.
The depth of the platform, like the width of the platform, depends on the door itself, namely on the distance of the door when it opens. When we open the door, we can determine what depth of the landing is needed so that the door can open freely, while we also need to take into account the fact that when opening the door we still need to remain on the landing, that is, when opening the door we take a step back so that let us pass the door itself and only then go inside.
So, what we have, the first is the length of the door itself and the second is you and me standing on the site.
Let’s say the length of the door itself is 800mm, in order to comfortably stand on the landing and open the door you need to add at least another 300-400mm, this is the distance so that you can pass the door, open it, take a step back while standing on the landing and freely go inside . That is, the comfortable depth of the site in this case is: 1100-1200mm.
Next, let's move on to the width of the site.
7.2. Platform width.
The width of the platform for the doorway is usually made wider than the doorway, so that if you stand on the platform you don’t have to back away at all, thanks to the fact that the platform is used wider than the doorway, you can stand not in front of the door itself and back away, but diagonally towards the door itself, then there is one on the side, in which case you can open the door while standing still.
The distance that can be made wider in relation to the door should also be at least 300-400mm, so that you can open the door standing from the side.
For example: The width of the doorway is 900mm, in which case the width of the platform would be best to use 1500-1700mm. I added 300-400mm to each side of the doorway. Why on each side?
Firstly, to maintain symmetry, of course, if the entrance itself allows it, there are cases when there are restrictions, then you don’t really have to choose, but now we take into account that we have no restrictions and we make the width based on our own comfort without being limited by anything ;
Secondly, making the same width 300x400mm on each side allows us to: 1) stand on the side when opening the door; 2) If there are fences on the other side, then the wider we take the distance after the doorway, the wider our door will open, which is quite important. If we don’t take distances at all from the other side and make them level, then when opening the door, it will open less than if we had a spare distance.
Conclusion: The depth and width of the platform complement each other. When you have restrictions on the depth of the platform and you need to make a staircase so that it is not quite long, then by making the width of the platform comfortable, we can reduce the depth and vice versa. If you have restrictions on the width of the platform, this happens, then by making the depth of the steps comfortable, we can reduce the width of the platform by making it along the opening, and it will also be comfortable. Thus, the width and depth of the site support each other, but if you do not have any restrictions, then you undoubtedly need to make both the width and depth of the site comfortable.
Also, when you don’t have any restrictions, when making a site, they often make huge terraces, where in addition to the entrance, the area for gazebos, a balcony, or simply a large space for relaxation is taken into account. It all depends on what you want and how much space allows it.
Manufacturing stages
To build a wooden staircase, you will need the necessary tools:
Triangle; Pencil; Roulette; Hammer; Saw; Nails; To hell. First they create the staircase frame, i.e. side walls. Use a triangle and a pencil on the board chosen for the frame to mark the size of each step from bottom to top. The same should be done with the second board;
Cut the frame with a handsaw and place it in the prepared area and secure with screws. The cuts should be thoroughly cleaned and smoothed to ensure a better fit of the steps; Once the base is secured, the steps can be launched and secured. The steps may consist of one solid plate or two narrower plates. It depends on the availability of material. The most important thing is that all steps are performed tightly and evenly. Screws and nails are used to secure the steps;
If desired, you can make railings, only in this case it is important to pay special attention to the selection and installation of railings (stair railings). Upon completion of the work, the staircase is painted and varnished to the owner’s taste.
Recommendation! Prepare the landing carefully; careless inspections and preparations can lead to creaks and vibrations in the stairs.
You may be interested in how to build a wooden staircase to the second floor: //6.//lestnica/derevyannaya/
Bottom line
After installing the steps, your staircase is ready. Just remember to periodically treat it with protective agents. Unfortunately, within the framework of this article, we did not talk about fastening balusters and railings, since they are rarely used in this type of stairs, but we will definitely talk about them in our next articles. And in conclusion, I would like to say that if you had a question about how to make a staircase to the porch, we hope that we answered it in full. And now forward to calculations and construction!
Related publications:
Features of fastening steps
In order to make use of the space under the stairs and not have to worry about safety, the steps are fixed, just like the steps. They are also made of wood. They mainly use three centimeter thick boards. The height of the step corresponds to the picture.
For the staircase itself, it is better to take a solid board four centimeters thick, which increases its strength. When attaching steps and steps to the foot of the stairs, in addition to nails and screws, it is necessary to additionally lubricate the seams with a special glue for wood or plain wood. PVA. This not only makes the entire structure more durable, but also protects the stairs from squeaking.
After installing the entire structure, it is recommended to cover the nails and screw plugs with plugs specially designed for this purpose. This should be done before you decide to paint the wood stairs so that the picture finally covers all the details of the installation.
In this video you will learn how to build a simple wooden staircase and how to assemble its steps:
Page 4
Modern cabins and private houses have 2 or more floors, and the highest of them can be residential and non-residential premises. Anyway……
A spiral staircase is a universal structure that connects floors. The main advantage of this type of design is its compactness and...
Making wooden steps
After making all the necessary calculations, we proceed directly to the manufacture of wooden steps. The steps of any staircase, including wooden ones, consist of two parts:
- Tread. This is the horizontal part on which the leg rests when ascending and descending.
- Riser. The vertical part connecting two horizontal treads. However, in some staircase designs they do without a riser.
Making steps from wood begins with selecting a board suitable for these purposes.
Important! The thickness of the tread board directly depends on the width of the flight of stairs and should be related to it as 1 to 20.
Accordingly, if the distance between the tread supports is 1 meter, then the thickness of the tread board should be at least 5 cm. If it is less thick, the steps will sag under the weight of an adult. For risers, the thickness of the board does not play a special role, since they actually do not bear the load. As a rule, an inch board (2.5 cm wide) is used for risers.