Construction of a wooden staircase
A wooden staircase for a private house most often consists of one or several flights (flights), which are located between floors or intermediate platforms.
Construction of a wooden staircase
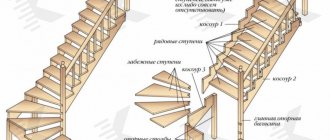
The design of a flight of stairs is a combination of various components with different functional purposes:
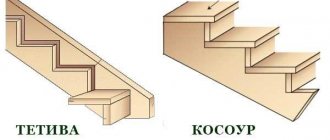
- Kosour. It is a load-bearing beam made of wood with a sawn comb. Risers with steps are fixed to it, so the part must be durable.
- Bowstring. In some cases, it becomes an alternative to a stringer, performing load-bearing functions (especially if one side of the structure is adjacent to the wall). Before installation, the string must be marked in detail so that the steps are located at a horizontal level.
- Step. The main element of any staircase, which is attached to one of the supporting beams. In addition to the usual ones, there are winder and radius steps. The winder elements have a non-standard shape and are mounted at the starting point of the march. Radius steps have a curved leading edge and can be semi-circular, wavy or with rounded corners.
- Riser. The part is optional, but it provides the staircase with high strength by supporting the step in the center. A spacer bushing is used to secure the riser. A radius type is installed under semicircular steps, and a curved version is mounted under the corresponding steps or under the landing between flights of stairs.
- Pillars for support. They are placed at the starting and ending points of the stairs, as well as along the edges of the inter-flight platforms. The elements increase the strength of the fence and serve as support for the handrails.
- Balusters. These are supporting posts for handrails, from which side railings are formed, and can have different configurations.
- Handrails. They are a required part. They rest on balusters and support posts. The main requirement for the element is a smooth surface.
- Distance sleeve. Such a stand is required for any structure with several flights (even when using stringers).
Placement of handrails
The railing is the most important element, using which you can lean when going up or down the stairs. It is because of this that the railings must have the most reliable fixation.
Therefore, fences must be securely fixed to withstand considerable loads.
Installation of railings is preceded by preparation work:
- marking the places where the balusters will be installed. They are formed where the steps will be connected to the supporting beam. The lateral end of the step should coincide with the side edge of the pillar;
- creating a hole of the required diameter in the place marked;
- making a small dowel from wood. The diameter of the rod must match the width of the hole, and above the surface. The dowel should rise 1-1.5 centimeters above the step;
- in each baluster, in its lower and upper parts, holes are made that correspond to the dowel in diameter.
After this, the installation of the railings begins. It looks like this:
- support pillars are installed at the end and beginning of the stairs;
- one or two intermediate balusters are installed;
- The correspondence of the angle of inclination is determined. To do this, the handrail is attached to the balusters (the height of the posts can be adjusted if necessary);
- the handrail is fixed by inserting a dowel into the upper recess;
- using glue, the base and recesses of the balusters are lubricated;
- posts are placed on dowels;
- the upper rod of the baluster also “sits” on the glue;
- the handrail must be fixed to the balusters.
Types of staircase designs
When choosing a staircase structure, the main factor is the size of the area required for its construction. In second place is the convenience and comfort of ascent and descent. Here you need to take into account the frequency of use, the presence of children and elderly people in the house.
Aesthetics is also an important criterion. The staircase should be combined with the interior of the room. In addition, it is necessary to take into account material possibilities: the production of wooden stairs with a complex configuration requires more time and financial costs than options that are simpler in form and execution.
Marching
Are the most popular. They got their name thanks to marches (flights) - a group of united steps. The staircase may have one or more flights.
There are straight structures (single-flight and double-flight, with a rest area). They can be free-standing or placed near the wall. But straight models require a lot of space, so in order to save useful space, two-flight options are provided with a rotation at an angle from 90 to 180 degrees.
The flight has a curved shape with an optimal angle of elevation, then rotary steps are used, which are also available in structures with two and three flights without platforms.
The most popular types of wooden stairs for a country residential building are:
- Ordinary one-march ones. They have a simple design with a span in the center of the room or near the wall - the most durable with reliable support.
- Curvilinear single-flight. Installed in large rooms to emphasize spaciousness. They are distinguished by a smooth turn and steps widened on the outside.
- Marching with lower turning steps. Sometimes this option is provided for by the layout of the room and can support the chosen architectural style.
- A simple 2-flight system. A staircase with two flights and an interfloor turning platform can be mounted above the door and save space.
- 2-flight L-shaped design. It is located in a rectangular opening along perpendicular walls and saves space.
- 2-flight U-shaped staircase with an upper platform and turning steps. The design is installed in luxury mansions with a large hall.
- 3-flight system with two platforms. This type of staircase saves space, but requires a significant ceiling height.
To select a specific configuration, you must correctly calculate and measure the free area for installation and draw up a drawing. A detailed guide on how to do this will be below.
Screw
Screw-type structures are used less frequently, as a rule, with limited space or for aesthetic reasons by the owner of a private house. They are not as convenient as marching ones, and it is difficult to transport furniture on them. To install the ladder, you will need to perform complex calculations, since with a small error it may lose its functionality.
Spiral staircases sometimes serve simply a decorative function, especially with a fence made of artistic forging. The installation of such options is possible in almost any room, because they take up less space than rotating designs. The following types are distinguished:
- with cantilever pinching of steps on the internal pillar;
- with steps supported on the internal pillar and perimeter walls;
- with cantilever support of steps on the casing pipe;
- with support on the fence and bent bowstrings.
More complex options are modular spiral staircases. The structure is assembled from modules, folding them at an angle in a certain sequence. They come with a central stringer (the steps are attached to the modules, and the edges are connected by bolts) and a central column (rested on a stacked column, connected by bolts). Read more about wooden spiral staircases.
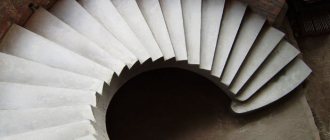
Spiral staircases save space
Types of structures
Before making a wooden staircase, you should choose the best design option for your room.
The following popular types of structures exist:
- on two stringers;
- on one central stringer;
- on bowstrings;
- on pain;
- on the central post (screw);
The simplest is a straight staircase, which ensures linear movement along the flight.
Read more about this in the article about types of wooden staircase designs.
Let's look at making a wooden staircase with your own hands with clear step-by-step instructions in more detail. The process includes two main stages: design and installation.
Installation of a spiral staircase
Let's briefly talk about installing a spiral staircase. Its design is different from the marching one. Accordingly, the installation procedure varies. It is like this:
- drawing up a drawing;
- manufacturing of structural elements according to the calculations;
- installation and fastening of the lower support unit in the selected floor location;
- installation of a vertical stand in a unit;
- pinching or putting the steps on the tripod;
- installation of the platform where the second floor will be located, securing the support rod;
- the railings are placed on balusters, which, in turn, are attached to the holes in the steps.
As you understand, installing a wooden staircase requires maximum care and thoughtful approach from the master who is involved in the installation. The strength and durability of the staircase structure will depend on correct calculations and correct fixation. Therefore, such work should be carried out exclusively by professionals. At “dmd-stairs” you will find specialists of exactly this level, who have extensive experience and are able to solve any problem in installing stairs.
Calculations of staircase dimensions
Before you start designing, you need to make accurate calculations, draw a diagram and put all the data on it. If you are not sure of the correctness of the calculations, then it is better to entrust the work to professionals who will make a competent drawing, which will allow you to carry out the installation step by step without errors.
Total height of the stairs
The height can be determined by measuring the distance from the floor of the first to the second floor, taking into account the thickness of the ceiling. For example, if on the 1st floor the ceiling height is 2700 mm, and the thickness of the interfloor ceilings is 300 mm. As a result, the total height will be equal to 3000 mm.
If there is no finished floor, then its dimensions need to be approximate.
Number of steps
If the height of the staircase and riser are known, the number of steps in the structure can be determined. To do this, you need to divide one indicator by the second. For example, with a total staircase height of 3000 mm and a riser height of 175 mm, the calculation will be as follows: 3000: 175 = 171 mm.
After this, you need to round the value, the result will be 170 mm. The table shows an example of a calculation:
Dependence of the height of the steps on their number at a given floor height
Riser height
According to experts, the optimal riser height should be 150–180 mm, which is actually the size of a human step. This height can be 150–200 mm. Usually the average value according to the standard is 160-170 mm.
The optimal slope range for the stairs is highlighted in green.
Step width
To avoid injuries as a result of incorrectly selected width of steps, you need to calculate it correctly. Based on many years of practice, the width of the part should be in the range of 220 – 400 mm.
To determine a more accurate value, you can use a certain formula. You need to take the average width of a human step (600 - 640 mm) and subtract from it the height of the riser, multiplied by 2, i.e. 640 – 2x175 = 290 mm. This indicator will be optimal for moving.
March width
According to safety rules, for convenient movement of people, the span should be at least 80 cm wide, but it is better to take at least 90 cm. For convenient transportation of furniture, this figure for a private residential building should be 100 - 120 cm.
Plan length of the staircase
To calculate this parameter, you need to multiply the number of steps and the width of the tread. In our example, it will be 29x17 = 493 cm. That is, the staircase is quite long and when constructing one flight, a room of at least 6 meters will be required. In a small log house or country house, you will need to make 2 flights with a 90 or 180 degree turn.
A platform is installed between the flights or turning steps are installed. If you can’t perform the calculation yourself, you can use the special program presented below, which will clearly reflect the localization of the staircase parts.
Ceiling opening size
When building a staircase from solid wood, you need to remember to calculate the ceiling opening so that you don’t have to bend over when going up. This indicator will depend on the slope, which affects the ease of movement and is selected individually.
A slope of 23-36 degrees is considered optimal, but often it is not possible to maintain the required angle due to the small area of the room (the steeper the slope, the less area it will occupy).
The size of the opening in the ceiling area will depend on the angle of the flight of stairs. So, for a folding structure, a small opening will be required, and for a larger slope, a more significant one will be required (up to 2 m).
The size of the opening in the ceiling is determined based on the minimum permissible value for human passage
Stringer length
To determine the length of the stringer, the Pythagorean formula is used: (length of the staircase in plan)²+ (height of the staircase)²= (length of the stringer)².
Determining the length of the stringer
That is, with a length of 493 cm and a height of 300 cm, we get the following: L = √ (4932 + 3002) = 577 cm (the indicator is taken with a margin of 580 cm).
Online calculator for calculation
For your convenience, you can use a convenient and visual online calculator for calculating wooden stairs.
Material selection
After all the calculations have been completed, you need to purchase materials. This will require boards of different lengths and densities: for steps the thickness is 3-4 cm; for risers – 2-2.5 cm; for a bowstring or stringer, the thickness is 5 cm and the height is 150-250 mm. It is better to buy ready-made handrails and balusters, since their production will require a lathe and timber measuring 10x10, 15x15 cm. To fix the components, you will need screws and nails, as well as metal corners for reinforcement.
Manufacturing of parts and installation of stairs
The installation technology includes the manufacture and installation of all elements of the staircase structure in accordance with the drawing.
Assembling bowstrings or stringers
On the prepared boards you need to mark the length and saw off the excess. On the block, using a square, mark the height of the riser and the width of the tread with a decrease of 2-4 cm.
Marking a solid stringer
Option for making a stringer with fillies
Assembling a bowstring with stiffeners
The notches for the steps are cut out with a jigsaw or saw. Next, place the workpiece at the installation site so that the lower edge rests against the floor, and the upper edge against the ceiling. The cuts under the steps should be horizontal, without “blockages”. After this, it is recommended to sand the surface of the block and perform milling, rounding the outer edges.
For optimal rigidity, sometimes 2, 3 or 4 stringers may be required, the number of which is selected depending on the width of the stairs. Sometimes it’s easier to order a ready-made supporting frame, which will include all the elements with cutouts, designated by numbers for joining in accordance with the diagram.
Installation of steps and risers
The risers are mounted in the prepared cuts of the stringer, leveled and sanded. Fastening is done using self-tapping screws, which can then be puttied or covered with finishing material.
Methods for installing steps on a stringer
Options for attaching steps to the string
After fixing the risers, pre-milled steps are installed, the length of which should exceed the distance between the pair of outer stringers by 1-2 cm. The width of the elements should be 2-3 cm larger than the comb protrusion. The steps are fastened to the risers and stringers using self-tapping screws, the heads of which must be recessed into the wood.
Attaching the stringer to the upper ceiling. Methods of connecting staircase elements.
Attaching the stringer to the floor
Practical work
The calculations are completed, and you can begin installing the wooden staircase: instructions, photos and videos are attached. Let's start with preparation
Tools for work
In order to assemble an excellent staircase, it is not enough to make just one drawing - you will need “straight hands” and a good tool that will allow you to accurately adjust the parts to each other.
Let's list it:
| This is of course ideal. The price of such a baby will be no less than 20,000 rubles, depending on the model and functionality. There is no point in buying one to assemble one staircase, but you can always rent it for a while, or try to find it from friends and acquaintances. Using such a machine, you can perform a perfectly even longitudinal or transverse cut, a conveyor cut at an angle, plan raw boards, mill workpieces and accurately drill holes. In general, we recommend it! |
| Another tool for cutting parts, which is indispensable for precise perpendicular cutting of steps. Unfortunately, it is impossible to make a longitudinal cut on it, but it is not always required. |
| You will need a compact lathe or access to one if you want to try making figured balusters yourself. |
| This tool can be used for longitudinal rough cuts, but if you additionally use guides, you can achieve greater accuracy when cutting. |
| You also can’t cut anything straight with a jigsaw, so be sure to use guides that are made from a flat metal strip and a pair of clamps. |
| A milling machine can be useful when making bowstring stairs, or if you want to get creative and make tongue-and-groove joints for treads and risers. |
| If you purchase unprocessed lumber, then you cannot do without a plane. Such a tool will allow you to get the job done quickly and efficiently. |
| A hammer drill is needed to fix parts of the stairs to ceilings and walls made of concrete and brick. |
| The photo shows a beautiful copy of “Hilti” - whoever knows, will understand. A screwdriver is an indispensable tool for any work with wooden frame structures. With its help, we will tighten the entire staircase with self-tapping screws. |
| With its help, we will grind large parts of stairs, such as stringers, risers, treads, landing boards. |
In the table we have listed the main power tools, but no work can be done without a hand tool, namely:
- Hammer;
- Mallet made of wood;
- Wood saw with fine teeth;
- Plumb;
- Building level;
- Set of chisels;
- Tape measure, square, pencil and ruler - for precise marking of workpieces;
- A brush or spray gun for applying paints and varnishes.
We may have forgotten to mention something, so you will have to do some additional research on the spot.
Materials for work
Selection of lumber for installation of wooden stairs
Now we have reached one of the most crucial moments - the selection of wood for your structure.
- The best candidates for stairs made from domestic species are oak, maple, larch and ash. The fact is that they are much less susceptible to shrinkage, and, accordingly, warping of the wood.
- In addition, these rocks have excellent density characteristics, due to which they cope well with mechanical loads and surface abrasion.
- Under no circumstances should you buy soft, porous or coniferous types of wood (except for the larch mentioned above) like pine. They will not last long and will very soon lose all their visual appeal. In addition, conifers emit resin, which can ruin the appearance of the product.
- Despite the high cost of the listed species, you still save on work, and do not forget that a longer service life is also a kind of savings for the future.
Advice! When choosing oak, remember that it is the densest and most durable of the listed varieties. To process it, you must acquire a good power tool.
It is very important to choose lumber with a moisture content suitable for the installation of internal structures, namely no more than 12%. Humidity is determined at the manufacturer's factory, but improper storage could again saturate the tree with water. A good store should have equipment for these purposes.
Conductometer for measuring wood moisture content
To determine the moisture level of wood, a compact device is used - a conductivity meter. If you don’t have it at hand, then you will not be able to determine the degree of moisture by color, weight, presence of cracks and warping, as experienced craftsmen do. But there is one simple way: saw through the board and collect the resulting sawdust in your palm, clench your fist and look - if the particles stick together, then the wood is raw, if they crumble, then you can safely conclude the deal.
Now let’s be more specific about what we need to purchase (let’s immediately say that the material is specified for assembling a single-flight structure, purchase the rest depending on the circumstances):
| We will need:
Inspect all wood carefully. Set aside boards that are warped, cracked, moldy, have wormholes, resin pockets, or other defects. |
| Here again you have a choice - buy a ready-made solution in a store or try turning them on a lathe. You can install simple massive square beams. They certainly look rougher, but certain interior styles require this brutality. As a last resort, you can buy a carved knob and install it on top. |
| It’s better to buy a handrail in a store, and it won’t be expensive, but if you stubbornly want to do everything yourself, then arm yourself with a grinder, a cutter and go ahead. |
| It is very difficult to cut truly beautiful figured balusters yourself without proper experience, so we advise you not to waste your nerves and time and purchase a ready-made factory version. |
| The studs are needed to securely fasten the support posts. They can also be used to fix balusters. |
| But more often, balusters are attached to dowels, since such a connection is quite strong enough. |
| An irreplaceable material, which we will talk about a little later. |
In addition to the above, you will also need:
- Concrete drill;
- Wood drills;
- Sandpaper with abrasive of different fractions;
- Self-tapping screws, galvanized;
- PVA or wood glue;
- Protective impregnations;
- Impregnations to give the desired shade to wood;
- Colored or clear varnish.
The use of these materials will become clear as the work progresses.
Manufacturing and installation of stringers
Instructions for installing a wooden staircase: structure of the stringer
This part of the work is the most important, since accuracy in the manufacture of stringers and their installation will affect the geometry of the entire structure, the evenness of the installation of balusters and future comfort of use. First you need to decide how the stringers will connect to the ceilings of the second floor and the floor of the first.
There are two main methods of connecting to a wooden floor beam (by the way, stringers are connected to intermediate platforms in a similar way):
- The first is performed with a cut in the stringer. This can be clearly seen in the diagram presented. A rectangular groove is sawed into the beam, into which a horizontal tenon cut into the stringer is placed and secured.
- In the second case, the stringer does not move, but the shape of the gash in the platform beam changes - its lower edge becomes inclined, repeating the angle of the stringer itself.
In both cases, the frieze step is installed flush with the floor level of the second floor. However, if necessary, you can retract the step by raising the level of the platform.
What to do if it is not possible to disassemble the floor of the second floor in order to make a cut, if you forgot about this nuance and incorrectly calculated the shape of the stringer, if the thickness of the beam is not enough for a normal cut, or if you want to install a wooden staircase on a metal frame or concrete floor?
Installation of a wooden staircase to concrete is carried out in the same way as shown in the photo
Steel corners and bolted connections will come to the rescue. The strength of such fasteners will be quite sufficient, but do not forget to periodically inspect the connection.
Supporting the stringer on the base
- The lower part of the stringer should rest against the support bar, which is well secured to the base. As can be seen from the diagram, the device is very simple: a groove is cut into the stringer to fit the shape of the support bar on which it is installed. The parts are fastened with steel corners and screwed to the floor.
- Separately, I would like to say a few words about the foundation. The floor is the main load-bearing element on which the entire staircase rests. Under no circumstances should installation be carried out on sagging boards, as the stairs will begin to deform along with the floor, which will inevitably lead to creaks.
- If you still have to rest the stringers on the boards, then first strengthen them with bars from below. Sometimes you even have to partially disassemble the floors to perform this procedure.
How to mount wooden stairs: a device for marking stringers
Now you can start marking. The easiest way to do this is with a construction square or a homemade blank, as shown in the photo above.
Marking with a square
You can also install improvised limiters on the square so as not to constantly measure the required distances.
We mark all the steps and start cutting. We use a hand saw or jigsaw for this purpose. Do not forget about the guides so that the cut is as smooth and accurate as possible. It is not recommended to use a circular saw, as there is a high probability of cutting further than necessary.
Wooden staircase, installation: making stringers
Afterwards, we thoroughly process the cut areas with a file and sandpaper, bringing them to perfect condition. We install the stringers using the chosen method, strictly monitoring the parallelism of the location and level.
Surface painting
DIY wooden staircase installation: wood processing
Painting the wood structure can be done after assembly, but it is best to do it now. The fact is that sagging will not form in the corners of the structure, and surfaces that stand vertically will not contain drips.
- But that is not all! The well-known creaking of wooden stairs occurs due to the diffusion of paints and varnishes. What it is? Carry out a small experiment - place two boards coated with a layer of varnish to each other and clamp them in a vice. Then remove them and you will see that, despite the fact that the varnish has long hardened, they stick together. Try to separate them, and you will hear a characteristic click.
- The fact is that varnishes and paints have the property of mutual penetration of molecules. When pressed tightly, a bond is formed, which is destroyed when a person walks up the stairs - that’s the creaking sound.
- The effect of breaking diffuse connections can occur due to poor fixation and fitting of parts, drying out of wood, excessive stress on the structure (if a would-be master tries to hide fit defects by tightly tightening parts) and when the floor sag.
From here we can immediately deduce a strict rule that varnish and paint should not come into contact with the joints of a wooden staircase. This applies to risers, bowstrings, stringers and treads. Therefore, before starting painting, all grooves, tenons and simply adjacent areas are covered with masking tape - preferably good automotive tape.
Treating steps with colored varnish
Let's talk about the painting itself in a nutshell, since we have very little space left:
- First, the surfaces are carefully sanded;
- Then protective impregnations against fire and rot are applied - optionally, if desired;
- A stain is applied to give the wood the desired shade;
- Repeated sanding is performed, since stains, penetrating into the wood structure, lift the fibers;
- The finishing coat is applied in several layers with intermediate drying and sanding.
Attention! When working with paintwork materials, be sure to use respiratory protection.
Assembling the stairs
Wooden stairs: installation of risers
Assembly, as well as dismantling of wooden stairs, is carried out in stages. First of all, we screw in the risers: this can be done from the outside, scrolling through the parts, or from the inside, using steel furniture corners or triangular slats.
Then the treads are installed - the method of attaching them is similar. Now let’s name the most important trick, how to assemble a “quiet” staircase that will never creak. All adjacent parts of the structure are generously rubbed with paraffin. Such a dry lubricant will prevent the formation of diffuse bonds, and will not dry out even 20 years later. We rub all the parts, including the mentioned triangular slats.
Some people recommend using sealants. This treatment will also eliminate the appearance of squeaks, but keep in mind that such a staircase is very difficult to disassemble. After all, something can always go wrong, and you will need to go back a few steps.
You can clearly see the assembly process in the video: “Installing a wooden staircase with your own hands.”