Advantages of spiral staircases
The choice of such an interior detail indicates that you are not only the owner of good taste, but also a pragmatist. Screw structures are characterized by a number of advantages:
- Space saving. This is especially true for small spaces. Even 1.5 m² is enough to install a ladder. It is located around a special support and seems to hover in the air. It is this design property that allows you to save usable space.
- Visually increases the height of low rooms. The construction of spiral staircases will be significantly lower in price than marching staircases. This is due to the relatively small amount of consumables during the production of the product and low labor costs during its installation.
- The simple manufacturing process and simple installation allow you to make a staircase without the help of specialists. Screw structures are perfect for a private house or apartment, as there is no excessive traffic there.
When building a spiral staircase at home, you should not forget about safety precautions. If the structure is steep and the steps are not wide enough, carelessness and fast walking can lead to injury. But this drawback can be easily eliminated due to strong handrails. In addition, it is important to correctly calculate the size of the structure, including winder steps and tread width.
Pros and cons of spiral structures
You should not rush and purchase all the building materials to create a spiral staircase; first you should familiarize yourself with the advantages and disadvantages of such structures. Unfortunately, there are practically no ideal things, and even knowing how to make a spiral staircase, the owner of a house or apartment must learn all the pros and cons of such structures.
Pros:
- Small sizes. Which is most convenient, for example, if the area of a private house is small. At the same time, by installing the required number of steps and correctly calculating all the dimensions, a do-it-yourself spiral staircase will become much more practical to use than an ordinary marching structure. It also simplifies the calculation.
- An attractive design that allows any owner of a private home to awaken the designer in themselves. When creating screw structures, you can choose such an unusual appearance that it will become a real work of art.
- Affordable price. Of course, if you do not make the steps from stained wood or mahogany, then the cost of a standard spiral staircase may “pleasantly” surprise the owner of the house. The most expensive element will be the metal frame and its welding; the rest of the calculation (consumables, wood for steps, etc.) has an average cost.
Minuses:
- After the construction is completed, it is quite problematic to lift or lower any cargo along the spiral staircase (this could be furniture, household appliances, or other bulky things). Therefore, all large items should be moved to the second floor or lowered from it in advance.
- Lack of convenience. It takes some skill to quickly ascend or descend a screw structure. This becomes especially difficult if the number of steps and their sizes are incorrectly calculated.
Otherwise, spiral staircases to the second floor are no less popular than marching structures; it does not take much time to make them yourself.
Video from YouTube:
What materials can be used
In the production of spiral staircases, various raw materials are used, on which their quality and service life directly depend.
A metal pipe or wooden pole most often serves as a load-bearing structural element. Often the support is made of stone, brick, concrete and even asbestos cement. The steps are attached to the finished load-bearing element in several ways: welding, bolts or couplings.
Railings are typically made from metal, hardwood, or a combination of these materials. As for the steps, the traditional options made of beech, oak and ash have been replaced by glass and plastic products.
Plywood is also used to make spiral staircases. Both individual elements and the entire structure as a whole can be made from this material. A spiral staircase made of plywood is distinguished by its environmental friendliness and low cost.
You can use plywood for the stairs: as elements or as a complete structure
Installation of the structure
All parts of the pipe are cut into sleeves, now we weld all the parts of the steps together, placing them in the jig. Then the resulting parts are welded to the sleeves.
A pipe with an average diameter is used as a support post, the length of which must correspond to the height of the stairs. To assemble the entire structure, you need to put sleeves with step frames welded to them onto the support post, align and weld all the elements together.
The sleeves must fit tightly around the support; for this you can use O-rings from the inside, which are welded into the gap between the two pipes.
Varieties of design
Spiral staircases have several modifications, differing from each other in design features and methods of fastening the steps. However, regardless of their type, the steps are always installed radially with a slight rotation of each of them. In this position, they resemble the threads of a screw, which is why this model of stairs received the appropriate name.
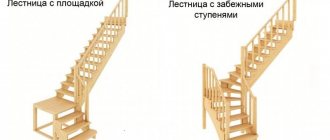
Types of spiral staircases
Thus, the following types of spiral staircase designs are distinguished:
- With the steps supported on an internal pillar and one or two walls located around the perimeter. Such structures are built in a narrow niche or in the corner of a room.
- With cantilever pinching of steps on the supporting element.
- With fastening steps to curved bowstrings.
These are the most common types of screw devices that a self-taught craftsman can build. Other varieties are considered more complex, so it is better to entrust their production and installation to real professionals.
Final works
In the case of a wooden spiral staircase, the final stage is painting. If you are using beech as the base material, this process requires special care (to preserve the natural texture). First of all, the parts need to be sanded, vacuumed and covered with stain. Next, you should apply two layers of parquet varnish, this will avoid abrasion of the surface.
Making a spiral staircase is a rather lengthy and responsible process. However, even a novice master can do it. Compliance with technical standards, safety rules and precise instructions for assembling and installing the structure will allow you to achieve excellent results. If you doubt yourself or do not have sufficient experience in the construction industry, then it is better to seek help from specialists.
Examples of assembling a spiral staircase with wooden steps (2 videos)
Beautiful and unusual models of stairs (46 photos)
The best posts
- How to wrap a DIY gift for a man in craft paper
- Shower cabin with deep tray
- Additional options for plastic windows that you didn't know about
- Which door filler is better to choose and according to what criteria
- Making your own wardrobe on the balcony
- Lighting the room and corridor with LED strip
- Johnny Depp's $17,000,000 Home Design Review [Do you get it?]
- Men's socks with knitting needles: patterns for socks for size 42 and above, how to knit a gift with photos and videos
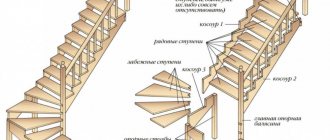
Screw design elements
Before we begin making a wooden spiral staircase with our own hands, let’s look at the following issues:
- what elements it should consist of;
- location of components;
- methods of fastening elements.
The staircase structure has the following components:
- steps;
- final platform located on top;
- a post designed to support railings and balustrades;
- the main load-bearing element, which is the basis of the structure;
- cylinders that make up the support column;
- balusters supporting the railings;
- jumpers;
- screw-shaped railings;
- barrier on the top floor.
Diagram of structural elements
The above components form a single device by connecting them at nodes:
- Node "A". Here the supporting post or pipe is connected to the barrier on the upper floor. To do this, a bolt or screw is fixed in the rear part of the post or pipe, onto which a handrail is placed through a through hole. A decorative cover is screwed on top to secure it.
- Node “B” is the place where the support post and the bushing, which is installed in the hole of the step, are connected.
- Node "B". In this section, washers and a sleeve are attached to the support, performing decorative and pressing functions.
- Node “G” is the place where the support and base installed in the floor are attached.
Connecting nodes
Do-it-yourself spiral staircase: spiral staircases to the second floor, we do it ourselves
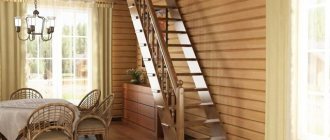
A spiral staircase is simply irreplaceable for the interior of rooms with limited space, or in cases where it is necessary to maintain a certain architectural style.
DIY spiral staircase
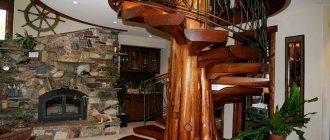
A do-it-yourself spiral staircase can be made of wood, metal, composites, or all of these materials in combination. This depends on the choice of the owners of the building, on the skills and capabilities of the craftsman, as well as on the general interior design of the room into which the created structure will fit.
Since this type of staircase itself is not just a functional, but also a decorative element, it is suitable for almost any interior style. For example, a wooden staircase with massive steps will be perfect for a room designed in a “rustic” country style, and for an interior in which the “modern” style predominates, you will need to purchase or order forged balusters or steps with metal “laces”.
For each of the existing finishing options, you can choose both a design solution and the material from which the staircase will be made.
The content of the article
1 Positive and negative aspects of spiral staircases2 Main types of spiral staircases3 Elements of a spiral design3.1 Video: prefabricated modular spiral staircase “Dream”4 Important nuances in the calculation, manufacture and installation of stairs5 Calculation of the parameters of a spiral staircase6 Manufacturing of structural parts6.1 Support column6.2 Manufacturing of steps6 .3 Manufacturing of racks and balusters6.4 Stair railings7 How installation is carried out7.1 Video: installation of a finished set of spiral staircases
- 0.1 Pros and cons of spiral staircases
- 0.2 Main types of spiral staircases
- 0.3 Elements of a spiral structure 0.3.1 Video: prefabricated modular spiral staircase “Dream”
- 0.6.1 Support post
- 0.7.1 Video: installation of a finished set of spiral staircases
- 1.1 How to make a spiral staircase with your own hands
- 3.0.1 What materials should be used to make spiral staircases?
- 5.0.1 Installation of a spiral staircase
- 7.1 How to choose a design
- 8.1 Design calculations
- 10.1 Stair height
Pros and cons of spiral staircases
Like all interior details, spiral staircases have their positive and negative sides, which you need to be aware of when choosing this option for installation in a particular room.
1. The advantages of this type of stairs include:
Compact design. Most often, this circumstance is decisive when choosing a staircase for small rooms. And if the room has a low ceiling, then the screw model usually visually makes it slightly higher. Unlike marching staircases, the spiral model will not take up much space on the first floor and will not require a large opening in the ceiling, which means you can save useful space on the second floor.
One of the main advantages of a spiral staircase is space saving
A spiral staircase is perfect as an additional, internal staircase for attic rooms, for example, if the main one is located on the outside of the building. The main staircase is necessary for lifting large items, such as furniture and household appliances, to the top, and it will be difficult to do without a spiral staircase in the winter. By choosing this option, you can save not only on the area of the rooms, but also on overall cash costs. A spiral staircase is often much cheaper than a flight staircase - due to the smaller amount of materials required for its manufacture, and also, in some cases, due to the ease of its installation. This original element will give the interior exclusivity, which for many owners of mansions is also important, and sometimes even a predetermining factor.
2. This design also has its significant disadvantages:
The main thing that can be attributed to the negative aspects is the impossibility or extreme difficulty of lifting large objects along the screw structure. If there is a residential, frequently visited premises on the second floor and the residents of the apartment have to go up and down the stairs several times a day, then this circumstance can have a bad effect on their mood, and perhaps even their well-being. Therefore, it is best to arrange bedrooms on the second floor, where they are not climbed so often, or, as mentioned above, you can have a main flight of stairs and a spiral staircase - as a decorative one.
Main types of spiral staircases
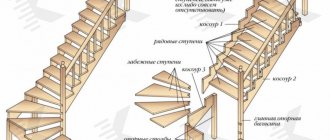
Spiral staircases come in several main varieties, depending on the design and fastening of the steps. But in all cases, the steps are attached radially with small turns of each step, forming some semblance of the thread direction of an ordinary screw, which is where the name of this staircase model comes from.
Typical variety of spiral staircases
If you look at the stairs from above, you can see a round or polygonal flight of stairs.
The latter is formed if part of the steps is fixed not only on the central pillar, but also on one or two walls. This type of staircase is placed in a narrow niche with limited space in the room or in a corner. In the picture above, this option is number one.
Part of the steps can be attached to the wall of the building
The second picture shows a view of the staircase in which the steps are cantilevered onto the inner central post.
The steps are rigidly mounted on the central pillar
In the third option, the steps are fixed to a support post and to bent bowstrings and a fence.
Option without a central post at all - with bent bowstrings
In the last type of spiral staircase shown in the figure, the steps are fixed on the casing and supported on the other side by curved railings.
The steps are “accumulated” onto the central vertical post
These are the main, most used types of screw structures, but there are others - more complex ones, which can only be made by professional craftsmen.
Find out which staircase lighting system is best to choose from our new article.
Screw design elements
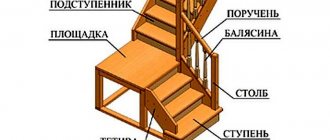
To understand how and what parts need to be made for a spiral staircase, you must know what they are called, where they are located and how they are mounted. Therefore, before moving on to further actions, it is worth understanding this issue.
General typical staircase design
1 — Stair steps.
2 — The final upper platform of the structure.
3 — Supporting post for handrails and balustrades.
4 — The central cylindrical support pillar, which can be called the basis of the entire structure.
5 — The cylinders that make up the central column.
6 — Balusters of the rack to support the handrail and fasten the turns of the spiral staircase together.
7 — Jumpers.
8 — Helical handrail
9 — Second floor fencing.
In addition to these elements themselves, you need to know how they are connected in various structural units:
Options for fastening parts and assemblies together
Node “A” is the connection between the central support post or crimp pipe of the staircase and the railing on the second floor.
A handrail with a special through hole is placed on a screw or bolt fixed in the back of the support post.
Next, a wooden or metal decorative cover is screwed on top of it, which secures the handrail in a certain place.
Node “B” - shows the connection using a thread of a section of a crimp pipe with a sleeve installed in the hole of the step. Unit “B” - installation of washers and sleeves on the casing pipe, which performs a decorative and pressing role. Node “G” is the connection of the support post with the base, which is fixed to the floor.
Video: prefabricated modular spiral staircase “Dream”
Important nuances when calculating, manufacturing and installing stairs
In order for the staircase to be comfortable and safe for ascent and descent, it is recommended that at all stages of work - during calculations, during the manufacture and installation of the structure - follow the recommendations and rules developed and tested by experienced specialists.
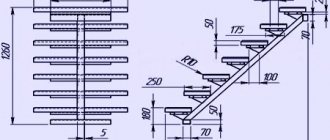
The width of the step in its middle, where people most often step when ascending and descending, is not recommended to be less than 200 mm. The supporting central post, for safety reasons, should not have a diameter less than 50 mm. It is not recommended to install risers on a spiral staircase, as they can interfere with the full placement of a person’s foot on the surface of the step. This can lead to your foot slipping and an accidental fall, and as a result, there is a high risk of injury. Each of the turns of the staircase must have at least 11 ÷ 12 steps. It is recommended to calculate the height of the turns of the structure taking into account the maximum height of the residents of the house; it is advisable to even take it with a margin of 100 ÷ 200 mm. If an incorrect calculation is made downwards, then in some parts of the stairs you will have to bend over so as not to hit your head. Agree that using such a structure will be extremely inconvenient.
Calculation of spiral staircase parameters
Before you begin manufacturing staircase elements, it is necessary to carry out careful calculations, otherwise the design may simply be unsafe.
The first thing to start with is a general drawing and calculation of parameters
The passage width of a spiral staircase usually varies between 700 and 1000 mm.
To understand how to correctly calculate the parameters, you can take average statistical data as an example. For example, the width of the staircase passage will be 900 mm , its height will be 2700 mm , and the diameter of the central support post will be 300 mm .
First you need to determine the overall diameter of the spiral staircase, in projection - top view. To do this, you need to take two passage widths of the stairs (900 × 2) and add the diameter of the support post to the resulting result:
(900 × 2) + 300 = 2100 mm
Next, you need to draw a drawing on a sheet of paper. 2100 found above is drawn on a scale of 1:10 , the result is 210 mm .
In this circle you need to inscribe another one, which will show the trajectory of a person walking up the stairs. The radius of the second circle will be equal to the sum of the radii of the supporting central post and the width of the staircase, divided in half.
(900 + 150) : 2 = 575 mm
Next, it is necessary to determine how many steps there will be in each complete turn of the structure. To calculate this parameter, you need to take the average width of the step. Since the usual width of this element for an external fence is 400 ÷ 450 mm, then approximately in the middle (along the trajectory of a person’s movement) you can take 250 mm for calculation.
Then, the circumference of the movement path must be divided by the average width of the step.
(2 × 3.14 × 575) : 250 = 14.44 pcs.
In this case, rounding is done upward and the result is 15 steps.
The next step is to find the height of the steps. For this purpose, the first circle is divided into 15 equal parts. It must be taken into account that the last and first stages of the coil should be located between themselves according to the height of a fairly tall person, for example, 1900 mm. Adding to this parameter another reserve - about 100 mm. In addition, you need to take into account the thickness of the step, let’s say it will be 30 mm. The total is
1900 + 100 + 30 = 2030 mm
Further, knowing all the calculated parameters, you can easily find out the height of each of the steps (if, of course, their placement is planned at the same height interval). To do this, the height of the coil must be divided by the number of steps:
2030: 15 = 135.33 ≈ 135 mm
In order to find out the total number of steps in the staircase, you need its height - from the floor of the first floor to the level of the second, divided by the height of the step.
2700 : 135 = 20 steps.
In total, during the entire ascent the ladder will make 20: 15 = 1.(33) full revolutions , or describe a full turn plus another 120 degrees.
Use the calculator to calculate the size of a winder or spiral staircase with a description.
Manufacturing of structural parts
support pillar
For the supporting central pillar, metal pipes, concrete, brick and wooden pillars are used.
Very often a metal pipe is used as a central post
Steps can be secured to metal, concrete or brick using elements welded to the pipe, couplings or bolts.
It is much easier to attach steps to a wooden stand. For this, any methods can be used, from metal corners to wooden blocks installed vertically in the gaps between the steps.
The stand must be strong and easily withstand the total weight of all structural elements and a large person with luggage located on the stairs. In addition, the central support pillar must be securely fastened at the top and bottom.
The diameter of a metal stand (pipe) must be at least 50 mm, and that made of other materials - from 150 to 500 mm and even sometimes more.
Making steps
For the manufacture of steps, a tree with a dense structure is most often chosen - beech or oak, but other species are often used. However, it is better not to choose fragile wood, such as pine or spruce, as they may not be able to withstand the heavy load that falls on these staircase parts.
When choosing material for steps, you need to know that the thickness of the finished parts must be at least 50 mm, provided that the height of the stairs does not exceed 2 meters. If the overall structure is higher, then the thickness of the steps should be greater - at least 60 mm. The material for the manufacture of parts must be moderately dried and processed. It is best to purchase an already planed board. If wood is dried unevenly, it can gradually lose moisture and become deformed, taking on the shape of a propeller or tray. The worst thing is if this starts to happen after the workpiece has been installed in the overall structure. Most likely, a deformed step will have to be replaced, otherwise it will “pull” other parts along with it, violating the overall strength of the assembly.
We recommend: Do-it-yourself tree house: photos, drawings, step by step making a children's house out of wood
Gluing timber into a single panel and marking steps
Use the stair steps calculator with explanations.
Taking into account all these circumstances, and relying on the experience of the craftsmen, it is recommended to use glued wood for the manufacture of steps, which can be made independently, using bars of the required thickness. The panel of bars should have a length equal to the length of the step, and the width should accommodate two steps laid in the opposite direction.
The bars are assembled into a common panel, and it is very important to ensure that adjacent parts have a structural pattern of fibers directed in opposite directions. The bars are glued together and tightened using clamps, and in this position this assembly is left until completely dry. In order not to constantly resort to measurements when making each part, it is best to make a step template, with the help of which the shape and size will be transferred to the prepared glued panels with very high accuracy.
The template is made according to the parameters obtained as a result of calculations carried out in advance. You should definitely remember that after cutting out the workpiece, the steps will undergo final processing, so you also need to provide a certain allowance for it, about 5 mm, and make a template taking this amendment into account.
When using a template to transfer the shape of the step onto the glued panel, it is especially important to accurately transfer the size of the wide side of the step and the hole (if provided) under the post. The correctness, ease and quality of installation of the structure will directly depend on the correctly transferred parameters. Naturally, it is equally important to accurately transfer other dimensions (the width of the middle and narrow parts), but they will not seriously affect the build quality. Since the topmost step is a kind of platform that connects the stairs and the floors of the second floor, it is significantly larger in size.
It can be marked and cut out using a template made for ordinary steps, only then slightly increasing the dimensions. The figure clearly shows the process of calculating and marking the upper step-platform on a blank panel glued together from bars.
The top step has its own characteristics
Sometimes the length of this element is increased so that the platform can rest its wide side on the interfloor ceiling, which will make the staircase more durable. In addition to the length, the width of this step is also made larger, which will improve its performance.
After marking the steps, they are cut out and then processed on special carpentry machines or finished manually. If there are holes for mounting steps on a support post, then they are selected with a specially selected cutter, only after all the elements have been cut out.
Several steps are stacked, securely fixed to each other on both sides, and then holes are drilled for the support. Using this “batch” method of cutting holes, you can obtain a more precise location, which will help in the future to facilitate the installation of the structure.
Marking finished steps for cutting mounting grooves
Read the article on how to decorate the space under the stairs yourself with detailed descriptions of the steps.
Manufacturing of posts and balusters
Next, marking is carried out and drilling or cutting out holes or grooves of the required size or shape for installing balusters.
To make racks, you must have laminated veneer lumber with a section size of at least 50 × 50 mm and a lathe. You can, of course, install well-processed square bars in the form of racks, but round balusters with a certain relief pattern are traditional. If it is not possible to independently manufacture such elements, they can also be purchased ready-made.
Balusters can be turned yourself or purchased ready-made
To ensure structural rigidity, the outer pillars are shaped in such a way that they can connect two stages at once - this is also necessary in order to eliminate the risk of the stage rotating on the support pipe. It should be noted that baluster posts can be glued into drilled holes, secured on top of the steps with special fasteners, or put on and glued to the steps using cuts made in the lower part of the balusters, half of their cross-section.
The calculation of the installation location of the balusters is clearly shown in the drawing below.
Later, it will be necessary to mark and cut the top of the posts at the desired angle, which will depend on the slope and turns of the stairs.
Stair railing
Curved wooden railings look great on a spiral staircase, but making them yourself is a task of a very high level of complexity. Thus, the necessary details can be completed in several ways, none of which can be called simple:
- sawing out individual parts of the railing from solid pieces of wood, and then assembling them together;
— sawing out railings from bars glued together;
— gluing an element made of thin wood veneer.
Making bent wooden handrails is a task for real craftsmen
To make a railing, you will need not only the appropriate material, but also a tool that provides the desired bend and at the same time fixes the bent element in the desired position.
Therefore, in order not to waste time and effort on making bent handrails (especially without any special guarantee of success), they can be ordered from specialized manufacturing companies engaged in the production of complex wooden structures, including stairs and their components.
The craftsman will determine on the spot what radius to make the bend, take all the parameters of the staircase and make a handrail, as well as a plinth, if it is also included in the project.
The owner of the house will only have to install these elements on the staircase during its installation, although this work can also be entrusted to the craftsmen.
If you need to save money on handrails made of wood, you can order them to be made from another material, for example, plastic, which perfectly imitates the textured pattern of wood. Another option for railings is a combined one, that is, made of metal and plastic.
However, no matter what type of railing is chosen, its installation and fastening occurs last.
How is installation done?
Having determined the installation location of the staircase, it is marked in such a way that the structure, designed to be installed at a certain distance from the wall, does not rest against it.
If the staircase rests on the wall, this is immediately taken into account when marking the installation site
If the structure will be fixed to the wall in a certain way, it also needs to accurately calculate the installation location of the central post and the shape of the opening in the ceiling.
The first step is to mark the ceiling, determining the center of the circle, which should later be cut into the ceiling and will subsequently serve as a passage to the second floor.
Determination of centers - on the ceiling and on the floor
Having determined this point, using a plumb line it is accurately projected onto the floor. This mark will become the location for installing the support post. Next, an opening of the desired shape is cut out in the ceiling, and its edges are immediately decorated decoratively.
Cutting a hole in the ceiling and finishing it
The next step is the installation of the support post, if it is monolithic.
If ready-made sets of spiral staircases are used, then their prefabricated parts - a support post, consisting of individual elements, and steps, which are immediately fixed to the post, are mounted simultaneously.
An approximate diagram of such an assembly is presented above.
If the steps will be mounted on a monolithic rack made of concrete or brick, then places are marked on it where special brackets are fixed using anchor elements or welding. The steps will be laid and attached to them.
If the stand has a large diameter and is made of wood, then to install the steps it is easiest to use bars that have the height of the distance between the steps, which will be obtained from preliminary calculations.
The bars are fixed vertically to precisely marked places on the pole using powerful self-tapping screws. The size of the bars can be 30 × 50 or 50 × 50 mm in cross section. This fastening method can safely be called the simplest; the main thing is to prepare the required number of bars of the required sizes.
Under the first step on its wide side, you can provide a reliable stand on the floor from a larger block, which must be carefully processed. The upper platform step is placed on the floors of the second floor and securely fastened.
The top step usually extends onto the floor surface of the second floor
Next, when all the steps are set, balusters are installed on them, but are not secured yet, since marks need to be made on them for cutting at the required angle, which will correspond to the slope of the stairs.
It is easy to determine the angle of their cut; for this process you will need to make a simple template in the form of a triangle. How to do this correctly is shown in the diagram below.
Installation and adjustment of balusters and racks
When all the balusters have been marked, they are carefully cut down, installed and secured to prepared fasteners (holes, tongues or grooves), but in addition to them, it is recommended to additionally fix the wooden balusters with glue.
Next, a handrail is installed on the balusters, which is secured to them using self-tapping screws, screwed at an angle. To avoid damaging the rack, you first need to drill a channel for the self-tapping screw with an appropriate drill (usually Ø 3 mm is used), and then a thin but fairly long self-tapping screw is screwed into this hole.
You can also attach it to nails, but it is better to use self-tapping screws
Instead, some craftsmen use ordinary nails, however, given the fragile twisted structure of the staircase, it is still better to use self-tapping screws.
To make the structure more durable, you can fasten a wide twisted plinth along the entire length of the staircase, on its outer side.
Often the outside of the staircase structure is covered with a wide twisted plinth
Having completed the installation of the staircase, you can proceed to its final finishing. You can cover it with paint, which will help fit the structure into the overall design, or you can use stains and colored or clear wood varnish.
If you decide to make and install a spiral staircase yourself, then the main thing in this matter is to make the structure as comfortable, reliable and safe as possible, especially if the house is inhabited by elderly people and small children.
If you lack experience and skills in such work, it is better to entrust this process to a qualified craftsman. As a last resort, you can install a finished structure, the set of parts of which is made by professionals. In this case, you will need to accurately, down to the smallest detail, follow all the technological recommendations specified in the instructions that come with such a kit.
Video: installation of a finished set of spiral staircases
Calculation of spiral staircase parameters
The process of manufacturing the components of a structure begins, first of all, with calculations. Moreover, the accuracy of their implementation is directly proportional to the level of safety of the staircase as a whole.
To understand how the calculations are performed, it is proposed to take a specific example with average statistical indicators for clarity. Let's assume that the width of the staircase is 90 cm (as a rule, its dimensions vary from 70 to 100 cm), the height is 270 cm, and the diameter of the support is 30 cm.
Further calculations are made according to the following scheme:
We determine the diameter of the spiral staircase, that is, the top view in projection. To do this, double the width of the staircase and add the diameter of the central pillar to the resulting figure:
(90×2)+30=210 cm
We make a drawing of the future structure. Correctly executed drawings of a spiral staircase made of wood are a guarantee of obtaining a good result.
On a piece of paper we draw a circle, the diameter of which we obtained in the previous paragraph (210 cm). For convenience, it is recommended to use a scale of 1:10. Thus, the diameter of the circle in the drawing will be 21 cm.
To display in the figure the trajectory of a person moving along the stairs, another circle is drawn inside. Its radius is equal to the sum of the radius of the support and the width of the stairs, divided by 2.
(90+15)/2=52.5cm
We calculate the number of steps in each turn. To obtain this parameter, an average step width is required. Considering that the usual width of this part of the structure is 40–45 for the external fence, then for the calculation we take approximately the middle (trajectory of a person’s movement) - 25 cm.
To obtain the exact number of steps, divide the circumference, which reflects the trajectory of movement, by the average width of the step.
(2×3,14×52,5)/25=13,18
Rounding, we get the result of 13 steps. Find the height of the steps. Divide the first circle into 15 parts of the same size. It should be taken into account that the distance between the first and last step is approximately equal to the height of a tall person. For example, 1m 90 cm. To this indicator, a 10 cm reserve and a step thickness of 3 cm are added on top.
190+10+3=203 cm
We determine the height of each individual step. To do this, the height of the coil is divided by the number of steps:
203/13=15,61
To calculate how many steps there will be in the staircase, you need to divide the height of the entire structure by the height of the step.
270/15=18
Based on available calculations, we can calculate how many revolutions the staircase structure makes during the entire ascent:
18/13=1,38
Important nuances during calculations and installation
Even small errors made during calculations, manufacturing or installation of the structure can make the ladder unsafe when ascending and descending. Therefore, in the process of work, it is not recommended to neglect the rules and recommendations of professionals:
- the middle of the step is the place where a person’s foot most often steps when ascending and descending; for a confident step, its width should be at least 20 cm.
- The minimum diameter of the support is 5 cm.
- a spiral staircase and risers are not the best combination; they prevent you from fully placing your foot, which is dangerous due to the foot slipping and resulting injury.
- There must be at least 11 steps in one turn of the stairs.
- the height of the coil is determined based on the height of the tallest family member plus a margin of up to 20 cm; If you ignore this recommendation, then when lifting and lowering you will have to bend over in some places to avoid getting a head injury.
Features of the calculation (drawing production)
This dimensional element of the interior requires drawing up a detailed diagram. You can make the drawing yourself or use the services of specialists (this will allow you to avoid many mistakes that a novice master cannot cope with).
Experts recommend starting the first stage of work with the design of the first floor. This document should indicate where the structure will be installed, as well as the exact dimensions (length, width, slope) of the staircase opening in accordance with the established scale.
It is necessary to correctly calculate and describe how the shape of the steps will change when using rotary blades. All parameters must be strictly observed; in cross-section, all structural elements must be combined with each other. You should also draw up a separate diagram showing the circular angles of the staircase.
Design calculation
When measuring a future product, it is especially important to follow the step-by-step instructions and the pre-created diagram. To avoid common mistakes, pay attention to these rules:
- For comfortable passage of a person, the width of the flight of stairs must be at least 900-1000 mm - for a screw structure; larger values are allowed only in the case of ordinary (straight) stairs.
- The optimal angle of inclination of the product is 45 degrees. The lower this indicator, the more space the staircase will take up.
- The optimal distance between the handrail and the edge of the opening is at least 100 mm.
Calculation of steps
When drawing up a project for a future product, it is necessary to take into account the parameters of the finished elements and their quantity. So, the thickness of the steps should be at least five centimeters with standard staircase dimensions. To determine the required number of steps, you need to know the height of the future staircase structure (H = distance from floor to ceiling + thickness of the interfloor ceiling).
Let's say the height of the future staircase (H) is 3 m. The recommended height of each step (S) is 18-22 cm. Let's take the average value - 20 cm (i.e. S = 0.2 m). To determine the number of steps, you need to divide the height of the stairs by the height of the steps, H:S=3:0.2=15. As a result, it turns out that we need 15 steps.
The dimensions of each tread for a spiral staircase are calculated using a special formula (see photo below).
Drawings of spiral wooden staircases
A circular staircase made of wood is in great demand due to its minimal costs and compact design. Wood products give the room solidity and are characterized by increased safety (compared to metal models). Even a novice craftsman can make a wooden staircase, the main thing is to draw up the drawing correctly or use ready-made examples. We hope that the proposed options will help you in your work.
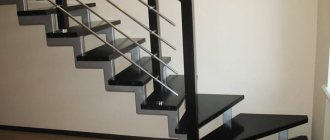
Drawings of spiral metal staircases
A spiral (or round) metal staircase has a number of advantages. First of all, this is the fire resistance of the structure, as well as ease of installation and long service life. The distinctive features of such circular products are their modern design and the ability to combine different materials.
Externally, the drawing of a metal spiral staircase is not much different from the previous example, however, there are some nuances here too. So, such a design can be made correctly only if you follow step-by-step instructions and special technology. Assembling the system involves installing the central pillar, attaching the bushing, washers and steps.
Manufacturing of structural elements
support pillar
To make the support, metal pipes with a diameter of at least 5 cm are used, as well as pillars made of materials such as concrete, brick and wood. Their diameter can vary from 15 to 50 cm, and in some cases more.
The central pillar is the main load-bearing element of the structure
Metal, concrete or brick supports are the most difficult to work with. To fix the steps on it, welding, bolts, and couplings are used. Elements can be attached to a wooden post without much difficulty using any method. These can be metal corners or wooden blocks, which are installed in a vertical position in the inter-stage gaps.
Since the central pillar is the main load-bearing element, it must be highly durable and withstand not only the total load of the entire structure, but also the weight of a person and luggage.
steps
The most common materials for their manufacture are wood species such as oak and beech. Unlike pine or spruce, they have a dense structure and are able to withstand the load placed on them.
The thickness of the steps depends on the height of the structure. If the staircase is no higher than two meters, then it is at least 5 cm. For taller structures it should exceed 6 cm.
When choosing material for steps, pay attention to the degree of drying and processing. According to experts, it is better to buy planed boards. Unevenly dried wood will begin to lose moisture over time and change its original shape. As a result of this, further replacement of the step will be required, otherwise the strength of the entire staircase structure may be compromised.
Experienced craftsmen recommend using laminated wood for steps, which is easy to make yourself. The length of the panel of bars is equal to the length of the step, and the width should be such that it can accommodate two steps placed in different directions.
To produce laminated wood, you must perform the following steps:
- Assemble the bars into a panel so that in closely spaced parts the structural pattern is directed in different directions.
- Coat the component elements of the panel with glue, tighten them with clamps and wait for the product to dry completely.
Scheme for manufacturing laminated wood
To save time and effort, you need to prepare in advance a template of the steps according to which they will be laid out. It is prepared based on previously made calculations and taking into account an allowance of 0.5 cm.
When transferring the contours of the template to the block panel, you need to be extremely careful. It is important to accurately display the dimensions of the wide edge of the part and the hole provided for the stand.
The upper stage of the structure deserves special attention. It is a platform connecting the stairs to the floor on the top floor. It is larger in size than other steps. In addition, the length of this element is sometimes deliberately made even greater in order to strengthen the staircase structure.
Making the upper stage
At the end of the work done, the manufactured steps are stacked and firmly fixed to each other on both sides. This “batch” method is used to make holes for the support post.
Fences and railings
The next step is to make the balusters. For this purpose, you will need laminated veneer lumber with a minimum cross-section of 5×5 cm and a lathe. If you are unable to make these elements yourself, you can buy them.
To ensure structural rigidity, the outer racks are shaped so that they can simultaneously connect two steps. This will prevent them from turning on the center support.
There are different methods for attaching baluster posts:
- by gluing them into the holes made;
- fixation to the steps using special fasteners;
- gluing using cuts made at the bottom of the posts.
Marking the railing posts and their installation diagram
The final stage is marking and sawing off the tops of the balusters at an angle depending on the inclinations and turns of the staircase structure. Curved wooden railings give a beautiful look to spiral staircases.
They are made using several methods:
- cutting out the components of the railing from a single piece of wood and their further assembly;
- cutting handrails from laminated wood;
- joining an element made of not very dense wood veneer.
Method for precision manufacturing of railings
Diagram of a twisted wooden railing.
Any of these manufacturing methods is quite complex. For these purposes, you will need appropriate material and special tools. Experts recommend purchasing ready-made handrails to order from a specialized company. Your task will only be to install them, although this work can be entrusted to a master of his craft.
As for the assortment, the market offers a wide selection of handrails that differ from each other in appearance, material and price. Those who prefer palace luxury can buy carved railings for the spiral wooden staircases to the second floor. And for more economical customers, there are plastic railings with an imitation of textured wood.
Installation Guide
Now in stores you can find ready-made screw structures, the assembly of which is not particularly difficult. In this case, the novice master only needs to follow the step-by-step instructions included with the product and check the reliability of fastening of the components (steps, supports, railings). There is also the possibility of using samples of wooden steps - they can be installed for any product parameters. However, be sure to thoroughly sand all edges when finished.
Related article: Types and features of modular stairs [options for assembling the system with your own hands]
Installation of support
The support of a spiral staircase structure can be concrete, steel, wood or brick pillars. Each of the elements is fastened together using bolts and occasionally couplings. The result should be a support post that can support the weight of the finished product and a person.
The support pillar, whatever material it is made of, is connected to the bottom and top of the stairs at the same time. The dimensions of this element may vary depending on the variety. The diameter of the concrete and wooden posts is 15-20 cm, the diameter of the metal support is no more than 10 cm.
When talking about making and installing a bowstring with your own hands, you need to take into account the labor-intensive process of giving wooden parts a bent shape. For this purpose, a special technology is used, which involves soaking the wood, forming the required proportions and drying.
The best option for making a spiral staircase yourself is to combine several parts into one string.
Installation of steps
For comfortable movement between floors, it is important to correctly position the axes. When choosing a metal staircase, a frame of the required shape is mounted using metal corners. The latter are welded to the support column in the form of straight plates. You can also weld three metal profiles together, which should then create a kind of stand for the step.
As for a completely wooden staircase, it is easier to make wedge-shaped steps with a hole in the narrow part and string them onto a support rod. You can also purchase ready-made components for assembling a modular staircase.
Fences and railings
The penultimate stage of constructing a spiral staircase involves installing a fence. In the case of screw models, it serves as additional protection and also performs a decorative function. Most often, the fence is made of metal pipes or forged elements, which looks very impressive and makes the interior of the house more stylish.
If you are planning to build a wooden spiral staircase, then pay attention to balusters and railings made of expensive wood. However, it is very difficult to install rounded railings - for this it is necessary to soak and dry the parts in advance. This is why professionals advise using wood imitation (PVC-based products).
Assembling a spiral staircase
Before you begin installing the structure, you need to decide on its location and whether it will be in contact with the wall. Having completed this task, you can begin to follow the step-by-step instructions:
- Apply markings on the ceiling, establishing the center of the circle.
- Using a plumb line, project the center of the circle drawn on the ceiling onto the floor. This will be the location where the support pillar will be installed.
The center of the circle drawn on the ceiling is the place where the support pillar will be installed
- Cut out a circle of the required shape in the ceiling and make a decorative frame around the edges.
Cutting and framing the opening
Further actions depend on the characteristics of the support post:
- If you purchase a ready-made set of spiral staircases, then the support, consisting of separate parts, is assembled simultaneously with the steps.
- If a monolithic concrete or brick support is used, then marks are placed on it where the brackets will be attached in the future. They serve for laying and fixing steps.
- The steps are attached to a large-diameter wooden support post using bars, the height of which is equal to the distance between the steps. Bars with a cross section of 3×5 cm or 5×5 cm are attached to the places marked on the post with self-tapping screws.
- When laying the first step, you can place a large wooden block on its wide side.
- The upper step is attached to the floor of the second floor.
- After setting all the steps, it is necessary to install balusters. They can be secured only after their tops have been cut off at an angle depending on the slope and turns of the stairs.
- The railings are installed and secured with self-tapping screws. To avoid damaging the racks, it is recommended to pre-make channels for screws.
- Then the plinth is attached, if provided for by the project.
Having carefully followed the instructions for installing a spiral staircase, proceed to the final finishing. Choose a suitable paint, stain or regular clear varnish for the design.
Screw structures are an excellent design solution for your home or cottage. And regardless of whether you chose an expensive option or an economy class, the result will please you in any case.
Staircase design
When drawing up a drawing, you need to decide in advance how you will use the free space. If you are going to do all the measurements and calculations of the spiral staircase yourself, then before drawing up a plan you need to take into account the main design features of this interior element. Below is a typical version of a spiral staircase.
For a private home with small children and elderly people you should also:
- equip the flight of stairs with additional protection (comfortable handles, anti-slip path);
- eliminate or reduce the amount of hazardous elements;
- increase the safety of the structure by choosing the right materials and drawing up a plan.
Related article: How to calculate a staircase to the second floor: optimal parameters
On video: mistakes in designing a staircase in a wooden house.
Components of the structure
Interfloor spiral staircases consist of many elements. The main ones are:
- steps;
- support pillar to which the steps are attached;
- treads - vertical strips of steps, which are sometimes used as additional support (depending on the design, they may not be present);
- bolts - bolts with which the steps are attached to each other with free support;
- baluster - a vertical fencing element that also has a decorative function;
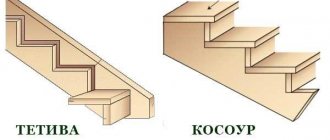
- bowstring - a supporting element on which the steps are attached;
- railings – used for support and to prevent falls.
High-quality components and proper assembly of the spiral staircase will make it safe, comfortable and durable.
Advantages of making stairs with us
We offer clients spiral staircases of different styles. Designers will help develop a model in accordance with the size and geometry of the house, its design. You can choose one of the options in the catalog. Finished products correspond to the approved design.
The company cooperates with manufacturing plants. Issues that arise during the work on the order are resolved promptly. Delivery and installation of stairs is carried out within the agreed time frame. Warranty service for screw structures is provided for 5 years.
Measurers work seven days a week, all calculations are made free of charge. We cooperate with clients from any region of Russia, sending ready-made stairs by transport companies.
There are four main types of structures:
- a design with steps resting on bent bowstrings - they have no supporting pillars. In this case, the bowstrings are wrapped in a spiral and pass into the supporting railings. This type is the most difficult to manufacture. It is not recommended to even undertake installation on your own, since the work requires precision and knowledge of many nuances;
- the steps rest on the wall and on the pillar - this design is rightfully recognized as the most durable. The steps in the form of wedges rest on the wall with the wide part, and on the support pillar with the narrow part;
- a lift with a casing pipe, which is the load-bearing part of the structure. For its manufacture, pipes with thick (at least 5 mm) walls are usually used.
- a design with steps attached to an internal pillar - it is attractive because it requires additional support in the form of walls, so it can be installed in any part of the room.