Choosing a skirting board
When choosing a plinth, you need to pay attention to its color, texture and size. As a rule, the color of the baseboard is matched to the tone of the floor or the tone of the wall.
The most common option is to choose the color of the baseboard to match the color of the floor. Almost all major manufacturers of flooring have in their assortment a line of skirting boards that are best suited to a particular coating. If you don’t want to think long about choosing a skirting board, then just buy the one recommended by the manufacturer.
Skirting boards in the color of the floor
If the room has plain walls, then the best option would be to choose a baseboard that matches the tone of the walls; this will give the interior a holistic and complete look. However, if the walls in the room are covered with decorative plaster or wallpaper with a pattern, it is better to abandon this option.
White skirting boards are universal and suitable for almost any interior.
White skirting boards
Sometimes the color of the baseboard is matched to the color of the door, but this option is not suitable for every interior and it is better not to overuse it.
In rare cases, the color of the baseboard differs sharply from the color of the floor and walls and coincides with the main color accent of the room; as a rule, this is implemented in “designer” renovations, where a professional with extensive experience and well-developed taste is responsible for the choice of interior colors.
Stainless steel plinth
When choosing the size of the plinth, the rule is that the higher the ceilings of the room, the higher the profile of the plinth should be. With a ceiling height of about 3 m, it is advisable to use classic profile skirting boards with a height of 40 to 70 mm.
Skirting boards to match the color of furniture and door frames
If the room has high ceilings, then it is better to use a thin and high plinth in white or a contrasting color.
When choosing a plinth material, you need to proceed from your financial capabilities and type of flooring. Let's consider the possible material options in more detail.
Wide plinth for an apartment with a high ceiling
Floors
156 votes
+
Vote for!
—
Vote against!
The final stage of room renovation is the installation of floor plinths. Plastic skirting boards are widely used due to their wear resistance, mechanical and temperature strength, attractive appearance and wide variety. We will learn further about how to install skirting boards with your own hands.
Table of contents:
- Do-it-yourself plastic plinth installation
- Do-it-yourself installation of warm baseboards
- Do-it-yourself ceiling plinth installation
- Features of installing a wooden plinth with your own hands
Do-it-yourself plastic plinth installation
Floor skirting boards are made from materials of various compositions. Products made of plastic are especially popular. Skirting boards made of MDF, steel, ceramic and stone models are used less often. The easiest way to create the illusion of smooth walls is with plastic skirting boards. They fit perfectly on the surface, are affordable and come in a variety of colors and textures.
PVC-based skirting boards are suitable for both wood floors and coatings made of laminate or linoleum. The plinth is moisture resistant, easy to install, and features cable channels containing wires inside.
Before you begin installing the skirting boards, you should decide on the amount of consumables. The optimal length of the skirting board for the floor is about 250 cm. Based on this, the number of skirting boards is calculated. Do not forget to add 10-15% compensation for joints and other errors to the obtained value.
There are special online calculators that will help you calculate the amount of plinth. Although it is quite possible to complete this process yourself. It is enough to add the length of the room to its width and multiply this value by two. Divide the result by 250 cm or 2.5 m, depending on the units in which the previous calculations were performed.
The next stage is choosing the optimal color of the baseboard, which fits perfectly with the interior of the room. When choosing a baseboard, we recommend taking a small piece of wallpaper with you to match it by color.
Plastic skirting boards are joined using special fittings. When cutting them, you do not need to maintain high precision in joining the elements. The design of the plinth itself allows you to ultimately obtain the ideal appearance of the coating. Fitting elements for plastic skirting boards contain two plugs - right and left, elements for joining, internal and external corners. Try to choose fittings that are as close in color as possible to the baseboard itself.
Do not confuse the number of plugs - the right and left parts are absolutely identical, they just have a mirror image of each other. When calculating the number of stubs, take this fact into account. Docking parts are installed to cover the joints between two skirting boards. No self-tapping screws are needed to secure the inner corners; they automatically snap into place after installation. Install this element with the same pressure, thus improving the appearance of the plinth. The outer corners are distinguished by the presence of two legs that hold them on the wall. Their use during installation work is not particularly relevant.
Do-it-yourself installation of plastic skirting boards video:
Carrying out installation work to fix the plinth involves constantly changing the workplace, so it is recommended to put all the equipment and fittings in one box, which you will move in relation to the place where the work is performed.
Installation of plastic skirting boards begins with cutting them into elements of the required length. At the same time, try to ensure that the seams between the baseboards are located in a less visible place. It is recommended to start installation work from the inner corners or from the doorway. Install two previously prepared plinths and make a mark on one of them so that the plinth extends 0.5 cm inside the corner.
Initially install baseboard slats that cannot be cut. Install elements for joining the plinth only if the length of the plinth is not enough to cover the wall of the room. When cutting the plinth, always leave a margin of a few millimeters so that the plinth completely covers the wall.
Sawing a plinth made of plastic is much easier than a wooden one. In this case, there is no need to maintain special angles. To quickly and efficiently cut the baseboard, use a hacksaw. At the same time, the plinth is placed in a special miter box. Thus, it is possible to achieve perfectly even corners in a short time. Next, after cutting, use a knife to remove the burrs from the plastic.
The next step is the construction of holes for fasteners for the baseboard. The holes must be made as accurately as possible; to do this, attach the plinth to the wall, mark it, and then drill a hole. To perform drilling, a drill with functional perforation attachments is sufficient. To ensure drilling accuracy, you will need a special device called a jig. If the walls in the room are perfectly smooth, then the distance between the fasteners for installing the baseboard is about half a meter. Otherwise, this value is reduced. Use a vacuum cleaner to remove dust generated after drilling.
If plasterboard is used to make walls in a room, then the process of installing the baseboard is slightly modified. If, when constructing holes for the plinth, it was possible to get into the profile on which the drywall is fixed, then only self-tapping screws are used to secure the plinth. Otherwise, the baseboard is fixed using dowels called “butterflies”.
To install such dowels, a hole is initially made in the wall; the dowel must be installed closely into it. For drilling, use any drills, as well as a jig. Next, the pressing parts of the dowel are pressed against it and the element is installed in the hole. To fix the dowel faster, you can use a hammer. Please note that the self-tapping screw should be slightly smaller in size than the dowel head.
The second method of installing floor plinths with your own hands involves preliminary drilling a hole in the plinth itself, and in relation to these holes, drilling the wall. For these purposes, we recommend using dowels that have caps. This installation method is less reliable and during its implementation quite often it is not possible to avoid the appearance of gaps between the wall and the baseboard.
In addition, it is more difficult to dismantle a plinth installed in this way. If the plinth is fixed with self-tapping screws, then it is recommended to make a hole in the plastic using an awl or a screwdriver. Rotating the awl, gradually move the plinth, this way you can get a hole with a high level of density. Install the self-tapping screw into the previously made hole and fix the plinth to the wall.
The process of fixing the outer corners is quite important, since these elements are under constant operational movement. Since the place where the corners are fixed is located twenty millimeters from the installation site of the self-tapping screws, there is a possibility of their damage. To do this, in order to avoid this unpleasant process, even when carrying out repair work, try to ensure that the outer corners are perfectly aligned.
The outer corners are fixed in the same way as the inner ones. Special plugs for decorative purposes are installed on the cable channels. This completes the installation of plastic skirting boards. If seams appear between the wall and the baseboard, it is recommended to increase the number of fasteners needed to secure the baseboard.
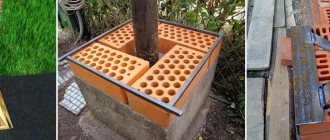
Do-it-yourself installation of warm baseboards
Warm baseboards are an excellent alternative to a modern heating system. Under these small furnishings there is a system of wires that provide main or additional heating.
Among the main elements of warm skirting boards, we note the presence of:
- boxes and brackets that secure the heaters;
- tubular converter;
- elements of the rotary system.
All parts are assembled into a single structure. Among the advantages of this system we note:
- uniform and rapid heating of walls - preventing the development of fungus and mold;
- uniform temperature distribution both near the floor and on the ceiling;
- attractive appearance;
- Since the body part of the plinth is closed, it is possible to achieve economical use of this system.
There are two options for warm baseboards - water and electric. The operating efficiency of these systems is the same, the main difference is the principle of heating the coolant.
In order to install an electric warm baseboard, you will need a powerful power supply system. For economical use of the system, it is recommended to additionally install a heating temperature regulator.
In order to heat the water baseboard, a heating boiler is used. This version of the plinth is more economical to use.
To install the plinth yourself, follow the instructions below:
1. The wall plate is installed. To fix it, use self-tapping screws or dowels.
2. Installation of convectors and connecting them to the system. Compression fittings are used to connect convectors.
3. Connection of the heating system with the heating main - electric or water. In order to connect the baseboard to the system, you will need a distribution comb.
4. Upon completion of installation work, check the operation of the device. Install the exterior decorative panel in the previously selected color.
Do-it-yourself ceiling plinth installation
Installing a ceiling plinth is a little more difficult than installing a floor plinth. First of all, due to the fact that the work is carried out at height. The most popular material for making ceiling plinths is plastic. Such products are distinguished by their attractive appearance, moisture resistance and mechanical strength.
During the work process you will need:
- hacksaws with miter box;
- a stationery knife with a rubber spatula;
- putty with masking tape.
Additional materials and tools are selected in relation to the individual characteristics of the room. The plinth is installed on the wall before or after finishing it. It is preferable to carry out the work after wallpapering or painting the walls.
The most difficult part is cutting the skirting boards at certain angles for joining them. To facilitate this process, you can purchase special elements for joining corners, but their cost is comparable to the cost of one plinth strip. Therefore, it is cheaper to trim the baseboard correctly, after which the angle will be perfect.
To cut the baseboard at an angle, use a miter box. Minimize joints on sections of plinth that are visible at the entrance to the room. Locate joint areas behind tall cabinets, curtains, or in inconspicuous places. Cutting the plinth for external and internal corners differs. First, carefully measure and mark the baseboard, only then proceed to trim it.
To fix the skirting boards, use special glue or putty. After installing the baseboard on the wall, press it firmly against it and hold it for a few seconds. After gluing the plinth to the ceiling, seal the joints with putty and paint the plinth using water-based paint.
DIY installation of ceiling plinths video:
Features of installing a wooden plinth with your own hands
Wooden skirting boards are the most difficult to install. They need, first of all, the presence of perfectly smooth walls; the slightest irregularities become visible after completion of the installation work.
There are several options for wooden skirting boards - material made directly from wood or from MDF. It is easier to install MDF skirting boards yourself.
First of all, you should choose a high-quality plinth with an optimal level of wood moisture. If you choose wood that is too wet, the coating may become deformed after drying.
Comparing a wooden plinth with a plastic one, the first one does not have special fittings that facilitate the installation process. Therefore, all connections are made with high quality, and all corners must be perfectly even.
To cut baseboards, use a hacksaw with a miter box. In this case, two plinths are installed at right angles and markings are made to form an external or internal angle between them.
The interval between installation of baseboard fasteners is about 65 cm. The baseboard is fixed with self-tapping screws. In the future, to secure the caps from the screws, a special grout or wood putty of the appropriate color is used.
It is possible to fix the plinth using finishing or liquid nails. The second option is relevant if the walls in the house are absolutely flat.
Do-it-yourself plinth installation video:
Solid wood skirting board
This is the most expensive version of the skirting board. It is usually used in combination with parquet and natural wood floors. Natural texture and pleasant color allow you to create a truly luxurious interior. Before installation, such skirting boards are impregnated with protective compounds and stain, and then varnished.
Solid wood skirting board
Traditionally, wooden baseboards were attached to the walls using screws, the heads of which were covered with special mastic. Today, a simpler and more aesthetic option for fastening with liquid nails is possible. Also on the market are wooden skirting boards with hidden fastening to brackets and even with channels for cable laying. However, the price of such skirting boards is quite high.
Wooden skirting boards must be purchased from the same batch, since the shade of wood in different batches may vary. To find out what color the baseboard will take after varnishing, wet it a little with a damp cloth.
Assortment of wooden skirting boards
Due to slight irregularities in the profile, trimming and adjusting the plinth can only be done at the installation site. When joining a wooden plinth in the middle of a wall, it is advisable to make it in a place that will be covered by furniture. The joints of the skirting boards at the corners are made by sawing off the edges at 45 degrees. There are no joining elements for wooden skirting boards, so sawing must be done as carefully as possible.
Floor and baseboard
How to install a plastic skirting board
Plastic plinth performs a double function: it improves the appearance of the walls, hiding their curvature and other imperfections, and protects the base of the walls from all types of influences. In most cases, plastic skirting is attached directly to the walls rather than to the floor, as it is very flexible and is designed to hide the curvature of the wall.
If you want to install a plastic skirting board, you have two options: either, using good glue, glue the skirting board to the walls of the room, or attach it with screws. We recommend that you choose the first option for plasterboard walls and the second option for brick walls.
If you want to install a plastic skirting board on drywall, you must determine the places where you will screw in the screws. Make sure that there is no gap left between the plinth and the wall, as well as between the plinth and the floor. If you need to install a plinth on a brick wall, you must drill holes every 40 cm, insert dowels and secure the plinth with self-tapping screws. We recommend that you use a quality impact drill to make proper holes in your brick walls.
To install a plastic skirting board, you need the following:
| Materials: | Tools: |
| Plastic plinth. | Miter box or miter cutting machine. |
| Accessories for plastic skirting boards (connecting elements, corners, plugs). | Hacksaw. |
| Dowels and screws. | Drill and drill bits. |
| Tape measure, pencil, square. | |
| Inhomogeneity detector. | |
| Vacuum cleaner. | |
| Protective gloves, glasses. |
Adviсe:
- Use a vacuum cleaner to remove dust and other debris from drilling holes in the wall.
To make precise cuts, you will need a miter box and a hacksaw. In addition, in this project we will show you how to attach plastic skirting boards to concrete walls, therefore, you will need to buy screws, dowels and other necessary accessories (assuming you already have a drill). We chose this path when implementing our project, but this does not mean at all that you must act in the same way.
Tools and supplies needed to install plastic skirting boards.
First, you must measure the perimeter of your room to determine the required length of the baseboard. Remember to add 5-10% for cutting waste. Plastic skirting boards come in a wide variety of shapes and colors, so it's best to pay attention to this aspect before making your final order.
Tip: If you want to hide wires or cables, buy a plinth with a special cable channel. The plinth of this model consists of two parts - a housing in which you can hide the wiring, and a masking cover.
Start installing the plinth from the farthest corner of the room, installing solid pieces in the most visible places in the room. In most cases, these seemingly small details make the project more successful, so pay attention to them as you work.
If you do not want to use glue to fix the plinth, you must secure the strip with self-tapping screws every 25-40 cm, after drilling holes in the wall and inserting dowels.
Installation of plastic plinth.
To do this you will need a drill and small drill bits. You should place the skirting board in place, making sure there are no gaps between it and the floor, and drill holes through the back of the skirting board every 25cm.
Tip: There is no need to drill deep holes in the wall at this stage - you should simply use a drill to mark the places where you will need to install dowels.
Drilling holes through the wall of a plastic baseboard.
Now, with the baseboard set aside, enlarge the holes using a larger drill bit that is the same size as the plastic dowels. Remember that if you are drilling into a concrete or brick wall, you must use drill bits designed specifically for that purpose. In addition, to make holes in such materials, it is better to use an impact drill that has a torque control function.
Tip: If your walls are made of plasterboard, you can screw in screws directly, without pre-drilling holes, in the locations of the frame posts.
Drilling holes in the wall.
Once you've finished drilling, you should use a vacuum cleaner to remove all the dust and brick/concrete chips that were created while drilling. This point is of great importance for your project, otherwise you will not be able to properly level and therefore install the baseboard correctly.
Tip: It is better to drill all the necessary holes along the wall, and only then start cleaning - this will allow you to speed up the process. If you've made it to this step, it means things are going great for you and you're on your way to finishing the job.
Cleaning up debris left after drilling.
Now you have to insert plastic dowels into the holes in order to then secure the baseboard using self-tapping screws. To do this you will need a wooden or rubber hammer. Make sure that the dowels are completely recessed into the wall, their edge should be flush with the surface of the wall.
Installation of plastic dowels.
Finally, you can move on to attaching the baseboard itself using self-tapping screws. To speed up the process, you can use a screwdriver.
Tip: Do not overtighten the screws, but at the same time they should not remain unscrewed. In the first case, you risk damaging the plinth; in the second, there will be a gap between the wall and the plinth.
Fastening the baseboard using self-tapping screws.
After fixing the baseboard, all you have to do is close its decorative cover. If you need to place any wires inside the baseboard, you can postpone this operation until you have completed the entire project.
Tip: When inserting the baseboard cover, do not use too much force, as you can easily damage it. Although such skirting boards are designed to protect walls, they cannot withstand all impacts.
Installing a masking baseboard cover.
If the baseboard is shorter than the wall, you must connect the two strips using a special plastic connector.
Advice: This aspect should be taken into account at the planning stage of work, and try to position the skirting boards so that the connecting elements are in the least visible places.
Connection of two fragments of plinth.
Installing skirting boards in the corners of a room is a little more challenging, so you need to focus to get the job done to a professional standard.
The first thing you have to do is mark the cut line with a pencil. This is a more than understandable operation, so there is no need to dwell on this point in detail.
Marking the cutting line.
Then you need to saw off a fragment of the plinth to the required length, using a miter box and a hacksaw. If you wish, you can use a miter saw for this purpose, but first make sure that it has the appropriate blade for cutting plastic products, otherwise you will not get a quality cut.
Sawing off plastic skirting boards.
Next, you must take measurements on the other side of the corner. Just mark a clearly visible saw line.
Forming an external corner.
Attaching the plinth to the wall is carried out in the same way as you did on straight sections of the wall. This means you have to drill holes every 25cm, insert plastic dowels and then secure the skirting board using self-tapping screws. Having installed the sawn-off fragments of the plinth in place, connect them using a special plastic corner.
Installation of a decorative plastic corner.
Once you have installed all the plastic baseboard pieces, you must put the cover back in place. In principle, this operation can be handled without any particular problems. You just need to make sure that at the junction of two fragments of the plinth there is no gap left between the plinth cover and the plastic fittings.
Connection of two fragments of plinth.
Remember that installing plastic skirting boards is not a difficult or costly job, but it can dramatically change the appearance of your home if you use the right materials and tools and follow our instructions.
Installed plastic plinth.
MDF plinth
This is a more budget-friendly version of the plinth; its main profile is made of MDF, and the front side is covered with natural veneer or plastic that imitates the texture of wood. In appearance, such a plinth is not inferior to a plinth made of solid wood, but at the same time it costs significantly less.
MDF plinth
Due to the great fragility of MDF, the plinth is not suitable for fastening with screws; it is usually fastened with liquid nails or hidden staples. The second option, as a rule, provides for the possibility of installing the cable inside the baseboard, which is very convenient.
Many manufacturers complete MDF skirting boards with plugs, joining and corner elements, which greatly simplifies the installation process.
MDF plinth with cable duct
DIY installation of baseboards made of wood or MDF: step-by-step installation
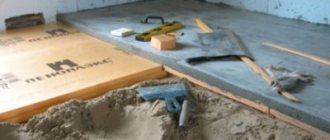
To fasten elements when installing MDF plinths, clips or glue are used. It’s good if the wall surface is perfectly flat, otherwise you have to use various tricks - linings, masking cracks with colored silicone, etc.
Let's look at the procedure for installing planks using glue:
- The base is cleaned and dusted.
- To make the joint of the skirting boards strong and less noticeable along the length, the ends are cut at an angle of 45°.
- First, large elements are glued along the longest walls, then in niches and partitions. The glue is applied to the back surface of the molding and the joint area. After a few seconds, when the polymerization reaction begins, the plinth is pressed tightly against the wall and the adjacent element.
- When installing corner elements, installation begins from the inner corner. After fitting, the slats converging in it are cut at 45°. carefully using a miter box or circular saw. Practice on unnecessary scraps first - mistakes are possible at first.
- If there are posts, they are inserted between the baseboards, achieving a neat fit.
- All parts are installed sequentially. If the walls are not completely level, you can place a small piece of molding and press the gluing area with a 10-kilogram weight.
It is recommended to fill small gaps and defects with a colored silicone compound.
Plastic plinth (PVC)
This is the cheapest and most widely available skirting board option on the market. You can find plastic skirting boards of absolutely any color and profile. Plastic imitates wood, marble, ceramics and even plaster.
Plastic plinth (PVC)
Plastic skirting boards are easy to install, are not demanding on the base, are not afraid of water and are quite durable. Most models provide the possibility of hidden cable installation.
Elements and dimensions of plastic plinth
Typically, PVC skirting boards consist of two parts, one of which is attached to the wall with screws, and the other part is snapped into it, hiding traces of installation. Some plastic skirting boards can be attached with liquid nails, which is very convenient.
Disadvantages of plastic products
- Use of auxiliary elements: plugs, corners, fasteners and connections. It is impossible to see all this in the finished design. In addition, after installation with your own hands, these parts often fall off during operation. The problem is small, but it makes its contribution.
- Imitation of natural materials. Appearing to be something you are not is always not very good, even if you are a baseboard. Not always worthy, not always high quality. Although this very drawback can serve as an advantage for someone: it’s like wood, but you pay less.
- Often cable channels do not contain all the wires that need to be hidden. But this is a drawback not only of plastic strips.
USEFUL INFORMATION: Cosmetic renovation of an apartment: what it is and what it includes
Skirting made of polyurethane foam (PPU)
These skirting boards are created specifically for decorating rooms; they can have a very complex shape that imitates gypsum stucco. PPU skirting boards go well with any type of flooring; they are especially suitable for tiled and marble floors.
Polyurethane plinth is an excellent alternative to a similar element made of plaster or wood
Such skirting boards are easily tinted and patinated; they can imitate almost any material. Thanks to their almost ideal geometry, they are easy to install, and the joints can be easily puttied and painted over.
Most manufacturers of PPU skirting boards offer flexible versions of their skirting boards; they can be fixed to a surface of almost any shape, including columns and niches.
PPU plinth in the interior
These skirting boards are mounted using liquid nails or special glue recommended by the manufacturer.
How to choose the right wooden plinth?
Evaluation of the material, type, size and other features of the plinth. When the floor covering is selected, it does not matter whether it is natural board, laminate, linoleum, parquet or carpet, it is necessary to select a baseboard for it based on shade, configuration, width and, if necessary, the presence of channels for laying cables. If you decide to install a wooden plinth, then, in addition to the above selection criteria, you need to pay attention to other points related to the manufacturing technology of the product, as well as the quality of the wood.
The choice of wooden skirting boards also has certain nuances
- Construction stores offer two types of wooden skirting boards - those made of solid wood and the veneered version.
Solid wood baseboard
The main types of wood for solid baseboards are ash, oak and cherry, which have a beautiful textured pattern and soft shades. In addition, such wood has good durability and the products will last a long time.
Veneered wooden skirting boards.
Veneered plinth is made from inexpensive pine or spruce solid wood, after which its outer side is covered with veneer made from valuable wood species. Therefore, in appearance it is difficult to distinguish it from the massive version - the difference can often be noticed only by looking at the end section of the product.
Solid and veneered skirting boards differ in price. It is clear that the first will cost significantly more than the second.
- It is important to choose products made from quality wood. This criterion is primarily taken into account when choosing a massive plinth, since the veneered version a priori undergoes special processing and drying before decoration. Wet wood is difficult to sand, so a product made from it looks sloppy - this is the first reason that such a purchase should be abandoned. In addition, skirting boards made from insufficiently dried wood may subsequently become deformed, resulting in cracking.
- If it is necessary for the plinth to be resistant to moisture, then you should choose products made from moisture-resistant wood species - yew, oak, larch, alder or fir. They do not actively absorb water, are easy to process and are easy to install. You should not buy products made from soft hardwood, for example, linden, as it deforms and cracks when it dries naturally.
- If you choose a solid baseboard for subsequent painting, then the beauty of the textured wood pattern is not of fundamental importance. However, in this case, it is necessary to carefully inspect each purchased product for the presence of large or through knots, since during installation they can easily turn into through holes, which will weaken the strength of the plinth, and it may simply break. In the best case, the resulting holes will have to be sealed with putty. Therefore, it is necessary to ensure that there are no knots at all, or that they are small in size, light in color and located on the inside of the product.
When purchasing a veneered version, the problem of knots, as a rule, does not arise, since these products are produced in industrial conditions, where strict selection and processing of raw materials for their production is carried out.
Prices for wooden plinths
wooden baseboard
A plinth pressed completely against the wall (on the left) and installed at an angle to it. In the second option, the cable can be passed into the space formed by the slope of the baseboard.
- Skirting boards are available for sale, which during installation are either pressed with the entire back plane against the wall, or mounted to it at an angle. When choosing the first option, it is necessary to determine in advance the required number of channels arranged on the back wall of the plinth for the passage of cables, if necessary.
The height of the plinth greatly influences the design of the room. In addition, high baseboards are much more capable of performing protective and camouflage functions.
- Another point worth considering is the height of the plinth, which directly affects the presentability of the floor covering frame. For example, a high plinth can elevate even a not very attractive floor pattern. In addition, it will cover the lower part of the wall and protect its finishing, which is often damaged in this area, from possible mechanical influences.
Wooden skirting boards, with similar configurations and sizes, can have a different number of channels for placing cable communications.
- If you plan to run communication cables under the baseboard, then you must immediately foresee how many there will be and, depending on their number, select products with the required number of channels on the back side of the products. The choice of the height of the framing elements often also depends on this factor.
The color of the baseboard should be in harmony with the shades of the main finish.
- Choosing the required color of the baseboard is also important. But most likely, no problems are expected with this, since the stores offer products made in various shades. If you plan to bring the interior design to the subtleties, then you should take into account the color of the flooring and wall decoration, since the baseboard should be in harmony with both surfaces. The color may differ from the main finish by two or three tones, or, conversely, contrast with it.
Find out how to attach MDF plinths and the procedure for completing the work from our new article on our portal.
How to calculate the required number of products?
It is not difficult to calculate the required number of skirting boards, but this must be done before going to the store to purchase.
Calculating the required number of skirting boards to frame the floor in a room is not difficult.
- To determine the total length, the length of each wall in the room in which it will be installed is measured.
- If the walls in the house are quite thick, then it is necessary to take into account the required length of the plinth to frame the doorway.
- Next, you need to summarize the results obtained.
- The width of the doorway (one or more, depending on the characteristics of the room) is subtracted from the amount found.
- The resulting value must be divided by the standard length of the plinth, which is most often 2500 mm, and then rounded up. This way you can find out how many pieces you need to purchase.
- Experienced craftsmen advise increasing the amount of material by 15%, that is, buying a plinth with a reserve. This is in case one of the products is accidentally damaged, or an error is made during cutting and fitting.
Well, when purchasing, of course, all selected skirting boards must be carefully inspected
Ceramic baseboard
Ceramic baseboard
These skirting boards are intended for use in rooms lined with ceramic tiles, for example in bathrooms, swimming pools, saunas. They are absolutely waterproof and are mounted with tile adhesive. The joints with the walls and floor are additionally sealed with silicone sealant.
Large manufacturers of floor and wall tiles usually have in their assortment ceramic skirting boards that best suit their products, so choosing the right skirting board will not be difficult.
Ceramic plinth - shades
After choosing a suitable baseboard, you should think about how it can be fixed. There are three main options for attaching skirting boards; let’s look at them in more detail.
How best to mount - to the floor or wall
Some home craftsmen, when starting to install a decorative strip at the bottom of the wall, begin to think about where it is correctly attached - to the wall or the floor. If you follow Dahl's dictionary, you cannot attach the baseboard to the floor. This will be a fillet. Nowadays, they don’t pay attention to Dahl’s definitions - they attach them in different ways. And they rarely, but greatly regret it.
The fact is that modern building materials change their linear dimensions when the temperature rises: they expand. This applies to all types of laminate, parquet boards, block parquet, wooden floors, as well as cement-sand screed. If the plinth is attached to the floor with glue or through the floor covering with screws to the screed, then when the floor expands, the plank will be pressed forcefully into the wall. There is a gap for the screed, but not for the baseboard - the wall will simply squeeze it out of the adhesive layer or tear it off the screws.
Therefore, it is better not to consider the option of attaching the plinth to the floor at all, especially since manufacturers offer a set of related fastening elements only to the wall.
Fastening the baseboard with hidden brackets
Clipstar baseboard fastening system
As a rule, this fastening method is used for mounting baseboards made of solid wood or MDF. In this case, the plinth is snapped onto special brackets, which are pre-fixed to the wall using dowels.
PVC skirting board with hidden fastening system
The brackets are installed in the following order.
Step 1
A horizontal line is drawn on the wall, which corresponds to the height of the brackets. The exact height from the floor is taken from the technical data sheet of the baseboard.
Step 2
A series of holes for dowels are drilled along the line at intervals of 30-50 cm. The first and last holes should be located no more than 5 cm from the edge. If the wall structure allows you to fasten the brackets directly with self-tapping screws, then this step can be skipped.
Baseboard fasteners
Step 2
The brackets are attached to the wall at the same level with a given pitch using dowels or self-tapping screws.
Mounting procedure
When installing the baseboard, do not press it too hard to the floor.
Step 3
Once all the brackets are installed, the baseboard is simply pushed onto them and snaps into place with a little force.
Fastening the baseboard with hidden brackets
The advantage of this method is that there are no traces of installation on the front surface of the plinth, and if necessary, it can be easily removed and reused.
Options for fixing floor plinths
There are several ways to attach skirting boards to the floor:
- glue or liquid nails, but always with the composition recommended by the manufacturer. Otherwise, claims regarding the quality of the plinth will not be accepted;
- self-tapping screws or dowels;
- plastic or metal clips (staples, latches, which are the same thing);
- finishing nails.
Glue method
The method of attaching a plinth to a wall with adhesives (special glue or liquid nails) is one of the simplest, yet most reliable. Can be used for all types of skirting boards (except metal and PVC skirting boards) and wall materials (panel, brick, concrete, etc.). It is enough to apply glue to the plank and press it firmly against the wall, holding it for several minutes. This fastening technology does not require experience or skills - any adult family member can do it.
Difficulties may arise only when passing corners. But there is a hint for this, which can be found here.
The method has many advantages:
- fastening is carried out without mechanical damage to the decorative strip;
- quick fixation;
- there are no restrictions on the type of surfaces to be glued;
- a tight connection is created with the wall that does not allow water and the smallest particles of dust to pass through.
Glue method for attaching skirting boards.
Flaws:
- destructive dismantling - removing and putting back up, for example, when wallpapering, will not work;
- increased requirements for the wall surface: it must be smooth, clean and dry. Otherwise the glue won't stick.
Fastening the baseboard with dowels
This fastening is most often used for mounting PVC skirting boards, but is suitable for any skirting boards consisting of two parts, one of which is used for fastening to the wall and mounting wires, and the other is a decorative trim. Fastening is carried out in the following sequence of actions.
Step 1
The main part of the plinth intended for fastening is applied to the wall, after which holes are made in it with a thin drill at intervals of 30-50 cm so that a mark from the drill remains on the wall. The first and last holes should be located at a distance of 5-7 cm from the edge of the wall.
Fastening the baseboard with dowels
Step 2
The plinth is moved away from the wall, after which holes for the dowels are drilled using a drill of a suitable diameter along the marks.
Fastening a plastic skirting board
Step 3
The baseboard is again leaned against the wall, dowels are inserted into the holes and screws are screwed in. It is better to screw in the screws without force, so as not to damage the PVC.
Methods for attaching floor plinths
Step 4
The sequence of actions is performed for the next plinth. When joining in a corner, the edges of the skirting boards are cut at an angle of 45 degrees.
Elements for fastening the plinth
Step 5
When the installation of the skirting boards is completed, a decorative front panel is installed on them, which hides traces of installation. The joints and edges are closed with plugs.
When the installation of the skirting boards is completed, a decorative front panel is installed on them
Mounting features
Depending on the material from which the plinth is made, one or more of the described methods for installing the specified elements is used.
Installation of plastic plinth
Such elements can be installed with glue, with special clips or with self-tapping screws. When installing with glue, there is no dust; before attaching the floor plastic plinth, you need to clearly measure them, keep in mind that they are glued once, and they cannot be dismantled.
It is necessary to dose the glue correctly and try not to smear the floor covering.
If you want to securely fasten, use self-tapping screws . Although this is a lengthy process, it is the most reliable.
First, holes are made in the plank at a distance of 50-60 cm, then it is placed against the wall and the places for the dowels are marked. In the marked places, holes are made into which dowels are inserted, after which a strip is applied and secured with self-tapping screws.
When screwing self-tapping screws into a plastic baseboard, you must ensure that it does not bend or crumple.
If the strips do not have a cable channel, then the caps of the screws are closed with special plugs, which the craftsmen recommend gluing, and if there is a cable channel, then they will be closed with a special strip.
Plastic plinth can be attached to the floor using special clips .
This installation method allows you to dismantle the baseboard, but when using it, the walls must be perfectly flat, and this is not always the case.
Do-it-yourself installation of plastic skirting boards, step-by-step instructions:
- Mounting points are marked on the wall;
- holes are made in the baseboard;
- insert dowels and, using self-tapping screws, attach special clips, the distance between which is 40-50 cm;
- Now all that remains is to apply the plinth and with the help of light blows with your fist, it is fixed.
Wooden
Installation of wooden plinths is more difficult than plastic ones, since there are no special corners. The corners are butted together and in order to cut the baseboard correctly, you will need a miter box. It's rare that a room has a 90-degree angle, so the adjustment of the planks is usually done locally, and done by hand.
If it is necessary to join wooden planks along the length, you need to make even cuts and select the material so that there are no knots or chips in this place.
Installation is carried out using self-tapping screws, with a distance between them of 70-100 mm. After marking, screw the screws into the plank so that they appear slightly on the other side, then place the plank against the wall and mark the holes for the dowels. Drill holes, insert dowels and fix the bar.
Installation on finishing nails is carried out using the same technology, but instead of plastic dowels, wooden pins are used. This method allows you to make the attachment points invisible, but it is not suitable for uneven and loose walls .
MDF skirting boards
Depending on whether you plan to remove the plinth after a while or not, you choose the method of its installation. MDF skirting boards are most often installed with glue , but in this case, the walls must be perfectly smooth.
You can fasten such elements using self-tapping screws or clips; the technology for performing the work is the same as in the previous versions.
If you do the installation incorrectly, you can damage both the plank itself and its fastening, so the work should be done carefully and slowly.
Fastening skirting boards with liquid nails
This fastening option is suitable for all types of skirting boards, and for PPU skirting boards this is the only possible option. The surface must be sufficiently smooth, strong, clean and dry. Carefully remove dust and dirt from the wall. Immediately before installation, degrease the surface with a product recommended by the liquid nails manufacturer.
Installation is carried out in the following sequence.
Fastening the baseboard with liquid nails. Applying glue
Step 1
The first plinth is cut to the required length if necessary. If the joint with the next plinth falls on the corner of the room, then the edge is sawn off at an angle of 45 degrees.
Step 2
The adhesive composition is applied. The plinth is placed tightly against the wall and pressed with little force.
Fastening skirting boards with liquid nails
Step 3
The next plinth is joined to the previous one, measured and cut in place.
Gluing the baseboard
Step 4
If necessary, front panels, decorative caps and corner elements are installed.
What is a plinth
In the middle of the 19th century (according to Dahl), a shelf at the base of a column was called a plinth. Later, a small-height plank covering the junction of the wall and the floor along the entire perimeter of the room received the same name. But there is one nuance here: a strip is called a plinth only if it is attached to the wall. If the fastening is made to the floor, then it is a fillet. By the way, the same interpretation of the word applies to the ceiling strip: attached to the wall - a ceiling plinth, to the ceiling - a fillet.
According to the site’s editors, a couple of centuries ago they had a better understanding of terminology: everything was clear and unambiguous, no confusion.
According to its intended purpose, the plinth can be:
- ordinary. The main task is to hide the junction of the floor covering with the wall. Made from wood, plastic, aluminum, MDF, ceramics, etc.;
- for carpet. The special shape of the plastic plinth allows you to glue the floor covering inside the decorative panel, creating the appearance of integrity of the floor with the plinth;
- fluted. A decorative strip of a special shape that makes it possible to install linoleum on the wall. Used in places with increased requirements for cleanliness: hospitals, clinics, sanatoriums, etc.
- tape. Flexible PVC tape is used to finish the joint between a floor and a wall of complex geometric shapes: columns, convex or concave surfaces, semicircular corners;
- cable channel. A decorative strip with a cavity inside or a groove that allows you to hide wires and cables. The latest fashion is special sockets that are attached to the baseboard.
Euro plinth with Euro socket.
What is it needed for
Installing a skirting board on the floor solves several problems at once. Firstly, it closes the technological gap between the wall and the floor covering from dust and dirt getting there. Secondly, it protects the edge of the floor from mechanical damage. Thirdly, it serves as a channel for laying wires and cables. Fourthly, and this is the most important thing, it is an important finishing element when decorating the interior of a private house or apartment.
Calculation of the required material
To make a correct calculation, it is necessary to measure the entire perimeter of the room, take into account the adjacent ledges and niches, and divide the size by the length of one plinth element, usually two and a half meters.
Getting ready for marking
Connecting elements must be taken according to the number of entire plinth panels. The required amount is rounded up to the nearest whole number.
The corners for the plinth are set according to the number of all corners in the room, taking into account internal and external ones. The number of plugs depends on how many times the baseboard will break: two plugs are needed per door. Note that they are right and left.
The entire quantity is selected with a small margin based on the fact that some elements may be damaged during operation. The amount of fastening material is taken from the calculation of the length of the plinth panels and the number of connecting elements, as well as the installation method.
Please note the shades of individual elements; the same color may be different in different batches; all decorative elements must match in color.
The cost of installing plastic skirting depends on:
- Mounting method;
- Skirting models;
- Conditions of the surface on which installation will be carried out;
- Room area.
Once installation is complete,
installation prices may vary in each region. In Moscow, the average cost is about 150 rubles per linear meter. But you can save money on these works: the ease of installation allows you to carry it out yourself without special skills; it is enough to have the necessary tools and be able to use them correctly.
Did the article help you? ( 7 ratings, average: 4.71 out of 5)
Required Tools
Tools for work
To work you will need:
- A screwdriver with a set of bits or a screwdriver, for fastening using screws or dowels;
- A tape measure and a pencil are necessary for marking the walls, determining the required dimensions in individual installation areas, as well as calculating the amount of material required. For ease of marking on a concrete or brick wall, you can use a marker;
- A hacksaw for metal, for cutting plastic, and you can also cut off a plastic baseboard using a grinder or a knife, it all depends on the rigidity of the product. In general, the master decides how to cut plastic skirting boards himself, the main thing is that the chosen tool can do the job and not spoil the finishing material;
- Hammer, for fastening with dowels and regular nails;
- Drill with a hammer drill and a set of necessary drills, for holes when fastening with dowels in concrete and brick walls;
- You may also need: an awl, for making holes in plastic and a miter box, for cutting planks at an angle, if attached with glue, a gun for liquid nails and a rubber spatula.
Features of a wide baseboard
This floor decorative element has the following features:
- This plastic plinth can be installed in large rooms. At the same time, it decorates the interior and fits well into the design. The white material is especially beautiful. It is universal for all types of premises.
- A wide baseboard can mask large gaps. In this case, the joint on the floor will not be noticeable.
- If necessary, a white or colored element can slightly smooth out the surface of the wall.
- You can attach the product yourself, no matter what size it is.
- A white plinth allows you to make the room brighter and the joint on the floor neater.
- If you need a custom length of the bar, you can order it. Naturally, before doing this, find out how much it costs.
- White looks great indoors. It is neutral and goes well with any other shades.
- This product does not create problems with furniture installation. That is, you can move the sofa and armchairs close to the wall.
The peculiarity of this material is that it can be combined with any floor covering. The presented product is made of foamed PVC. The discrepancy between the texture and shade of the connecting elements and the baseboard will always be very noticeable.
Please note that this material has a significant drawback: under the influence of low temperatures it can become brittle and break.
Installation methods
Fastening with dowels
A reliable way to secure skirting boards. Makes it possible to install plinths, even on uneven surfaces, without visible gaps.
Dowel as fastener
The method is excellent if installation is carried out on a brick or concrete wall. For fastening, dowels and nails with a hidden side are required. The entire dowel must be completely immersed in the wall, otherwise there will be a gap.
Before installation, an internal corner is attached to the profile and placed against the adjacent wall. If the wall has unevenness, you need to add fastening points, then you need to drill holes in the baseboard according to the diameter of the screws. After this, the places for the dowels are marked through the holes and the strip is removed.
Using a hammer drill and a pobedite-tipped drill, make a hole in the wall the size of the dowel. The dowel must be driven completely into the wall with a hammer, without much effort. The plank is put back and the screw is screwed into the dowel through the holes. The same is repeated with subsequent plinth panels, joining them with connecting elements.
The design of the plinth should allow you to hide the attachment points, otherwise the appearance will be unaesthetic. If the design does not provide an external decorative strip, which usually covers the cable channel, the screws should be hidden with decorative plugs or special mastic.
Installation with liquid nails
Fastening with glue
You can quickly fix the plastic skirting board using a special mounting adhesive. This method is suitable if the wall surface is well leveled and prepared for gluing.
Usually a plinth is used for installation, which does not provide for cable laying. The reverse side should be flat for a larger gluing area.
First, markings are made on the wall where the installation will be carried out, then cut to the required size. The glue must be applied in a continuous, preferably a sinuous line to the plank to be glued, so that after pressing it to the wall it does not squeeze out. If the baseboard is narrow, apply the glue in dots every five to seven centimeters. After this, you need to immediately press the plank evenly against the wall without leaving any gaps, for the time specified in the instructions for using the glue. On average it is ten to fifteen minutes.
Do the same with corner joints and couplings. The possibilities of dismantling with such a connection without damaging the surface are very small, so the plinth is fixed only once.
Fastening with clips
The plinth is attached to the clips.
Installing plastic plinths to the clips allows you to completely hide the attachment points and, if necessary, easily dismantle the product. You can only work with flat surfaces. The design of the bar itself must be designed for fastening in this way.
First, make markings for the clips on one line, then they are secured with dowels or screws, after which the plinth strip is placed on the clips. In places where elements are joined, additional clips are installed for a strong connection. If you install a plastic skirting board yourself in this way, you need to know that precise markings for fastening the clips are important.
By drilling through the baseboard
Drilling through
This method is necessary when there is no cavity inside the baseboard. You can drill it with a drill or using a screwdriver. In this case, the part can be secured with screws or dowel-nails. The holes are made according to the diameter of the fastening material and flared under the cap; for this you can use a drill of a larger diameter, and you can also nail the plastic plinth to the floor with nails, but for this you need to drill it or pierce it with an awl and flare the hole under the cap.
To hide the joints, the caps of the fastening element are covered with decorative plugs or putty tinted in color.
Secrets of success
We have already found out that the choice of which plane to attach the plinth to depends on the physical and mechanical properties of the base. But for each type of flooring there are also rules for how to install a profile.
For example, if you decide to lay laminate or parquet, then the baseboard is attached exclusively to the wall. Before attaching the baseboard to the laminate, make sure that there is a technical gap between the flooring and the wall, which is necessary to avoid deformation if the laminate expands during use. Veneered and wooden plinths are installed, as a rule, on a floor made of solid wood, laminate or parquet; if the wall has minor defects or unevenness, then it is recommended, in addition to clips, to attach the profile to parquet studs. For floors made of porcelain stoneware or other tiles, it is better to install skirting boards made of the same material; they are attached to the wall with tile adhesive, then the joints are puttied. For attaching skirting boards to self-leveling floors and artificial stone surfaces, there is a special glue that matches the color very closely to the original material.
Correctly selected and installed plinth fits harmoniously into the interior
In children's rooms and in rooms with a large glass area, it is better to install a warm baseboard. For bathrooms, loggias and other rooms with a specific microclimate, the ideal option is PVC profiles that do not absorb moisture.
We have discussed several ways to install floor plinths; the video and photos in the article step by step explain all the technological nuances of attaching planks made of different materials. By and large, the secret to the success of the installation lies in the accuracy of the fastening and the correct choice of skirting boards in shape, material, size and color for different floor coverings.